Materials for making crafts
- Cardboard. Most options use white
- Glue. It is recommended to use a glue gun, as it will be most convenient for attaching small parts. For some moments, a high-quality glue stick may come in handy.
- A marker or a good black felt-tip pen.
- Leaves. You should definitely select as many different colors as possible, then the picture will turn out more impressive.
- High-quality and sharp scissors that can cut and not tear off the sheet.
- It is also worth collecting various dry blades of grass, which will also become an essential component of the picture.
First we prepare the material
The materials for oshibana are leaves, flowers, grass, seeds, fluff, moss - in a word, all plant diversity.
- First you need to collect them. Moreover, these natural gifts are collected both in summer and autumn. The more colorful they are, the more beautiful the picture will be. Some plants are best collected in the summer, others in the fall. This is a whole art, and the conversation about it is separate. It is important that the collected flowers, leaves and herbs are dry. Otherwise they will quickly deteriorate.
- Next, the collected leaves, flowers, stems, etc. must be further dried. This is done in several ways:
- in thick books between the leaves (putting tracing paper under each flower or stem);
- in a box with dry sand (if you need the flower to remain voluminous);
- using a warm (not hot!) iron;
- in the microwave;
- in glycerin. To do this, glycerin must be diluted in hot water (ratio 1:3), pour the diluted mixture into a deep container, lower the plants there vertically and leave for 2-3 days. Wait until they darken, remove and dry.
Stages of creating a craft
When starting any master class on creating crafts in the form of paintings, it is important to first outline the outlines of the image with a marker or felt-tip pen. This is done so that, firstly, all the elements are organically distributed over the entire area, and, secondly, so that later a particular image can be more accurately conveyed.
This is what happens with the painting of leaves depicting a girl. Let's consider one of the possible options.
- We make a sketch of the image of a girl holding an umbrella in her hand.
- The image is applied to white cardboard.
- Next, there are several options for how to make a girl craft from leaves, namely, you can simply color this drawing with a marker, or you can decorate it, giving it volume.
- Let's consider the option when the girl simply paints herself over.
- The drawing is no longer touched, and then work begins with the image of the painting, which they begin to decorate with materials prepared in advance.
- We mark a place for the future tree next to the figure of the girl, cut out the base from the bark, and use elements cut from the collected leaves as its foliage.
- We supplement the tree with twigs, which can also be cut from leaves.
- It is worth noting that the bark can only be glued with a glue gun.
- To give the future tree a natural look, dry all the collected leaves and glue them to it, already slightly crumpled.
- The result is a kind of mass that will look interesting and organic in the picture.
There is no need to skimp on leaves; the more there are, the fluffier and prettier the tree will be. Pre-trimmed blades of grass will serve as grass and decorate the lower part of the picture.
The more diverse species you can collect, the more interesting the picture will look. The finished work can be placed in a frame with glass. In this form it can already be hung on the wall.
Bouquet of "roses"
Gifts made from maple leaves in the form of bouquets look especially impressive. They are difficult to distinguish from real flowers. If you and your child have enough patience, we recommend making a bouquet of flowers from autumn leaves in suitable shades. This type of work will require perseverance and hard work. This is an excellent cure for childhood restlessness. You can keep your child busy with magic.
Materials for work:
- not withered maple leaves;
- tree branches;
- wire;
- threads;
- glue.
The sticks should not be fragile. The durability of the entire created structure directly depends on the strength of this element.
Experienced craftsmen for creating such works have compiled an algorithm. He will help you create a luxurious bouquet:
- bend the maple leaf in half. Be careful to ensure that its surface is not damaged. This is a very important nuance;
- gently roll it into a tube. It is most convenient to make “buds” if you do this procedure from the side;
- take the second maple leaf and carefully wrap the resulting workpiece in it.
You should repeat adding new “petals” until you get a flower of the desired diameter. We do not recommend getting carried away with its size. You may encounter the “bud” falling apart.
Having achieved the desired result, carefully secure the base with thread. This will allow you to form the desired “flower” shape. Decide for yourself how many “buds” you will need. Just make sure that the bouquet does not lose its harmony and beauty.
The final step in creating this type is to attach it to sticks or wire “stems.” The wire should not bend easily and should be of sufficiently large diameter and rigid. Fastening can be done using threads or special glue.
You can place the masterpiece in a cup, vase or wicker basket. It would not be a shame to present such a gift as an addition to a birthday or other celebration. The autumn mood with such a bouquet will stay with you for a long time. In recent years, gifts in the form of products made from dry leaves have become increasingly popular. Especially as a unique interior decor.
Painting girl - autumn
Previously, step-by-step instructions were presented on how to make a simple picture of leaves with children. But there are options that will certainly captivate adults too.
Creating a picture of a girl-autumn will not only be an interesting activity for several hours, but will also allow you to realize your imagination in it. It starts with the selection of materials.
To create it you will need:
- Fiberboard, the ideal size for such work is 50 by 40 cm
- As many materials as possible that autumn gave, namely, these can be not only leaves, but also ears of wheat, various twigs, acorns, rowan berries, all kinds of flowers, grass and even millet
- Glue. You can use PVA and a glue gun. Here, rely on the tool that is more convenient to use.
- Acrylic varnish, you should choose a matte version
- You will also need yellow acrylic paint.
If all the suitable materials are collected, then the chance of making a girl out of leaves with your own hands increases many times over.
Secrets of the autumn panel
From autumn leaves you can create not only beautiful, but also practical products. For example, a panel.
Materials for work:
- board;
- adhesive composition;
- dry leaves.
Such crafts made from dry leaves can transform any interior into a completely new living space. Even if everything else remains unchanged.
The basis in the form of the desired shape of the drawing must be drawn with a marker so that the lines are not erased before the deadline. If you approach the selection of leaf fragments creatively, you can create a real work of art. It will delight the hero of the occasion or your family for a long time, and in winter, bringing the bright colors of autumn to life.
It doesn’t matter what natural elements you choose, but professionals recommend choosing bright crafts made from maple leaves. They will delight the eye with a magical atmosphere for a long time if you take the technological process of their creation responsibly.
Such a joint hobby will quickly unite children and their parents. By properly drying the leaves and allowing your imagination to spread its wings, you can create amazing things that you can rightfully be proud of.
Tips for creating a leaf painting
It is best to make a picture of leaves on the wrong side of the fiberboard. You should definitely think about the design of the frame; it can be done in the direction of terra.
- To do this, you will need putty, which is mixed with ears of wheat; if there are none, then you can use the thinnest twigs.
- The putty can also be replaced with some kind of dry glue, or you can even use a mixture for laying tiles.
- PVA is added to this mixture, it acts as a substitute for water, and then, together with plant elements, you can create decor.
- After the mixture is around the entire perimeter, you can sprinkle millet on top and leave it in that state for half an hour.
Next you need to shake off all excess. To add aesthetics, the frame should be painted, for example, gold. After which it is also necessary to cover the entire surface of the fiberboard.
In advance, you need to cut out the silhouette of a girl from cardboard, especially important for those who often have difficulties with drawing.
This silhouette is glued to the surface and also painted with acrylic paint. And then the most interesting part begins - the work of fantasy.
For a girl, you need to create an image: it could be a dress or a luxurious skirt made of leaves, or maybe a flying hat will be created. The combination of leaves in the picture with flower petals looks more elegant.
Preparation of natural material
To make panels from leaves, you must first prepare the materials. The leaves must be thoroughly dried. In order to avoid their deformation, the leaves need to be dried under pressure. You can place them between sheets of parchment or tracing paper, put a suitable sized board on top and press down with a small press. This way the leaves will dry in a few days and become completely flat, which will make gluing them to the base much easier.
If you are planning to make a three-dimensional panel, you should consider the option of drying the leaves in sand. To do this, take a box, pour dry river sand into it, lay out the leaves, and pour sand on top again. The leaves will also take several days to dry out. In the same way, rowan or rosehip berries are dried, which will be an excellent addition to a panel of leaves.
If you want to get to work quickly, but you haven’t had time to prepare the leaves, then you can resort to a quick drying method using an iron. Of course, you need to turn off the steamer, if there is one, and press the leaves themselves between two sheets of tracing paper and cover with a thin towel on top. Then heat the iron to medium heat and iron the leaves until they are dry.
Photo of crafts girl made from leaves
Preparing the base
In order for the natural material to easily adhere to the selected base, it must be prepared in advance. First, decide whether you will give it some color and draw the contours of the future design, or whether it will simply be an imitation of a carpet of leaves.
First the base needs to be painted. If you choose paper or cardboard, this can be done with watercolors or gouache using a brush or small roller, if plywood or wood, acrylic paints, which are applied with a brush or airbrush, are best suited.
The contours along which you will later stick the leaves need to be drawn with a simple pencil over the tint.
When everything is ready, apply a thin layer of PVA glue to the entire surface on which you plan to stick the leaves, so that it dries easily. This is necessary in order to improve adhesion between different materials.
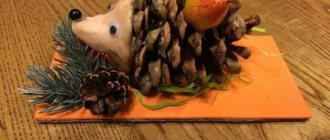
Hedgehog
This is the simplest autumn panel made from natural materials that can decorate a child's room. To work you will need:
- two sheets of cardboard (for example, pink and yellow);
- various dry leaves (pointed ones are more suitable, as they better imitate needles);
- black felt-tip pen;
- a simple pencil;
- scissors;
- glue.
Make the panel on a pink sheet - this will be the background for the picture. Follow these steps:
- Remove cuttings from the leaves.
- On a white or yellow sheet of paper, draw the contours of a hedgehog with a pencil. Cut it out.
- Using a black felt-tip pen, draw the animal's nose, eyes and mouth.
- Attach the hedgehog's body to the base of the panel.
- Start gluing the leaves, forming needles on the back and sides of the hedgehog.
If you wish, you can attach several red rowan berries to the “needles”, stick leaves near the paws, and make a tree nearby.
Falling leaves
You can come up with many options for panels on the theme “Autumn”. In the photo below, for example, autumn leaves fall.
The panel unobtrusively and subtly conveys an atmosphere of peace and tranquility. The leaves are falling, nature is falling asleep. The painting will fit perfectly into the interior of any room where there are no bright contrasting colors and tacky decorative items. It's quite simple to create. You will need the same materials (except for the twig) as in the previous case.
Follow these steps:
- Prepare a sheet of plywood. Choose its length and width at your discretion.
- Paint the plywood with black acrylic paint.
- Choose maple leaves in shades of red and yellow-orange. Remove their cuttings.
- Start gluing the leaves from the top of the panel. Place them with the tips down so that the illusion of free fall is created.
- The closer to the bottom of the panel, the fewer leaves it should have.
Painting "Autumn Oak". Felting. Amazing crafts made from felted wool
Painting “Autumn Oak”
You will need
Carded wool in green, light green, yellow, orange, red, blue, light blue, light blue, brown, light brown, soap solution, bubble wrap, felting brush, scissors, frame.
Progress
Mark the dimensions of the painting on the bubble wrap. Then use a felting brush to comb the blue wool and place it on the bubble wrap. Make clouds from light blue combed wool and place them on top of the background.
Now we need to lay out the oak crown. Lay out combed long strands of yellow color radially in a circle, starting from the center of the picture. Place strands of orange and red wool in the same way. Then you need to select the sky. To do this, lay out strands of blue wool in a circle in some places. Next make the leaves. Cut wool of red, yellow, green, orange colors into small pieces and place them on top of the crown.
You also need to add patches of sky made from pieces of blue wool. For acorns, cut brown wool and place it on the picture - at the bottom of the crown and at the bottom of the picture. At the next stage of work, lay out the trunk and branches. Twist the brown wool into spirals and lay it on top of the crown; you can also put combed wool. Make individual branches with light brown wool. Below under the oak tree, make several acorns from lumps of brown wool. Insert the picture into the frame (Fig. 78). Figure 78. Painting “Autumn Oak” Share on the page
Next chapter >
diy.wikireading.ru
Panel of flowers
You can use them to create beautiful bouquets in vases. To make a picture like in the photo, you will need:
- dried flowers;
- spikelets;
- leaves;
- glue;
- cardboard;
- acrylic paints;
- brush;
- pencil.
The process of creating a panel looks like this:
- Apply acrylic paint to a piece of cardboard to create a dark background.
- Draw the outlines of the vase and table.
- Use yellow leaves without petioles to imitate the plane of a table.
- Start creating a vase. Try to decorate its lower part beautifully. Use scissors to create a smooth outline. There is no need to level the top of the vase, as the bouquet will cover it.
- Glue dried flowers, leaves and spikelets. Try to create a spectacular bouquet.
How to dry flowers
Flower petals or small (not thick) flowers are dried in the same way as leaves. So, you can prepare flowers of daffodils, phlox, bindweed, viola (pansies), and bells. But asters, roses and other flowers, which have a dense, fleshy base, are best dried as follows:
- Prepare a sheet of cardboard or thick paper slightly larger than the flower itself.
- Fold the blank in half like a postcard.
- Cut a hole of any shape in the center of each side (this is a kind of ventilation so that the flower does not rot).
- Unfold the cardboard and put a layer of cotton wool inside.
- Place the flower on the cotton wool.
- Add another layer of cotton wool on top.
- Cover with cardboard (fold the flaps).
- Secure the “card” with rubber bands or tie with thread.
- It is advisable to put it under a press.
- Check the result after a few days. If the cotton wool is very wet and the flower is not dry, change the cotton wool and dry it completely.
As you can see, the technology for harvesting leaves and flowers is simple, but if you don’t follow it, you won’t get high-quality material. Leaves that are not dried enough may become deformed, and flowers may lose their petals.
Heart
This panel is suitable for young romantic girls. To make it, you need the following materials:
- small leaves of red and orange (acacia, rowan are suitable);
- white sheet of paper;
- glue;
- a simple pencil;
- orange or red paint.
Making a heart-shaped panel with your own hands is very simple. You need to do the following:
- Draw a heart on a piece of paper.
- Glue the leaves chaotically, filling its entire volume.
- Under the heart, draw something that looks like a puddle.
- Glue a few leaves that “fall” from the heart.
How to make a hedgehog, lion and deer (master classes with templates)
I noticed that the children were happy to perceive images of hedgehogs, lions and deer. Let's make them in applique. Moreover, everything is quite simple.
For example, oblong leaves make excellent “needles.”
You can use this template as a basis. You can simply save and print it.
Or simply randomly pasted material will also dress our hedgehog in lush “clothes”.
By using different shades of leaves, you will get a brighter applique.
The hedgehog loves to pick mushrooms, berries and fruits. Therefore, use herbarium and dried berries in your creativity.
I also liked the master class on creating a hedgehog and a baby squirrel. I give it to you below. But here you need to work with scissors.
Let's move on to the lion cub. He has the most wonderful mane. And of course, our material is completely suitable for it.
Print or draw this template.
And decorate his mane by gluing the material with PVA glue. Only leaves that have a reddish color scheme are suitable here.
Another cute lion.
First, cut out the blanks according to the template (Fig. 3) and paint them.
Then take the base template (Fig. 4) and decorate it with leaves. Don't be afraid to create a voluminous mane by gluing pieces on top of each other.
When everything is ready, glue the cut out and painted muzzle on top of the mane. This way we will hide all the ugliness and sloppiness.
Figure 3.
Figure 4.
This idea is implemented in a similar way. Only the face is different.
Simplified version.
This is what an adult animal with good drawing looks like. But the creation technique is still the same.
I couldn’t help but show this king. Beautiful and colorful.
You'll probably like the deer. With branchy horns and kind eyes. They can be made from just three parts.
And complicate the craft by adding a torso and hooves.
For older children, it will not be difficult to perform such a composition.
Feel free to complement your creativity with available materials, such as watercolors and plasticine.
Application “Girl in the Garden”
For this product you need to prepare:
- honey watercolor (gouache);
- brush;
- dry herbarium of leaves;
- black felt-tip pen;
- petals from flowers of yellow, lilac shades;
- ribbon, satin, yellowish;
- glue stick;
- scissors;
- white cardboard.
Next, we do everything according to the instructions:
- A large leaf is painted red with watercolors.
- An imprint is made on cardboard; to do this, the sheet is pressed against the cardboard with the painted side, creating a shrub.
- The second is made in a similar way, but yellow.
- An image of a girl in a fluffy dress is drawn, looking at the bushes.
- A skirt begins to form from three oak leaves. The first row is glued with glue, only from the top, since other leaves will be glued under the bottom.
- A small five-petalled leaf is attached at the very beginning of the skirt, right at the top.
- Large yellow flower petals are glued to the very bottom of the dress.
- The procedure is repeated only using lilac petals.
- A bow is formed from a yellow or lilac satin ribbon, which is subsequently attached to the very top of the skirt.
- To complete the girl's look, a small needle-shaped leaf is attached to her hair.
After the girl is ready, we proceed to the background. First, dip a brush in red and spray it onto the craft, then do the same using yellow paint. At this point, the work on the craft is completely finished.