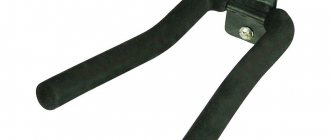
When I started working on this project, I wanted to make a device that could replace the two or three devices that are usually found in a photographer's backpack. In the end, my project culminated in the creation of a flexible camera stand, I will simply call it a “flexible stand”.
The stand is based on 90 centimeters of calcined super-flexible copper wire, at each end of which there is a screw for installing the camera. All this is placed in a vinyl tube that keeps the wire clean and safe, and it also has a soft surface that gives a feeling of comfort when bending/unbending the mount. This tool can replace many other photo tools, including:
- Standard tripod - form a base from the wire and bend one end up, then install the camera.
- Selfie Stick - Bend one end of the flexible stick into a loop and wrap it around your arm or wrist. Attach the camera to the other end of the flexible stand and bend the end to the angle you want for a great selfie.
- Shoulder (Articulated) Camera Mount - You can wrap 90cm of soft copper around anything and mount your camera almost anywhere.
Among other things, the flexible stand collapses into a very small item that is convenient to take on trips and conveniently wrap around your wrist while moving from one place to another.
How to hang a pot over a fire
A tripod acts as an easy way to hang cookware over the fire. However, there are several other options:
- A single rack with several horizontal rods that can accommodate 2, 3 or more containers. This design is also made of metal.
- Two slingshots with a crossbar also allow you to accommodate several vessels.
- A rope stretched between vertical branches.
- A perch located on a slope and supported by a large boulder.
You can also use two tripods, between which you place a pole or stretch a rope. In this case, both the spears and the stands must be stuck or driven into the ground. The tripod is a universal tool because it is suitable for any type of soil. The device can be easily installed even on a rocky surface. This distinguishes it from other designs.
If you are smart, there is one alternative that can replace the hook. Find a branch with a fork and break off one of the branches, leaving a short fragment - you will get a suitable solution.
Share in the comments what is your favorite way to cook over a fire!
LED Ring Lights for Selfie Photography with Phone and Tripod
In this article, we'll talk about LED ring lights for phone photography, which greatly simplify the process of creating cool videos or selfie photos from a tripod. Today, becoming a video blogger is to some extent much easier than it was a few years ago, and at the same time more difficult. This paradox is not accidental. The fact is that previously there were no such strict requirements for video quality - it was enough to put a cheap smartphone on a tripod and start recording under room lighting. And for the end viewer on YouTube, this was quite enough.
Today, users are tempted by high-quality pictures and sound, and it is becoming increasingly difficult to surprise them. A good image and clear sound are the basic components without which no one will watch your videos. However, at the same time, the tools for creating them have become more accessible. Modern smartphones boast excellent capabilities for creating media content.
But you still can’t do without bright artificial light. Until recently, everyone used massive softboxes with fluorescent light bulbs that took up a huge amount of space. But the hit of this year was the ring LED photography lamps, which received a lot of positive reviews from various bloggers. Not surprising, because they not only allow you to make up for the lack of daylight well, but given their dimensions, they significantly save space, which is especially important when taking pictures at home - selfies and more.
Making a reflector or reflector
First of all, you need to draw out the blanks or petals of the future reflector. You can use the following sizes and template.
Next, using a utility knife, cut out the marked blanks.
To join them into a single structure, use self-tapping screws.
They will ensure the initial rigidity of the frame. Then finally glue all parts with polyurethane foam.
First from the inside.
And then from the outside.
Polyurethane foam will firmly and reliably connect all the pieces into one whole. You will never achieve such a rigid frame from cardboard.
After the foam has dried, and given its small thickness, 40 minutes is enough, its excess is cut off.
Next, you need to cut out a central square that will fit into the middle of the reflector.
You can first cut a hole inside it for the cartridge. Make it (the hole) end to end so that the cartridge itself is inserted as tightly and tightly as possible.
Due to the sufficient thickness of polystyrene foam, you don’t even have to bolt it.
By the way, you can cut a hole not for one light bulb, but for two at once. Suddenly you don't have enough power.
Some advise using one or two powerful lamps connected via a dimmer on a cord.
Next, this regulator sets the required brightness level.
However, one should not forget one negative nuance - the appearance of flickering when dimming LED lamps.
This will have a negative impact on the quality of video recording and your vision.
The central part is also fixed to the mounting foam. As a result, you get a tough, durable, but most importantly lightweight workpiece.
Determining dimensions and preparing a drawing
To make a tripod, you first need to decide on its size. To make a comfortable holder, there are a few things to consider. You need to decide what kind of utensils will be used in the cooking process. It is extremely important that the device matches the dimensions of the pot. You also need to determine what size the structure will be when folded. After all, if the parameters turn out to be excessively large, moving the product will be problematic.
In addition, you should decide how high the homemade tripod should be. It is noted that it is much more convenient to cook on high stands. True, their weight is impressive. Therefore, for a hiking option, the height should be insignificant.
In fact, a drawing is not needed when making such a structure. You can do without it altogether. True, in order to make the work significantly easier, it is recommended to make a full-size sketch of the future structure. In the future, you will simply need to attach parts to it and take measurements.
Example drawing
The height of the tripod is selected individually: the higher it is, the more convenient it will be to cook over a fire.
Large LED lamp
Let's start with the largest model that was in my hands. This is an impressively sized lamp that is mounted on a cabinet with a special head for lighting equipment. To install it, I took my tripod from an old softbox.
Power is supplied via a standard adapter with a European plug that plugs directly into the outlet. It is no coincidence that I am emphasizing this, since the second LED lamp, which is smaller, has a slightly different power supply principle.
Materials and tools
Before you make a tripod for a pot with your own hands, you need to make sure you have all the necessary materials and tools. The work will require the following:
- 3 pieces of steel pipe about 150–200 centimeters long;
- 3 steel bolts;
- 3 S-shaped hooks;
- a chain that will be used to hang the cauldron (must be metal);
- hammer;
- a hand saw designed for working with metal or a grinder;
- pliers.
The size of the future structure directly depends on how long the pipes are. The longer they are, the higher the homemade holder will end up.
Instead of steel pipes, the use of aluminum options is allowed. True, in this case the design will be less durable. But its mass will decrease significantly. This will make carrying the tripod much easier. The main thing is to choose the appropriate dimensions of the product.
Steel bars
Wire
Chain
Tools
Features of using tripods
It is easy for any experienced tourist to make a device for cooking food over a fire. The design is suitable for hunters, fishermen and all outdoor enthusiasts. The best choice for a stationary tourist camp or traveling by car is a barbecue. However, when hiking, such “equipment” will cause more trouble than benefit. Therefore, a tripod would be the best choice here.
Metal tripod
Using only the barbecue frame allows you to hang 2, 3 or more containers over the fire at once. However, such a design will result in inconvenience, since it is difficult to carry, and excess weight is undesirable.
There are any number of suitable materials in forest areas - as a rule, various branches and wooden crossbars are used. But in some cases you have to improvise. For example, you need to cook something in winter in snowy areas. How to act in the absence of special devices?
Anyone who goes on a winter trip has at least three ski poles. They will just serve as stands for an improvised tripod. All that remains is to tie the elements together, and the dishes can be hung with a rope, which can also be found. Any suitable item can become a hook.
How to make a tripod out of wood
In order not to waste precious time, you can set up the purchased tripod and immediately proceed to cooking. There are many different options available for sale at appropriate prices.
But not every vacationer will want to spend their savings on such a purchase, because nature itself can provide everything that is needed. And he will not require any remuneration for this. There are several ways to build a useful device. Subsequently, you can burn it, since it hardly makes sense to take it with you. It is easy to find other branches in a new location.
Option of two flyers and a crossbar
The most common way is to hang one pot, or even several containers, over a fire. It is simple and reliable to use. In the forest, on the bank of a river or other body of water, it is not difficult to find two branches with a fork. To attach the entire device, it is better to sharpen the ends of the flyers so that they can be easily immersed in the ground. But you can just bury it in the ground.
When preparing for a hike, you should always take with you one hook, or better yet several of different lengths. The dishes will be hung on them to the required height above the fire. It is advisable to keep in stock the wire from which the hook of the required length is made. It won't take up much space in your backpack and weighs very little. But there are a lot of benefits from it.
Tripod option made of two flyers
Option of one flyer and a long pole
Among nature lovers, this is another preferred way to cook food over a fire. However, in terms of reliability, it is inferior to the option discussed earlier. The parts of the device will be one flyer and a long thick branch. Moreover, both need to be chosen in fairly large sizes.
Sharpen the stick at one edge and drive it into the ground to a decent depth. Also, place a large stone on the side of the fire to the fixed branch to give additional strength.
Important! Before its intended use, it is better to test the structure without lighting a fire and fill the container with water.
Wooden tripod made from a flyer and a stick
Three pole option
To do this, you will need three long and strong branches, which are laid in a pyramid. At the top, the device is tied with wire, a hanging chain or a strong thick thread. Then the entire structure is placed above the place where the fire will be lit.