A paperclip is one of the most underrated things we use in everyday life. A piece of flexible and not very durable metal can be used in dozens of original ways. In Norway, the paper clip was even able to become a symbol of freedom - this is how it was used by the Norwegians who fought the Nazi regime. In this article we will tell you what can be made from paper clips and teach you dozens of useful and interesting ways to use them. Let's get started?
What can be made from paper clips
Origami hedgehog
You can make great bookmarks if you make origami out of paper, as in the photo.
Advice!
To make a hedgehog bookmark, you can take any colors of paper, even if you take brighter and more saturated ones, the hedgehog will turn out fabulous, red or green.
- You need to fold a light brown sheet of paper diagonally in two directions.
- Next you need to bend one side in the middle, then the other.
- Bend the edges, bend the left side parallel to the vertical in the middle.
- Do the same with the second side.
- Fold the ends into pockets.
- Insert a sheet of dark paper into the corner. Using a felt-tip pen or pencil, draw thorns on a dark sheet. Next they need to be cut and attached.
- You can also draw eyes and nose.
Everything ingenious is simple
The birth of the classic paperclip, which looks like two ovals twisted from a piece of steel wire 8 cm long, had a rather thorny path. The year of her birth can be considered 1899, when the Norwegian engineer Johan Voler was shown several versions of this stationery item. Then he did not believe that it was possible to make a salable and popular product from paper clips, and refused to engage in this project, but the British successfully developed it. The Gem Manufacturing Company Ltd launched this invention into mass production, making the right decision.
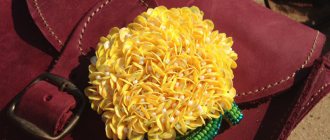
On the eve of the holiday
Many crafters hardly realized that they could use paper clips to make a wonderful girly hanger toy, which can easily be transformed into a magnificent New Year's decoration. This is an excellent solution for organizing the wardrobe of a child's favorite doll. Also, later on the cute miniature hangers from the Barbie cabinet, just glue paper sweaters and various Christmas paraphernalia and in a simple way make excellent Christmas tree decorations from paper clips.
Another option to use office supplies in an original way is to make a postcard from paper clips. To do this, it is best to choose multi-colored paper clips rather than classic steel ones. Colored shells on wire can be of various shades; from such bright ovals it is very easy to lay out figures of different shapes - snowflakes, Christmas trees or flowers.
Stationery organizer out of the box
There is always a box of cereals, equipment, and shoes lying around the house. This material can be used to create a convenient organizer.
You will need:
- small cardboard box;
- toilet paper rolls;
- scissors;
- decorative paper;
- glue.
How to do:
- Make a partition from the lid of the box and secure it with glue.
- Decorate the box itself with paper.
- Cut the bushings in half and also decorate.
- Place the parts inside the box.
Now you can put things away. The organizer is perfect for a children's desk to organize all the writing utensils.
Twisted bracelet
To create such an original bracelet you need:
- ordinary silver paper clips (their exact number depends on the length of the bracelet, but in any case there should be some supply);
- any lock (from a chain, for example);
- round and pliers;
- rings for connection.
What you need for a bracelet made from paper clips
Step 1 . The paper clips are straightened with pliers - you should get equally straight wires.
The paper clips need to be straightened
Step 2 . Each wire is twisted into a spiral (pliers are used). First, a small loop is wound at one end, then the wire is shifted so that the loop is clamped in the pliers in a plane parallel to the table (see photo).
A spiral is twisted from the wire. The loop is parallel to the table surface.
Step 3 . The paperclip is wrapped around the loop, but not too tightly, and remains in the clamp all the time. About halfway through the paper clip (about 3 turns) you can finish.
In the middle of the paperclip you can finish
Step 4 . Similar actions are performed with the second end of the wire, but you need to twist it in the opposite direction. It turns out like this “figure eight”, on each of the curls of which there are 3 layers.
The other end is twisted
Received part
Step 5 . This must be done with all paper clips. If they were the same size, then the parts would be the same.
All parts are the same
Step 6 . A pair of straightened rings is taken, they are inserted into the center of one curl, after which they are passed through the center of another part and clamped with pliers.
Connection of parts.jpg
Step 7 . The required number of parts are connected. Only one ring needs to be attached to the outermost free curls.
Links are added
Step 8 . Next (using the same pliers) the lock is attached. The connecting rings are securely clamped.
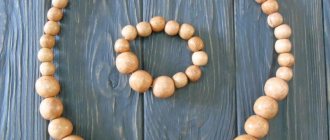
Fastening the lock Ready-made twisted bracelet made from paper clips
The bracelet is ready! Using the same technology, you can make a necklace, you just need to get a sufficient number of paper clips .
Clip chain - an original decoration
If you cannot curb the fountain of your creative abilities, here is another interesting idea for the craftswoman. We will need multi-colored paper clips. At the end of such a chain you can attach a heart that you have already made. There will be an original double bookmark. It is easy to fix.
Children can use this chain as a toy decoration. Young princesses will love this invention.
Necessary materials:
- colored paper clips;
- a nail or pencil with a diameter of 0.6-0.7 cm.
Step-by-step description of the creative process:
- To create an original chain we will need paper clips.
- You can use paper clips of different colors. We will combine them in blocks so that the chain turns out to be multi-colored, like a rainbow.
- Now let's get down to the most time-consuming part of the job. We need to straighten each paper clip and turn it into wire.
- The number of paper clips depends on how long the chain you want to weave.
- These are the kinds of delays we end up with.
- To connect the rings we will need small pieces of wire; we will cut one into several parts.
- You also need to choose a suitable round object for winding the rings. A nail or a simple pencil is ideal.
- Apply a paper clip to the round rod.
- Leave a small tip on top. It should be straight.
- Now we begin to twist the straightened paper clip around the rod. We twist in a spiral, placing each layer next to the previous one.
- We get these blanks.
- We make as many of these rings as we need for the desired length of the chain.
- We use other colors of paper clips. Place approximately 10-12 paper clip rounds per link.
- A little advice: small rings are needed for the connection, and in order not to make them by hand, you can cut off one turn from the made blanks. Let's use wire cutters.
- We begin to assemble the chain by connecting two rings of different colors. As a result, we will get something like this.
- We continue weaving by analogy to the desired length. At the end of the chain you can attach a heart made from a paper clip.
Heart bookmark
Today you will learn how to make a heart shaped paperclip. There is nothing complicated about this. This kind of activity, as they say, is a jack-of-all-trades out of boredom. You can take a moment to be creative while working in the office, college, or in class at school.
To construct a heart, paper clips of any size are suitable, but only with a rounded edge. It will not be possible to make a heart from triangular and rectangular paper clips.
Paperclip hearts are mainly used as bookmarks . This invention can also be used to decorate a romantic souvenir for your significant other.
For work we will need multi-colored paper clips. If you have regular metal stationery on hand, you can paint it with decorative nail polish. For example, red varnish will apply evenly and adhere well to a paper clip.
How to do:
Making a heart from a paper clip is very simple step by step; you do not need any additional tools or materials. Just a paper clip. Now we will tell you how to make a heart bookmark from a paper clip. You can make several multi-colored figures at once. They hold together the pages of a book, diary or planner very well. The fairer sex and children will love this craft.
Complex
A paper clip can make an unusual heart with two clips if you take purely metal blanks without plastic coating.
Begin:
- Straighten the prepared paper clip completely, resulting in a regular wire.
- Bend the part in half, now wrap each piece on top with a loop extended downward, similar to a drop of water with a tail.
- Decorate the made things with golden acrylic paint, let them dry and put them on notebooks or diaries.
As you can see, making hearts from ordinary paper clips is very easy. Make a dozen or more of these souvenirs and give them to children, friends and acquaintances for a good mood.
Organizer made of sleeves
A very simple and uncomplicated organizer. You can store tools, pens and pencils, scissors in it. It’s easy to make, you can even involve children in the work.
You will need:
- cardboard tubes (for example, toilet paper);
- decorative paper;
- glue;
- scissors.
How to do:
- Cut the sleeves to create different heights - this will make the organizer more interesting.
- Carefully cover the parts with decorative paper.
- When the bushings are dry, glue them together.
- Secure to thick cardboard.
- You can decorate the organizer with beads, ribbons, lace, and buttons. In general, what is enough for your imagination?
Master Class. Repairing a zipper on a jacket
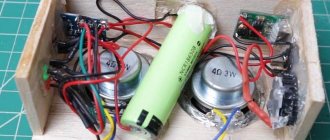
To repair a zipper you need to prepare:
- one paperclip;
- wire cutters;
- pliers;
- "rubber" plasticine (optional), sold under the name Sugru.
What you need to fix a zipper
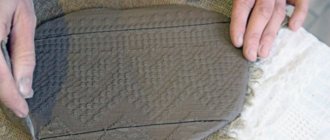
Step 1 . First, the paperclip is inserted into the fastener slider.
The paperclip is inserted into the fastener slider
Step 2 . The paperclip is then twisted using pliers.
The paperclip is twisted
Step 3 . Excess parts are cut off.
Excess parts are cut off
Step 4 . The paper clip is wrapped in plasticine-rubber. After some time, when the plasticine dries, it will become as strong as rubber.
The paper clip is wrapped in plasticine-rubber
School supplies decor: how to decorate school notebooks
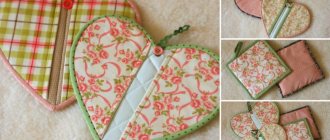
You can decorate your school notebook with a fabric cover. Among the advantages of such covers: they are pleasant to the touch, you can make additional pockets both inside and outside, a variety of textures and patterns and, of course, simple execution techniques. This notebook can be used in the summer as a notepad or personal diary.
Embroidery on a notebook. It sounds strange, but it looks very beautiful and unusual. This decor is suitable for notebooks with plain and soft cardboard covers.
Stamps and drawings with paints can be made not only in a sketchbook, but also on the covers of notebooks, in order to decorate these same school notebooks in this way. Try it and you will like it!
Decorative adhesive tape is also perfect for decorating school notebooks, folders, book covers and albums. Thin strips of tape can be glued straight or diagonally, creating your own special pattern.
You can decorate an ordinary notebook with a photo collage of your favorite photos or pictures for a summer mood. Follow the link - complete.
Girls will especially love this idea for decorating their school supplies. The openwork decor for the notebook cover was created for romantic schoolgirls.
Phone stand
Below is a life hack using paper clips for your phone. Following the step-by-step guide, you can build a budget smartphone holder with your own hands.
Step-by-step instructions for making a stand
- Work begins with the construction of the foundation. To do this, you will need a pair of paper clips; they should be bent so that an acute angle of 60-70 ° appears. When extending, it is important to achieve an acute angle
- In the area of the short part, the free tip is bent towards the second rod so that it can touch it. As a result, the structure takes on a teardrop shape. After bending, the shape of a drop or loop is obtained
- Having measured a distance of more than half on the long part of the paper clip, you need to bend the product in the opposite direction, choosing the direction from the short edge. When taking measurements, it is very important to achieve the effect that when installing the stationery on the table surface at an acute angle, the upper long extreme part before the fold coincides with the length of the short edge. The second half of the long tip is unbent so that the entire plane is able to touch a flat surface.
- From the edge of the long side, a small part is bent upward using pliers, thereby creating conditions for the smartphone to rest against the material. At this stage you can start fixing the card
- Having placed a pair of prepared paper clips at a distance from the wide part of the card, you need to lower the latter onto the iron elements. A layer of superglue must be applied to the junction between it and the paper clip, which will make it possible to securely fix the structure.
- Now you can use decorative elements and decorate the finished structure with pieces of fabric, rhinestones, and ribbons. A phone stand made from a paper clip, the production video of which is presented below, will look quite impressive after decoration.
Useful tips
Experts have developed a number of recommendations that will help in the process of making a structure with your own hands:
- When applying glue, you should try to squeeze it out of the tube in small portions so as not to spoil the appearance of the future stand.
- The legs of the stand can be painted with nail polish. A plastic card will look aesthetically pleasing if you cover it with bright self-adhesive film.
- When performing work, it is important to measure all parts. Otherwise the structure will be skewed. The stand will be more stable if you use large paper clips.
- The material from which the stationery item is made will become more plastic if it is first bent into an even line and then returned to its original position.
- Finishing in the form of rhinestones, flaps of elegant fabric or colored leather will help to give a stand made of paper clips decorative qualities.
- The design will become more functional if it is equipped with special corner clips. They are made of rubber and fixed to a plastic card with glue.
Alternative option
From the clamps
Stationery clips or binders will help you quickly and easily build a smartphone stand. It is enough to supplement them with any plastic or even paper card, and the mount for the gadget is ready. You can build a more complex structure from binders alone - whatever you want.
Materials and tools for paper crafts
DIY paper products are created using simple materials and tools, most of which can be found in any home.
Paper
The most popular types of paper raw materials are:
- White or colored office paper is the main material for making paper crafts. It can be used to create applications, origami, and crafts using the quilling technique.
- Corrugated, tissue paper and crepe paper are suitable for making delicate three-dimensional flowers, balls, and appliqués using the cutting technique.
- Napkins are used in cut appliqué, trimming, and decoupage.
- Magazine and newspaper sheets are used to create collages, crafts using the iris folding and papier-mâché techniques.
- Cardboard is a dense base and background for various paper products.
Masters of paper crafts also use various waste materials, paper ribbons, openwork napkins, sets of colored paper for children's creativity, leftover wallpaper, and whatman paper.
Glue
The correct choice of adhesive influences the final quality of the paper product.
To select an adhesive, the following factors should be considered:
- texture and size of bonded surfaces;
- purpose of the product;
- age of the master.
The most popular adhesives are:
- Glue stick , which is used for working with small parts. It is suitable for use by children of early preschool age, as its convenient packaging and consistency prevent heavy contamination of the work surface. The disadvantages of glue in the form of a pencil include fairly rapid drying, which makes adjustments to the craft impossible.
- Starch (flour) paste is a natural, safe adhesive. It can easily be made at home by mixing 100 g of dry matter and 1 liter of water. Initially, they begin to heat the water over low heat, pouring about 100 g into a separate container. This liquid is used to prepare a thick, homogeneous solution, which is slowly added to boiling water and stirred thoroughly.
Important! The glue should not boil, so it must be stirred constantly, bringing it to a thick consistency.
The paste can be used in children's paper crafts, without the need to use a brush to apply it, in the making of papier mache and paper figurines.
- PVA glue is a universal glue widely used in handicrafts. It reliably glues different types of paper together and with other materials. But at the same time, working with it requires care.
Scissors
A must-have tool for paper crafts is scissors. Beautiful paper crafts can be created with only 2 types, but paper craftsmen use many different cutting devices.
These include:
- Long scissors with straight blades , the shape of the ends of which depends on the age of the craftsman. For safety reasons, young children should use a tool with a rounded cutting part, the length of which is no more than 10-12 cm. Straight blades are suitable for cutting paper and cutting out large shapes.
- Small scissors with sharp ends are used to make small designs on paper. They are especially in demand when creating piercings and three-dimensional pictures.
- Scissors with shaped blades (zigzag, wave) are designed for creating decorative edges on paper parts.
- A utility knife is used to cut paper into strips or cut out stencils. When using it, it is important to remember about safety precautions and the need to work on a solid base (wooden, plastic or glass board of a suitable size).
- A figured hole punch quickly and easily makes a large number of identical decorative parts that are used to decorate paper products.
Additional items
In addition to basic materials and tools, paper art uses additional elements to make the work easier and improve its results:
- simple and colored pencils;
- brushes;
- pens;
- paints;
- rulers;
- stencils;
- decorative elements (toy eyes, buttons, sparkles, pieces of fabric, beads);
- threads and needles.
Frame
This unusual craft is suitable for a small drawing or photograph. The frame will be an excellent interior decoration and will make it brighter.
For production you will need:
- the paper clips themselves (64 pcs.);
- threads (optional);
- fast drying glue.
What you need to create a frame
Step 1 . Even paper clips of the correct shape (without defects) and different colors are counted. It is advisable to select them so that no particular color predominates.
Selection of paper clips of different colors
Step 2 . Paper clips are glued together in pairs (preferably from different colors) to speed up the process.
Let's start gluing the paper clips
Paper clips are glued together in pairs
Step 3 . After the glue has dried and the paper clips have been fixed, the pairs are connected to each other (4 pieces each).
Couples connect
Step 4 . Next, the paper clips are glued together in such a way that the result is 4 rows of 16 pieces. in everyone.
Staple row 4 rows of 16 staples
Step 5 . The rows are connected to each other using Moment glue. The evenness of the sides is checked.
Moment glue is used for fixation. The rows are glued together
Step 6 . That's it, the staple frame is ready! Additionally, it can be varnished so that it does not bend too much.
Finished frame made from paper clips
Step 7 . A drawing or photograph is inserted (for fixation, curved fastenings of paper clips on the back side are used).
A drawing is inserted into the frame
Step 8 . You can hang the frame on a nail. To do this, take a thread, fold it in half, one end is threaded into the right side of the frame, and the other into the left (through a paper clip).
Thread is used for fastening
Step 9 . The threads are tightened.
The threads are tightening
Step 10 . A loop is pulled through the opposite side.
The loop is pulled through the other side
Step 11 . After this you need to return to the middle.
Next you need to go back to the middle
Step 12 . The edges of the thread are re-threaded through the paper clips, a knot is tied and the excess is trimmed off.
Nodule formation
The end result is such a creative and colorful frame.
Creative frame on the wall
Original frame made from paper clips