How to do it yourself?
The DIY wall stand for guitar is a fork-shaped bracket. In order not to damage the guitar neck, it is rubberized. The fastener is the optimal placement of a musical instrument in the room. The guitar is fixed vertically on the device. This method is considered the most reliable, aesthetic, and cheapest.
What you need
To make a guitar mount on the wall with your own hands, you will need the following materials:
- timber (plank) 20 mm thick;
- rod for making a slingshot;
- bolt with nut for attaching the slingshot to the base;
- stain, varnish or veneer and varnish;
- sandpaper for cleaning a wooden block.
Components alone are not enough. In order for wood and metal to turn into a product, you need the appropriate equipment:
- screwdriver (screwdriver);
- drill;
- set of drills;
- two dowels.
Attention! If you have several guitars, then there may also be several wall mounts.
If you have the listed material, devices, and sufficient experience in creating such products, you will get a decent fastening.
Step-by-step instruction
Wall mounts are the most reliable, optimal option for placing a musical instrument. In case of the necessary performance of a piece of music, the six-string can be easily removed from the fastener and ends up in the hands of the musician. A fastening in the form of a grip can be purchased for 300 rubles in a store and safely secured with dowels on the wall.
There is a more creative way - you can make a guitar holder with your own hands thanks to step-by-step instructions:
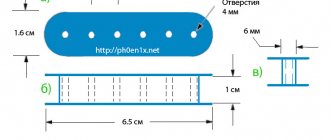
- Take an MDF beam or a 20 mm strip. The length of the beam should be 26 cm, width – 8 cm.
- For beauty (optional), you can glue veneer onto the timber. If you take a plank, you can cover it with stain and varnish.
- Technological holes are made along the edges of the plank at a distance of 4 cm. A hole is also made in the center for attaching a slingshot.
- A recess is made on the back side of the strip for fixing the nut.
- The slingshot is made from dozens of reinforcement. Its edges are curved towards the top.
- The base of the slingshot is welded to a bolt, which will subsequently secure the slingshot to the base of the block.
- After securing the slingshot to the base, a place for mounting on the wall is installed.
- Holes are made in the wall, dowels are installed and the product is secured.
- Finally, the musical instrument is fixed to the mount.
Attention! The slingshot itself must be covered with soft material so as not to damage the neck of the instrument.
Wall fasteners can be made from laminated chipboard. The back part of the fastener and two side walls of the fastener are cut out from the remaining sheets. The width between the walls should be slightly larger than the width of the neck, but less than the base on which the pegs are placed. In order not to damage the paintwork of the instrument, you can stick rubberized material onto the fasteners from the inside. It will protect the body of the musical instrument from scratches.
If you have very little time, then such a mount can be assembled from a sewer pipe clamp. As we know, it consists of two parts. We need one that is fixed to the wall with a dowel. By making a hole in the wall and screwing the clamp with a screw, you get a fastener that is additionally wrapped with electrical tape or a foam pipe. Everything is ready - you can use it.
Step-by-step instructions for making a stand
Before making a guitar stand with your own hands, take measurements specifically from your instrument. Body and neck sizes vary, so the bridge needs to be a good fit to ensure proper stability. Then start making.
- Use slats to make a bar stand with a holder.
Attention! Cover the inside of the holder with soft material or foam rubber so that the structure does not damage the neck of the instrument.
- Cut out the lower side supports from the boards with a jigsaw. Glue felt or foam inserts to the points of contact with the tool.
- Make the base of the stand from plywood and secure it with the side supports using self-tapping screws.
- To prevent the supports from spreading, secure them with a front wooden panel. Drill holes in its lower part and in front of the side supports. Connect them with nails or screws.
- Use your imagination and give the front of your guitar stand an original look by cutting out decorative elements on it.
Finally, coat the product with varnish or stain and let dry.
Racks made of polypropylene pipes
There is another simple way to make a guitar stand. For this option, you can use polypropylene tubes. Its advantage is that assembly is simple and does not require large financial outlays.
For a stand for one guitar you will need:
- drawing;
- polypropylene pipe with a diameter of 20 and 25 mm;
- two contours made of polypropylene;
- pipe plugs and tees;
- corners 45 degrees;
- special scissors for cutting pipes;
- soldering iron
To make one part of the rack, solder plugs to the contours on one side, tees on the other. Secure the legs of the stand using corners. Make a jumper with a tee. Do the second part in a similar way. Secure them together.
Making a stand for several guitars will require the following materials, which can be purchased at any plumbing store:
- 6 tees;
- 8 corner transitions;
- 2 tubes 40 cm and 70 cm;
- 15 pieces of 4 cm;
- 4 plugs.
To assemble the top of the rack, connect 4 tees and 3 pieces of pipe. Place a corner transition on both edges. Use glue or a soldering iron to connect. For the legs on both sides of the tee, fix it along the corner transition, placing the parts at an angle of 90 degrees. Make the second leg. Using two 40 cm pipes, connect the legs. Use the remaining angles and tubes to complete the structure, securing the top and bottom parts together.
To make such a stand, you do not need to have any special skills. It is simple and minimalistic. Will suit any interior and provide reliable support for the instrument. If desired, you can paint the racks any color using a spray can.
Advantages and Disadvantages of Wall Mount
The positive aspects include the following:
- It is easy to install, fastened with 2-4 screws.
- Convenience and comfort in a small space.
- Determines the place of a musical instrument.
- The fasteners are nice and aesthetic. The interior design will not be affected.
- The soft covering of the bracket will protect the guitar from scratches and damage.
- Securely fixed to the wall. There is no fear that the guitar will break.
There are practically no negative aspects to this mount. The only downside is the dust that settles on the guitar if it is rarely used. Each instrument requires maintenance, so dust will be wiped off the instrument constantly.
As you can see, the positive aspects dominate the negative ones. This means that a guitar wall mount is a must-have item in a guitarist’s home.
Types of mounts and holders for guitars on the wall and their design features
Guitar wall mounts come in several types, allowing you to secure the musical instrument in a comfortable position. The size, angle of inclination and shape of the fastener depend on the model of the fastener. Metal or wood is used to make them.
Wall brackets are small devices that are mounted on the wall surface. They serve as a kind of hanger for guitars of various types. Any store that sells musical devices and accessories constantly has in stock several varieties of such devices, designed for different weights of a musical instrument.
Disadvantages of guitar wall mounts:
Universal guitar mounts
The universal type of fixture allows you to mount not only guitars, but also many other instruments and electronic equipment. Universal holders for guitars on the wall are a rubberized swivel bracket, which eliminates the possibility of causing mechanical damage to the instrument during the process of fixing it. The base is completely wooden and pine is most often used for its manufacture. Such elements will be a pleasant addition to any interior. Approximate dimensions: 15×15×20 cm and weight – 500 g.
Fixed
This accessory is indispensable for a guitarist. Durable materials are used to make a reliable fastening. The higher the reliability of the structure, the more significant its cost will be. Special screws are used for fastening, which provide excellent support if it is not possible to install a floor stand due to limited free space. The fork is made of soft materials that cannot damage the tool. If the headstock is angular type, the model can also be used.
Rotary holder
This type of holder for guitar instruments can withstand a weight of up to 10 kg, but at the same time has very modest dimensions - no more than 35 cm. The weight of the structure itself will be no more than half a kilogram. A set of dowel nails will be needed to create a secure fastening. The cost varies depending on the brand of fastening manufacturer and the quality of materials used.
Recommendations and tips for making a holder
To ensure that the fastener meets all requirements, you should follow the recommendations of specialists when manufacturing it:
- If pins are used instead of a slingshot, then the distance between them should be narrowed so that the tool does not slide to the floor.
- If a musical instrument of decent weight will be attached to the wall, then a more massive block should be used for fastening.
- To avoid damaging the body of the guitar, rubber and foam tubes are installed on the fasteners.
- It is not recommended to install the fastener above the battery. Also, direct sunlight should not fall on the musical instrument.
Considering the above, do not forget the common truths. When caring for a musical instrument:
- Air humidity of 40-60% is suitable for storing a guitar. You can achieve favorable conditions with a humidifier.
- Air temperature also affects the condition of the wood of a musical instrument. An air temperature of 19-25 degrees is ideal for storing a guitar.
- It is recommended to vacuum your favorite tool twice a year.
- The best way to store a guitar is on a wall mount.
Careful, proper storage will keep the guitar intact. A guitar wall mount is a great way to permanently display your instrument. Do-it-yourself fasteners will provide reliable protection against unforeseen situations. The guitar will delight you with its wonderful sound for many years.
Good day to everyone who has a lot of money, today I want to tell you about a small project I completed with my son.
Namely, design development, production and assembly of a guitar stand.
Methods and rules for installing holders with your own hands
To secure the holder, use dowels, which are often supplied in the kit. However, you need to consider the wall material and the weight of the guitar. For a heavy guitar, you need to choose more powerful dowels, and for mounting on a plasterboard wall you will need special fasteners: a butterfly dowel or a molly dowel.
The clamp is attached to two fasteners. Installation is simple:
- Perform markings: apply the holder to the wall and mark the location of the holes with a marker.
- Using a drill or hammer drill, prepare two holes in the wall surface.
- Hammer the dowels.
- Screw the holder.
- Set up the guitar.
You can learn how to make a bracket yourself by watching the video:
Not only its service life, but also its sound quality will depend on the correct storage of a musical instrument. There are plenty of types of fastenings and places for fixing them. If there is not enough free space and if there are small children and pets in the house, it is recommended to use wall-mounted guitar holders and mounts.
Design
Initial data
Design
Having brainstormed the options (of which there were not very many in general due to point 2 of the initial data), we decided to make a stand
for placing guitars.
The first solution was to take 6 plastic water pipes: make two bends in each, cut out special fasteners from steel - ties and put it together.
The option is quite workable, but the manufacturability (as I imagined that I would have to bend 6 pipes with high precision with my hands and a construction gun - my mood immediately dropped noticeably) and the aesthetics of the solution leave much to be desired.
The second option was to use a threaded rod (for example M10x1000, price about 70-100 rubles), a large-radius plastic pipe, make the upper and lower supporting parts of the structure from 3mm-4mm steel and cut a thread in the central part for the rod or weld a nut. Manufacturability increases significantly, aesthetically it looks easy. But doubts arose about the rigidity of the structure: the support point (even if a large washer and an additional nut were added under the upper part) is small and distortions are quite possible, and the weight also began to confuse: according to calculations, 3 - 4 kg. It worked out roughly, and that was without guitars.
Possible errors and difficulties
Those who want to hang a guitar on the wall sometimes face certain problems and make mistakes, for example:
- If the bracket on which the instrument is mounted is made of hard material, there is a risk of scratching the neck or breaking the pegs. Therefore, the guitar holder must be covered with a soft covering.
- The mount may not support the weight of a massive guitar. In this case, you should choose a mount with a large block and stronger dowels. Please note: for plasterboard walls you need to use fasteners such as a butterfly dowel or a molly dowel.
- If the distance between the mounting walls is incorrectly chosen, the guitar may slide down and the pegs may break - for this reason, it should be wider than the neck, but narrower than the guitar base.
- If the guitar is stored in an inappropriate place, it may become damaged and crack. It is necessary to keep it away from windows, radiators, balconies, and protect it from excessive moisture and direct sunlight. The ideal air humidity is 50%, and the temperature is plus 21°C. We recommend that you purchase a hygrometer and a humidifier to maintain a stable atmosphere throughout the year.
Build result
The result was quite a beautiful and neat design (thanks to the 0.1-0.2 mm gaps in the tongue-and-groove joints).
Strong and reliable - since the lower base is quite wide. The stand is equally stable with one guitar or three.
The groove under the fingerboard in the top panel is made with a slight negative angle for additional fixation.
The LED strip inside looks beautiful.
Design
Initial data
Design
Having brainstormed the options (of which there were not very many in general due to point 2 of the initial data), we decided to make a stand
for placing guitars.
The first solution was to take 6 plastic water pipes: make two bends in each, cut out special fasteners from steel - ties and put it together.
Build result
The result was quite a beautiful and neat design (thanks to the 0.1-0.2 mm gaps in the tongue-and-groove joints).
Strong and reliable - since the lower base is quite wide. The stand is equally stable with one guitar or three.
The groove under the fingerboard in the top panel is made with a slight negative angle for additional fixation.
The LED strip inside looks beautiful.
Assembly
Unfortunately, I didn’t take pictures of the assembly process, so I’ll describe it in words.
Preparation
- As you may have noticed, the bottom base plate is made of two 6mm panels - they need to be glued together. To ensure everything fits perfectly, I recommend inserting vertical panels and then gluing one panel to another.
- low-
is also connected with this : you need to weld a large washer onto the stud, flush with the edge of the stud. In this case, the pin is perfectly attached to the bottom of the base. I did it myself. If you want to make the same thing, I think in any company/garage/dacha where there are welders, they will weld the washer easily and simply.
The assembly itself
We insert the stud into the lower base, then the washer and tighten the nut along the entire stud
. We tighten another nut to a depth of approximately 10-15 mm from the top edge and place another washer on top. We insert the panels (if necessary, attach the LED strip to them from the inside), fasten the upper base and tighten the cap nut.
