Battery
This gadget uses a new 18650 lithium-ion battery from PKCELL with a capacity of 2200 mAh and an output voltage of 3.7 V for autonomous power supply.
You can also use batteries from old laptops in a portable speaker, but the battery life will be reduced.
The numbers 18650 in the name of the battery indicate its dimensions: diameter - 18 mm and length - 65 mm.
Finding the radiator size
Two amplifier channels are connected to the heatsink:
The chip must be attached to a heatsink, otherwise it will quickly overheat and be damaged. The size of the heatsink will depend on the maximum power dissipation and thermal resistances along the heat flow path from the TDA2050 chip.
Maximum power dissipation
Maximum power dissipation (P dmax) is the amount of power that the TDA2050 will dissipate as heat at its operating limit. P dmax depends on the maximum supply voltage from the transformer and the speaker resistance:
For the amplifier we are making here, the maximum supply voltage from the transformer is ± 24.7 V, and 6 Ohm speakers are used, so P dmax:
P dmax 20.6 W is below the TDA2050's absolute maximum of 25 W, so it's fine.
Heat sink thermal resistance
Now we can determine the maximum thermal resistance (in °C/W) of the heatsink required to dissipate all the power generated by the TDA2050. But first you need to find out the values of three thermal resistances along the path of heat flow from the microcircuit:
- 0 jc: Thermal resistance from the chip junction to the outside of the plastic case.
- 0 cs : thermal resistance from case to heatsink.
- 0 sa: thermal resistance from the heatsink to the surrounding air.
Heat dissipation will be more efficient when any of them becomes smaller. There is nothing we can do to get a lower 0 jc value because it depends on the chip design. 0 cs can be reduced by using thermal paste between the chip and the heatsink. Thermal paste's thermal resistance is typically around 0.2°C/W.
The greatest reduction in thermal resistance will occur when choosing a radiator (0 sa). The thermal resistance of a heatsink is usually listed in a table as °C/W. Heatsinks with lower thermal resistance will dissipate more heat, meaning they are better.
Use this formula to calculate the maximum heat sink thermal resistance required to dissipate P dmax TDA2050:
- 0 cs TDA2050 is 3°C/W.
- T jmax is the maximum junction temperature, or the temperature at which the thermal protection circuit is turned on. T jmax for TDA2050 is 150 °C.
- T amb is the ambient temperature during operation of the amplifier. Typical value is room temperature (25°C).
The maximum thermal resistance of the heatsink for this amplifier with P dmax 20.6 W is:
Therefore, you will need a heatsink with a value of no more than 2.9 ° C / W to ensure that all the power produced by the amplifier is dissipated.
Battery pack assembly
The battery is assembled as follows:
- Both poles of the battery are bad.
- On two wires of different colors at the ends, the insulation is removed on one side by 7-10 mm, on the other by 20-25 mm and also tinned.
Long tinned ends are soldered to the batteries folded together:
- black wire - to the battery negative;
- red wire - to positive.
Tools and materials
Materials
So, let's move on to making our speaker. We will need:
- Bluetooth module;
- 2x3W speakers;
- 2x2W amplifier Nsiway NS4263;
- Passive radiator (optional);
- USB charging module;
- Battery capacity 1,000 mAh;
- Regular sliding switch;
- 3.5 mm stereo jack;
- Case for glasses;
- Matte black paint.
Tools
- Soldering iron;
- Drill or screwdriver;
- Super glue;
- Hot glue gun.
With the help of these simple tools we will assemble our column.
Switch and power connector
To replenish the battery capacity after the portable speaker is assembled, you can use any charger that comes with a smartphone or other device with a constant output voltage of 3.7-5 V.
You must first connect the adapter with a USB Type-A/Micro USB cable to the micro-USB port located on the controller board, and then insert the plug into a 220 V AC power supply.
To prevent the batteries from being discharged idle and the speaker to be turned on and off, the battery is disconnected from the amplifier using a rocker microswitch.
What? For what? and why?
All of us have such a part of the apartment as the kitchen, where we spend a significant part of our time. Many people most likely have a TV, radio, etc. technology that we turn on during meals, cooking, or just watching and listening, well, that’s what I’m talking about.
I recently completed a kitchen renovation, and I wanted to add something interesting and unusual to the interior.
As you probably already understood, this thing will be a “ Portable music speaker”
».
Why exactly her, because it’s quite boring to cook, etc. in silence, but it turns out it’s much more interesting with music, I think many will agree!
Moreover, to do something useful for yourself, and even with your own hands, what could be better?!
So, let's begin!
Installation of main modules
To install the modules, unscrew the back panel on the speaker body. The amplifier and controller boards must be secured in its upper part with self-tapping screws and hot glue.
Since there will be no mechanical impact on the amplifier, its micro-USB port is glued to the inside of the rear panel of the speaker, and then screwed to it with a self-tapping screw through a hole on the board. Before mounting the DW-CT14+, a hole is drilled on the panel opposite the LED.
The micro-USB port of the controller is also glued to the inside of the rear panel so that when installing the plate into the body of a portable speaker, the input of the micro-USB port is adjacent to the top edge of the speaker.
At this point, a rectangular opening is cut out in it to connect an external charger to the USB connector. Before gluing the charging module, a common hole is drilled in the plate opposite the LEDs.
Since the controller board will constantly be subject to mechanical stress when connecting the plug, it is additionally screwed to the back plate with self-tapping screws through the unused contact holes “IN-” and “IN+”.
For a miniature rocker switch with a diameter of 20 mm, you can bore the hole left on the back plate from the outgoing wires with a file, or drill a new one with a core drill.
It is better to secure the battery at the bottom of the rear panel of the speaker using double-sided tape.
What you will need
To install a homemade speaker on 2 mid-frequency dynamic radiators, you will need a number of consumables and tools.
Accessories:
- Speakers. Selected according to the required parameters: extractable frequency range, output power.
- Decorative grilles for emitters. You can purchase them or make them yourself.
- Amplifier. Recommended class D with output power for 2 channels up to 50 W.
- Digital or LED voltmeter. It allows you to control the battery charge level during autonomous operation of the device.
- Volume control. Any standard one for devices of this type will do.
- You can supplement the design with an additional audio input.
- Socket and charging module. It is recommended to use 14 V.
- Switch and power connector. Any standard ones for devices of this type will do.
- Rechargeable batteries - 3 pcs. x 1.5 V. It is necessary to install samples of a proven brand with the same charge level.
- Bluetooth device. It is recommended to use wireless. If it is wired, then it also needs a power board.
Materials:
- Chipboard. The workpiece area is taken with a margin of 10% of the calculated one.
- Furniture self-tapping ties. The quantity is taken at the rate of 2-3 pcs. on one side. For a rectangular case you will need a maximum of 24 pcs.
- Screws or fastenings for the back panel, if it is removable. Quantity based on 2-3 pcs. to the brink.
- PVA glue. It is used to lubricate bonded surfaces.
Tools:
- wood hacksaw;
- drill with attachments and drills;
- jigsaw for wood;
- bench knife;
- screwdriver or screwdriver;
- glue brush;
- sandpaper;
- soldering iron
Soldering modules
The wiring and connection of circuit components is carried out in the following order:
1. Solder wires from two small chips that come with the amplifier to each speaker, strictly observing the polarity. The yellow wire is soldered to the positive of the emitter, and the blue wire to the negative.
2. The red wire coming from the battery is connected to the “B+” contact on the controller board, the black wire to “B-”.
3. A large chip is inserted into the red “BAT” connector on the amplifier block, and the wires coming from it are soldered in the following order:
- black - to one of the rocker microswitch terminals;
- red - to the “OUT+” contact.
4. It remains to cut another black wire of the required length, strip it and tin it on both sides and solder it to the second terminal of the switch and to the “OUT-” contact.
5. The panel with the speakers, which has become a façade, is attached to the body of the portable speaker with self-tapping screws or hot-melt adhesive, after which 2 chips coming from the dynamic emitters are inserted into the corresponding “Lout” and “Rout” sockets on the board of the DW-CT14+ electronic unit.
The manufacturer of the portable speaker himself determines which of the speakers, when the Bluetooth speaker is placed horizontally, will be left and right.
Testing a homemade speaker
Tests have shown that these two full-range speakers, unfortunately, are not fully capable of reproducing the entire frequency range, so 10 W tweeters were installed along with them. The HF speakers were connected in series with film capacitors.
As for the bass amplifier on the TDA7492 (the sound is received by the bluetooth 4.1 module), the sound quality is very good and clear. The only problem with this board is that the speakers are slightly noisy when listening to music quietly. There is a solution to this problem on the Internet; only a slight modification of the board is required, but this is not particularly disturbing.
The housing must be very sealed, otherwise the pressure inside the speaker causes air to escape through small holes, which causes unpleasant “farts” from the speaker.
Making a modern music device out of an old music center
Car acoustics. How to make it?
We take out the old stereo system from the storage room and take the speakers from it. We find an amplifier in the car (if it is missing, turn off the rear speakers), thoroughly strip the wires on the old speakers, it is important not to confuse the polarities, and connect. The sound from the old speakers from the center is much louder and better quality than ordinary car mugs, some of them will replace the subwoofer, the main thing is not to burn it or turn the music volume up to maximum. You'll have to find the best option for setting the volume so that it doesn't gurgle.. Universal Bluetooth speaker system
How to collect it?
Universal Bluetooth speaker system. How to collect it?
To make it, we take an old stereo system and buy a Bluetooth adapter with an aux or a standard 3.5 mm jack. It all depends on the inputs on your speaker system
The price of adapters varies between two hundred and five hundred rubles. It is important to choose the right adapters so that you do not have to solder them in the future. We connect Bluetooth to our music center, set up a computer, laptop, smartphone... This assembly is perfect for an apartment
You can take the device with you to your country house by connecting your smartphone. In your car, you can connect a Bluetooth adapter to the radio and listen to music directly from the Internet via a smartphone (mobile phone)
This assembly is perfect for an apartment. You can take the device with you to your country house by connecting your smartphone. In the car, you can connect a Bluetooth adapter to the radio and listen to music directly from the Internet via a smartphone (mobile phone).
Materials for making an amplifier
Before starting work, you should take care of selecting high-quality materials from which you will assemble a sound amplifier for your speakers with your own hands. First, you need to choose a suitable case that is strong enough and can accommodate all the functional components of the device.
The main element of the amplifier is an electronic board, the dimensions of which must be known in advance. The speaker itself can be used as a housing (in this case, the amplifier is mounted in a separate space) or a suitable third-party container.
If there are no suitable ready-made solutions at hand, you should take care of making the case from any available material.
It is best to take ordinary plywood with a sheet thickness not exceeding one centimeter. Aluminum sheets, double-sided textolite boards and other similar materials can also be used.
How to make a simple amplifier
It’s easier to make an amplifier if you have a ready-made circuit at hand. It is worth considering that the number and location of legs differs on different devices. On paper they are indicated by numbered dots around the perimeter of the square representing the chip.
In fact, they can be located on one or both sides of the device
Therefore, it is important to make sure that the numbering is understood correctly, otherwise the likelihood of making a mistake when connecting increases.
Some microcircuit models have designations that prevent them from being used upside down. You should also pay attention to such signs.
When using a device with eight legs, you can work according to the following algorithm:
- The wire is fixed to foot 6. Its other end is soldered to the switch. Its second contact is connected to the crown connector. The wire goes to positive.
- A capacitor is soldered to the fifth leg with a positive contact. The minus element is directed to the speaker.
- Alternatively, some avoid connecting the capacitor and speaker directly for the latter's safety.
- To do this, a wire is added to the shortened contact of the capacitor, which in turn is connected to the positive contact of the speaker.
- The negative contact of the speaker should be soldered to legs 2 and 4.
- The third leg is connected to a resistor, to the second leg of which a wire is soldered leading to the mini jack, to its plus.
- When using a two-pin mini jack, you need to combine the channels leading to the channels and solder them to the wire leading from the resistor.
- The negative of the jack is connected to the negative of the speaker.
- Finally, all that remains is to combine the minus of the connector with the minus of the speaker.
The result is a base that can be used as a base for a portable speaker. Using simple systems is also convenient for connecting headphones, computer, phone and other devices.
Powerful DIY sound amplifier
A radio amateur planning to make a low frequency (LF) system must resolve a number of the following issues:
- Element base
- Electrical parameters
- Scheme selection
Modern sound systems are assembled using bipolar or field-effect transistors and integrated circuits. Such designs do not require high voltage in the power supply circuits, are quite compact and provide a good range of reproducible frequencies and a low percentage of distortion. High-end audio equipment is assembled using vacuum tubes, which have not been used in mass-produced technology for a long time. Electrical parameters depend on the purpose for which the ULF will be used. The design, intended for connection to a tablet or computer, does not imply high quality sound reproduction.
For a specialist, it will be easy to assemble an audio amplifier with your own hands that provides fairly high parameters. In this design, you can use powerful transistors or microcircuits. The block can be designed to work with devices that produce a powerful output signal. Then a preliminary cascade is not required and it is enough to assemble only the tip. If the device is intended to work with a microphone, turntable or electric guitar, then you will have to assemble a complete path with a preliminary stage and tone controls. The easiest way to assemble a final power amplifier with your own hands is on an integrated circuit. This design is assembled on a simple printed circuit board, does not require adjustments or adjustments, and if assembled correctly it starts working immediately.
The design provides an output power of up to 20 watts per channel, operates from 10 to 18 V, so can be used in a car. This power is provided using the TDA1557 chip. The TDA8560Q can deliver up to 30 watts per channel. For more stable operation of the design when reproducing low frequencies, it is recommended to use 5 2200 µF capacitors connected in parallel in the power filter. The chip body gets very hot, so it needs to be installed on a radiator. To assemble a sound amplifier for speakers with your own hands, you will need a tester and a soldering iron. An oscilloscope and generator are not used for simple circuits.
We assemble the simplest circuit using one transistor
Next, consider the simplest ULF design, consisting of a single semiconductor
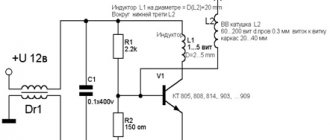
Please note that this circuit is a single-channel amplifier. Here is a schematic diagram of such an amplifier
As an example, let's assemble a simple sound device using a single transistor.
First, you should prepare the necessary components and equipment. For assembly you will need:
- · Silicon NPN transistor, for example, KT805, or its equivalent.
- · An electrolytic capacitor with a capacity of 100 uF; its voltage should be 16 volts or more.
- · Variable resistor, with a resistance of approximately 5 kOhm.
- · Circuit board, if available. If not, you can assemble the device by hanging it.
- · A radiator is a must, without it the transistor will quickly overheat and fail.
- · Wires for connecting components.
- · Mini jack connector for connecting a sound source. This could be a computer or other device with an audio output, for example, you can use a smartphone.
- · DC power source 5-12 volts, this can be a power supply or a crown battery.
- · Soldering iron for soldering elements, as well as solder and rosin or any other flux.
We will assemble our amplifier from components that have already seen life.
So, when all the components are selected, we begin the assembly. First, we place the components on the circuit board.
Next, you need to solder the negative terminal of the capacitor and the central contact of the variable resistor to the base of the transistor.
According to the diagram, we connect the power plus and the speaker plus to the second contact of the variable resistor. To do this, we connect the contact using a wire to the circuit board. The central contact of the transistor (collector) is the negative terminal of the speaker; we will also connect it to the board.
Then the remaining contact of the transistor (emitter) must be connected to the negative power supply, as well as the contact for the negative input signal. The positive terminal of the input signal is the positive leg of the capacitor.
The assembly is almost ready; to start testing, all that remains is to solder three pairs of wires. From left to right in the photo: entrance, exit, food. And also be sure to install a radiator on the transistor.
Then we proceed to setting up our amplifier. To do this, we connect all components, be sure to strictly observe polarity. Also, before connecting, you need to make sure that there is no short circuit, especially when mounted.
The setting is made by adjusting the variable resistor, thus matching the resistance of the speaker and the transistor.
That's all, the assembly and configuration of a simple low-frequency amplifier is complete. Accordingly, such a ULF is a mono amplifier, i.e. single-channel. To achieve stereo sound, you need to assemble two similar devices
It should be noted that such devices, assembled according to the simplest scheme, are not used anywhere due to their inexpediency. More complex devices are needed for domestic needs