Installing a Christmas tree is quite a troublesome task. A Christmas tree cross will help simplify and speed up the process.
Many companies, artels and just private craftsmen are actively supplying the market with their products that will help cope with the task of installing a Christmas tree.
One of the options for solving this problem is to make a stand for the Christmas tree with your own hands, which can be made quickly enough from scrap materials.
Let us note that any man almost always has a certain amount of wooden boards, beams or metal corners with pipes and tin cans, and there is nothing to say about tools - a thrifty home owner should have them in stock. Therefore, below we will consider the question of how to make a cross for a Christmas tree on your own from improvised means in about an hour.
Crosspiece for small and medium-sized Christmas trees
The first project is a classic wooden cross. Its main difference is the absence of a half-tree connection, which eliminates the need for complex markings, work with a chisel and subsequent hassle with adjusting the connection.
A reliable and neat cross is made from four simple blanks - two boards (60x15x2.5 cm) and two square scraps (15x15x2.5 cm).
We determine the place where the boards will intersect. In our case, we measure 22.5 cm from the end of each board.
Using a square, we apply markings.
We do the same with the second board: measure 22.5 cm from the end and apply markings.
We lay the boards along the marking lines and check the accuracy of the fit using a square.
We connect the crosspiece with four screws or self-tapping screws.
We screw supports from square scraps along the edges of the top board.
We apply cross markings to determine the center into which the main rotor will be screwed in or a wide through hole will be drilled.
Drill a pilot hole.
For small trees, mounting with a 120 mm through screw will be sufficient. If desired, you can use a feather drill to make a wide through hole of the required diameter; a depth of 5 cm is enough for the tree trunk to be stably positioned in the cross.
Glue the felt pads. They will protect the floor from scratches and add stability to the cross.
Simple manufacturing option
The above-described design can be made in approximately 1-1.5 hours, but you don’t always have that much time. You can make a cross faster using the following technology.
For this, a wooden beam, board, picket, pallets, round beams, etc. are suitable as a base. In this case, the material should be approximately 50 mm thick (if the boards are thinner, then several can be combined into one).
It is worth noting that the thicker the beam and the wider it is, the more durable the structure will be. This will allow it to withstand the weight of the tree with toys and various loads on it. The tools you will need are marking kits (square, rulers, pencils), a drill, a screwdriver, a hacksaw and self-tapping screws (the latter can be replaced with nails).
The next stage is preparing the preparations. To do this, you need to saw off 4 identical bars, the length of which should be about 40-50 cm (at least 30 cm). They are cut using a hacksaw, and it is important to maintain the plane of the ends.
After this, the diameter of the pine/spruce trunk is measured from below (for installation). Next, the resulting size is calculated from the ends of each beam.
It should be noted that the hole in this cross will be square, since the joint of the beams-blanks is carried out as follows: the end of the other is applied to the marking (set aside diameter) of one beam so that the plane of the line and the plane of the edge of the beam coincide.
Similar procedures are performed with all bars. The result should be a cross with 4 beams and a square hole. Next, the beams are fastened with glue and self-tapping screws/nails (if there is no glue, then it can be omitted).
The assembly of the cross is completed by installing the legs, which are made from the same material as the main part. The only drawback of these designs (this one and the one described above) will be the lack of moisture, which will lead to rapid drying out of the tree, causing the needles to yellow and fall off. A design with a glass will help eliminate this problem.
Christmas tree stand with uncut edge
The next project is a simpler, but no less reliable version of the Christmas tree stand. A simple cross, assembled from four boards without unnecessary joints, will provide stable support for a tree of any size. Using a board with an uncut edge, the traditional question: how to cover the crosspiece will disappear by itself. The living edge will add decorativeness to this simple design, and make it a natural extension of the New Year's tree. After the holidays, the crosspiece elements can be easily disassembled and stored until next year.
From a pre-prepared board with one edge trimmed, we cut 4 pieces of the same length. We focus on the size of the tree: the larger it is, the longer the boards will be needed.
And again grinding
After sawing the planks, the grinding process began again. The principle of operation in this case is identical to that already described earlier. First, use medium-grit sandpaper. The finishing work is done with a regular zero.
What kind of prayer can you remember your relatives on Radonitsa without leaving home: text
In Orthodoxy it is not customary to leave vodka and bread at the grave: the position of the church
Father said that it is not recommended to drink at graves: Parents' Day mistakes
Adjustable cross for Christmas trees of all sizes
The third project is a simple and stable wooden stand that can be adjusted to any trunk diameter. The crosspiece consists of three supporting elements. The optimal length of each part is 250 mm. Two parallel grooves are milled in the face of each of them. The ends of the boards are cut at an angle of 60°, and shallow guide holes for screws with wide washers are drilled into them. It is convenient to store the collapsible elements of the cross in a compact stack until the next holiday.
Drawing of an adjustable cross for a Christmas tree
Milling grooves according to pre-applied markings.
What it is?
A cross is a tree stand that allows the tree to stand upright without the usual support in the form of roots. Both artificial and live trees need it. True, the first ones, as a rule, are sold with a cross attached to the post. But you often need to look for a stand for a living tree yourself.
A crosspiece of the required size can be purchased both in online stores and offline. And if you have at least a few beams and nails on hand, you can do it yourself.
High stand for large Christmas trees
Four elements, cut with a jigsaw according to the template suggested below, will easily turn into a beautiful and stable stand that can support a Christmas tree 2.5 meters or more in height. The structure is tightened using screws screwed into pre-prepared holes, and can also be easily disassembled without taking up extra space during storage. You can place a reservoir of water under the stand so that the spruce stands even longer and continues to fill the house with its unique scent.
Drawing of the main element of a wooden stand
From buckets and bottles
Another simple way that will help you secure a Christmas tree in a matter of minutes when you don’t have the necessary materials and tools at hand. You will need a bucket and plastic bottles filled with water. Place them in a circle, leaving space in the center for the tree trunk. To make the structure heavier and not fall under the weight of the green beauty, you can also pour water into the bucket. Decorate it all with fabric or a bright box.
As you can see, making a stand for a Christmas tree is not difficult. And materials for it can be found in any home, the main thing is to show a little imagination.
Artificial tree stand
The simplest version of a spruce stand is made not only for artificial, but also for natural spruce. If you somehow lost a stand for an artificial fir tree, then you shouldn’t be upset, because making one is as easy as shelling pears.
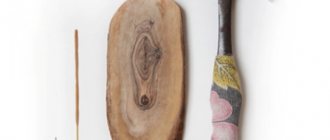
We offer you an interesting option made from cut wood, using a drill or jigsaw.
To begin with, it is worth determining the thickness of the spruce trunk at the bottom, since the size of the hole will depend on this. The cut must weigh more than the spruce itself, otherwise it will simply fall.
After determining the diameter of the spruce tree, it is necessary to make a hole exactly according to it in the very center of the cut with the necessary tool.
Be sure to treat the cut with sandpaper and open it with varnish so as not to accidentally injure yourself on it afterwards.
Once the hole is ready, you need to check it for compatibility with spruce. If it fits exactly into the hole and does not wobble in it, then everything is matched perfectly.
Then you can freely and without problems use the cut as much as you need. Here's how to easily make a stand for an artificial Christmas tree with your own hands from a cut tree.
How to choose fasteners for a Christmas tree, make it from scrap materials and decorate it?
There are no compromises when it comes to beauty. Therefore, if you want every detail of your New Year’s interior to harmoniously complement the other, pay attention to the Christmas tree stand. Yes, usually everyone forgets about her. Today we will decide together what it should be and what is better - choose a ready-made one or make your own.
The fashion of “masking” the stand of the New Year tree appeared relatively recently - our grandmothers did not hesitate to place the forest beauty in a bucket or on a wooden cross.
However, today it would be a crime to leave the stand undecorated, especially if you have put so much effort into decorating your entire home.
Whether you are planning to buy a ready-made stand or use your imagination and do everything yourself, you need to remember that it should look beautiful. We offer several ways to aesthetically hide the stand - choose any, they will all make your holiday interior a little more beautiful!
Take a look at the various ready-made solutions - for example, this round “mat” will ideally hide the stand and go very well with the rest of the New Year’s decor.
The rosy-cheeked Santa is well suited for bright interiors, and the cute (and very well-mannered!) reindeer on the craft texture are suitable for calmer decor.
If the leg is tall and you don’t want to leave it open, a basket stand may be a suitable solution.
It will not only hide the leg, but will also add a little more coziness to your room. Natural colors, stylized to look like real weaving - this stand has every chance to make you fall in love at first sight!
Stand for thick-trunked spruce
Natural spruce can have not only a thin trunk, but also a fairly voluminous one.
In this case, a stand is made that will practically hug the lower part of the trunk. For this option, you will need three identical strips, a screwdriver, connecting angles and screws.
It is best to make the stand when the tree is in a standing position. That's why someone has to hold it on top.
We place the boards one next to the other around the spruce trunk and first connect the first two with corners and screws to each other. Then we attach the third plank close to the spruce itself and screw it in the same way to the first two.
The planks must be massive enough to support the spruce. It is also better to take wide boards so that they are as tall as possible along the trunk. Think and you will definitely find what you can use to make a Christmas tree stand.
Common cross
Many people remember from childhood the most popular homemade stands for natural spruce in the form of crosses. This option was most often chosen due to its reliability and ease of implementation.
It’s easy to make this type of stand for a spruce from leftover boards and blocks. But the cross is relevant only in the case of spruce with a thin trunk.
To begin with, two completely identical segments are measured and drawn on the board, which will make up the cross. Using a jigsaw we cut out both parts.
It will also be necessary to attach legs to the upper part of the cross of the same thickness as the bottom board, so we also measure and cut them.
We connect two boards of the cross in two places, slightly moving away from the center on both sides. We screw the legs, which were previously cut out, to the top bar on both sides of the bottom.
We mark the place for our spruce in the center with the diameter of the trunk and cut it out using a jigsaw. We insert the spruce and everything is ready, you just need to sand the surface with sandpaper.If desired, open the surface with varnish. Here's another option for how to quickly make a Christmas tree stand with your own hands.
Photo of Christmas tree stand
Source
Choosing material for the stand
The main task of a Christmas tree stand is to hold a tree hung with toys.
There are designs that are made from a combination of plastic or metal. Give preference to non-toxic materials so as not to worry about the safety of children. If you plan to buy a compact tree up to 1 meter high, then you can make a cross from wood. In addition, the base, painted to match the texture of the trunk, will blend harmoniously with the tree and will not attract much attention. For a two-meter beauty, a more reliable stand is needed. The wooden base is reinforced with a metal pipe, the diameter of which corresponds to the diameter of the pillar.
The most reliable products are those made in the form of a tripod made of steel. By design, they are small buckets standing on supports. If desired, the container can be filled with earth, sawdust or water, and then the Christmas tree will last a long time without losing its freshness. The tree trunk is secured inside using special screws. If you have forging or metal carving skills, then it will not be difficult for you to make an original stand with an ornament yourself.
When choosing the material and shape of the Christmas tree stand, consider the weight, size of the tree, as well as the interior of your home, so that the support fits well into the overall theme.
Metal stand
Metal stands are reliable and, one might say, eternal. Having made it once, you can pass it on to your children and then your grandchildren.
Tools and materials
If you have a workshop or garage, you can find suitable materials there. In other cases you will have to spend money. You will need:
- a piece of metal pipe with a diameter equal to the diameter of the barrel;
- metal rod made of soft metal with a diameter of up to 12 mm;
- vice;
- Bulgarian;
- hammer;
- construction corner;
- welding machine;
- anti-rust metal treatment agent;
- paint of the required color.
Paint is needed to paint over all welding seams and give the product a more noble appearance.
Sketch of a metal stand
Manufacturing process
Cut a piece of the required length from the metal pipe. Cut three identical blanks from a metal rod. Fold lines are drawn on future legs, as indicated in the sketch. From the top line, mark the length of the shoulder. Do the same on the bottom.
After all the blanks are ready, you need to give them the required shape. Insert one leg exactly vertically into the vice up to the fold line mark and fix it well. Make sure that the rod and the lips of the vice form a 90 degree angle. You can check this using a construction angle. Hitting the rod with a hammer in the area of the bend line, bend it to the required angle on one side. Using the same principle, bend it from the other end, in the opposite direction. Prepare the remaining two legs for the stand in the same way. On each side, use a grinder to cut off the excess, leaving about 2 cm after the fold line on top, and up to 6 cm on the bottom.
Using a grinder, vertical through grooves are cut around the pipe on the pipe. Thus, the tree trunk will receive additional water supply. The more holes you make, the better.
Carefully sand all cuts with a file, removing sharp nicks. Now it's time to weld the legs to the base. To ensure the stability of the stand, make sure that the rods are equidistant from each other. After the entire structure is assembled, you can start decorating the metal Christmas tree stand. Treat it completely with an anti-corrosion agent, and after it dries, paint it in any color you want. The stand can be green to match the tree, or brown, like the trunk. If you are an experimenter, you can make a stand in a contrasting color, such as red.
Cardboard coasters
Cardboard is often used as a material for making homemade crafts. Almost every family has an unnecessary cardboard box. It is suitable for making a holder for a mobile phone or tablet.
You can also make a photo stand. To make such a wonderful thing you will need a few supplies - cardboard, scissors.
The manufacturing process will not take much time. A strip of 10*10 cm should be cut from a cardboard sheet folded in two parts.
The next stand can be used for a book or tablet. The essence of manufacturing is similar, all that remains is to note the size of your gadget. When working, you need to use cardboard that bends well. The cardboard stand is very convenient to use and easy to take with you.
Making tiger cubs from bushings
Tiger from toilet roll
When you run out of toilet paper, paper towels, or foil, you're left with a cardboard tube. You can’t throw them away, it’s better to create crafts for the New Year 2022:
- cardboard sleeve;
- colored paper / thick cardboard;
- black marker;
- glue;
- scissors.
Procedure:
First draw on paper, then color the body parts in the form of separate parts. When finished, cut them out.
If necessary, shorten the sleeve by trimming the edges with a sharp knife and cover them with an orange sheet.
Having prepared the parts of the figure, connect them by gluing them together and complete the stripes with a marker.
The product diagram is simple, you can do without ready-made examples, the bushing serves as the basis, it can be placed vertically / horizontally as required.