How to make a spider craft on a web?
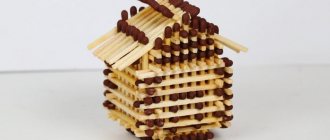
Spider made from natural material
First you need to decide what or what your spider will be made of. There are these options:
Pine cone spider
You will need plasticine, a pine cone, thin twigs. The branches should not be too dry so that they do not break off completely when bent.
Prepare 6 identical pieces broken off from a branch. Glue brown plasticine onto the cone between the scales.
Place twigs in plasticine to form spider legs. To do this, the branches need to be slightly broken and bent. For reliability, the fracture site can be secured with plasticine.
Next, all that remains is to glue the eyes and the pine cone spider is ready. All my eyes move, but they can easily be made from plasticine. Roll out two balls from white and the same number of balls, but smaller ones, from black plasticine. Glue it on the pine cone and you will get a very funny bug-eyed spider.
Chestnut spider
Prepare brown plasticine, twigs, chestnut and acorn cap. And also purchased eyes or plasticine ones.
Glue a small layer of plasticine onto the bottom of the chestnut, which will hold the spider's legs and branches. They also need to be slightly broken or bent, and the bend points secured with plasticine (optional).
All that remains is to glue the eyes, the acorn cap and the funny chestnut spider is ready.
Acorn spider
Another simple version of a spider made from natural material. It is made in exactly the same way as from chestnut. You will need branches, plasticine, an acorn, and eyes.
You need to glue plasticine to one part of the acorn, and stick 6 bent branches into it. The spider's appearance will be completed by its eyes and nose. I subsequently added plasticine noses to all the spiders.
These are the kinds of spiders you can make from natural materials. For the craft, just one of your choice is enough.
We knit decor
You can crochet a very beautiful decorative web, which will add an appropriate ambiance to the setting. Having real cobwebs in the corners is not very pleasant, but such an openwork thing will definitely become the envy of your skill. If you have sufficient knowledge, you can knit such a product.
The process will not take much time if you know how to handle a crochet hook. For those who are not new to this business, we can suggest replacing the first column in each row with air loops. This way your web will become not only more voluminous, but also more realistic.
- 1st row: 12 tbsp. with a ring over it.
- 2nd row: 12 tbsp. yarn over and between each stitch there are 2 air loops.
- 3rd row: 12 tbsp. and between them there are 3 air. P.
- 4th row: 12 double crochets and 5 chain stitches between each stitch.
- 5 row: 12 tbsp. with 3 yarn overs, 9 ch between loops.
- Row 6: 12 st. with 4 yarn overs, 11 chain stitches between each.
- Row 7: 12 st. with double crochets, 15 ch between each.
Read this: How to correctly make a “Collage of Wishes” according to Feng Shui: a piece of the East in your home
It turns out a neat, small web on which you can attach its owner, also made from scrap materials, beads, threads, etc. But this is only an approximate size. You can continue knitting as needed.
Making a web for a spider from natural materials
Take 3-4 branches, relatively the same size, connect them crosswise. Secure the intersection with tape. If the branches are very thin, plasticine is enough; thicker branches need to be carefully secured in several layers with tape, ensuring that they practically do not move. Otherwise the threads will sag.
Then you can immediately wind the threads, but it is better to first glue the plasticine to certain areas. The photo shows their location. There are many advantages of this action: the plasticine will hold the thread on the branch, hide it, and leaves can later be glued to it.
Wind the threads. I have them thin, it’s better to take a thicker one. You must first wind one tier, from branch to branch, and several times around the place marked with plasticine. Then the second and third. If desired, you can make more of them.
Everything is ready, glue a large maple leaf onto the plasticine in the center - this will be the spider’s nest. And on the sides there are any small leaves - probably the wind blew them into the web. But more for beauty.
The web has been made, now it’s time to place it in the nest of its owner. Here is a chestnut spider on the web.
And now the home and hunting place of the cone spider.
The acorn spider has settled down quite well.
And now the spiders are all together, although in real life the spectacle would not be for the faint of heart.
This is what a spider on a web made from natural material could look like, simple and as natural as possible.
The most realistic spider web
Do you want to really scare your Halloween guests or tease your neighbors with your skills? Try to create a truly scary and realistic composition for the holiday.
Such a web is suitable both for the facade of a house and for decorating a small apartment inside.
A gauze web is a win-win option. Firstly, the material is accessible and will definitely be available to everyone. Secondly, working with it is easy and simple.
To create a lighter, airier version, you will have to tinker. It is necessary to stretch each thread of gauze. But the effect exceeds expectations.
Related article: How to knit a beanie with stockinette stitch: master class with video
Even your workplace can be decorated this way.
The second option is easier and faster - hang the gauze, stretch it slightly or tear it. The effect of realism will be less, so it is worth placing spiders and corresponding attributes on the canvas.
A web made from threads or ropes will look great. Wool yarn will do. If the threads are thin, then the white cobweb will look faded and unprofitable; it is better to use black.
Stretch six long threads crosswise in the place where you decided to install the composition, secure the ends with pins, nails, and masking tape. Closer to the center, attach a thread of the same color to any ray using a knot.
Moving in a spiral, secure parts of the web, making the distance between levels increasingly greater depending on the distance from the center. And at the end, secure with a strong knot.
The web is ready! It will look especially beautiful hanging on the corners. All that remains is to attach spiders and other decor to it.
The bats
Bat
It is very easy to make the figure even and symmetrical if you cut out a half by folding a sheet of paper in half.
All that remains is to hang such decorations on the tree.
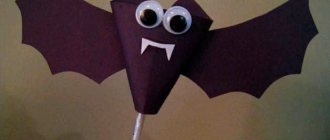
Bat
To create it you will need:
- Toilet paper sleeve;
- Black paint;
- Black paper;
- Scissors;
- Glue.
Instructions:
- Paint the sleeve black.
- When the sleeve dries, flatten it. Then straighten and press the edges from above and below, connecting the ends.
- Cut wings for the mouse.
- Glue the wings.
- Draw eyes or glue ready-made ones.
Now you can hang the mouse and let it “fly” under the ceiling!
Author
Features of paper spiders
First of all, you need to remember that spiders, regardless of whether they are real or paper, have 4 pairs of legs on each side of the body. This is a distinctive feature of arthropods.
Where is the best place to use such crafts?
What can such crafts be useful for? First of all, it is worth remembering the works where one of the heroes was a spider. These are “The Fly Whoosh”, “Spider-Man”, “The Lord of the Rings”, “Harry Potter”, “Charlotte’s Web” and others. A paper spider craft can help you reproduce one of the scenes, as well as make appliqués based on them.
Another option for using spider crafts is to decorate a room for a holiday. It could be a witch themed party, birthday party or Halloween.
Examples
There are a lot of options on how to make a spider out of paper. The choice of one or the other depends on the purpose.
DIY autumn crafts: stars from twigs
- branches of the same length and diameter
- raffia (or just bright fabric or paper ribbons)
- superglue (or hot glue gun)
- acrylic paint or gouache (if desired)
1. Collect branches from the forest and cut them so that they are the same length. You need 5 pieces.
2. Form a star from the twigs.
*If you wish, you can paint the sticks with white acrylic paint or gouache.
3. Take raffia or ribbons and connect the branches to make a full-fledged star.
4. To make the star more beautiful, you can wrap it in raffia or colorful ribbons.
What species can be found at the dacha
Spiders are predators, representatives of the animal world.
In summer cottages they are found everywhere: both in residential buildings and in nature. The table contains information about spiders that prefer close proximity to humans:
| View | Description |
| Black or gray house spider |
| A ubiquitous species. Lives in trees and almost does not reproduce at home. Often found in rooms where it enters through open windows and vents. The size of the female reaches 3 cm, the male – 1.5 cm. | |
| Harvester, long-legged or moss-legged | Lives in the garden (often on the external walls of houses), but with the onset of cold weather it moves indoors. It has a brown oval body up to 1 cm long and long legs. Prefers to live next to windows, feeding on midges and flies. |
| Hobo Spider | Lives on the street, but is also found in houses, getting there through open doors and windows. It has a brown color and dark stripes on long powerful limbs. The bite of such a spider causes pain and an allergic reaction. |