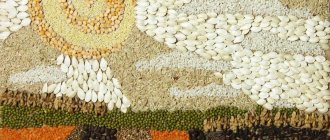
Natural materials for autumn crafts
You can create beautiful and original autumn crafts with your own hands from the following available natural materials:
- Dried leaves, berries, twigs of trees and bushes;
- Pumpkin seeds, sunflower seeds;
- Chestnut fruits and shells;
- Walnut shell;
- Pumpkin;
- Acorns.
You can also use pine cones, bird feathers, flowers...
Autumn crafts for kindergarten
As a rule, autumn crafts for kindergarten are created more simply, using one or two techniques. As the main material you can use colored paper, plasticine, cardboard, cotton wool, but it is more interesting to work with natural autumn materials.
Basic autumn-themed crafts for kindergarten:
- Thematic applications;
- Panel;
- Image of autumn composition;
- Herbarium.
Autumn composition of natural and non-natural materials.
Crafts made from autumn materials can be supplemented with other non-natural materials, such as plasticine.
Quite often, whole colorful compositions are created for autumn exhibitions in kindergartens.
There is one good composition that looks very interesting and pleases with a pleasant aroma; to make it you need to prepare:
- Fresh and slightly dried tree leaves;
- Apples are red in color and small in size;
- Rowan berries;
- Plasticine;
- Matches;
- PVA glue;
- Sheet of cardboard.
Step-by-step instructions for creating this composition:
- Glue tree leaves around the entire perimeter of the cardboard.
- Take 5 apples and put them in one line, fasten them together with matches.
- Take one apple and use a match to attach it to the first apple in the row, but only diagonally upward.
- Thus, 5 apples are the body of the caterpillar and 1, which is placed diagonally upward, is the head.
- Form the eyes, mouth and nose of the caterpillar from plasticine and attach to the head.
- Break the match into 2 even parts and stick it into the head so that the horns come out.
- String rowan berries and small balls of white plasticine onto matches, in alternate order.
- Attach a match to the sides of the apples, which act as the body, and string a rowan berry on them, thus creating legs.
- Make ladybugs from plasticine and place them around the perimeter of the cardboard.
- Place a bunch of rowan berries on the side of the composition.
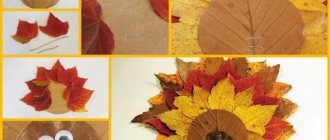
Cones are the same flowers
Panels of pine cones look very interesting. The buds, which are naturally brown, are uniform and boring. But if you paint their tips or bottoms with multi-colored gouache, they look like overseas flowers.
Pick up a lot of different cones in the nearest park, and give in to your imagination: red and blue, orange and purple, the flowers can be anything you want.
Use a ready-made wooden frame with a cardboard base and fill the entire space with pine cones, gluing them in random order or creating a colorful pattern.
Rainy weather is not a reason to be sad. Use this time to spend time with your children and create something together.
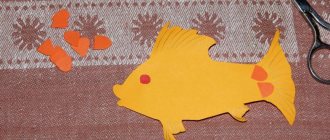
Aquarium with goldfish
This craft is great for preschool or elementary school students.
In order to make such a children's autumn craft, you should prepare:
- A sheet of blue cardboard;
- Pencil;
- Scissors;
- PVA glue;
- Plasticine;
- Dried leaves of different sizes;
- Dried grass;
- Seashells.
Step-by-step work plan:
- Draw a round aquarium on cardboard and cut it out.
- Roll a small ball of yellow plasticine and smear it on the bottom of the aquarium so that the sand comes out.
- Attach several pieces of shells to the plasticine bottom of the aquarium.
- Form several small pebbles from plasticine and attach them near the shells.
- Attach a sprig of dried grass to one of the pebbles.
- Form several flat circles from blue plasticine and place them from the bottom of the aquarium to the top.
- Glue a yellow leaf with a more rounded shape to the center of the aquarium.
- Make an eye out of plasticine and attach it to the glued leaf.
- Take a leaf of a more curvaceous shape, preferably maple, and glue it as a tail.
- Pick up a small leaf and glue it on top of the large round one as a fin.
What glue is suitable
Manufacturers offer many varieties of glue suitable for gluing paper and cardboard. The composition of the products is different, so they must be used correctly.
Glue stick
This type of medium is often used in children's creativity. The advantage of a glue stick is that it:
- easy to use;
- economical in consumption;
- firmly glues different types of paper, cardboard, textiles.
The product does not stain the child’s hands and does not stain clothes.
Use a glue stick to temporarily fasten sheets to create an applique. You cannot use the product for voluminous crafts, as the parts will quickly move away from each other after drying.
PVA
This material is based on polyvinyl acetate, a substance with excellent adhesive properties. The harmless adhesive composition has no pungent odor. It is used for gluing natural material onto cardboard. When applied in a thin layer, PVA prevents the paper from deforming. After only 3-4 minutes the glue partially dries without leaving any stains. The product is left for a day under pressure for better bonding. They note the convenience of applying glue strips, since the product is packaged in bottles with a nozzle.
Super glue
The adhesive force of the substance cyanoacrylate, which is used to make the adhesive composition, is great. The viscous mass sets instantly, so you should connect the parts of the object correctly right away. Then it will be more difficult to correct the situation.
The disadvantage of the material is that when gluing it can connect the skin of the fingers. Then it is difficult to wipe off pieces of glue from it. And the product has a pungent odor, so it is better to carry out the connection in a ventilated area or in the fresh air.
Gum arabic
The adhesive composition is made from gum arabic diluted in water. Its advantages are that it:
- harmless to human health;
- has a high degree of adhesion;
- reliable and gives strength to glued seams.
It is difficult to purchase ready-made glue. More often it is prepared independently by mixing 10 grams of gum in 20 milliliters of water.
Acrylic
The peculiarity of acrylic adhesive compositions is that they hold even thick cardboard together efficiently. The glue is produced in tubes, hence the ease of application. But since the base of the material consists of water, a large amount of the applied substance leads to deformation of paper crafts.
Dextrin
Previously, a paste made from flour or potato starch was used to glue paper elements. Nowadays, in the production of dextrin glue, starch is exposed to high temperatures. Within 1.5 hours in a cabinet heated to 160 degrees, starch is broken down and converted into dextrin. The resulting substance is dissolved in water and a little glycerin is added. The product is used for gluing paper.
Spray adhesive
The new adhesive spray was highly rated because it is evenly sprayed from the can onto the sheet. This leaves no traces on your hands, table, or clothes. They quickly adhere when sprayed onto fabrics and all types of paper.
Carpentry
This type of glue is natural and is distinguished by the fact that it firmly glues parts of the object together.
It is important that the product is transparent. Long-term storage of the substance in a liquid state leads to the formation of mold inside the bottle
It is better to purchase glue in the form of a brownish powder and dilute it with water, slowly heating the mixture in a water bath. For 1 part of the substance you need 2 parts of water.
Photography glue
It is better to glue photographs into an album using rubber glue. Even after drying, if necessary, you can remove the photo and clean the cardboard surface of the album with an eraser.
Autumn crafts for school
Autumn crafts for school can be made more original and unique than for kindergarten, because the student has a wide variety of techniques and can work with a large amount of material.
Some of the popular types of autumn crafts for school are:
- Volumetric applications;
- Panel;
- Herbarium;
- Thematic wreaths;
- Various volumetric compositions;
- Candlesticks;
- Fairy lights;
- Photo frames.
History of creation
A varied interior with notes of uniqueness and mystery is, undoubtedly, inherent in man since ancient times. Decorative panels are one of the most ancient methods of decorating a living space that have survived to this day. For the first time, thematic pictures made of stone or painted on clay appeared on the walls of buildings many centuries ago.
Who first invented wall panels still remains unknown, but the idea of decorative panels has never gone out of fashion. Only the themes, methods of conveying art, color relationships and materials from which the masterpieces were made changed.
The execution of such paintings can be classified according to the theme of the image, seasonality, color scheme, different types of materials and even age restrictions. After all, we all know that there are no limits to creativity, and we start small.
Every child and his parents at least once in his life had to do crafts for kindergarten. But not everyone is involved in this topic, and not everyone can immediately do or come up with something on the go. I want something unusual, surprising and at the same time useful for the development of the child. That is why we offer you a small master class on how to make a beautiful and simple panel on the theme of autumn with your children. This is a fairly common theme, but with its help you can always find a way out of the situation and do something in this style, especially in the autumn.
Related article: Crochet kitten patterns
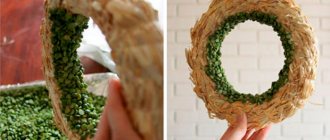
Autumn wreath
In order to make a themed autumn wreath, you should prepare:
- Large diameter disposable plate;
- Glue;
- Tree leaves of different tones;
- Decorative tape;
- Scissors.
Plan for how to make this type of autumn craft:
- Cut the bottom out of a disposable plate.
- Glue tree leaves around the entire perimeter of the plate so that there is no gap.
- Glue the leaves on the other side of the wreath as well.
- Cut a small piece of ribbon and tie it to the wreath as a loop.
To make the wreath more voluminous and fluffy, the leaves should be glued only by the tips, so that the edges are free, and can be supplemented with various decorative elements.
Candlestick with an autumn theme
Candles are one of the popular decorative elements during the cool season. In order to convey the atmosphere of autumn as much as possible, it is worth decorating a candlestick in this theme. A simple, but original and interesting version of an autumn candlestick using dried leaves.
For this craft you need to prepare:
- Glass jar;
- Alcohol and a piece of sponge;
- Dried leaves;
- Glue;
- Scissors;
- A couple of branches of hay.
Step-by-step plan for creating a candlestick.
- If there are any stickers on the jar, you should wash them off.
- Degrease the jar with alcohol.
- Choose the leaves you like best, cut out small stars or tree leaf shapes inside them.
- Glue the blanks in a fairly orderly manner on all sides of the can.
- Tie the neck of the jar with sprigs of hay and form a small bow.
For such a candlestick, a tablet-shaped candle is best suited.
Household recipes
There are many recipes on how to make high-quality wood glue with your own hands. To do this, you can purchase ready-made casein in powder form or get it at home. Place low-fat milk in a warm place to sour. When it has fermented, filter it with gauze and wash the remaining casein in water and boil to remove fat. Then spread it on paper, dry it thoroughly and mix with borax (1 part borax to 10 parts casein) until the consistency of dough. Dilute the resulting mass with water (2 parts) and use the resulting glue immediately, since it hardens after 2 hours.
Vase of pumpkin and bouquet of leaves
This craft is very easy to create, the main thing is to work carefully with the knife.
So, for it you need to prepare:
- A small pumpkin, more or less regular in shape;
- Beautiful tree leaves;
- Bunches of rowan;
- Spikelets of wheat;
- Knife;
- Jute.
Step-by-step instructions for creating this composition:
- Cut the tail off the pumpkin and carefully cut out the core so that you can place a bouquet in it.
- Form a bouquet from leaves, spikelets and bunches of rowan, secure it with jute.
- Place the bouquet in a pumpkin vase.
In this simple way, you can create a colorful and themed autumn craft from natural materials.
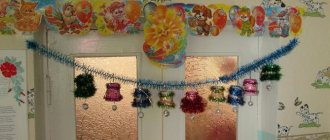
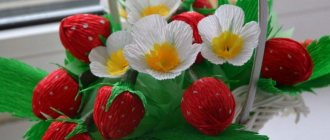
Photos of autumn crafts
0