Howling ghosts, black cats, grinning pumpkins, lanterns with cobwebs... Scary? No, it's terribly fun! Halloween is an entertaining holiday where everyone, young and old, can have fun. First, let's make suitable decorations - let's make Halloween crafts with our own hands.
From the article you will learn how to make beautiful and funny crafts using different materials:
- Pumpkins
- Lamps and candles
- Paper
- Felt
- Threads and fabric
- Wreaths
- From different materials
- Templates, diagrams and patterns
Pumpkin crafts
Jack is the main character of the holiday. A lamp in the shape of his head is quite easy to create. To do this you will need a pumpkin and a little patience. Instructions on how to carve a pumpkin candle holder.
- On the sheet of paper, draw the outline of the face (eyes, mouth, nose). Draw large elements for convenience.
- Attach the template to the peel, you can secure it with tape so that it does not move. Transfer the design by making punctures with an awl through the sheet.
- Remove the stencil, there will be dots on the peel of the fruit - we will cut along them. Use a craft knife or a craft knife with a sharp retractable blade.
- You need to cut off the top or bottom of the fruit and carefully remove the core with seeds so that it does not spoil prematurely.
- You can put a candle inside if you want to achieve a natural effect. Or put an LED flashlight or garland. And it will shine and it will be safe!
If you don’t have a special knife, you can use a regular chef’s knife. Just please be careful and attentive. Under no circumstances should you entrust this complex operation to small children.
Your Halloween pumpkin craft is ready!
If you don’t have the desire or skills to cut shapes, you can draw a face on the thick pumpkin skin with permanent markers or acrylic paints. They will not be able to penetrate the pulp; it can then easily be eaten. You can also cut out facial features on self-adhesive film.
By the way, all templates and patterns can be found at the end of the article. You can download them for free, print and use. Or come up with your own, scary and unique faces for Jack, the Lord of Pumpkins!
Halloween lamps and candles
You can create a completely safe lamp for children if you simply put a garland inside a painted jar. The main thing here is how to decorate! Spider webs, monster faces, witch eyes, furry spider legs, skeletons, black cats and bats are just a few of the things that can be used as a motif for decorating a lantern.
You can wrap a jar (or glass) with threads - it will be a cobweb. Place plastic spiders nearby - this is a ready-made decoration. You can cut out silhouettes of cobwebs, bats, trees, a witch on a broom from a black sheet or film and simply glue them onto a suitable container.
You can complement your Halloween crafts with black lace, bright black and orange ribbons, beads and rhinestones.
An excellent holiday lamp will be made from... an orange or a tangerine. We only need citrus peel. We tell you how to make such an amazing fragrant lantern. Using a sharp thin knife, draw a circle on the zest, separate the slices from the peel and remove. Press the design onto the peel with a knife or small baking molds. You can cut a face or just a geometric pattern: diamonds, squares, stars, zigzags.
If you are a fan of real interior candles, you can make them uniquely scary. Use a knife to cut off the top without damaging the cotton wick. Place the paraffin in a fireproof container and melt it in the microwave or in a water bath. Next, add a few drops of any dye and mix. Pour the colored mixture onto the candle, forming picturesque drips.
It is absolutely safe and at the same time fun and picturesque to decorate with LED candle lanterns. The design can be applied with paints through a stencil or drawn or pasted.
Paper bag flashlight
Isn't it unexpected? The most ordinary paper bag, which you can take for free in any supermarket if you buy a couple of rolls or a kilogram of apples! And with some effort, minimal artistic skills and a desire to get creative, this very ordinary package can be turned into an amazing flashlight that will scare away evil spirits during Halloween and bring you positivity with its warm glow.
How to make a lantern from a paper bag - job description from Everydaydishes
From paper
You can create a lot of Halloween crafts out of paper. Let's start by making bats, of which there can be very, very many on this day. For the body, we will need an empty jar, a cardboard tube from toilet paper or paper towels. The base can be painted black. For the bat wings, use a thick black sheet. You can fold it like an accordion. You can draw eyes or glue ready-made plastic ones. A pair of sharp white fangs will complement the terrifying look.
With kids you can make a bat from a disposable cardboard plate. Help your child cut out the ears and wings. Glue them on the back side. Mark the grin and teeth with white paint or a clerical touch-corrector. Draw more eyes.
Interesting decorative items are made from a sheet of paper folded like an accordion and glued into a circle. The orange material will make pumpkins, the black material will make cats and bats. If you insert a stick or kebab skewer inside, the monster can be used as a topper.
Simple white paper napkins make adorable and friendly ghosts. In addition to the napkin, you will need a small elastic band or thread and stuffing for the head. You can take a ball of cotton wool or make something more interesting! Use a round candy as a “filling”! This surprise will delight those with a sweet tooth of any age.
From identical orange stripes you can make a fairly simple craft - a pumpkin. Make holes at the ends and pull the strips together as shown in the photo. Use green paper for the tail. The strip can be wound onto a pencil in the form of a spiral.
Black cats and cats are the witch's companions on all holidays; on Halloween you can't do without them. To create a cat that will stand on its own paws, cut out a silhouette with a fold from thick paper (watercolor, Whatman paper), paint it black. Draw a happy face for the cat, because he is a welcome guest at the Sabbath today!
For a children's party, guests can make caps. If there is no base of a suitable color, it can be painted. Twist a cone from whatman paper. Tape the edges. Then get creative and make the decor whatever your heart desires: ribbons, silhouettes of bats, seals, beads, feathers.
The same elements will make a wonderful garland. Make silhouettes from cardboard of the desired color, tie them with thread or ribbon. Complete the garland with tassels, fringe, and beads.
What would a holiday be without a carnival mask! You can literally create it from scrap materials. A small master class is given below.
- Paint a disposable cardboard plate in the desired color.
- Make decorative details from colored paper.
- Connect the mask elements using glue or double-sided tape.
- Glue a cardboard drinking straw to the side - this will be the handle.
- Who are you, mask?!
You can make small memorable and useful souvenirs for holiday guests. For example, bookmarks. Cut out two identical motifs (pumpkin, sugar skull, bat, etc.). Merge them together by placing a simple paper clip inside. Makes great crafts for Halloween.
Web and spiders
Our web and spider
A web of twigs and twine held together with hot glue. The spider's legs are made from poplar branches; they have interesting joints, similar to joints. And the body of the spider is made of hot glue. The legs were placed on the parchment and hot glue was poured in layers. They let each layer dry so that the spider would turn out plump.
View this post on Instagram
Thanks for the inspiration and idea @mom_.3._girls We also made such a wonderful cobweb and spider. The spider was also made from a glue gun and twigs. Just the other day we bought black and gold rods for a pistol. This is not just a toy, but a beautiful wall decor! Thanks again @mom_.3._girls. What do we play #daynotes_ play #crafts with children #what to play with a child #what to do with a child #crafts from twigs #hot glue
Publication from Elena Selivanova (@daynotes.ru) Oct 26, 2022 at 8:10 PDT
Web for decoration
If you want to decorate your home in an unusual way, this spider web “ornament” will suit you.
How to make a giant web?
Ever cut out snowflakes from napkins? This decor is made using the same principle, only from large black garbage bags. First, the seams of the bag are cut off. Then a square blank is made. It folds into a thin triangle. Squares and rectangles are cut out on it opposite each other.
Author of the master class
When a sufficient number of webs are ready, they can be stapled together and hung like curtains.
Paper web
I'll show you step by step how to construct everything:
- Fold two black sheets like an accordion.
- Fold one of them in half.
- On the side where the edges are, cut out rectangles.
- Make one, then exactly the same pattern and another sheet.
- Connect. Glue or sew.
Such a web can be decorated with a spider.
Author of the master class
Spiders
Let's look at simple and familiar things as materials for crafts. For example, plastic straws and plates can turn into spiders.
- Bend each tube at the bend (where it has an accordion).
- Cut the back of the tube at an angle of 45⁰.
- Glue the tube to the bottom of the plate. You need 4 tubes on one side and the other.
- The craft is ready. All that remains is to glue on the spider's eyes. You can buy them, or you can make them from cardboard or foamiran.
It is better to use black dishes. This way the products will look more colorful.
Author
Spider webs
Wrap yarn dipped in glue around the inflated balloon.
When the yarn dries, all we have to do is deflate the ball and decorate the craft with small spiders. Read more about this technique at the link - how to make a ball of cobweb from threads
From felt
Felt is such a pleasant and warm material that even the most frightening figures sewn from it turn out to be homely, cute and cozy.
For the little ones, you can make a pumpkin toy from felt, the face of which the baby can change independently. Here she is smiling, and here she is frowning. Make parts of the face: eyes, nose, mouth with different emotions. Prepare a whole set to make the game more varied and interesting.
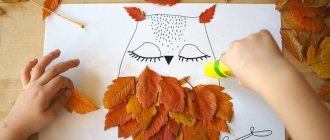
To decorate a child's room, make a felt wreath. A charming owlet with big eyes is unlikely to seriously frighten anyone, but it will definitely become a decoration! The abundance of small details will give it originality and make it a wonderful gift for little holiday guests.
Schoolchildren and teenagers will be happy to take part in creating Halloween crafts themselves. Sew with them whole families (or gangs) of monsters or bloodshot eyes. In this case, the veins are embroidered with red thread using the simplest stitch.
From threads and fabric
Thick threads and knitting yarn are also useful for Halloween crafts. The simplest toys for children - ghosts - are made from ordinary brushes. To make a tassel, wrap a piece of white yarn around a rectangle. You can use a cardboard children's book or cut out a rectangle of the desired size from thick cardboard. Glue the eyes and place a flag in the hands. Welcome to the holiday!
The leftover orange yarn will make a wonderful pumpkin. The ponytail can be made from thread or a chenille brush.
Knitters can knit pumpkins for the holiday from bright yarn. A simple plain glass cover with a movement of the hand turns... into a festive pumpkin, you just need to add a little imagination. Black eye sockets and grins can be embroidered or glued on. Fill cups with Halloween themed candy. By the way, such souvenirs can be presented to all guests of a “scary” party without exception.
Using the diagram below, you can sew a pillow pumpkin. The craft can be tiny or quite voluminous. For sewing, take felt or soft, tactilely pleasant flannel. To make the folds on the “peel” look natural, you can tint them with dry pastels or eye shadow.
Nasty lollipop spider
A black, furry, but irresistibly delicious lollipop with long legs - your child will make a great treat for his friends!
You will need:
- lollipops;
- chenille wire;
- toy eyes (can be beads or cut out of paper);
- glue gun;
- scissors.
Cut the wire into 4 equal parts; these will be the spider's legs.
In the middle, twist each wire around a lollipop stick; straighten and bend at the ends so that it looks like paws.
Glue the eyes with hot glue. By the way, several pairs will look original, because real spiders have 8 eyes!
Wreaths
A wreath is an exquisite interior decoration for Halloween. You can hang it not only in the children's room. It will look great and invite you to Halloween celebrations if you place it on your front door or window.
The material for wreaths can be very diverse:
- threads, twine, yarn;
- ribbons, lace;
- strips of fabric of a suitable color;
- felt;
- paper, cardboard;
- twigs and flowers (live and artificial);
- even tinsel.
By the way, a great idea is to make a wreath of green tinsel and decorate it according to the holiday: for the New Year with balls, in the fall with pumpkins and fruits, in the spring with flowers and ribbons.
You can buy the base for making a wreath at a craft store or use items you have on hand. For example, take a hanger, glue a semicircle of cardboard to the bottom and wrap it with orange ribbons.
The stores also offer a wide range of decorative elements suitable for Halloween celebrations:
- ready-made plastic orange fruits;
- figurines of bats, ghosts, etc.;
- cardboard silhouettes of spiders, black cats, haunted castles;
- felt elements.
Just use them in your crafts and your Halloween will be the most original and memorable.
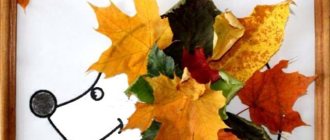
Cheerful witch, I would even say friendly in appearance
Let's make things as easy as possible!
Our product will be composed of several geometric shapes:
- Large triangle (black);
- Rectangles:
- 3 black (2 of them are the same size);
- Green thin small;
- 2 orange;
- Brown is thin and long;
- 3 white circles (one large, 2 small).
If you cut all that out, let's make a cheerful witch:
- Having stepped back some distance from the top, we fix the face (large circle).
- Cut the orange leaves into strips. Place it around the head (hair).
- Place a rectangle horizontally across the top of the face. These are the brims of the hat.
- Directly above the black one, glue the green rectangle overlapping;
- We place 2 rectangles (arms) almost vertically under the head. But you only need to fix these rectangles halfway.
- Glue a small circle (palm) to each of the rectangles at the bottom.
- All that remains is to make a broom. Cut the edge of the brown paper into small strips. Roll it into a tube (you can do this around a pencil).
We connect the edges. And we place it in the hands of the witch. - Draw the nose and mouth. But if you want, draw the eyes, but you can again make an applique of circles.
If you want, you can change something. For example, it would be interesting if it were not a broom in the hands of a sorceress, but a magic wand , etc.
Author MK
Movable toy
Do you want the toy to move? Then let's begin!
The main idea is that the witch should actually “fly” against the background of the moon.
- Paint the plastic plate dark gray. Leave only a large circle. Paint it yellow (or leave it white).
- We assemble a figure from a triangle (body), a circle (head), a small triangle (nose) and a rectangle (hat flap). Let's finish drawing the eye. Glue the hair from red yarn.
- Making a broom. We tie pieces of yarn to an ice cream stick.
- “Put” the figurine on a broom.
- We paint another stick dark gray. And glue it vertically to the figure from below.
- We make a horizontal slit in the plate (below the sun). We thread the stick through the slot.
If you move this wand, the witch will fly!
Author MK
From scrap materials
Crafts for Halloween can be made from any materials, if only you have the desire and a little time. For some masterpieces, the material is literally at hand.
A black ball plus pipe cleaner legs and ready-made eyes - and now a spider is looking at us.
A glass jar or a decorative cloche will make a unique interior craft. What will happen there, decide for yourself. You can use this idea and create a tree on which several ghosts can comfortably sit.
Make ghosts with your kids from ready-made cotton balls. Cut out a base from white cardboard and let your child glue the balls. Add eyes and be sure to smile - this is a good ghost!
A collection of Halloween monsters will be made from plastic bottles painted with acrylic paints. The paints dry very quickly and then do not stain, harmless to children. The nose and eyes can also be sculpted from plasticine.
Sometimes the shape of objects suggests what can be created from them. Citrus fruits - tangerines, oranges - turn into spiders, disposable cups into a garland of bells, a kitchen towel tube into a mummy.
Given time, you can create complex and individual compositions for the interior. The whole town, artfully cut out of thick cardboard, looks beautiful. Complete it with shiny toys, matching colors and garland.
Several framed ghosts will make up an entire picture gallery for Halloween 2022.
Halloween Ideas: Glowing Ghost Garland
You will need:
- a garland (preferably made from round light lanterns)
- cotton fabric
- white thread
- scissors
- black marker.
1. Cut the fabric into square pieces. In this example, the side of the square is 35 cm.
2. Fold each square into a triangle and cut off the tip. When you straighten out a square piece of fabric, there will be a hole in the middle.
3. Carefully remove the lanterns from the garland, put fabric on them so that the hole is on top, and insert them back. 4. Tie a thread at the bottom.
5. Use a marker to draw eyes and mouth.
Templates, diagrams and patterns
In this section you will find all the necessary stencils and patterns to create Halloween crafts. Create your own, unique works. A sense of humor is what will be most useful at the festival of evil spirits. Use it, joke and have fun to the fullest. We wish you a spooky... no wonderful Halloween!