There is very little time left until this unusual holiday. It's time to start making small souvenirs for yourself and your loved ones. Today we do not offer you the usual master class and diagrams. Instead, in our tutorial you will find interesting beaded crafts for Halloween that will help you make interesting themed items with your own hands.
Step-by-step master class
We take 155 cm of wire and put 28 beads on it. We pass the right end of the wire through 15 beads, tighten it well, make sure that the wires remain the same length. The first two rows turned out.
For the third, we string 17 beads onto the wire from either side. We pass the wire of the other side through these 17 beads and tighten it well.
In the fourth row we will add black beads. We string 8 orange, 5 black and 8 orange and, just like in the previous row, take the opposite tip of the wire, pass it through these beads, and tighten it well.
Then we continue to weave with a similar weave according to the pattern.
How to Make Halloween Decorations
In any case, you should start preparing for this holiday in advance. In order for the party to turn out in the desired style, you should first of all take care of the decor of the rooms in which it will take place. Unfortunately, there are very few places in Russia where you can buy decent decorations for this holiday.
It is best to order them online, although chain stores often add themed accessories to their assortment before the holiday. But you can do everything yourself. So, let's make our house scary beautiful for Halloween!
The most popular decorations were:
- Pumpkins with cut out eyes
- Webs and spiders
- Ghosts and witches
- The bats
- Walking zombies and mummies
- Brooms, magic wands and other belongings
- Black cats in all forms
- Candles, dry leaves and other attributes of autumn.
Beaded pumpkin weaving pattern
Explanation of the scheme:
- op or op-yh is orange;
- H or che-yh is black.
From the first to the third row, orange beads are woven. The number of beads is:
- First row - 13 beads.
- Second row - 15.
- Third row - 17.
From the fourth to the fourteenth rows it is woven with the addition of black beads. The number of beads is:
- Fourth row - 8 orange, 5 black, 8 orange.
- Fifth row – 7 ops, 9 blacks, 7 ops.
- Sixth row – 6 orange, 2 black, 7 orange, 2 black, 6 orange.
- Seventh row - 6 ops, 2 black, 9 ops, 2 black, 6 orange.
- Eighth row - 10 orange, 5 black, 10 orange.
- Ninth row – 11 ops, 3 blacks, 11 ops.
- Tenth row - 12 op, 1 black, 12 orange.
- Eleventh row – 5 orange, 5 black, 5 op, 5 black, 5 orange.
- Twelfth row - 5 ops, 5 blacks, 5 oranges, 5 blacks, 5 ops.
- Thirteenth row - 6 orange, 3 black, 7 orange, 3 black, 6 orange.
- Fourteenth row – 6 ops, 1 black, 9 orange, 1 black, 6 ops.
From the fifteenth to the seventeenth it is woven with orange beads. The number of beads in the rows is:
- Fifteenth row - 23.
- Sixteenth row - 21.
- Seventeenth row - 19.
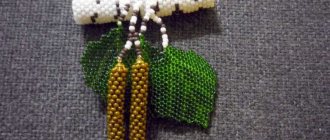
From the eighteenth row we use orange and green beads. The quantity is:
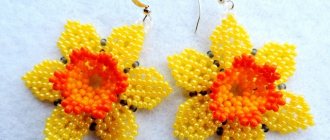
- Eighteenth row – 5 ops, 5 greens, 5 ops.
- Nineteenth row - 2 orange, 9 green, 2 orange.
- Twentieth row – 3 green.
- Twenty-first row - 4 green.
- Twenty-second row - 4 green.
- Twenty-third row - 2 green.
When everything is done, you need to secure the wire. We pass it between the rows, as if we were making stitches.
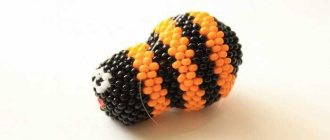
The remaining segments are trimmed. The beaded pumpkin is made!
This pumpkin, which can be made in just a few minutes, will be a wonderful souvenir for all participants in a scary Halloween party. The beaded pumpkin can be used as a keychain.
Pumpkin – Beads
Olga October 22, 2012 Brick stitch, Orange, Simple, Pumpkin, Halloween
Rubber band with a flower and a pumpkin Halloween is just around the corner and we all want to be bright, original and unique! Today, I suggest you make a wonderful decoration for your children - bright rubber bands! The inspiration for their creation was a trip to a store with sewing accessories, namely...
Read more →
biserok.org October 21, 2012 Orange, Simple, Pumpkin, Halloween
Pumpkin Basket A very cute DIY Halloween pumpkin. A cute souvenir that will definitely please not only you, but also the person who gets it. Basic technique: weaving balls or fullerene To work, you will need bi-cone faceted beads, which are indicated on ...
Read more →
biserok.org October 28, 2010 Cat, Spider, Simple, Pumpkin, Halloween
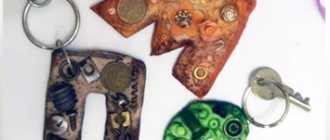
Flat figurines made of beads (Halloween) Weaving patterns for products: Cute keychains for the Halloween holiday. Here you will find diagrams of different pumpkins, ghosts, spiders, skeletons, skulls, black cats, bats and more. These keychains can serve as a nice souvenir or...
Read more →
biserok.org
“Spider” made from natural materials and plasticine
Master class by Anastasia Batina.
Creating with children is a pleasure! Little dreamers and entertainers with great enthusiasm transform ordinary objects into new amazing things. This also applies to natural materials, which can easily be found in the arsenal of young craftsmen. You can create very interesting crafts for Halloween by decorating a room or paraphernalia with them, which are necessary in creating a suitable atmosphere of darkness and horror. Try to make a realistic spider from a peach pit and plasticine, following the tips in this master class.
For the lesson, prepare:
- peach pit;
- plasticine;
- stacks and surface for modeling;
- an old toothbrush.
We create a spider figurine from natural materials and plasticine
Select a whole peach pit, rinse and dry. Take brown plasticine and roll a ball for the head.
Roll out two long rolls, divide each into four parts. The result should be eight identical limbs.
Connect the head with the body. Using a round stack, mark two notches for the large eyes. Using a cone-shaped stack, make two small holes for small eyes.
Roll out two pairs of eyes from black plasticine and stick them in place.
For large eyes, add two white highlights, for small eyes, one each.
Make a thin flagellum from red plasticine and stick the mouth on the insect's head.
Use a toothbrush to add roughness to the spider's legs.
Connect the limbs to the base of the figure, bend each one, as in the picture.
Make a roller out of brown plasticine, press it with your finger along the entire length. Using a cutting stick or toothpick, make cuts along the outer edge. Wrap around the junction of the head and body.
A figurine of a funny spider made from plasticine and natural materials is ready!
The spider turned out to be friendly and not scary at all. Therefore, those who do not like these arthropods will be able to take a fresh look at their appearance. And to decorate the festive space, you can make several spiders with different facial expressions and place them on an impromptu cobweb, pumpkins or tables with treats.
Weave, weave, web, big and small
Of course, without the web, a horror festival would not be possible. It can be cut out of black polyethylene and hung in all corners of the room. Or you can go a more practical and aesthetic way - paint and decorate wooden hangers - let guests, even on the threshold of the house, take off their outerwear, immerse themselves in the appropriate atmosphere.
If there is a web, there must be spiders. They can be cut out of paper and “placed” in a lampshade by gluing it to the inside. Or, for example, make spiders from egg trays and chenille wire.
Watch a step-by-step master class on how to make them yourself.
Here they are - our handsome spiders!
How to make a spider from chestnuts
The next master class is how to make spiders from chestnuts.
Ghosts and witches for Halloween
As far as ghosts and witches go, this is just a classic. Ghosts can be either simple, made from a sheet, or modern mechanical devices that independently move around the room and frighten guests. It all depends on the imagination and budget of the owners.
How to make a ghost from gauze
Making such a ghost is very simple:
- dilute flour with water to the consistency of sour cream;
- prepare a piece of gauze 10-15 cm wide;
- dip it in water with flour and cover the glass with the ball;
- leave to dry overnight;
- decorate the finished ghost, for example, glue on eyes.
Witches and witches are the most common characters of Halloween. They can also be made into a decorative feature on the walls or as a stand-alone display piece sitting in a chair. They can be both intimidating and playful. The main thing here is not to overdo it and not forget about the hat.
More interesting ideas to add to your collection
Paper Witch
How to make a witch out of paper - see a detailed step-by-step master class here.
DIY witch for interior decoration for Halloween
This witch is made from scrap materials - a plastic bottle, garbage bags and ribbons. The special thing about this DIY craft is that it can be used on Halloween to decorate your garden and yard.