How to make a bat out of paper
The method for making a paper bat depends on the material available. So, you can use fairly thick cardboard, thin paper for small origami and thicker paper for large figures. For quick results, you can use ready-made templates. They are usually cut out when you need to make many identical shapes, for example, a garland or similar type of decoration. More pleasure from the process is promised by complex volumetric origami and crafts from other improvised means using paper elements. When making a paper bat, you need to take into account that it is usually placed upside down, as if it were hanging upside down on a branch.
Required Tools
Usually, to make a Halloween bat out of paper or cardboard, you need to prepare a standard set of tools:
- main material (paper or cardboard);
- double-sided tape, stapler, glue for fastening parts of the craft;
- colored paper for the eyes, mouth and paws of the mouse;
- scissors, ruler, simple pencil for marks.
Ready-made Halloween templates
Working according to templates and stencils, you can cut out both simple small silhouettes and a large picture, for example, to decorate a window or door with glazing. In addition, the stencil will come in handy if you need to paint some kind of craft. Depending on the purpose, he selects paper. A figure cut out according to a ready-made template will look more voluminous if you make several folds: in the middle of the body and at the corners of the wings.
For garlands and similar interior decorations, use double-sided thick paper or thin cardboard, and usually stick figures cut out of thin paper onto the glass. Thick cardboard is used for stencils.
Colorful templates deserve special attention. Some of them, after printing on a color printer and cutting out the outline, simply turn out to be flat figures. But there are also those that are a diagram of several parts that need to be bent and glued in a certain way. The result is a voluminous craft. If you print it in black and white, contrary to the instructions, you can color the bat to your liking.
From a toilet paper roll
You can actually use a fairly thick paper towel or napkin roll. If there are not enough of them in quantity, glue together a similar cylinder of thin cardboard. The beauty of this craft is that it is done quickly and turns out quite cute.
To work you need:
- gouache black or dark brown;
- paper or cardboard of the same color;
- plastic eyes or colored paper for eyes;
- black yarn, laces or chenille wire for paws.
You need to paint the sleeve with gouache, cut out a pair of wings from paper, attach them to the body of the mouse, then glue on the eyes and ears. You can draw a smile on a brown craft with a black marker, and on a black one with white corrector, gouache or slightly diluted watercolor. The desired expression of the muzzle can be created using parts made of white paper. Narrow triangles can become villainously narrowed eyes, and a couple more of the same ones can become sharp fangs, laconic and ominous.
You can stop here and put the craft on a shelf or window sill, or you can make holes with scissors or a hole punch and add the finishing touch - paws made of threads, with which the mouse holds onto dry branches placed in a vase or a stretched rope. If you add barely noticeable pins to them, mice will be able to fit on thick curtains.
In another type of craft, bat ears are made by bending the top of the bushings.
It is not necessary to use one sleeve for one mouse. You can cut it into two halves. Then a wide grin will look good on the muzzle, and the wings will need to be smaller. Another way to make wings for a body from a sleeve is an accordion. You just need to cut out a wide semicircle from paper and carefully fold it into an accordion. The smaller the folds, the more impressive the wings will look.
Way
A voluminous bat made of paper using the origami technique is not difficult. You will need:
- black paper;
- gouache, acrylic paint or plastic eyes;
- scissors.
First, you need to make the necessary folds on the black square.
- By first connecting opposite corners, then the folds form a cross. Then fold and bend the sides of the square towards each other.
- Then you need to bend the left and right sides of the square inward as in the picture.
- Fold the parts of the mouse body.
- Bend the corner.
- Cut where indicated by the arrows.
- Decorate the eyes.
Way
You can easily make a charming bat out of paper, which will be not only beautiful, but also useful.
- Take a ready-made one or cut it out of double-sided colored paper into a square with sides of about 20 cm.
- The first addition should be from one corner to the other to form an equilateral triangle, the corner should point down.
- Fold the top edge about 1 cm, making sure the line is straight.
- Bend the side parts towards the center so that you end up with a pentagon, iron the folds with force.
- Unbend them, make a fold next to the fold. You should get a pentagonal base - the body of a bat - and bent, pointed wings.
- Turn the workpiece over so that the wings are behind.
- Cut an arc at the top of the head so that pointed ears remain on it.
- All that remains is to glue the eyes to the muzzle. Add fangs if desired.
- Also, if you have a black marker or gel pen, you can mark the membranes on the wings.
Since the craft is folded in 2 layers, it can easily be used as a bookmark. And these little mice can be attached to the corners of holiday cards, photographs or stands.
Step-by-step instructions for cutting out a bat from paper
A charming bat can decorate plants on the windowsill if you secure it with a stick, which you then stick into the ground.
To make this craft you will need:
- double-sided black thick paper or thin cardboard;
- some white and red paper (for the mouth, eyes and teeth);
- if desired, you can buy plastic eyes;
- wooden stick;
- glue stick;
- ruler;
- a compass or round object that can be circled with a diameter of about 20 cm.
Procedure:
- Cut out two small circles from paper, keeping in mind that the mouse's body is only half a circle.
- Cut the circles in half, one of the four semicircles can be removed to the side, it is extra.
- Fold one of the semicircles as if forming a bag.
- The protruding corners are the ears of the bat, they need to be aligned.
- Draw a wing on one of the two remaining semicircles. Attach another semicircle to the back and cut out the wings.
- Cut out eyes and teeth for the mouse's muzzle. You can convey any expression to the eyes - put the black pupils a little “in a bunch” or squinting in different directions, and also make them of different sizes. Two fangs can also be either symmetrical or different in size.
- Wings are glued to the back of the head.
- Attach a stick to the mouse.
It can be replaced with a pin or loop to hang it from something.
Made from felt and fur
A soft and fluffy bat, made by yourself - you can pet it as much as you like!
You will need:
- black felt
- black artificial fur fabric;
- scissors;
- hot glue.
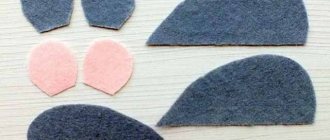
We collect mice. To do this, cut out a shape from felt 8.5 by 11 cm with inverted triangles - these are legs - and jagged wings on the sides, as in the picture. For convenience, fold a piece of felt in half, mark half the outline with chalk and cut it in two layers.
The body is made from a piece of fur 3 by 4 cm, slightly to the side of the middle it is intercepted with an elastic band. If you have a torn fur pompom lying around from winter clothes, you can use that too.
The body is placed in the middle of the felt, tacked on with a drop of glue, and the wings are wrapped and secured with hot glue. This creates a sleeping bat that can be hung upside down.
The original solution would be to hang it...by a branch! To do this, choose a more picturesque branch on the street and paint it with black spray paint (optional).
The mice are attached with glue, and the branch can be hung from the chandelier using a fishing line. If there is enthusiasm, the branch is additionally decorated with a web of bandage and homemade spiders. To make the web look more believable, the bandage should be frayed and pulled in different directions.
The mice turned out to be faceless. On the crafts below, faces are drawn, the emotions of which can be very diverse.
Paper Bats: Halloween Crafts
In recent years, the holiday of All Saints has become increasingly popular in Russia. People decorate their homes, prepare special treats, and throw parties. For budget-friendly Halloween decor, you can use crafts in the shape of bats.
Cardboard bats
The fastest way to give a room a festive atmosphere is to create a composition on the wall from a flock of winged animals:
- Prepare 10-20 sheets of black cardboard or thick paper and fold them in half. On each sheet, draw halves of bats or print ready-made templates.
- Cut out the silhouettes along the contour and unfold the figures. Attach to the wall using single-sided tape.
A flock of “vampires” on the wallpaper
If you don’t want to spoil the wallpaper, you can thread threads of different lengths through the mouse figures and hang them on the chandelier. The result is an unusual garland that is very easy to remove after the end of the holiday.
Original garland
To implement another idea, you will need branches and a vase (a regular jar will also work):
- Cover the paper figures with glitter: nail gel, rubbing or rhinestones.
- Prepare dry branches in advance; they should not have leaves. Using hot glue, attach the figures to the branches and place the composition in a vase.
Unusual composition in a vase
How to make candy packaging
Mouse template
Sweets wrapped in the arms of a cute monster will delight both children and adults:
- Print out the template presented above and transfer it to black paper.
- Bend the mouse in half and make a couple of cuts on the body.
- Decorate the face with white markers or watercolors.
You may be interested in: Crunchy slime recipe for making your own at home
Step-by-step production of packaging for candies
Note! The bag of candies or nuts should be threaded through the central hole. You can write the name of the recipient in the middle, then the gift will become even nicer.
Volumetric bats for Halloween
Sequencing:
- Cut 4 strips of black paper 28 cm long and 2 cm wide for 1 figure.
- Lay out the strips in the shape of a snowflake and fasten them in the center. Form into a ball by lifting the strips up. Glue them in the center.
- Make wings out of paper and attach to the balls. Add eyes and a smile. The craft is ready.
Volume mice
Bats - do-it-yourself soft toys | 33 Crafts
The toys that a mother sews for her child with her own hands remain in the memory forever. As a rule, they are the ones who become the most beloved. Making a pet for your baby is not at all as difficult as it might seem at first glance. We offer you the option of a homemade toy that you can make in just a few minutes. We will make cute, original and very nice animals - bats.
How to sew a soft toy?
First, let's make a pattern. To do this, you need to carefully look at the photographs and transfer all the details to the fabric. Or you can simply print a stencil, cut out all the details on paper, then attach it to the fabric and trace it.
Use thicker material to make the craft durable. Also choose the size of the toy yourself. You can make many small colored mice, or you can make one big one. Sew all the pieces together from the wrong side, leaving a small hole. Now turn the product right side out. You can stuff the toy with padding polyester, or you can leave it flat. Carefully sew up the hole.
All that’s left to do is sew on the bat’s eyes, teeth, bow and whatever else you want!
Bats are ready! Your child will definitely appreciate these cute animals!
33-podelki.ru
Paper figurine of a bat step by step
A very simple and quick technique that you can do together with your child.
Required accessories:
- A square piece of dark-colored paper.
- Scissors.
- Paints, brushes, water.
The manufacturing sequence is shown in the pictures.
You might be interested in Dressing a Barbie doll yourself - beautiful dresses, suits
Take a piece of paper and make several folds: on 2 sides diagonally and on 2 sides
Unfold the paper and bend it to class=”aligncenter” width=”600″ height=”470″[/img] Bend the wings inward and form the body. Bend the nose and make small cuts
Draw eyes, nose and fangs
Halloween outfits for girls at home
Currently, the costumes of Marilyn Monroe and Lady Gaga are becoming increasingly popular. The reason for this is the ease of making the costume: you only need a wig, bright clothes and catchy makeup. And studying the mannerisms and movements of the idol will give the image more extravagance. It is worth noting that the costumes of these particular heroines are in particular demand among female representatives.
Marilyn Monroe image
Lady Gaga image
Bride of Frankenstein
For women, the image of Frankenstein's bride, a vampire, is ideal. The main thing in these images is a pale complexion, bright eyes and lips. The look can be completed with false lips and colored lenses in red shades. The image of a woman should not only be intimidating, but also sexy.
Halloween cat image
Modern women, in addition to the images of idols, love to try on the image of Catwoman.
Combined image - Alice + Cat
A voodoo doll
Clown image
Superheroes
Origami bat
An origami bat will be a great activity to do with children in kindergarten or primary school. To create a craft, you will need a minimum of materials: a square sheet of black paper, beads or eye paint, scissors, a ruler.
The procedure for creating an origami mouse:
- Bend the sheet of paper twice, marking the center lines diagonally and straighten it.
- Fold in the center to form a rectangle. Unfold and fold on the other side. Using this method, the center lines will be outlined again.
- Fold along diagonal lines with a frog, so that the corners look inward.
- From one edge, bend the long corners inward toward the center.
- Make cuts on the sides at the top. Bend the central corner down, it will become a spout. The corners of the cuts will form flirty ears.
- Cut a wavy edge along the edge of the wings. Attach beads or draw eyes with paints. The craft is ready.
In order for the folds to be even, they must be worked out by running the blunt end of the scissors along a ruler. If you bend the paper after this treatment, you can avoid creases. In professional printing, this operation is called folding.
Other craft options using the origami technique:
How to make a Batman costume
Becoming Batman, as in Marvel films and comics, is quite simple. In addition, this outfit can be worn for any occasion, such as Halloween or other costume events. The costume consists of two parts: a mask and a cloak . Black tights and badlon can be found in everyone's wardrobe. Let's look at making a costume step by step.
- It’s better to make a cape using a black umbrella , which you don’t mind throwing away. You need to remove the handle and knitting needles from it and cut off the top part. The hole should be “under the neck”.
- Next, we make a cut at the neckline along the length of the zipper. Baste the zipper and stitch it. Then you need to trim the neckline with bias tape.
- The hat can be sewn based on the pattern of any hood.
Advice. If you have difficulties with sewing, you can make the task easier by purchasing a hood. The hood will be much easier to adjust to the required parameters.
- We cut out a mask . It is made of cardboard and is no different from other masquerade masks.
- The ears can be made from thick black cardboard or the cardboard can be painted. If the cardboard is not so dense, then you can make them in several layers.
- We twist the mask into a tube so that it has a curved shape. We sew or glue the ears to the sides of the mask and attach an elastic band.
- We prime the mask with a water-based composition. We cover it with black gouache paint and then varnish. The mask will dry instantly if you use a hair dryer . This way it won't lose its curve.
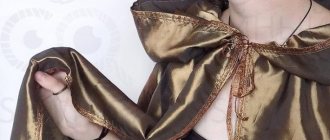
- We make a Batman belt, a mandatory element of the costume that allows you to quickly recognize the character. The belt is made of golden fabric . A rectangle is cut out and stitched. Then an elastic band is sewn to it. The belt can also be decorated with appliqué using sequins or black beads.
IMPORTANT! If you don’t have a black T-shirt, you can quickly sew one by making a pattern from the finished product. Simply pin the t-shirt to the fabric, then trace and cut it out.
Step-by-step instructions for creating a paper bat
For origami you will need a square sheet of black double-sided paper. Optimal size: 15x15 cm.
The sheet must be folded diagonally, bend the resulting triangle in half and bring the corners to the center along the fold line.
The first stage of creating origami
Bend the outer corners of the diamond, turn the figure over and fold it in half. Open the triangle by bending the tip to the other side. Turn the origami to the other side.
Second phase
Fold the triangle in half and open the corners like an accordion. The craft is ready.
Final stage
Halloween outfits for guys at home
Guys give more preference to ghoul and zombie costumes.
Zombie
Dracula
They also like to try on the image of Count Dracula.
Darth Vader image
In addition, at the festival you can meet more than one Darth Vader and other representatives of the films “Star Wars” and “Transformers”.
The image of a hatmaker
The costume of the hatmaker and the cat from “Alice in Wonderland” is in particular demand.
Harry Potter
The image of the hero from the book “Harry Potter” has also recently become increasingly popular.
Batman and Spiderman image
They often dress up as Batman and Spider-Man
Joker
Image from the movie "The Ring"
They also try on the image from the horror films “The Ring”.
DIY bat for Halloween: what to make it from?
A bat for Halloween is like snowflakes for New Year. It creates a festive atmosphere, gives a feeling of mystery, mysticism and joy. Making a bat with your own hands is not at all difficult. Use the following supplies and materials for this cool Halloween craft:
- colored paper;
- cardboard;
- paper towel and toilet paper rolls;
- clothespins;
- wine corks;
- air balloons;
- tulle;
- felt;
- plastic plates and cups;
- thread pompoms;
- pumpkin
Next, we will tell you how to make a bat with your own hands to create a mystical atmosphere for Halloween.
How to Decorate Your Home for Halloween
Bats can be used to decorate almost any surface in the home, classrooms or halls for Halloween:
- paper garlands can be hung from the ceiling;
- under the ceiling you can place hanging mice or mobiles made from them;
- These items can be used to create candle holders for LED candles, but not for open flames;
- bats will find their place as decoration in compositions with pumpkins and other characteristic objects;
- It would be appropriate to decorate a window or mirror with paper products;
- a large number of black mice on magnets can be placed on white refrigerators;
- small mice can be used to decorate stationery items;
- a huge mouse will look original on the front door as decoration.
In addition to interior decor, these items can also be used as accessories for a carnival costume:
- brooches;
- hair clip;
- decorations for headbands or hair bands;
- jewelry for the bag.
There are a lot of ideas on where you can attach a bat for Halloween, and your imagination can be limitless.
Snack bar design
The Halloween table should also be decorated. Instead of regular dishes, you can use themed ones. For example, bat-shaped snack jars.
Treat jars
You will need:
- bushings of different sizes;
- black paper;
- scissors, glue;
- plastic eyes.
First you need to cover the bushings with paper. Then cut out the wings according to the template or according to your own sketches and attach to the sleeve. On the front side you need to make big eyes. If there are no special eyes, you can cut them out of paper. Fill the jars with cookies, marmalade, and chips.
Such dishes will become the center of the table and attract the attention of guests.
You can also decorate drink bottles with bats.
Halloween Bottle Decor
From black ribbon
A themed accessory for those occasions when it is not possible to dress in a full costume, but it can also be used as an addition to it.
To make this you will need:
- the black tape is wider for a larger wingspan;
- hot glue;
- hairpin;
- scissors.
Cut out a symmetrical outline of the wings according to the template.
Connect in the middle; grab it across with a narrow ribbon into a butterfly, secure the ribbon at the back with hot glue and glue on a hairpin.
Now the mouse can be pinned to your hair or to a hairband.
In addition to satin ribbons, artificial leather is suitable, reminiscent of the real leathery membranes of chiropteran animals.
From a toilet paper roll
A roll of toilet paper will produce a colorful Halloween animal that can be used as a stand for anything: stationery, candy, snacks, sweets or typical holiday colors.
For work you will need materials:
- toilet paper rolls;
- black paper of different textures;
- scissors;
- glue;
- eye materials.
Procedure for creating a product:
- Cut a rectangle to the size of the sleeve and paste it over the sleeve. This item can also be painted. You can also make sleeves from black, thick paper. Then you will get mice of different sizes.
- Using the template, cut out the wings and ears. Glue the parts to the sleeve. Wings can also be made from paper accordions, then the mouse will look even more terrifying.
- Make eyes for a cave dweller. The craft can be used as a dish or stand.
From clothespins
If desired, it is possible to make home decor even using clothespins.
Materials:
- clothespins;
- PVA glue;
- scissors;
- black marker;
- eyes;
- black cardboard.
First you need to paint over a wooden clothespin with a black marker. For a small child this is not so easy, you will have to try!
Cut out the head and wings from cardboard, glue on the eyes.
Just put the wings and head on a clothespin!
This craft is suitable for young children.
How to make a paper bat that flies
People who have experience in the origami technique can definitely cope with creating a movable figure:
- Prepare a sheet of colored paper and fold it in half. Unfold again, place on the long edge and fold the corners towards the center.
- You should end up with a triangle with a protruding piece of paper. The corners of this segment must be bent so that the figure represents a pentagon.
- Fold the figure along the fold line. Bend the corner of the triangle inward. Turn the figure over and fold it in half, bending only the center.
- Bring the wings to the center, make an accordion on each wing.
- Turn the craft over, bend the wings towards the center and form a body. The mouse with movable limbs is ready.
Scheme for making a figurine with movable limbs Having shown your imagination and studied the recommendations of experienced needlewomen, it will not be difficult to create a wide variety of bat figurines from paper. They can be used for different purposes, but the main advantage is that fun crafts can provide a lot of positive emotions for both children and adults.
You might be interested in this Knitted tilde toys - a selection of knitting patterns
Useful tips for making costumes
Original prints
As an interesting attribute of a bat costume, you can use thick black tights . You can make prints on them yourself . For example, in the form of black cats or bats themselves. To print on tights you will need the following materials.
- White adhesive tape.
- Acrylic paint.
- PVA glue.
- White paper for printing.
- Black marker.
With these tools you can quickly make any print on tights (both transparent and plain) or clothes. If you are using sheer tights, a marker in a contrasting color will do.
You need to print or make a stencil yourself and trace it along the contour. Don't forget to put some paper underneath so you don't get the marker on your feet.
Using the same method, you can apply a design to thick, plain tights. But instead of a marker, it is better to use a piece of chalk, which is then painted over with acrylic paints.