Happiness Tree Ideas
There are a lot of ideas for creating topiary. It can be made from sea shells, coffee beans, aromatic herbs, spices and even food. One of the most attractive, affordable crafts is topiary made from autumn leaves.
However, each person who creates his own work receives something unique as a result. The tree of happiness does not require care.
It will delight the eyes of residents and guests of the house for a long time, and also give everyone positive emotions. You can make an autumn topiary without any problems, and besides, the budget for the craft is minimal.
Material for the crown of the tree of happiness
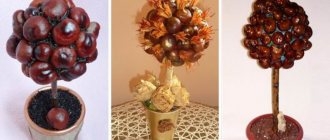
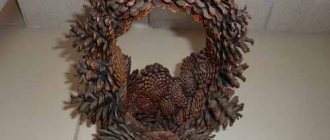
It was noted above that any natural materials can be used. A very beautiful autumn topiary is made from acorns, pine cones, nuts, bright leaves, flowers, chestnuts, berries, some fruits and vegetables. Cones collected in the forest or park must first be washed and dried. After contact with water they close, but soon open again if they are placed near the battery. For topiary, choose cones of approximately the same size.
The most commonly used fruit is small apples. They are attached to the base using wooden kebab skewers. Such autumn topiaries are short-lived, as apples quickly deteriorate. You can make the craft for a holiday or a kindergarten party, and then simply eat the elements of the crown. You can use not only apples, but also other fruits. When forming a crown from them, you need to insert green leaves between them.
Decorative pumpkins are the most commonly used vegetable for topiary. To keep them longer, they are glued to the base without disturbing the integrity of the peel.
Preparation of materials
Let's consider a master class on how to make topiary from leaves with your own hands, and we will study each step step by step.
First you need to think about what the product will look like. It is best to draw a sketch on paper. Consider the size of the craft. Topiaries can be made either miniature in height (about the size of a mug) or large (about half a meter and above). Once the idea for the craft is on paper, you can begin the preparatory work. It consists of choosing a workplace and collecting materials.
Necessary materials:
- glue;
- duct tape;
- scissors;
- plaster or stones;
- a piece of foam plastic or newspaper;
- napkins;
- a beautiful pot or bucket;
- stick or wire;
- satin ribbon, braid, twine.
If it’s autumn, then some of the materials for the tree can be collected right on the street . Here everything depends on the author’s imagination. Typically, autumn compositions are made from leaves, moss, bark, artificial or natural flowers. Pine cones, rowan berries, acorns, chestnuts, and blades of grass look very beautiful on the wish tree.
Idea No. 4. From vegetables
The “Autumn Tree” craft can be made not only from inedible, but also from edible products. For example, from vegetables.
1) You should take a long cucumber and cut off 2 ends of it, on one of which it should be placed so that it stands vertically. The cucumber will serve as the trunk for the future tree. (You can paint it brown if you wish.)
2) In the upper part of the trunk, five centimeters down, you need to make slits into which “leaves” will soon be inserted.
3) Any greenery will do as leaves. It is desirable that it be dill, basil and parsley. Basil is dark in color, but parsley and dill are not. Therefore, it is advisable to take greens that have already had time to wilt a little, so that the color is not so rich and expressive.
4) All this greenery needs to be inserted into the slots so that the crown of the tree is formed. If it looks like the tree's "leaves" are too sparse, then more slits need to be made. But you shouldn’t insert greenery too often either, because this is an autumn tree, not a summer one.
5) At the end, you should peel one potato and place the dirty skin at the base of the “trunk”. This will symbolize the already fallen leaves. Between them you can insert small mushrooms, which will definitely make it clear that the tree is autumn.
Master class on making crafts
To make the work unique, you should familiarize yourself with the autumn topiary master class. The main thing is to understand the sequence of the process, and for the rest the master can rely on his feelings and imagination.
In general, creating a craft can take from several hours to several days. The nuance is that all the elements of the wood dry well before decorating and are firmly secured.
So, do-it-yourself autumn topiary, master class:
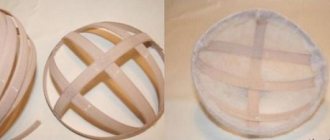
1.The base is usually made in the form of a ball. This part of the craft is the main one; it acts as the crown of a tree.
You can make the base in several simple ways: using newspapers or polystyrene foam, which can be purchased at a specialized craft store. A square is cut out of it, which is then turned into a ball. In turn, it is wrapped with paper and thread to make it easier to glue leaves and other objects to it. Next, you need to make a hole in it for the barrel.
If foam plastic is not at hand, then the ball is rolled from crumpled newspapers, which are wrapped in layers with thread or tape. Then torn napkins are glued onto the base using glue. Ideally, the ball should be dense and neat. The size of the base depends on the wishes of the author. Next, the workpiece needs to be allowed to dry thoroughly. It is best to let the base sit for a day or night.
2. Barrel. The base will be attached to it. You can make it from a strong stick, or you can use wire, which needs to be twisted into a rope, wrapped with satin ribbons or twine for beauty.
The branch should be decorated with stain, braid or twine. The trunk can be created in any shape; it does not have to be straight. If it is curved, the decorative composition will look more original. However, the choice of shape depends on the imagination of the person doing the needlework.
3. A stand or vase containing a tree. It must be sustainable. Stones and sand are placed in a beautiful flower pot, box or other container. If the pot is already heavy, then it can be filled with construction foam into which a tree trunk is inserted.
Topiary of fresh autumn flowers
This DIY autumn craft made from fresh flowers will be an excellent gift for any occasion. A product made from natural materials can be given as a gift to a teacher, friends or relatives. An original bouquet simply cannot fail to turn out worthy and beautiful. Its creation requires a minimum of time and financial costs. With the correct formation of the crown and base, live chrysanthemums will retain moisture and freshness for a long time.
Materials and tools
To make this craft you will need a small flower pot, floral sponges, stabilized moss, fresh chrysanthemum flowers, plant stems, and tree branches. To fix the materials you will need the following tools:
- Gerbera wire;
- Paper clips and staples;
- Stretch film;
- Anchor tape for bouquets;
- Elastic ribbon for creativity;
- Scissors, hot glue, thread.
Creating a topiary
First of all, you need to prepare all the initial elements. We make the trunk from gerbera wire, add branches and stems, and wrap everything with special moisture-permeable tape. If the crown is small, you can get by with one thin stick. If desired, decorate it with green ribbon.
The base can be quickly made from a floral sponge. We lay a piece of polyethylene at the bottom of the pot and lay the material in the form of a hemisphere with the slide up. We insert the barrel into it and fix the place of interaction with a special tape.
We will also make a spherical base for the crown from a floral sponge. Place the piaflor in a container of water and wait until it is completely saturated. We carefully form a circle and insert the trunk into it. To retain moisture for as long as possible, wrap the resulting base tightly with stretch film.
It is better not to prepare chrysanthemums for crafts in advance. When the entire holding structure is ready, cut off the caps at an angle of 45 degrees and place them at the base of the crown. To make it easier to transfer living stems, you can make small holes in the sponge with a toothpick. It is better to distribute flowers taking into account their size, this way you can avoid the formation of voids. At the final stage, we line the surface of the pot with stabilized moss and decorate the pot to your taste.
When immersing flowers in the crown base, at least 3 cm should remain between the chrysanthemum cap and the sponge ball. Otherwise, the living topiary will quickly lose its freshness.
Original ideas for topiary design
An excellent solution is to decorate the topiary with maple leaves. You can make them with your own hands from colored paper, fabric, foamiran. Living material collected from the street works well. The leaves can be attached to the base entirely, or you can create flowers from them. The roses turn out very beautiful. You can easily make them from maple leaves with your own hands in a few minutes.
For one flower, 10-12 beautiful fallen leaves of different colors are suitable. They should not be dry. The middle of the craft is formed from the first sheet. It is folded with the front side across in half so that its leg touches the top. Then the sheet is rolled into a roll. The core is ready.
Now you need to wrap other leaves in layers around the core. They should also be folded right side in half. In this case, the core roll is located below the new bent leaf. The next one has the edge of the bend slightly bent and wrapped around the core. It turns out as if the middle was dressed in a coat with a collar.
Then the next sheet is taken. Folds in half. The edge of the bend is bending. The leaf wraps around the core in the same way as the first element placed on it. Thus, a rose bud is formed.
Such flowers are attached with glue to the base of the topiary. To do this, holes are made in the ball with a nail, which are filled with glue, and roses are inserted into them. You can do the same with the following materials:
- leaves of maple and other trees;
- cones;
- bunches of rowan;
- acorns;
- artificial flowers;
- beads;
- ribbons;
- lace;
- dry blades of grass.
Autumn is a wonderful time when there is a huge amount of living material to choose from in nature. Moreover, it is at this time that the most vivid and memorable works of authorship are produced.
Composite ball
This is the next stage of work. Some needlewomen use a foam sphere. It can be purchased at the store. These balls are not very expensive. The foam base for topiary is convenient because the crown elements can simply be stuck into it. In addition, it has a perfectly correct shape.
If you can't purchase a foam ball, there's nothing wrong with that. Many needlewomen make the basis for topiary on their own. Various materials are suitable for this purpose:
- old newspapers;
- a ball of yarn;
- any filling for soft toys (cotton wool, foam rubber, padding polyester);
- fabric scraps.
You also need to have thread and tape on hand. From the selected material you need to form a dense ball of the desired size. Then you should wrap it with threads and secure it with tape. The basis for the autumn topiary is ready.
Useful tips
Experienced craftsmen who create original crafts with their own hands have their own secrets. Their recommendations are:
- Before work you need to prepare. To do this, a sketch is created on paper, all the necessary elements and materials are purchased and collected.
- It is better to choose a place in the house for topiary where it can be least damaged. No need to put the craft in the kitchen. There the crown can get dirty and wet with water. The craft should be protected from direct sunlight, which will negatively affect the appearance of the product. If possible, the topiary is hidden under glass. This way it will last a long time and retain its original appearance.
- Caring for a wish tree is not difficult. It is necessary to carefully remove dust in a timely manner. This is done using a vacuum cleaner, hair dryer, or rag.
- If topiary is being prepared as a gift, then it is worth starting its production as early as possible. It is best to do it a few weeks before the expected event.
Topiary “Gifts of Autumn”: how to care
Having given yourself or your loved ones topiary the gifts of autumn, it is important to understand that the product will need, albeit the simplest, but still, care. From time to time, dust may accumulate on the surfaces of the material, which will still have to be removed.
You can do this in several ways:
- With a vacuum cleaner.
- Hairdryer with cold blow function.
- With a rag.
The first option is the most preferable, but cleaning must be done very carefully so as not to damage the fragile elements with your own hands. A hairdryer turned on in cold mode also perfectly removes dirt. However, it can only remove external contaminants.