Homemade electric plow for the garden
A homemade winch is designed to facilitate heavy manual labor when cultivating the soil and can replace any walk-behind tractor or cultivator.
With its help, you can plow the soil under the beds, plant, harrow, hill, dig up potatoes. The agricultural winch allows you to carry out a full cycle of soil cultivation when growing potatoes. The unit helps preserve and maintain soil fertility, which leads to maximum yield.
In the distant 90s, a plowing winch was created based on the engine from the Ural, Druzhba chainsaw, and it still serves faithfully to this day. Changes and improvements concerned mainly the plow. The video below clearly shows these changes. See winch drawings here. Gradually the idea came to create an electric analogue. And this is what happened, see the video and photos below.
Electric plowing winch
The motor is three-phase and connected to a single-phase 220 V network. This power is enough for plowing, hilling, and digging up potatoes. If you buy a motor for a single-phase network, you can plow virgin soil. And in my modification for plowing virgin soil, I used a block that reduces the plowing speed by half, but also increases the effort.
The principle of working with an agricultural winch is to sequentially plow the land with the plow returning to the beginning of the furrow. It is advisable to carry out the work together, but if necessary, it is possible to do it alone. In this case, it is possible to apply fertilizer (humus) directly into the furrow.
Even the turf (virgin soil) can be plowed. At first, a classic homemade plow with handles was used, which required basic plowman skills and weighed a couple of kilograms more than the modernized one.
Electric and petrol winch
(the wheels on the winch are used only for transportation around the site)
Parts that need to be turned on a lathe or purchased at a motorcycle parts store.
Source
Homemade electric plow
Engine The most suitable options are those with a power of 1.5-2.5 kW and a speed of 1500 rpm. It is important to choose the right parameters, because if you use an engine of insufficient power, you will have to move the plow at a very low speed or it will not cut deeply into the ground. If the engine is heavy-duty, the winch will be too heavy, it will be difficult to move, and energy costs will be high. If desired, you can install not an electric motor, but a gasoline one (for example, from a motor cultivator). Gearbox The best option is a gearbox with a suitable output shaft speed. But if there is no factory gearbox, then you can select gears or use a worm gear consisting of one helical wheel (gear) and one worm (screw). If the gear ratio is not large enough, then it is increased by a belt drive between the worm and the engine. A belt drive is also made to connect the gearbox to the engine or in case the gear ratio of the factory gearbox is not suitable. The optimal gear ratio is calculated using the formula: i = (3.14 x D x n)/V where i is the gear ratio; D is the diameter of the winch drum on which the cable is wound, in m; n — engine speed in rpm; V is the speed of the plow in m/min. The optimal plow speed is about 4 kilometers per hour. If we take the drum diameter of 15 cm and bring all the values into the required dimension and substitute them into the formula, then: i= (3.14 • 0.15 • 1500)/67 = 10.5 In this example, the gear ratio is not very large, which means you can use not just worm and gear drives.
Coil. It is generally accepted that the cable winding reel is the simplest design element, but many parameters depend on its diameter. The smaller the diameter, the slower the electric plow will move. It happens that the gear ratio is determined incorrectly and the plow speed is too high. In this case, the diameter of the coil is reduced - if you reduce this value by 2 times, then the speed will decrease by 2 times. You can also reduce the diameter of the coil in cases where the engine power is not enough - for example, for digging up virgin soil. It should be taken into account that on small reels the cable becomes more tangled. Also, during the process of winding the cable, the diameter of the coil will increase, which will increase the load on the cultivator and speed up the movement of the electric plow. To prevent such phenomena, small reels are made longer so that there is more space for winding the cable. In turn, the diameter of the coil can be changed if the gear ratio is too large and therefore the coil rotates too slowly. In this case, structures are made with a large coil diameter, for example 30 cm. In this case, the entire structure should be located as close to the ground as possible so that the winch does not tip over during operation. Also, the cable must be wound from below onto the reel. To unwind the cable, different options are used - for example, a disconnecting coupling between the reel and the gearbox or running the engine in the opposite direction. For stability of the device, stops are made that are driven into the ground, and wheels are provided for a heavy electric plow. Also, on large structures, you can additionally make a seat for an assistant, who will press down the structure with his weight and thereby give it greater stability. It is better to work with such an electric plow together with an assistant: when one person walks next to the plow, and the second person turns the engine on and off, and also controls the operation of the winch. It will also be easier for two people to move the winch from place to place. With each new installation of the winch, it is necessary to ensure that the device is installed in such a way that the axis of rotation of the reel is located strictly perpendicular to the movement of the plow (cultivator) - this is a necessary condition for uniform winding of the cable. When using such an electric plow, it is also necessary to take into account that every year it is necessary to change the installation side of the winch in the treated area. It is placed at the opposite end of the site to prevent the gradual movement of the earth due to the plow blade and dragging the soil to the winch. It is not difficult to make such a plow, and elements from other devices can be used to make it. But the end result is a universal device, because an electric plow can easily turn into a cultivator, harrow, potato digger, hiller, etc. Post based on data from other sites.
Source
HARNESS..WINCH
A winch working in tandem with a plow is not new.
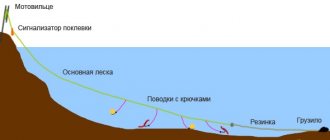
Especially for owners of small plots of land, on which these fairly simple and reliable nonstrings have already proven themselves to be excellent. Unlike a mini-tractor, the winch does not compact the soil. And it doesn’t slip like a walk-behind tractor. And almost all the traction power of the motor here goes to useful work - plowing the nursery land with a towed plow. The winch itself is securely held in place by an anchor, the arms of which, having the appearance of bayonet shovels, easily penetrate into the ground. Plowing is carried out by two people, making furrow after furrow. Moreover, the partner, whose duties include returning the plow to the beginning of the furrow, can be a 10-year-old child. High plowing quality is guaranteed even on extremely inconvenient sites (slopes with a “washboard” profile) and heavy soils. The proposed homemade plow-electric winch (see illustration) has a number of additional advantages associated with the relative cheapness of electricity, ease of acquisition and long life (over 30 years) of trouble-free operation of the electric motor, ease of start-up and operation of the entire structure. The gearbox speed control lever is located in close proximity to the unit with electrical equipment (capacitors, magnetic starter, “Start” and “Stop” buttons). Next to it is a coil of cable on a reel. So the electric winch can be anchored anywhere on the land plot at a distance of up to 100 m from its connection to the power grid (with a longer cable length, line losses increase). And the built-in remote control with a “Stop” button allows you to control and plow, even working together with a disabled person.
When a boulder or tree roots get under the plow, the force on the rope increases sharply. And when it becomes the maximum permissible (330 kgf), the winch electric motor stops, preventing the rope from breaking (as well as breaking the chain transmission mechanism).
And one more feature. Thanks to the modular design, if necessary, you can easily remove the engine and the unit with electrical equipment from the electric winch (it is enough to unscrew 4 M10 bolts) and, installing them on an electric sawing machine, start preparing firewood, slats, timber, etc. By rearranging these same block units onto the grass cutter, we obtain valuable, vitamin-rich feed for livestock and poultry. Well, having replaced the plow with a towed cultivator-hiller, the same electric winch can be used not only for weeding and hilling, cultivating row spacing, but also, say, for digging potatoes.
Kinematics? The proposed home-made design is so elementary (and therefore reliable) that it is unlikely to cause anyone any difficulties when “incarnating it in metal.” From the electric motor shaft, the torque is transmitted (a sleeve coupling is used for this) to the gearbox (taken from the Riga moped with subsequent minor modifications). And from there (thanks to a chain drive with a pitch of 12.7 mm) - onto a drum with a 10-mm nylon rope wound onto the last one, to the end of which a towed plow or cultivator-hiller (aka potato digger) is connected.
The frame is based on a welded structure made from sections of 34x50 mm steel angle with a tubular spar and brackets for mounting the electric motor, gearbox and drum. Moreover, the rope guide, made from a suitably bent section of 22×3 steel water and gas pipe, is welded after installing the drum. And in the brackets of the latter, boring holes are provided for the shaft with the possibility of some movement of the shaft to ensure proper tension of the PR-12.7 drive roller chain.
How to make an electric plow
At all times, the garden remained a reliable supplier of fresh vegetables and fruits to the tables of the owners.
Nowadays, growing various vegetable crops remains in demand, and many people have vegetable gardens. But cultivating the soil by hand is very tedious, and as you age, it becomes more and more difficult. To help gardeners, you can now find a large number of different devices and devices in the store - walk-behind tractors, cultivators, seeders, electric plows, etc. A significant disadvantage of such equipment is its cost, so you can and should consider the option of making a homemade device - for example, an electric plow based on a winch. A three-phase asynchronous electric motor can become the basis of this design if there is a three-phase voltage of 380V in the area. But a similar design can be made with a single-phase motor. In this case, the winch will act as the driving force for a plow, cultivator, hiller, harrow, potato digger, etc. The main advantage of this design is its versatility. The principle of operation of the mechanism is as follows: a winch is installed at the edge of the site, a plow or cultivator is attached to it, which is placed on the opposite side of the site, unwinding the winch. Then it turns on and begins to pull the towbar towards itself, which performs the task. When the plow or cultivator reaches the winch, it is turned off, moved to the side and the process is repeated. The entire plot of land is cultivated according to this principle.
Types and classification of plows
There are several plow designs:
- ploughshares;
- disk;
- rotary;
- combined;
- chisel.
The most common are plowshare plows. They were used by our ancestors and to this day they work in most fields. For plowing heavy soils and areas with high or low humidity, disc plows are used. Combined and rotary - more complex in design, suitable for cultivating virgin soil. Chisels are special devices that do not involve formation turnover. They are classified as plows conditionally and are rarely used, especially in private farming.
How to make a plow from a winch?
In homemade electric plows, the most complex element is the winch. There are many options for its manufacture, but we are always talking about three main components - the engine, the drum with the cable (reel) and the gearbox.
Engine
The most suitable options are with a power of 1.5-2.5 kW and a speed of 1500 rpm. It is important to choose the right parameters, because if you use an engine of insufficient power, you will have to move the plow at a very low speed or it will not cut deeply into the ground. If the engine is heavy-duty, the winch will be too heavy, it will be difficult to move, and energy costs will be high. If desired, you can install not an electric motor, but a gasoline one (for example, from a motor cultivator).
Gearbox
The best option is a gearbox with a suitable output shaft speed.
But if there is no factory gearbox, then you can select gears or use a worm gear consisting of one helical wheel (gear) and one worm (screw). If the gear ratio is not large enough, then it is increased by a belt drive between the worm and the engine. A belt drive is also made to connect the gearbox to the engine or in case the gear ratio of the factory gearbox is not suitable. The optimal gear ratio is calculated using the formula:
where i is the gear ratio; D is the diameter of the winch drum on which the cable is wound, in m; n — engine speed in rpm; V is the speed of the plow in m/min.
The optimal plow speed is about 4 kilometers per hour. If we take the diameter of the drum 15 cm and bring all the values into the required dimensions and substitute them into the formula, then:
i= (3.14 • 0.15 • 1500)/67 = 10.5
In this example, the gear ratio is not very large, which means that not only worm and gear drives can be used to obtain it.
Coil
It is generally accepted that the cable winding reel is the simplest design element, but many parameters depend on its diameter. The smaller the diameter, the slower the electric plow will move. It happens that the gear ratio is determined incorrectly and the plow speed is too high. In this case, the diameter of the coil is reduced - if you reduce this value by 2 times, then the speed will decrease by 2 times. You can also reduce the diameter of the coil in cases where the engine power is not enough - for example, for digging up virgin soil. It should be taken into account that on small reels the cable becomes more tangled. Also, during the process of winding the cable, the diameter of the coil will increase, which will increase the load on the cultivator and speed up the movement of the electric plow. To prevent such phenomena, small reels are made longer so that there is more space for winding the cable.
In turn, the diameter of the coil can be changed if the gear ratio is too large and therefore the coil rotates too slowly. In this case, structures are made with a large coil diameter, for example 30 cm. In this case, the entire structure should be located as close to the ground as possible so that the winch does not tip over during operation. Also, the cable must be wound from below onto the reel.
To unwind the cable, different options are used - for example, a disconnecting coupling between the reel and the gearbox or running the engine in the opposite direction.
For stability of the device, stops are made that are driven into the ground, and wheels are provided for a heavy electric plow. Also, on large structures, you can additionally make a seat for an assistant, who will press down the structure with his weight and thereby give it greater stability.
It is better to work with such an electric plow together with an assistant: when one person walks next to the plow, and the second person turns the engine on and off, and also controls the operation of the winch. It will also be easier for two people to move the winch from place to place. With each new installation of the winch, it is necessary to ensure that the device is installed in such a way that the axis of rotation of the reel is located strictly perpendicular to the movement of the plow (cultivator) - this is a necessary condition for uniform winding of the cable.
When using such an electric plow, it is also necessary to take into account that every year it is necessary to change the installation side of the winch in the treated area. It is placed at the opposite end of the site to prevent the gradual movement of the earth due to the plow blade and dragging the soil to the winch. It is not difficult to make such a plow, and elements from other devices can be used to make it. But the end result is a universal device, because an electric plow can easily turn into a cultivator, harrow, potato digger, hiller, etc.
Source
Winch for plowing land with a plow
For personal plots, it has become popular to use a homemade winch when plowing. Do-it-yourself homemade products are preferable. Let's consider a winch for plowing as a donor, which was the Minsk motorcycle.
The engine with a displacement of 125 cm3 is not too heavy and the power is quite enough. Anyone who has used a Minsk motorcycle knows that the engine starts very easily and without fail. Reliable in operation, repairs are not expensive.
Spare parts are available and there are no problems with them.
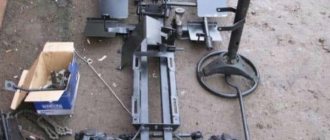
Plowing winch drum
The drum is the main part. A cable is wound around it and how this happens depends on the work of the homemade product. The first time we made guides for winding. After a short time of operation, they refused because, when the cable came into contact with the guides, it quickly wore out and broke.
You just need to install the winch during operation directly in the direction of the unwound cable. The cable began to be wound exactly ring to ring and lasted many times longer. The dimensions of the pipe on which the cable is wound are 108 mm in diameter. Pipe width 100 mm.
The pipe is driven by a bolted sprocket.
The parts from which the plowing winch drum is assembled: 1. The base is welded from pipes and two flanges; 2. flange for sprocket installation; 3. driven sprocket from the Voskhod motorcycle; 4. bolts with nuts and engravers for fastening the sprocket; 5. washer for securing the cable; 6. bolt for securing the cable; 7. bearings 204;
8. spacer between bearings;
9. an axis that holds all the parts together; 10. axis engraver; 11. axle nut; 12. fasteners for fastening to the frame; 13. spacers between the bearing and the strut, welded to the strut; 14. stands on which the winding pipe is held and secured.
15. bearing seats.
Installing the cable
A consumable material when plowing the land is, of course, a cable. The entire main burden falls on him. At the first break in the cable threads, you need to think about replacing it. Therefore, two holes are made on one flange of the drum base: 1 - a hole with a 10 mm thread for a bolt. 2 - hole for passing the cable.
We take the end of the cable, pass it through the drilled hole, twist it around the bolt, under the washer and press it firmly to the drum body.
Drive sprocket installation
There are several options for fixing the star on the flange. The first and fastest is, of course, done by welding. But not the most practical. After welding, the metal may become softer. Yes, and you have to work with the earth, which ends up on the chain and sprockets. As a result, wear and tear occurs intensively. Replacing a welded star is quite difficult.
You need to choose a method in which the replacement should be convenient. For this purpose, a third flange is installed (welded) on the drum base. Holes with a diameter of 8 mm are drilled on the flange, onto which the sprocket is fixed. The drive is carried out by a motorcycle chain.
Preparing for work
One of the most popular tools for working with land is a hand plow. Every farmer needs such a unit, but due to the high price, not everyone can afford to buy it. In addition, you have to use the plow infrequently, which indicates the inappropriateness of such financial costs. It is much wiser to make a plow with your own hands. At first glance, this idea may seem strange and impossible, but not everything is as scary as it seems. A homemade plow can be made with minimal investment of money and time. In order to make a plow, you will need a reserve of patience and minimal knowledge of geometry.
Before you figure out how to make a plow with your own hands, you need to decide what it will be like, because there are a rotary plow, a reversible plow and a double-hull plow. Each option has its own characteristics, and therefore requires an individual drawing of the plow, work plan and selection of the necessary tools. You can make drawings with your own hands if you have the skills of a craftsman, but if you are not particularly strong in this, you can familiarize yourself with existing ones. (Fig. 1, 2, 3)
A plow for a mini-tractor must be made of metal and have the correct shape to smoothly enter the soil. If there are any inconsistencies and differences with the drawings, then the plow will not be able to fully perform the work, but if you can handle it, then in terms of its efficiency in work it will not be inferior to the factory versions. Initially, you need to make a template according to which a homemade electric plow or another type of plow will be made. To do this, you need to cut out individual elements from cardboard that will make up the entire structure. If your assembled layout corresponds to the drawing, then you can make the same elements, only cutting them out of metal.
DIY electric plowing winch
A homemade winch is designed to facilitate heavy manual labor when cultivating the soil and can replace any walk-behind tractor or cultivator. With its help, you can plow the soil under the beds, plant, harrow, hill, dig up potatoes.
The agricultural winch allows you to carry out a full cycle of soil cultivation when growing potatoes. The unit helps preserve and maintain soil fertility, which leads to maximum yield.
In the distant 90s, a plowing winch was created based on the engine from the Ural, Druzhba chainsaw, and it still serves faithfully to this day. Changes and improvements concerned mainly the plow. The video below clearly shows these changes. See winch drawings here. Gradually the idea came to create an electric analogue. And this is what happened, see the video and photos below.
Electric plowing winch
The motor is three-phase and connected to a single-phase 220 V network. This power is enough for plowing, hilling, and digging up potatoes. If you buy a motor for a single-phase network, you can plow virgin soil. And in my modification for plowing virgin soil, I used a block that reduces the plowing speed by half, but also increases the effort.
DIY plow drawings
After I got a self-made agricultural winch, which is used for plowing the garden, the question became: should I buy a plow or make it myself? Walking through the shops and bazaar of Smolensk, you get a strange feeling that the plows produced by the industry for walk-behind tractors are a sad sight.
And these industrial creations are suitable only for “picking” and not for plowing the land, and even with the rotation of the layer, and regarding the depth and width of plowing, we can conclude that for planting potatoes with a distance between rows of 60 cm, not one of the proposed ones is suitable in the plow trade. Either our manufacturers are saving money, or the power of the most popular walk-behind tractors is not enough to work with a normal plow with a working width of 30 cm. When planting potatoes, you shouldn’t plow one furrow three times. And the price wants to leave the best - under 2 thousand. rubles (for a couple of pieces of iron from a scrap metal collection point).
The next step to find something useful is to search the Internet. To my surprise, there are 3-4 original descriptions with drawings floating in the vastness of the Russian-language network (this fact surprises me very much). The next step is to look at what those around you are using. It was not possible to buy a suitable plow; the decision was made to make a plow with our own hands. Based on the fact that the plow was supposed to be used for planting potatoes with a winch for plowing, the following requirements are imposed on it:
1. Plowing width – up to 30 cm.
3. The plow must hold the furrow itself, without digging in or jumping out of the furrow. The geometry of the plow must ensure movement with the specified parameters without the help of a plowman.
4. Possibility of adjusting the depth and width of plowing.
5. Minimum weight and sufficient strength.
My uncle has been using his homemade motorized winch for plowing for more than 10 years and has tried several options. For the last few years, he has settled on an option optimized for a homemade motorized winch for the garden, namely for planting potatoes with a distance between rows of 60 cm. There is also a homemade hiller for a motorized winch and a homemade potato digger, all this can be viewed on the corresponding pages of the site.
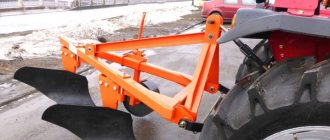
Plow drawing
Field board drawing.
The blade is bent according to this template until the two profiles coincide and then welded at an angle.
Using a drawing of a homemade plow, you need to draw a template for the plow pattern on thick paper, and then transfer the picture to metal and cut out the blank with a grinder. Personally, I used stainless steel material with a thickness of 1.8 mm. Many often use a sheet of 2-3 mm. The cutting part of the plow is reinforced with a strip of thicker metal. Someone suggests using a disk from a circular machine for these purposes, or a spring from a “Muscovite”. From personal experience, if you plow a summer cottage plot for a family of 4 people in the spring and fall, cultivating six acres, you shouldn’t strive for super-strength. It is more profitable to make a plow that is light but strong enough for its tasks. It’s better to repair or replace something after 10 years, and only if necessary, than to carry around the heavy structure of a homemade plow for 10 years. There is no need for excess weight.
This is what the plowing width adjustment system looks like. By rearranging the large wheel, you can change the plowing width within significant limits. When I plant potatoes, I set the grip to 30 cm, in two passes the distance between the rows is 60 cm. For autumn plowing of the garden or when plowing virgin soil, I use a smaller grip. The small wheel is made so wide that the plow does not press into the ground.
Having looked at the pictures below, you can imagine the basic principles of operation of a homemade plow, or rather a guide system that allows the plow, without the participation of a plowman, to move strictly in a straight line at the established plowing depth and width. The plowing width is regulated by moving the large wheel, which, when the point of application of the traction force is shifted as shown in the figure, is pressed against the furrow, which allows the plow to repeat the direction of the previous furrow. The plow turns slightly, which increases the plowing width. In fact, the width of the nose in the direction perpendicular to the axis of movement of the plow is less than 300 mm, however, the specified width is available for plowing.
The plow wheel runs along the bottom of the plowed furrow and this situation is observed from the previous furrow to the next. As a result of the application of traction force, a force is exerted to deepen the plow until the plow is aligned with the axis of the wheel, as shown in the figure, as a result, all forces are balanced, and the system operates very stably. Rough adjustment of the plowing depth is carried out by selecting the appropriate difference in wheel diameters, and smooth adjustment is carried out by adjusting the tilt of the plow. At this stage, there was no longer any need to use handles to control the plow, except for some special plowing conditions.
Plows not only loose soil as in the video, but also virgin soil
Manufacturing technology of various types of plows
The easiest way to make a plow with your own hands is a single-body type.
You can take part of a gas cylinder as the starting material; such a unit will have high strength and operational reliability. Squares or steel pipes may also be suitable for the body. First you will need to make a cylindrical blade, for this you will need a plowshare, a sheet of metal and a side shield of the rack. The wedges are inserted into the sheet so that the ploughshare is at an angle of approximately 45°. After joining the side shield with the surface of the ploughshare, the blade on it should be located slightly below the shield, about 1 cm. As a result, the blade is applied to the ploughshare and everything is welded to the plow body. If you want to make a rotary type motor plow, then it can be made as a trailer. This type of design relies on a single chain to achieve turning, just like the previous version. In order to make a new pass, there is no need to return to the beginning of the garden, since thanks to the turn, the plow itself will turn the furrow in a different direction. This processing technique makes it possible to obtain even furrows after the tractor passes. The rotating model consists of 3 main parts: the lower plane of the runner, its side and front dump plane. We place the cutting cavity approximately 3 cm below the runner, and the sides of the blade must adhere to the ploughshare. Under no circumstances should there be any gaps, and the back of the share should be level. If you manage to construct such a version of the plow, then you can weld it and wait for a big harvest.
Plow with skimmer for walk-behind tractor
The skimmer is designed to remove the top layer of soil when plowing a plot of land. He turns over the layer of soil with weeds, places it at the very bottom of the furrow, made by a body equipped with special devices. He cuts and turns some of the soil on the side of the furrow. At the same time, the body with the equipment loosens the soil and distributes it evenly over the layer of weeds laid by the skimmer. To level the wall of the furrow, the plow is equipped with a special knife, which is mounted in front of the outer body of the attachment.
Types and structure of the case
Plows are divided depending on the number of bodies into single-, double-body and multi-body devices.
The housing design includes the following parts:
The type and quality of plowing of the land plot depends on the last two elements of the structure. The ploughshare cuts the soil layer, which then rises along it towards the dump, then turns over and crumbles. The angle of rotation of the earth layer depends on the design of the dump. A field board is mounted at the bottom of the body, which prevents the plow from moving in the direction of the plowed land.
If you are interested in how to make a plow with your own hands, you should select drawings of its design based on the type of soil being cultivated with this attachment for an MTZ tractor or motor cultivator.
Plow body options:
If you plan to make a plow with a support wheel for a walk-behind tractor at home, it is recommended to select the body design depending on the type of soil.
The choice of housing depends on the type of crop being grown. Root crops need thoroughly loosened soil, for which none of the above listed options for agricultural attachments is suitable. In this case, it is recommended to use a combined design. The body is equipped with a shortened blade, a plowshare and a rotor, which further crushes the soil during the cultivation of the land.
Blade design
When choosing a plow design, it is necessary to take into account a significant point: the ploughshare and blade must be almost the same thickness (1 mm is the permissible “step” value, no more than 0.5 mm is the gap between the blade and the ploughshare).
Share shape
To make a plow with your own hands, drawings of a plow for a mini tractor need to be selected according to the type of soil being cultivated and the complexity of the device itself. First you need to decide on the design of the ploughshare.
A ploughshare is a part of a plow that cuts a layer of soil. Along the ploughshare, the soil further rises to the dump. For the manufacture of this structural element of the plow, high-strength hardened steel is used. You can make such a structural element of a plow field at home from an ordinary steel pipe.
Of the listed ploughshare options, the most popular is a chisel-shaped product for a reversible plow. They are considered the most stable during operation; the plow can be freely buried to the required depth.
Before you make a handmade plow for a walk-behind tractor, you need to choose the right design diagram for the attachment. If you have an old tool, you can make new parts based on it. If the old plow is missing, you can use Zykov’s drawings to make it. But it is imperative to take into account the parameters of agricultural machinery on which further use of independently manufactured attachments is planned.
A do-it-yourself plow is a universal invention that is suitable for both plowing the land and planting potatoes. You can make a plow yourself from available materials. The proposed plow model consists of a control unit and a device designed for plowing (plow). The control unit is a stand, which consists of the main control elements and accessories. Namely: 1 – rectifier bridge (power supply). 2 – electric motor. 3 – gearbox combined with a gear. 4 – cable – 5 mm, acting as a winch. 5 – anchor (working part of the shovel).
A plow, which is intended for plowing the land, consists of the following elements: 1 – steering wheel (plow control lever). 2 – ploughshare. 3 – base with fastenings.
Installation and connection of the plow. 1. The anchor must be installed at an angle for better support.
2. After which the anchor should be deepened into the ground up to the connecting strip.
3. Then the anchor is connected to the control device using a piece of reinforcement.
4. In front of the barrier bar, near the cable, reinforcement is also driven in. It will additionally hold the control unit in place during operation.
5. In the working position, the gearbox is in the engaged position.
6. The control unit is ready for operation.
7. After installing and securing the control device, attach the plow to it. To do this, the free end of the cable is attached to the base of the plow.
Operating principle and operation. 1. The plow is carried to the required distance. 2. The ploughshare is driven into the ground to the required depth.
3. The left foot is placed on the ploughshare, and the right foot rests on the ground.
4. Thus, while moving the plow along the ground, the tiller pushes off with his right foot and controls the plow using his weight.
5. During operation, the plow steering wheel should not exceed the level of the plowman’s belt.
6. When the plow reaches the end of plowing, the control unit is turned off and the plow is again taken to the opposite side of the site. A plow made according to this principle is capable of plowing land that has been left without care for a long time.
A homemade plow is not only economically profitable, but also not difficult to produce. You will always be confident in the reliability of such equipment, but let's figure out how to build it.
A plow is used in agriculture to plow the land.
If you have ever read newspapers and magazines intended for rural residents, you have probably noticed an abundance of advertising for the sale of mini tractors and walk-behind tractors. Not surprisingly, the land has to be cultivated. But the attachments for such equipment on sale are not always of high quality. The most popular unit is the plow. And when purchasing it, the future plowman faces a lot of problems: one cannot always expect high-quality plowing from such a device, although the cost of an industrially produced plow is quite impressive. A homemade plow can be an excellent alternative to a low-quality product.
Winch for plowing or how to plant potatoes correctly
With the onset of spring, almost every landowner breaks out in a cold sweat. Again, regular cultivation of the vegetable garden, garden, planting potatoes and various crops, which requires a lot of time and effort. Based on this, some people think about how to significantly simplify their lot in this whole process, others purposefully choose a faithful and irreplaceable assistant - a winch.
Advantages of a homemade winch
According to the survey, few people find a suitable traction mechanism in stores or other trading platforms. Most people do it themselves, using scrap materials and standard publicly available parts.
As a rule, the design of a homemade winch is very simple and consists of a rigid frame, a motor (usually a three-phase one is used), an upper shaft (transmits engine power to the drum that winds the rope) and a lower shaft (affects the gear ratio of the device). It is distinguished by increased traction force with a fairly low weight; it can be part of a cargo scooter that reaches speeds of up to 40 km/h.
Features of the plowing winch:
- High traction power;
- Wide scope of application;
- Powered by both internal combustion engines and electric ones;
- Long period of operation;
- Ease of dismantling;
- Maintains soil fertility;
- Effective hilling of cultivated plants;
- Safe and environmentally friendly use;
- Cost-effective mechanism;
- Almost silent in operation.
Electric plow - purpose and principle of operation
Often, a plow is used in tandem with an electric winch, which significantly increases its performance.
Its principle of operation is quite simple: a traction structure is installed on one edge of the site, and a cultivator or plow attached to it with a cable is installed on the other.
Switching on: the trailing mechanism begins to pull towards it, switching off – it moves to a new row and the process repeats.
You can buy a plow for a winch in almost any specialized store, but you can also make it yourself.
To do this, it will be enough to correctly measure the angles of the share (the optimal indicator relative to the field board is 20°-25° and 45° relative to the center line) and take a solid base (channel, for example).
Often, for the stability of the structure, a 4 mm metal strip is welded into the middle, which will protect the plow from damage when it hits boulders.
WE RECOMMEND!
Buy only high-quality traction mechanisms from trusted manufacturers. Basically, for manual assembly of an electric plow, ATV winches from the Polish companies Dragon Winch and Husar are used.
They are quite resistant to loads and do not require significant maintenance.
However, during operation it should be remembered that the traction force directly depends on the length of the cable: the more turns there are on the drum, the less weight the winch can pull and vice versa.
| Winch ATV Dragon Winch DWH 3000 HD | Winch ATV Husar BST 3000 LBS |
No less popular mechanisms for quickly plowing land are walk-behind tractors. These devices come in three types: light, medium and heavy. Basically, the last two are used in gardening activities, the main feature of which is the presence of rear-wheel drive.
Walk-behind tractors are suitable for use on large areas (up to 0.5 hectares), have a load-resistant engine with a power of up to 30 hp, and are easily attached to additional equipment. However, like most electrically powered devices, they have their own pros and cons.
Advantages of a mini tractor:
- possibility of attaching a plow or trailer;
- wide range of uses;
- multifunctionality at work;
- lightweight and easy to use;
- does not require a large supply of fuel.
Disadvantages of the walk-behind tractor:
- low productivity;
- large dimensions;
- inconvenience in transportation.
Agricultural winch or walk-behind tractor – which is better?
| Process | Winch | Walk-behind tractor |
| Planting potatoes | Occurs using the classic method without damaging the product. | It can significantly “harm” the vegetable (cut it, mash it). |
| Loosening (harrowing) | Effectively pulls the plow at almost any speed from the other side of the site. | Quite inconvenient: the soil is heavily compacted by repeatedly moving over the planted potatoes. |
| Hilling up potatoes | It is not difficult to adjust the row spacing. | Complex types of tillage are used, which significantly damage the organic crop. |
| Digging up potatoes | An ordinary hiller is used. | A weapon with greater power is used. |
| Plowing the land | Multifunctional: it will loosen the soil both in a greenhouse and in the open air. Leaves no weeds. | Used exclusively in the garden. The wrong choice of cutters can lead to the disappearance of earthworms. |
| Earth compaction | Absent: all forces are devoted to plowing with a plow. | Compacts well. |
Back
Making an electric plow
It is much more difficult to make an electric plow with your own hands, this is explained by the fact that in most cases the driving force for an electric plow is a winch, and it is impossible to make it yourself without the appropriate knowledge.
A homemade electric plow works according to the following principle: a winch is installed at the edge of the garden or field, and an electric plow or cultivator is already attached to it, which should be placed on the other side of the field.
After the winch is connected, it begins to attract the homemade plow to itself, which in the process of movement performs the task assigned to it. When the plow reaches the end of the winch, it needs to be turned off and moved slightly to the side, repeating similar actions.
The layout and trajectory of the plow is developed before installation. As a motor for the winch, you can use options with a power of 1.5-2.5 kW. If you do not have a factory gearbox, you can use a worm gear consisting of 1 gear and 1 screw. Additionally, you will need a reel on which the cable will be wound. It is very important not to make a mistake with its diameter, because the smaller it is, the slower the plow will move. The entire structure should be as close to the soil as possible so that it does not tip over during movement, the furrows are even, and the plowing is of the same depth. On electric plows of this type, it is better to work together, that is, one person will walk with the plow, and the second will have to turn the winch on or off all the time.
Do-it-yourself electric winch-electric plow (photos and drawings) | With your own hands
At home I had an old, dusty and oily 4-40 worm gearbox with a reduction ratio of 1:40, which served as the basis for the winch. This, by the way, can be found at a flea market for a low price and in good condition.
Having completely disassembled it and washed it in gasoline to remove oil deposits, which looked more like black plasticine, I decided to immediately change the seals. As a replacement, I used oil seals from a VAZ family car. I changed all the gaskets (replacement ones were cut out of paronite 0.6 mm thick), and adjusted the gap between the worm and the gear. I filled in the transmission oil and the gearbox was like new.
To determine what size drum would be needed, I first welded a frame from a 40x40x4 mm angle piece measuring 75x30 cm.
Source