Rolled newspaper rose
So, for work you will need:
- newspapers;
- glue;
- paints;
- scissors;
- brush.
To begin with, you can make a large massive rose without a stem. To do this, the sheets need to be folded into long multi-layer strips. To do this, you need to fold the sheet in half along the long side, then in half again, and so on until the strip is about 1-1.5 cm wide. The longer it is, the more magnificent and massive the rosebud will be.
When the strip is ready, we begin to twist it. If it is perfectly smooth and uniform in thickness, the rose will turn out to look like an ordinary cylinder and will not look beautiful. Therefore, at small intervals the strip can be twisted, thus creating volume. After making 2-3 turns, the newspaper can be glued and then rolled further.
When the rosebud is ready, the end of the paper ribbon is also glued to its base. After this, the rose can be painted. Some people prefer to take a thin brush and carefully paint over the entire bud, even the innermost crevices, so that the color is uniform. Although careless painting with a thick brush, through which the text is visible, looks vintage and unusual.
You can try painting the rosebud in two layers. Then the colors will appear even more original and beautiful. This rose can decorate any composition or gift wrapping.
Torn paper flower
Flowers for which the newspaper is not cut, but torn into pieces by hand, look even more original. Torn edges look as natural as if they were created by nature and not by human hands.
To make such a natural flower, you need to tear the newspaper into small oblong strips. Pages of plain text or even printed images will work for this. Thanks to the variety of stripes, the flower will look unusual and bright.
The strips need to be crumpled into the same uneven tubes. And then make a flower from several tubes. You can take any number of them that your imagination dictates; the bud will be either small and neat, or lush and dense.
Having connected several strips into the core, you can take several wider strips, also torn off, and continue to increase the petals of the flower until the master thinks that its volume and splendor are already sufficient.
The petals at the base need to be glued together so that the flower does not fall apart.
The torn strips can not be wrinkled, but twisted, as was done when making a rose. Thanks to the thinness of newsprint, such a flower will look gentle and neat.
By making a composition of flowers and adding it, for example, with leaves, you can decorate the lid of the box in which the gift will be packaged. Using paper of different shades, you can achieve a beautiful result that will delight both the artist and the person to whom it will be given.
Wreath of paper flowers
A wreath based on wire and decorated with paper flowers looks beautiful, original and unusual.
Making it will require more time and skill than gluing regular flowers, but the result is worth it. By allowing yourself to dream, you can make a very beautiful decoration for any interior. Flowers can be supplemented with a carefully cut cardboard core, depending on the interior you want to fit the wreath into.
In addition to a bead and a cut out flower, you can use a regular button for the core. Its size and color should be chosen based on your own preferences and further design of the composition.
Thus, it is clear that newspapers are a universal material for making flowers and decorations, by playing with which you can make something original, unusual and beautiful.
Using thin wire and a few folded pages, you can make another type of flower that will also look good in any paper bouquet.
Several such blanks, after careful manipulation, turn into beautiful flowers of unusual shape.
A few old magazines, imagination and inspiration – that’s all you need to create mini-masterpieces, delighting yourself and your loved ones with beauty.
News MirTesen
Master class on folding paper tulips
At some point in our childhood, we all folded different figures and used origami. I remember during labor lessons I really liked this activity. The tulip is usually done using this technique. It turns out voluminous and looks like the original.
You can also make an open type bud.
Or take another idea from corrugated paper as a basis and hide a candy in a bud. No one will refuse such a gift, that's for sure!
And here’s another great idea with disposable spoons. This gift can be given for a birthday or even a wedding.
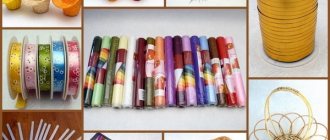
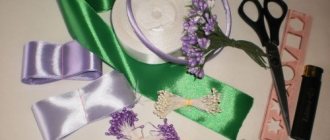
Stages of work:
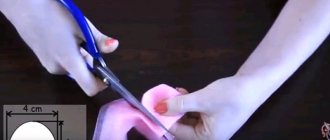
1. Prepare everything you need for work, all components are shown in this picture.
2. Cut scarlet rectangles from corrugated paper and then wrap the spoon in this material, as if slightly twisting it on a stick.
3. What does it look like? Of course, for the petals.
4. Mask the stick with green paper, while stacking the spoons towards each other (4 pieces) to form a stem and a bud. Then cut the leaves into a specific shape.
5. Place the craft in a pot or cup. You can tie a bow or some other pattern.
DIY newspaper crafts: “Butterfly” project
Newspaper or junk magazine
Double-sided foam tape
* You can make butterflies in several sizes and shapes.
* If you want to make a butterfly of the same shape and size, you can use one stencil or buy a shaped hole punch.
1. Prepare a stencil.
2. Using a stencil, draw butterflies on different sheets of magazine or newspaper. You can draw a butterfly on one sheet, fold several sheets together and cut out several butterflies at once.
3. Cut out the butterflies.
* Each sheet can be cut into wide strips that can be folded together, draw 2-3 butterflies of different sizes on one strip and cut out several at once.
4. As you cut out the paper butterflies, fold them carefully on a flat surface. You can arrange them depending on the color scheme and/or size (shape).
Works from newspapers: wall clocks
You can make this decoration without using a clock mechanism - you will get a beautiful decoration for your home, reminiscent of the sun.
Approximately 24 sheets of newspaper or magazine
Pencil or pen (to make it easier to twist the tubes)
Two plastic discs (like those that protect a large package of CDs)
* discs can be replaced with colored cardboard of any color.
Cardboard in the shape of a circle with a hole in the middle (optional)
Battery operated clock mechanism (optional)
Openwork
Particularly beautiful crafts from newspaper tubes are made using the openwork weave method. Unlike the solid one, there are gaps between the paper tubes in the openwork, which play a decorative role.
There are a lot of openwork weaving patterns - from simple ones, reminiscent of a picket fence, to very complex ones with an intricate multi-layered pattern.
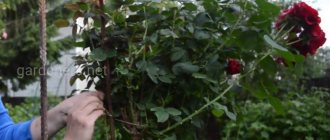
rose stem
For a DIY newspaper flower, of course, you will need a stem. It's very easy to do. To do this, cut a long strip from the newspaper. You can use white fields, then the element will not merge with the beautiful petals.
Coat the strip with glue and, gluing the tip to the base of the bud on the wire, begin to wrap it tightly and tightly, in several layers, leading the section lower and lower.
Add a few leaves to the rose for a more realistic look. Attach the strip tightly to the end.
Learning to make voluminous flowers
What kind of crafts are they made from nowadays? They even adapted egg molds for this work. It’s a shock to me how and when it could have occurred to anyone, but it came and conquered everyone. At first it looks unattractive, but then it turns out amazing masterpieces.
The sample is painted with paint and placed on a wire or stick.
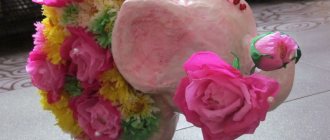
A wonderful souvenir, as they say, made from improvised means, and how beautiful and funny it looks.
You will agree that with such voluminous flowers you can quite easily and quickly decorate any interior of a room or hall, making it irresistible and unforgettable.
You can also use this chic flower garland.
After this, put each workpiece on a fishing line or thread.
You can also make unforgettable creations from paper bags.
Using the origami technique, you can fold and then glue the parts.
And the coolest volumetric look, which I really liked and I advise everyone to do it, is this one:
Do you like calla lilies? Then take note of this master class.
You can even make a masterpiece out of ordinary newspapers.
By the way, you can even make Pansies with your children.
How to make a bouquet from newspapers
You can make any flowers from newspaper, but roses look especially romantic. In accordance with the desired result, you can select any scheme and algorithm of operation. In addition, we will analyze how to make stems and collect flowers into a lush and beautiful bouquet.
Required materials and tools
Before you make a bouquet from a newspaper, you need to prepare the necessary tools and materials:
- Newspaper. It is worth choosing copies with good quality paper. You can take foreign press - this will add some charm to the product.
- Paper scissors.
- A simple pencil with which you can prepare sketches of the petals.
- A thin copper wire that can be used to form the base of a stem.
If you need to glue the bud parts together during assembly, you can use not just PVA glue, but a glue gun.
To make the composition as natural as possible, other decorative elements can be used to create petals, receptacles and fix the stems.
Stage-by-stage assembly of the composition
You can make beautiful flowers from newspaper with your own hands within a few hours. In this case, the composition can be used to decorate gift boxes, photo frames (mirrors), vases, flower pots. You can make a bouquet of roses from newspaper with your own hands, using different methods of making the buds themselves - there are a lot of schemes.
How can you assemble a flower in stages, if we consider the general algorithm:
- You need to prepare the material and select an assembly diagram.
- Then cut out the petal blank.
- Assemble the buds by gluing.
The final stage may be assembling flowers into a bouquet, as well as decorating it.
Color schemes for folding newspapers
The easiest way to assemble a rose bud is to assemble petals of different sizes. Step by step instructions for assembly:
- First you need to prepare the petal templates using a pencil. You can draw a sketch directly on paper. Fold the sheet 6 times.
- Cut out 6 larger petals and 6 smaller ones. Another 4 parts for making the core are crown-shaped strips with 3 sections.
- Next you need to twist one of the parts to form the middle. Then glue this part with the remaining 3 elements. In this case, you need to ensure that the gear elements do not overlap the previous ones.
- Make a small cut at the base of each petal. Then glue these cuts together with a slight overlap. Thanks to this, a curved shape of the petals is formed.
- Then smaller petals are glued in a circle to the base of the core. And on top of them, larger petals are glued in tracking layers.
Then bend each element in the opposite direction. Thanks to such manipulations, you will get a neat flower, but as close as possible to the original.
Another simple option for assembling a bud
There is another completely simple way to make a rose bud:
- Cut out a circle of large diameter from paper. It is not necessary to use a compass to get a perfect circle. Then moving from the edge to cut the circle.
- Then grease the central part of the part with glue and begin to form the base - glue the central curved edge to the point greased with glue.
- Glue the entire length of the part in this manner. To give the bud the required shape, the strip should be collected like a roll. But it is not recommended to tighten the workpiece.
The result is a simple rose bud. To create a decorative effect, you can color the edges of the petals with paint or a felt-tip pen.
Origami rose
A flower made using the origami technique looks beautiful. Here is the simplest algorithm for assembling a rose using the origami technique from newspapers:
Method of weaving roses from newspapers
Roses made using this technique do not look very natural, but some compositions require such products. To weave flowers from newspapers, you do not need to use complex patterns. Algorithm for making roses by weaving:
- You should prepare the necessary materials and then get to work. Divide double sheets of newspaper in half. Then cut each sheet into 3 equal parts. Next, glue all these parts together, forming a wide, long strip.
- Next, you should fold the strip along its entire length. Straighten the fold, and then fold the edges towards the center line. Tape the folds. Then perform the same procedure again. Re-glue the folded strips. Roll the formed strip into a roll. It is recommended to do this so that it does not turn out too tight.
- The next stage will be the formation of the bud itself. Now you have to twist the strip tightly, lubricating the “web” on each tier.
TWISTED INTO A TUBE.
We have been familiar with this method of creating flowers since childhood. All of us at school or kindergarten made classic flower crafts for February 23 - red carnations from crumpled crepe paper . They twisted a strip of paper around a toothpick, wrapped a piece of green paper around the twist, and fluffed a bunch of flower panicles.
And it never occurred to us that inside this primitive method there was hidden a recipe for more than just the humble clove.
This method of “ twisting crepe paper into a roll” can give birth to completely different three-dimensional and flat flowers. It all depends on how we changed the SHAPE OF THE EDGE OF THE PAPER STRIP. Depending on its pattern, we will get paper flowers that are completely different in design.
Here's photo proof. Do you see?
Different regions produce different flowers - disheveled aster, neat chamomile, chrysanthemums. Even roses can be made in this way (but roses will be discussed in a separate article - in detail and in detail, as befits the queen of flowers).
And not only from soft corrugated (crepe) paper you can make craft flowers using this ROLL technique.
Here you go in the photo below - an example of paper flowers using the same technique of rolling a roll FROM REGULAR THICK COLORED PAPER (office double-sided colored paper).
This is a simple job and very simple instructions.
- A narrow strip of paper was wound onto a thin rod (or toothpick) (to form the center of the flower).
- And then to this rolled center they added a winding of a wider tape, already cut along the edge into petal strips.
- And the petals are folded to the side - like a spreading umbrella.
AND IF YOU ADD A THRUST FOR EXPERIMENT TO THIS SIMPLE TWISTING TECHNIQUE, YOU CAN GET NEW DESIGNS OF PAPER FLOWERS.
For example, what if... you don’t just bend these petals to the sides with a flat daisy-spread, but slightly twist the tip of each petal inward (as we do with curls in the morning) - and you’ll get a voluminous, lush ASTER.
What if... make a strip for twisting with AREAS OF DIFFERENT WIDTH. We see the result of this idea in the photo diagram below.
- A narrow strip (1 cm wide) for the middle stamen (wrap it in a tight roll on a toothpick).
- Next, we wrap a petal strip (with a fringed edge) 2 centimeters wide onto this roll.
- And then we wind a petal strip 2.5 cm wide...
- and then a petal strip 3 cm wide.
And thanks to the different widths of the stripes, we will get a roll flower in which the height of the petals increases from the center to the edges.
As you can see, you can and should do EXPERIMENTS with this simple roll technique. Let's continue to encourage our inquisitive mind and decide on another wild idea...
WHAT IF, cut the fringe not straight, but diagonally . And what if... this oblique fringe is cut not along the edge of the CUT , but along the edge of the FOLD (that is, bend the strip in half along the entire length, and cut this fold line obliquely into a fringe, and then twist it in this form.
We see the result in the photo below - an amazing aster with spirally twisting carved perforated petals. A beautiful flower craft - it looks like a difficult job, but making it with your own hands is simple and quick.
Such shaggy flowers with slanting petals can be used as a shaggy stamen for other flowers.
Like for example in this master class in the photo below. Do you see?
There, too, a bent strip is cut along the OBLIQUE FRINGE... and an orange shaggy stamen is formed - needed to decorate the center of the paper aster.
By the way, the paper aster itself from the photo below is made in a very original and simple way.
- The base of the aster is a puff (multi-rayed star with chopped rays).
- Each ray in the puff is bent with a slate ruler into a sharp arrow (like on trousers).
- The layers are superimposed on each other - we get a lush flower.
And just the stamen inside this voluminous flower is made using the OBLIQUE FRINGE technique, which we just talked about.
This roll technique can be combined with a regular petal puff (Method No. 1 from this article) .. Yes - you can - because it occurs in nature. God himself once came to this idea - and created the Marigold flowers. And we will implement this method of combining a roll and a puff on paper. (see how this is done in the infographic below).
using the roll technique . And using the “Puff ” technique, the lower petal part of the marigold flower is made of paper (templates with five-leaf silhouettes). Photo instructions for assembling the flower are below.
But here is a rosehip flower - where the stamen and the middle are also combined using the rolling twist technique and 2 petal layers. By the way, you can make them in large sheets of A4 format and stick them on the wall - and your living room will be transformed. Buy a pack of red office paper from the stationery store and play interior designer. All the neighbors will come running to gasp with delight.
But here is a flower craft where the roll technique is also used to create a fluffy panicle-stamen, and the side petals are simply glued separately to the lower layers of the fluffy panicle-stamen.
You get large sunflowers from crepe paper.
Using a similar ROLL-BUNK + INDIVIDUAL PETAS technique, you can also make a daffodil flower with your own hands.
But these flowers, EITHER LILAC OR SALVIA - with a long stem of inflorescences, are also made using the roll technique.
Yes, yes, this is also a regular roll technique, with the only difference that the strip of paper is not rolled into a tube, but is wrapped in a spiral roll around a long stick .
Here in the photo below is a master class of this lush paper flower.
- a wide strip of crepe (corrugated) paper into a long fringe.
- We wrap the fringes on a toothpick (or knitting needle) - and we get curls along one edge of the ribbon.
- We take a long wooden skewer and wrap our paper ribbon with curly fringe around it - the wrapping starts from the upper end of the wooden skewer and goes down in a spiral .
- Under the flower we make a green wrap around a skewer stem and glue wide green leaves to this stem.
Paper rose flowers
FOLDING method.
Using the roll technique, you can quickly roll up a paper rose. We will have a separate article on paper roses. But I will give two master classes right here - because they cover the roll technique of creating flowers.
Here is the first step-by-step paper rose master class . Thick paper is used here and in order for the petal parts to have the geometry of broken pink petals, this thick paper strip needs to be PUMPED AND TWISTED around itself while rolling.
And don't pay attention to these centimeters ... Just take the very essence of this instruction. Cut a strip of paper from the draft and try to twist it into a rose, simply bending the strip as God wishes - the paper itself will tell you where to bend and turn it.
You will find many other options for making a paper rose from different types of paper in the article “PAPER ROSES (25 ways to make it yourself).”
And here is another way to roll a paper roll so that it looks like a rose. For such a roll, we need a paper strip NOT IN A STRAIGHT SHAPE, but to make a strip of paper IN THE SHAPE OF A SPIRAL.
To do this, just draw a snail on a sheet of cardboard (an uneven curve, no matter what). This drawn spiral will be the template for our paper flower.
Now you need to cut out this spiral line , and then start twisting the roll NOT FROM THE MIDDLE OF THE SPIRAL... but rather FROM ITS EDGE. And a paper rose will appear in our hands by itself.
My advice is not to use polished slippery glossy paper for this rose craft - such an elastic rose will try to unfurl or the spiral circles will slip out of the flower bed. It is better to choose rough paper or not very thick cardboard - this way the rose will better hold its shape.
Video master class - DIY paper rose
We wish you to always remain original and surprise your family, loved ones and friends with new creative solutions. We will be happy to publish your creative works in the article. Therefore, do not hesitate and send photos to our email address - .
DIY chenille wire rose
DIY large paper roses
A bouquet of flowers made entirely from newspapers: we show you how to make them
You can decorate the interior of a room or other decorative elements using flower buds. Even gift bouquets of this kind can be presented to acquaintances and friends without shame. To do this, you can make flowers from newspaper (newspapers are available and often on hand). Thanks to the unique “print” of the main material, the decorative decoration looks very beautiful and original. Thanks to the huge variety of assembly schemes, you can choose the production option that is suitable for the composition; we also provide step-by-step diagrams of simple and more complex flowers, and we will give recommendations on how to assemble a whole composition from them in the form of a bouquet.
Making crafts from A4 sheet
Not so often, but you still have to make such products from ordinary large sheets. Of course, you can use such luxurious crafts anywhere; they look especially good if you decorate walls or a hall with them, that is, use them in the interior of premises.
Each leaf is a large petal that you will have to paint in the desired color.
Larger flower options can also be made in the form of a rose. Initially, you will need to use a template.
And then follow all the steps presented step by step.
Rose from the newspaper
There are several ways to create beautiful flowers from newspaper with your own hands. We invite you to familiarize yourself with the master class, which will tell you in detail how you can make a rose from several sheets of paper that is as similar to the real thing as possible.
To create flowers from newspaper with your own hands you will need:
- newspapers,
- large beads,
- glue,
- strong wire according to the size of the bead hole,
- pliers,
- scissors and pencil.
The bead in the product plays the role of the core. Take as many beads as you plan to weave flowers. In addition, prepare a ribbon to decorate the bouquet, and, if necessary, acrylic paints, gouache or a can of spray paint.
Types of weaving
Crafts are woven from newspaper tubes in different ways. The choice of a specific technology depends on your skills and features of the design of the future craft.
Typically, the tubes are divided into a base - a frame or guides for the future product - and workers with which the frame is braided.
DIY paper rose
You can make this delicate beauty, a rose, with your own hands using special stencils.
The stencils must be printed (choosing the color you like from those presented: red, white, pink and yellow), then carefully cut out and following the photo instructions to create a luxurious paper rose. This rose is perfect for decorating items of clothing or hats, gifts and cards, creating floral panels and compositions.
Stencils for creating a paper rose:
Red rose - stencils
White rose - stencils
Cream rose - stencils
Orange rose - stencils
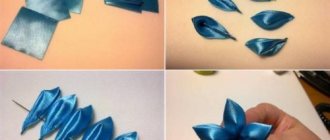
Petals
So, how to make a flower from newspaper with your own hands? First, let's cut the petals. For one rose you will need 5 pieces of different widths. The first one is 3 cm, each subsequent one is 1 cm more.
Fold the flower cuttings from the newspaper into an accordion shape with your own hands, creating a square. Draw a neat, even petal on it with a pencil and cut it out. Set the finished petals aside.
Do this with each segment, placing petals of different sizes in different piles.
Let's start creating a rose. To do this, cut a wire 25-30 cm long. Place the bead on the wire and bring it to the center. Bend it in half and make 5-6 turns of the bead, twisting the wire together and securing it in the center.
The smallest petals are glued first. Go around the bead, securing the newspaper with glue. To be sure, you can use hot glue or quick-drying Moment glue.
Start bending the next stack of petals to the side or twisting them a little onto the pencil. This will make the rose look more luxuriant. Otherwise, the bud will not look very natural or closed.
Attach all the petals in this way, securing them with glue at the base. When the petals are finished, you can begin to form the stem and decor.
Using the POMPOM technique.
Here's an even faster way to create a fluffy, voluminous flower. It is made using the pompom technique - from corrugated crepe paper
This technique is good because it allows you to very quickly make large flowers from paper - since crepe paper is sold in large rolls (like wallpaper). And each roll can turn into a large flower for holiday decoration.
The master class in the photo below shows how to make such a lush paper flower with your own hands. We fold a wide (20 cm wide) ribbon several times to create many layers. We cut the folded ribbon into fringe from TWO EDGES, leaving the middle intact.
Next, fold this cut paper in HALF. And we squeeze the fold line in a fist and put an elastic band on it (usual for banknotes).
We fluff the fringe of the flower in all directions - achieving the shape of a perfect circle. And we decorate the central part of the flower with a wad of black paper - and the flower resembles a disheveled poppy.
As you understand, the height of the petals depends on the length of the fringe. And the shape of the petals depends on the shape of the fringe.
Below (paper flower master class) we make anemones using exactly the same pompom technique. The difference is that we slightly changed the shape of the fringe - it’s not even a cut fringe at all, but just a beautiful curly petal edge of the napkin.
As a result, the fluffy flower no longer becomes a poppy - but a delicate anemone made of paper.
Or you can not change the shape of the edge - that is, you don’t cut it or fringe it at all. Leave it flat, as it is on a napkin. Just lightly color it with a marker.
And using the same technique, we make a pompom flower with our own hands. They pinched it with wire, folded it in half, fluffed it up and got a carnation on a wire stem.
All that remains is to add elements made of green paper - a receptacle (wrap a jagged roll around the flower bowl), a stem (a long green strip for wrapping the stem of the flower), leaves (glue long oval ones to the stem).
You can also make this pom-pom flower two-color with a center of a different color (see photo below) . To do this, we need paper strips of two colors - one wide (yellow), and the second 2 times narrower (black).
We prepare the strips - first we cut a wide strip onto a double-sided fringe (or a patterned edge on both sides), then we make patterned edges on both sides on a narrow strip.
To make a patterned petal edge , you need to fold the strip into an accordion (as fans were made in childhood) and make a rounding on both sides of this folded fan with scissors.
Then we unfold the strips and place a narrow black strip in the middle of a wide yellow strip. We fold them again like an accordion (this time two-color).
We tie it with twine or wire. And we unfold the sides of the fan in a circle - a flower is formed. If desired, the center of the flower can be decorated with crumpled paper or cut fringe, glued between the blades of the black center.
And here is a master class that shows how to make a paper pom-pom flower WITH A FRINGED stamen with your own hands (photo instructions below).
The principle of creating this flower from paper of two colors is the same as in the previous master class. Only here the middle strip is shredded on both sides into small fringes. This is another way to make large flowers using crepe paper.
We decorate a suitcase with newspapers and magazines
PVA glue, or even better decoupage glue
Scissors or utility knife
1. Cut out the images you like from your favorite magazines, which will then decorate your suitcase.
2. Apply glue to the suitcase and begin carefully placing magazine excerpts on it.
3. Apply glue again on top of the glued pages.
4. Decorate the entire suitcase in this way.
5. Using scissors or a utility knife, carefully cut off the excess pieces so that everything is even.