Hobbies are an integral part of our life. They help put your nerves in order, calm down and relax after a hard day. Some people play the guitar, others read books or paint pictures. Someone chooses knitting - one of the most popular leisure activities in the world.
In this article we will tell you:
- How to choose the right knitting needles?
- How to choose yarn for knitting?
- Types of knitting
- How to make a set of stitches with knitting needles?
- How to knit knit and purl stitches with knitting needles?
- How to knit an elastic band with knitting needles?
- Decreasing and adding stitches in knitting
- How to properly close loops when knitting?
- 8 steps to help you knit your first project
How to make a set of stitches with knitting needles?
It is with a set of loops that any knitting begins. Here we will look at the simplest and most universal method, while more complex and elegant options are best studied with professionals.
The order of casting on loops when knitting
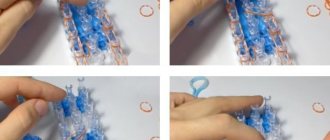
How to cast on stitches on knitting needles, a simplified method
1) Place the thread across the middle of the palm, leaving the “tail” on the left and the ball on the right. 2) We wrap the upper part around the thumb from right to left and lead it to the index finger, grabbing it from behind. 3) We pass the yarn between the second and third fingers, place it on the palm, holding the two ends formed with the middle, ring and little fingers. 4) We connect 2 knitting needles together and use them to pick up the loop on the thumb from top to bottom. 5) We continue moving towards the thread on the index finger, prying it from top to bottom, and again thread the ends into the first loop. 6) Remove the thumb while simultaneously tightening the knot on the right needle. 7) Holding the resulting loop on the knitting needle with the index finger of your right hand, lower them down towards you. We use knitting needles to hook the thread on the thumb from the bottom up from the side of the palm and again pull it into the loop on the index finger.
Decorative lampshade for table lamp
Dimensions: diameter 20cm, height 15cm.
We will need:
- yarn consisting of 50% polyamide, 25% wool, 25% acrylic (50g by 66m) – 100g;
- knitting needles No. 5.5;
- add. knitting needle for braids
Patterns:
- fantasy pattern: see diagram.
Density: on the main pattern using knitting needles No. 5.5 17p. for 25 rub. equal to 10 cm by 10 cm.
Description
We dial 114p. and knit a fantasy pattern, repeating the repeat of 16 stitches 7 times. We complete row 2. At a height of 15 cm it is freely closed. loops.
Assembly and finishing
We make a seam. We stretch it onto the lampshade and secure it with double-sided tape (1 tape at the top, 1 tape at the bottom). If necessary, you can change the diameter of the product, adjusting it to a specific lampshade.
The unfolded length is calculated using the formula: lampshade diameter X 3.14.
How to knit knit and purl stitches with knitting needles?
All knitting is based on the front and back loops, and depending on the pattern you will only have to change their number. There are two main ways to knit knit stitches.
Method one. We always keep the thread behind the product. The free knitting needle must be inserted into the middle of the loop and the thread should be pulled out from the back wall, grasping it with the knitting needle from top to bottom. Then you need to drop the loop from the left needle.
Method two. The pattern remains the same, only now we wrap the working thread from the front wall of the loop.
Purl stitch, first method. We hold the yarn in front of the product, insert the free knitting needle behind the front wall of the loop and throw the working thread under the knitting needle in the right hand and pull the captured thread into the loop.
Second way. We insert the free knitting needle behind the front wall of the loop and move the knitting needle to the right so that the satin stitch is under it.
Headband
Size: head circumference 49cm, headband height 11cm.
We will need:
- yarn consisting of 70% acrylic, 30% wool (50g per 84m) – 50g;
- knitting needles No. 3.5;
- needle with a large eye.
Patterns:
- elastic band: 1l.x1i.;
- pattern “Lacy corners”: knit according to the pattern: 1p. (front side): 1kr., *4l., 2p. in 1l., 1l., 1n., 2i., 1n., 1l., 1 simple persons. broach, 4 l.* – from * to * repeat until the last point, 1 cr.; 2p.: 1kr., *3i., 1 simple broach, 1i., 1n., 1i., 2l., 1i., 1n., 1i., 2p. in 1i., 3i.* – from * to * repeat until the last point, 1cr.; 3r.: 1cr., *2l., 2p. in 1l., 1l., 1n., 2l., 2i., 2l., 1n., 1l., 1 simple persons. broach, 2l.* – from * to * repeat until the last point, 1kr.; 4p.: 1kr., *1i., 1 simple broach, 1i., 1n., 3i., 2l., 3i., 1n., 1i., 2p. in 1i., 1i.* – from * to * repeat until the last point, 1cr.; 5 rubles: 1cr., *2p. in 1l., 1l., 1n., 4l., 2i., 4l., 1n., 1l., 1 simple broach * - from * to * repeat until the last point, 1cr.; 6p.: 1kr., *7i., 2l., 7i.* – from * to * repeat until the last point, 1kr.
These 6 rubles. form a vertical repeat of the pattern.
Density: on the main pattern using knitting needles No. 3.5 23p. on 24r. respectively equal to 10 cm by 8 cm.
How to knit a headband
We dial 114p. and knit 4p. rubber bands. Then we move on to the main pattern - see diagrams and description of the pattern for beginners. We repeat vertical rapport four times, which is 24 rubles. or 8cm. We finish the work by knitting 4p. rubber bands. At a height of 11cm closed. loops.
Fold the strip in half and sew it together.
How to knit an elastic band with knitting needles?
This is the most popular type of knitting, without which no job can be completed. It involves alternating two types of knitting: front and back, 1, 2, or 3 loops of each option. It is used to process necklines and sleeves.
We cast on the number of loops we need, as we learned to do earlier, slip the first loop without knitting onto a free knitting needle, and with the second loop we knit two knit stitches, then two purl stitches and continue alternating them until the end of the row, the last stitch is always a purl stitch, regardless of the pattern.
Comments
Oleksi, where did you come from to be such an inventor? I'm kidding of course and it's actually a compliment! In general, knitting is not my thing, but I find myself looking at your site at least once a week and seeing what interesting things you have here. I guess I'll start knitting! Just tell me what’s easier? Maybe with knitting needles, since they can be made from pens!
Naomi, your comments are always so glamorous
, which, to be honest, I always associate you with that same Naomi. Naomi Kembel.
But seriously, I don’t even know what to advise. For me, crocheting is easier, but I also knit well. It’s probably better to crochet, because it’s unique.
And yes, for me the advantage of the crochet pattern is that it can be knitted with one hand. I just love knitting while lying on the couch.
In general, a cool and fashionable knitter should be able to knit and crochet!
In more or less resort towns (Moscow, St. Petersburg) they sell HUGE size pencils) is also an option)
Oh, I was also heading to shops like Garden, Children's World, Stationery. for ideas for large knitting needles.
But in fact, they are also available in stores for knitters. Both 15 mm and 25 mm. Real huge knitting needles. Made of plastic or wood, made in China. So just check out the stores or online stores
Source
Decreasing and adding stitches in knitting
This technique is used when the fabric of the product needs to be slightly enlarged or reduced.
Decrease stitches with a slant to the right. Having knitted the fabric to the place of the intended decrease, insert the right knitting needle into two loops on the left knitting needle behind the front wall
Using a knitting needle, grab the working thread and pull it into a loop.
By following the described sequence of steps, you will get decreasing loops with a slope to the right. Using this technique, you can knit an inconspicuous decrease when making a V-shaped neckline.
Decrease by knitting two stitches together. After knitting to the place where the stitches decrease, remove the last loop onto the right knitting needle without knitting. Knit the next stitch. Then pull the knitted loop through the removed one.
Adding loops. When the product is already knitted before the loops increase, you should use a working knitting needle to pull out the thread that is between the loops, the so-called broach.
We throw the drawn thread or broach onto the knitting needle on the left. And only then can it be knitted with a front loop, using only its back wall.
Headband
Dimensions: 52cm by 8cm.
We will need:
- yarn consisting of 50% polyamide, 25% wool, 25% acrylic (50g by 66m) – 50g;
- knitting needles No. 5.5 and No. 6;
- hook No.5.
Patterns:
- elastic band: 1l.x1i.;
- fantasy pattern: we carry out according to the pattern.
Density: Fant. pattern with knitting needles No. 6 18p. for 25 rub. equal respectively 7cm by 10cm.
Description
Using knitting needles No. 6, cast on 18 stitches. and knit a fantasy pattern to a height of 45cm. Closed P.
To insert using knitting needles No. 5.5, cast on 17 sts. and knit an elastic band, starting and ending with the 1st and all odd rows (i.e., front rows) 2l. Knitting 8cm, closed. P.
Assembly and finishing
We crochet the edges of the strip 1 p. single crochet, then - 1p. "crawfish" step. Sew the insert along the edges of the bandage.
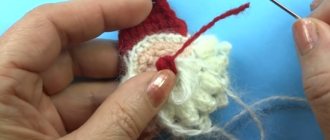
How to properly close loops when knitting?
When the work is almost finished, you need to close the loops correctly so that the fabric does not come apart when removed from the knitting needles. To do this, we need to knit the first 2 loops, eventually getting one, then we throw it onto the knitting needle.
Next, we need to repeat this movement, only using the resulting loop. After 2 loops we pull the thread and get a loop again, throw it onto the knitting needle and continue like this until the end of the row until all the loops are finished. We knit the last one, take out the knitting needle and tighten the thread.
As you can see, everything is really simpler than it seems at first glance. A competent selection of tools and materials for knitting, a few minutes to master basic knitting skills - and now you can please your loved one with a handmade scarf or even open your own store of knitted designer items.
Try, knit and you will succeed!
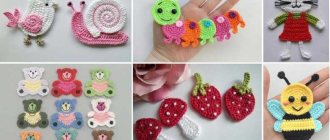
Step-by-step learning to knit children's clothes for beginners
Knitting children's clothes gives a special pleasure:
- you can work with threads of bright colors;
- realize your creative potential;
- products knit quickly;
- To make them, you can dissolve any unnecessary thing.
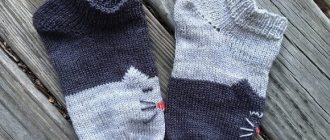
Knitting mittens
Children's mittens are an indispensable accessory in winter. Although they are inexpensive and presented in a wide range in stores, a child will especially love mittens that are hand-knitted taking into account his preferences.
Mittens can be knitted on two or five knitting needles. The work is divided into four stages:
- Knit from cuff to thumb;
- Knitting a hole for the thumb;
- Knitting a toe product;
- Thumb knitting.
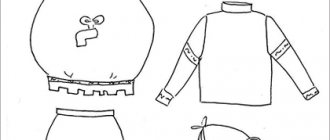
Children's vest
Vest - very comfortable clothing for a child
- The most convenient way to start is by creating a life-size pattern. This stage will simplify all subsequent ones and eliminate bandaging of an almost finished product.
- A children's vest can be knitted on two knitting needles - then you will have to sew the side seams. If you knit on five knitting needles or on circular ones, the product will be seamless. Only the shoulder seams will remain.
- The next stage is choosing the pattern with which the product will be knitted. If there are several patterns used, it is necessary to draw up a knitting pattern for each part of the product. This will help you avoid annoying mistakes.
Learn how to knit a blouse for a newborn.
Scarf hats
A hat-scarf is an analogue of a snood. The main difference from it is that it no longer wraps around the neck several times. Knitting this product is very simple. The best choice of technique would be knitting on circular or five knitting needles. This article describes in detail how to knit this accessory.
The size of the hat should be perfect. If it is small, it will be uncomfortable to wear; if it is large, it will not protect against wind and frost. Wide models will also not protect against the cold, and this should be kept in mind when choosing a model. A drawstring knitted from the same threads as the hat will provide a tighter fit to the neck.
Openwork scarf
Dimensions: width 40cm, length 190cm.
We will need:
- yarn, 100% cotton (50g per 121m) – 400g;
- knitting needles No. 3 and No. 3.5;
- markers.
Patterns:
- elastic band: 3l.x3i.;
- shawl rice-ok: all p. in all p. – facial;
- persons Ch.: in facial r. - faces, purl R. - purl stitches;
- openwork pattern alternating diagonally: patterns No1 and No2;
- “Grid” pattern: scheme No.3;
- openwork inserts: pattern No. 4;
- pattern “Apple Tree Leaves”: scheme No.5.
Density:
- gum sp. No3 27p. for 32r. equal to 10cm by 10cm;
- shawl rice-ok sp. No3.5 20p. for 34r. equal to 10cm by 10cm;
- openwork pattern diagonally sp. No3.5 20p. for 28 rub. equal to 10cm by 10cm;
- pattern "Grid" sp. No3.5 22p. for 32r. will be 10cm by 10cm;
- openwork inserts connected sp. No3.5 22p. for 27r. will be 10cm by 10cm;
- pattern “Apple tree leaves” sp. No3 23p. for 31r. will be 10cm by 10cm.
Scythe
The braid pattern is a very voluminous and romantic pattern. Even though it looks quite difficult, creating such a pattern is very simple.
Knitting pattern:
- 3-5 loops are knitted purlwise.
- The loops that will make up the width of the braid are knitted with knit stitches. Their number must be even.
- Purl 3-5 stitches again. The purl loops will create the background, and the knit stitches will create the braid pattern.
- The purl row is knitted in a mirror pattern.
- After 5-7 cm of height have been knitted, the loops of the braid are divided into two and first the half of the loops that is on the left is knitted. After this, the first, right half of the loops is knitted.
- Then again 10-14 cm are knitted according to the old pattern and a cross is made again from facial loops.
This pattern can be used to decorate any scarf, hat or vest. You can also combine several braids of different thicknesses.