Do you want to decorate your home for the New Year? We will help connect Father Frost and Snow Maiden - the main characters of this holiday.
New Year is approaching . Everyone wants to decorate their homes in order to quickly plunge into this fabulous holiday atmosphere. Needlewomen can make decor with their own hands - Santa Claus and Snow Maiden , crocheted or knitted. Just look below how cute and beautiful they are; your interior will definitely sparkle with new colors.
In another article on our website you will find master classes that will help you crochet a heart for Valentine's Day . Make a heart for the holiday with your own hands on a skewer or a three-dimensional one - it’s simple and quick.
In this article we have published several master classes on knitting these characters, and you follow the instructions and knit. Read on.
Simple crochet Santa Claus: description
A simple crocheted Santa Claus.
Any novice craftswoman can knit this Santa Claus. String a lot of them, and here you have gifts for friends and family. You can decorate a Christmas tree or interior with these “grandfathers” - beautifully and stylishly. Here is a description of creating a simple crochet Santa Claus:
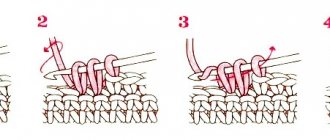
- Tie a slip stitch using pink thread. Then 2 chain stitches.
- Knit 4 stitches inside the sliding loop. with one yarn over. Another pillar. with one yarn over. It turned out to be 2 pets.
- Take a white thread and knit these loops together.
- 8 columns with one yarn over with white thread. Another pillar. with one yarn over, without knitting to the end, close with pink thread.
- Pull the ring of the first slip stitch. and connect the edges using one connection. pet.
- 2 tbsp. bn next pet., then 1 tbsp. bn. Repeat again - 2 tbsp. bn next pet., then 1 tbsp. bn. Close the loops with white thread.
- 1 air pet, 4 columns. with one yarn over. We make popcorn by knitting the first and last white threads.
- We knit 5 air. pet. Insert the hook into the second stitch. and knit the connection. pet.
- 1 air pet, 4 columns. with one yarn over. We make popcorn by knitting the first and last white threads.
- Again we knit 5 air. pet. Insert the hook into the second stitch. and knit the connection. pet. Repeat this until the end of the white part.
- 3 air pet and conn. loop.
- Now we knit a hat. loops to the end and at the end connect. pet.
- Then we knit with red thread, pulling out one stitch from each white loop.
- Cast off all stitches by 2 sts. together. But 1st pet. air
- We dial pet. second row.
- Now cast off, but decrease by 2 stitches. from each side.
- Next row - 1 st. skip at the beginning and knit two loops together at the end.
- Close the new row, like the previous ones - 1 air. pet., and then 2 pets. together.
- We cast on sts, and then cast off, as in the previous rows of 2 sts. together.
- Knit the next row as usual, and then close it again, knitting 2 stitches at a time. together.
- Decrease next row and then cast off 2 stitches. together. Tie this to the end of the hat.
- Unfold the work and knit the connection from the inside out. pet. to the end of the cap so that it turns out beautiful and keeps its shape.
- That's it - all that remains is to make the pompom, nose and eyes. The nose will be red: knit 2 air. pet. and in the first air. knit a lush stitch and yarn over. Repeat this several times. Then knit all stitches. together and air. pet.
- Just like the nose, make a pompom for the hat, but from white threads: knit 2 air. pet. and in the first air. knit a lush stitch and yarn over. Repeat this several times. Then knit all stitches. together and air. pet.
- Sew the pompom onto the hat.
Sew on Santa's nose
- To make a mustache, wrap some thread around your finger, remove it, thread it from your nose, and tie it off. Sew the nose and mustache to the muzzle and cut off the white threads in the middle with scissors.
- Sew bead eyes. Ready.
Look how good Santa Claus turned out, and most importantly - simple and fast. If something is not clear, you can clearly see in the video how a craftswoman knits such decor.
Grandfather Frost and Grandmother Snow Maiden
Do you still think that Snegurochka is the granddaughter of Father Frost? No, everyone has long known that the faithful companion of the main giver of all New Year's gifts is his wife. She is a wonderful housewife, a reliable friend, the best adviser and an irreplaceable assistant to the Russian “Santa Claus”. And if it weren’t for Grandma Snegurka, Grandfather would not have had time to visit all the kids and give out such welcome surprises and presents. Therefore, it is impossible to do without a grandmother under the Christmas tree, otherwise Moroz Morozovich will remain hungry, not combed and not collected. So, quickly stop knitting bunnies and start making this charming couple - just in time for the New Year 2011! Happy holidays everyone! Happy knitting!
Legend: ch - chain stitch sc - single crochet ss - connecting stitch increase - 2 stitches in the base loop decrease - 2 stitches knit together hdc - half double crochet picot - 3 ch fasten in the 1st ch DP - long loop (extended loop) [...] - the number of loops in the row *...* ... times - repeat as many times as indicated in ** All parts are knitted in the round.
Torso and head (knitted equally for Dedik and Snegurochka)
Fill while knitting. Red (blue) thread. 1 row – 2 ch, in the second ch from the hook, knit 6 sc [6] 2 row – *1 increase* 6 times [12] 3 row – *1 sc, 1 increase* 6 times [18] 4 row – *2 sc , 1 increase* 6 times [24] 5 row – *3 sbn, 1 increase* 6 times [30] 6th row – *4 sbn, 1 increase* 6 times [36] 7th row – *5 sbn, 1 increase* 6 times [42] 8 row – *6 sbn, 1 increase* 6 times [48] 9 row – *7 sbn, 1 increase* 6 times [54] 10 row – *8 sbn, 1 increase* 6 times [60] 11 row – knit behind the back wall 60 sc [60] 12-21 rows – 60 sc [60] 22 row – *8 sc, 1 decrease* 6 times [54] 23 row – 54 sc [54] 24 row – *7 sc , 1 decrease* 6 times [48] 25 row – 48 sb [48] 26 row – *6 sb, 1 decrease* 6 times [42] – fasten and cut the red thread Attach a flesh-colored thread 27 row – 42 sb [42] 28 row - knit behind the back wall *6 sc, 1 increase* 6 times [48] 29 row – *7 sc, 1 increase* 6 times [54] 30-35 rows – 54 sc [54] 36 row – *7 sc , 1 decrease* 6 times [48] 37 row – 48 sbn [48] 38 row – *6 sbn, 1 decrease* 6 times [42] 39 row – *5 sbn, 1 decrease* 6 times [36] 40 row – *4 sbn, 1 decrease* 6 times [30] 41 row – *3 sbn, 1 decrease* 6 times [24] 42 row – *2 sbn, 1 decrease* 6 times [18] 43 row – *1 sbn, 1 decrease* 6 times [12] Row 44 – 6 decreases [6] – tighten the hole, fasten and cut the thread and hide it in the part.
Nose (knitted equally for Dedik and Snegurochka)
Row 1 – 2 ch, in the second ch from the hook, knit 6 sc [6] Row 2 – *1 increase* 6 times [12] Row 3 – *1 sc, 1 increase* 6 times [18]
Rows 4-6 – 18 sc [18] – fasten and cut the thread, leaving a long end of the thread for sewing. Sew the nose 1 row above the collar. Glue on the eyes, embroider the eyebrows.
Bottom edge (knitted equally for Dedik and Snegurochka)
White thread. 1 row - for a half-loop 11 rows of the body 60 sc [60] - knitting direction is the same as for the body 2-3 rows - 60 sc [60] 4th row - knit sc, grabbing the fabric of the bottom row (attaching the edge to the fabric) 60 sc [60 ] (you can simply knit and sew) – fasten, cut the thread and hide in the part.
Collar (knitted the same way for Dedik and Snegurochka)
White thread. 1 row – for a half-loop 28 rows of the body 42 sbn [42] – knitting direction is opposite to the direction of knitting the body 2nd row – 42 sbn [42] 3rd row – *6 sbn, 1 increase* 6 times [48] 4-5 rows – 48 sbn [48] Row 6 – knit sc, grabbing the fabric of the bottom row (attaching the collar to the fabric) 48 sc [48] (you can simply knit and sew) – fasten, cut the thread and hide in the piece.
Leg – 2 pcs (knitted equally for Dedik and Snegurochka)
Brown thread. 1 row – 8 ch, in the second loop from the hook 1 increase, 5 sbn, 4 sbn in the last loop, knit on the other side of the chain 5 sbn, 1 increase [18] 2nd row – 2 increase, 4 sbn, 6 increase, 4 sbn , 2 increase [28] 3 row - *1 sbn, 1 increase* 2 times, 4 sbn, *1 sbn, 1 increase* 6 times, 4 sbn, *1 sbn, 1 increase* 2 times [38] – 1 sbn – offset 4th row – knit behind the back wall 38 sb [38] 5th row – 38 sb [38] 6th row – 2 decrease, 8 sb, 7 decrease, 8 sb, 2 decrease [38] – fasten and cut the thread, leaving a long one end of thread for sewing. Fill the leg with stuffing and sew it on.
Arm – 2 pieces (knitted equally for Dedik and Snow Maiden)
White thread. Row 1 – 2 ch, in the second ch from the hook, knit 6 sc [6] Row 2 – *1 increase* 6 times [12] Row 3 – *1 sc, 1 increase* 6 times [18] Row 4 – 18 sc [ 18] Row 5 – *7sc, 1 decrease* 2 times [16] – fasten and cut the white thread Attach a red (blue) thread Row 6 – *7sc, 1 increase* 2 times [18] Rows 7-11 – 18 sc [ 18] – don’t get it! Row 12 – fold the hand over and connect the two sides 9 sc [9] – fasten and cut the thread, leaving the long end of the thread for sewing.
A cap
Red thread. 1 row – 2 ch, in the second ch from the hook, knit 6 sc [6] 2 row – *1 increase* 6 times [12] 3 row – *1 sc, 1 increase* 6 times [18] 4 row – *2 sc , 1 increase* 6 times [24] 5 row – 24 sb [24] 6 row – *3 sb, 1 increase* 6 times [30] 7 row – 30 sb [30] 8 row – *4 sb, 1 increase* 6 times [36] 9 row – 36 sb [36] 10 row – *5 sb, 1 increase* 6 times [42] 11 row – 42 sb [42] 12 row – *6 sb, 1 increase* 6 times [48 ] 13 row – *7 sbn, 1 increase* 6 times [54] 14 row – 54 sbn [54] – fasten and cut the red thread Attach a white thread 15th row – 54 sbn, 1 ss [54] turn the work 16th row – knit in the opposite direction behind the back wall 54 sc [54] 17 row – 54 sc [54] 18 row – knit sc, grabbing the fabric of the bottom row (attaching the edge to the fabric) 54 sc [54] (you can simply knit and sew) – fasten and cut the thread, leaving a long end of the thread for sewing. Fill the hat a little and sew it to the head.
Beard
White thread. 1 row – 36 ch, in the second loop from the hook 1 sc, 34 sc, 1 ch, turn the work [34] 2nd row – 35 DP, 1 ch, turn the work [35] 3rd row – skip 1 loop of the bottom row 32 sc, Decrease 1, ch 1, turn work [33] Row 4 – 33 DP [33] – fasten and cut the thread, leaving a long end of the thread for sewing. Sew on the beard, bending it “like a smile”, so that the edges of the beard are near the edge of the hat (see photo).
Grandpa's Hair
White thread. 33 ch, into the second loop from the hook 1 dp, 31 dp – fasten and cut the thread, leaving a long end of the thread for sewing. Sew the hair on the back of the head close to the edge of the hat.
Crown
Blue thread. We knit in rows.
1 row – 26 ch, into the second loop from the hook 1 sc, *1 increase, 1 sc* 12 times, 1 ch, turn work [37] 2nd row – skip 1 loop of the bottom row 34 sc, 1 decrease, 1 ch, turn work [35] 3rd row – skip 1 loop of the bottom row 5 sbn, 23 hdc, 4 sbn, 1 decrease, 1 ch, turn work [33] 4th row – skip 1 loop of the bottom row 5 sbn, 21 hdc, 4 sbn, 1 decrease, ch 1, turn work [31] Row 5 – skip 1 loop of the bottom row 2 sc, *1 sc, picot* 25 times, 1 sc, 1 decrease – fasten and cut the thread. Either tie 35 ch on each side to the ends of the crown, or attach a ribbon.
Assembly
Grandpa - following the instructions described above, sew, embroider eyebrows with white thread, rouge the nose. Snow Maiden – embroider hair with white thread; from the back of the head near the hair of the 2nd row, attach a white thread (like a fringe) - braid it into a braid; tie a ribbon; embroider eyebrows; put on a crown (you can sew on a crown with a few stitches), embroider eyebrows, rouge cheeks; You can sew on bead earrings.
Knitted Santa Claus and Snow Maiden with knitting needles with description: step by step, video
Knitted Santa Claus and Snow Maiden
Knitting such cute characters is much easier and faster than it might seem. You will definitely succeed in them, since the knitting technique is simple. We will knit with 3.5 knitting needles. You will need red yarn for Santa Claus, blue for the Snow Maiden, beige for the face and white for finishing the toy items. So, we suggest making knitted Santa Claus and Snow Maiden. Here's a step-by-step description:
Description of knitting
Description of knitting
- Collar - cast on 35 stitches with white threads.
- Knit faces. stitch 15 rows. Edge loops are also needed.
Description of knitting Description of knitting
As you can see, everything is simple. A little time and thread, but the result is so beautiful. Watch the video clips below. In them, the craftswoman knits these characters in her own way. It turns out also interesting.
Making a bag and strap
The bag itself is made of red yarn, and the strap is made of white.
To do this, a chain of five holes is tied along an oval. Then an addition is made to each loop. Then nine lines are knitted without increasing. The product is filled with foam rubber.
For the strap, you need to cast on loops in the amount of 70 pieces from white threads. The resulting bag can be tied with a bow and attached to the hand of Santa Claus. Decorate the face using black beads and a red nose from a piece of yarn.
So, your cute DIY craft is ready. It will become an indispensable and creative decoration for the New Year's green spruce. The process does not take much time and does not require professional knitting skills, and even a beginner can make a product using this master class. Santa Claus amigurumi crochet patterns can be found on the Internet on home craft sites.
How to crochet Santa Claus and Snow Maiden: description
Crochet Santa Claus and Snow Maiden
Look what a cute couple. They are simply touching. In this case, the Snow Maiden is not a granddaughter, but a faithful companion of Grandfather Frost. She is his wife, and the faithful companion of the main gift giver. She urges him on so that Grandfather can get to all the children and bring a bag of gifts. So, how to crochet Santa Claus and Snow Maiden? Here's the description:
Materials you will need:
- Acrylic threads - flesh-colored, red, blue, white, brown
- Hook 1.5 mm
- Filler
- Needle with a large eye
- Special eyes with glue or beads
Conventions for knitting
Descriptions for knitting
- Attach a flesh-colored thread and continue.
Description for knitting Description for knitting Description for knitting
- The collar can be simply knitted and sewn on. Fasten the thread, cut it and hide it in the piece.
- Once you have tied the legs, fill them with stuffing and sew them on.
Description for knitting Description for knitting Description for knitting
- Sew the hair at the back of the head right next to the edge of the hat tightly.
Description for knitting
- You can knit 35 chains on each side to the ends of the crown. If you don’t want to knit, then just attach a ribbon.
We collect products:
- Santa Claus - follow all the instructions above for assembling and sewing the parts to the body. Embroider the eyebrows with white thread and brown the nose.
- Snow Maiden - make hair from white threads and braid it. To do this, attach 2 rows of white threads from the back of the head, like a fringe, and braid it. Tie the ribbon. Embroider your eyebrows with dark threads, your bangs with white threads, and rouge your cheeks. Sew on the crown, making stitches in different places. Attach bead earrings.
The products are ready, now you can use them to decorate the interior or give them as a gift. Watch the video below to see how interesting the craftswomen knit these characters.
Preparation of materials and process of creating a figure
Before you start work, you need to prepare:
- Red wool blend yarn - 50 grams.
- Cream-colored wool blend yarn - 15 grams.
- White yarn - 1 gram.
- “Grass” yarn for beard – 10 grams.
- Pieces of foam rubber.
- Black beads for eyes.
- Glue gun.
- Scissors.
Knitting body figures
The first stage of work is knitting the Grandfather’s torso. For this purpose, red yarn and Grass yarn will be used. We crochet a chain of three loops and connect it so that we get a small ring.
- Starting row. Knitting loops with the addition of 1 extra loop to each.
- Second and third row. A loop is added to every even number.
- Fourth and fifth row: tied in a circle. Loops are not added.
- Sixth row. Loops are added to each even numbered stitch.
- From the seventh to the tenth row: rows are knitted in the round. Loops are not added in this case.
- Eleventh line. Loops are added every two.
- From the twelfth to the fifteenth row. No loops are added. The rows are knitted strictly in the round.
- Sixteenth line. An increase is made in every third stitch.
- From the seventeenth to the nineteenth row: knit in the round. There is no need to add loops.
The body of the figurine is almost ready. Now it needs to be filled with pieces of foam rubber. After filling the body, you need to knit from the inside. The next 2 rows are simply knitted in the round, after which the stitches are shortened. Two rows must be decreased every 2 stitches. In the next row, the reduction occurs through each loop, then in each loop. The thread is cut and the body is completely finished.
You can tie a white thread around the bottom and top of the body in a circle so that you get an impromptu edge on Grandfather’s fur coat.
Knitting a head from yarn
Knitting the figurine's head is made from cream-colored yarn. To get started, 3 loops are connected into a ring. Next 2 rows an increase is knitted in each stitch. On the third row, the increase is performed through 1 loop. The fourth row is performed in a circle without any increase. The fifth row is performed exactly the same as the third.
From the sixth to the ninth - knitting is done in a circle. There is no need to add anything at these stages. On the tenth line the reduction is performed every 3 stitches. We knit the eleventh line without any additives. The next row is similar to the tenth row in its design. The difference is the number of cuts. They occur every 2 holes. After which knitting is performed without adding or subtracting - 1 row. The last line is shortened in each loop and the remaining thread is cut.
Making a cap for Grandfather
At the initial stage, the hat is made of red threads. The work begins with a ring of three loops. In the first two lines, you need to make an addition in each line. The next row allows adding through one sling. Then knitting occurs without any additives. In the fifth line, the addition occurs through each line. The next row is simply knitted in the round. The last two rows are made with White Grass yarn for beauty, and the thread is cut.
Making the hands of Santa Claus
The hands are knitted from red threads. Getting started is also done from those loops that are connected to each other:
- First line. Increase in every hole.
- Second line. There is no increase.
- Third line. A chain of five holes is knitted. Then it is folded in half and knitted in the round. It turns out to be a finger.
- Fourth line. It does not involve additions.
- Fifth line. Knitted with Grass yarn.
Then we knit in a circle with red threads. After this, the hand is filled with foam rubber. In the next few lines the reduction is performed. The second arm of the figure is knitted similarly to the first.
Then you can attach the head to the body using a glue gun. Grandfather’s face must be decorated with the beard familiar to all children. For this, the needlewoman will need white yarn. For a beard, it is enough to knit two rows on the figure’s face. The arms are glued to the body of the figure.
How to crochet Santa Claus on a bottle of champagne: description, video
Santa Claus on a bottle of champagne crochet
New Year is a special holiday. Everything on the festive table should be beautiful, even bottles of champagne. You can decorate them using covers that are easy to knit yourself. Look how stylish Santa Claus and the Christmas tree look on the bottles. Crochet this decor, it’s very simple. Here's the description:
Santa Claus on a bottle of champagne crochet Description for knitting Description for knitting Description for knitting Description for knitting Description for knitting Description for knitting Description for knitting Description for knitting
- Here is another option for tying Santa Claus and Snow Maiden onto a bottle of champagne.
- Guests will be impressed by this decor throughout the coming year.
- For knitting you will need a hook, as well as red and white threads.
- For the Snow Maiden, prepare white and pale blue threads, as well as a satin ribbon for a decorative bow.
Santa Claus and Snow Maiden on a champagne bottle crochet Description for knitting Description for knitting
Look in the video how else you can crochet such a cover for a bottle. The craftswoman tells everything in detail.
Knitted Pinocchio cap using a crochet hook
For both boys and girls, a funny Pinocchio cap will suit their everyday look. A crocheted accessory will make a child stand out among his peers and emphasize his bright personality.
To work, you will need a hook number 3 and a skein of white and pink yarn.
Cast on a chain of chain loops around the circumference of your head, the number of loops should be a multiple of 10 or 12.
Knit the first row with s/n stitches and close the circle, then knit a relief elastic band. The elastic is formed by s/n stitches, which are knitted around the leg of the previous stitch. The hook for the front stitch occurs on the front side of the knitting; for the back stitch, the hook is inserted from the wrong side of the fabric.
The elastic band can be narrow or wide at the discretion of the craftswoman. Now switch to a white thread; to do this, knit the last connecting loop of the row with another yarn.
Knit the fabric, alternating colored stripes, but do not break the threads, but carefully hide them on the wrong side of the fabric. When the cap reaches the top of the head, begin to decrease evenly.
In each row, knit 2 tbsp. together on every 10 stitches, in the next row on every 9th, after on every 8, 7, 6, 5 and so on.
To make the cap long, some rows can be knitted without decreasing. At the tip, connect all the columns with one loop and decorate the work with a fluffy pompom.
Note to needlewomen! Victoria Yakubovich made a magnificent multi-colored cap. The craftswoman is ready to share the secrets of knitting a cheerful holiday hat in the Pinocchio style in a video lesson.
Knitting Santa Claus and the Snow Maiden with crochet and knitting needles: ideas
If you are no longer a beginner, but have experience in knitting, then you almost always do not need diagrams and descriptions. Just by looking at the product, you already know how to knit it. If you don’t have enough ideas for inspiration, then below you will find several options on how you can crochet or knit Santa Claus and the Snow Maiden. They are all beautiful, interesting, cute and funny.
Knitted Father Frost and Snow Maiden Knitted Father Frost and Snow Maiden
Knitted Father Frost and Snow Maiden Knitted Father Frost and Snow Maiden Knitted Father Frost and Snow Maiden
Knitted Snow Maiden Knitted Father Frost and Snow Maiden Knitted Father Frost and Snow Maiden Knitted Father Frost and Snow Maiden
Crocheted Santa hat
During the Christmas holidays, a knitted New Year's hat will suit both grandfathers, fathers, and restless children; crocheting it according to the pattern will give pleasure to caring and skilled craftswomen.
To knit a classic Santa hat you will need a No. 2.5 hook and 50 g each of white and red wool yarn.
Cast on a chain of air loops around the circumference of your head, preferably so that the number of loops is divided by 6. Close it in a circle and knit the first row with s/n stitches. Switch to a relief elastic band, alternating the front and back stitches.
Perform the elastic band to the required height. Many needlewomen knit 18-20 rows, and then fold and sew a double elastic band, giving the hat a beautiful volume. Switch to the red thread and perform 12 r. columns b/n.
The next step is to reduce the cap evenly. Divide the number of loops by 6. For example, there are 60 loops, divide by 6, you get 10. This means we knit 9 s/n stitches, and knit 10 and 11 together. Knit one row without decreasing, and in the next row, make 8 stitches s/n, and knit 9 and 10 together. Using this principle, the cap is reduced to 10-12 loops.
Work several rows without decreasing to get an elongated cap tip. In the last rows, the loops are cut one at a time and the work is beautifully closed. Decorate the party hat with a white pompom and optionally attach a fluffy beard. Attention needlewomen! Video tutorial on how to crochet a Santa hat. An easy lesson with a step-by-step explanation will help novice, inexperienced craftswomen understand the work.
Materials, tools for work
To work on the toy from the main photo (Santa Claus), the knitter will need:
- Yarn “Soufflé” (100% acrylic, for working thread 292 m/100 g) - a little (you can have leftovers) of red and yellow, green and brown, as well as white and beige colors.
- Yarn “Travka” (100% acrylic composition) - white color (very little, leftover yarn).
- Long knitting needles No. 3 - 1 pair for elm straight/reverse e.g.
- Circular knitting needles No. 3 with short fishing line (up to 40 cm) - 1 set.
- Hook No. 4 for elm manually made of plastic or metal - 1 pc.
- Sintepon for stuffing toys - a little.
- Cardboard circle with a diameter of 9 cm - 1 piece.
- A beautiful, narrow ribbon - a small piece to beautifully tie a “bag of gifts.”
- Elm markers (MM), with which even a novice needlewoman can easily perform some techniques, patterns and other elm nuances:
Working on Santa Claus under the Christmas tree (description)
The body of a toy Santa Claus: with yellow yarn you need to knit on knitting needles 17 pp and elm lgl, add every second p with side 18 x 1 st. Then knit plv 8 pp, then - with green yarn lgl 6 pp + brown yarn 8 rp. Then close everything, carefully sew the seam, and then seal the part with padding polyester.
For the bottom of the toy, on which it will stand, sl on knitting needles with brown yarn 25 pp and elm further elm lgl 35 pp, after which all slave pp closed.
Sew this edge along the edge, then insert a cardboard circle for stability, pull it together and nail it (with a stapler) to the bottom edge of the toy body.
Hands of a toy Santa Claus: red thread on knitting needles 16 pp and elm further lgl 14 pp. Then change the thread to yellow and knit another 26 pp, and then pp closed. Then cut out the seam and stuff it with padding polyester. The connection after the second part is similar to the first. Next, the goth hands of the toy Santa Claus need to be sewn to his body.
Head of a toy Santa Claus: use beige yarn on a 25 pp needle and knit 30 pp lgl. After that, close all work items freely - in any convenient way. Then the part will need to be stitched along the edge, then stuffed with padding polyester and finally tied with thread. Next you need to tie a very small ball-nose, then sew it on the middle of the toy face, and then carefully glue the eyes. The finished head will need to be sewn to the doll's body using invisible stitches. Then the white yarn used to twist (in a special way) the hair and beard, as well as Santa Claus' mustache, is sewn into the appropriate places (see photos provided).
Santa Claus robe: red yarn should be cast on 19 pp needles and elm further lgl, st add sl arr:
- 1 r: *3 lp, from sl p knit 3 pp*, repeat ** x 4, then 3 lp.
After you need to elm, add in every 2 second p in four places above the middle n - another x 9.
Then knit all 5 parts separately.
Sleeves of Santa Claus's robe: elm needs 8 pp, change the thread to yellow and elm another 8 pp.
The fronts, as well as the back of the elm sl, another 26 pp, adding 1 st at the beginning/end of each 4 r. Next, sew out the seams, and then along the entire contour of the robe on a circle of knitting needles with yellow yarn, you will evenly need to cast on pp and elm lg 8 pp. And after the procedure, close it freely - using any technique convenient for the needlewoman.
Santa Claus hat: with “Travka” yarn you need to knit 30 pp and then elm yarn 5 pp. Continuing to work with red yarn, knit 12 pp straight, and then decrease every second row evenly by 5 pp x 4. The rest of the stitch work will need to be closed loosely and the seam should be closed.
DM bag with gifts: green thread should be cast on a needle 40 pp and then elm plv 16 cm. Then stitch should be loose (in any way) closed, tucked seam. The finished baby bag must be filled with padding polyester. Stuck with a beautiful ribbon at the top (see photo).
Crocheted little chef's hat
Find out how to crochet an original chef's hat using the example of the Japanese toy Amigurumi.
The scheme of work is very simple! Take white acrylic yarn and hook No. 1.5-2. First you need to knit 5 or 6 convex petals, similar to small hats, and leave long tips to fasten the parts.
From the wrong side, use connecting loops to carefully assemble the top of the cap and create the appearance of a beautiful flower. Knit 2-3 rows of non-woven stitches around the entire perimeter of the part.
The next step is to lower the cook cap. If you have 5 petals, then decrease 2 loops in the center of each, making a total of 10 decreases. In the next row, remove 5 more stitches between the convex petals. Next, check the resulting volume and try the cap on the future cook. If the number of loops exceeds the head circumference, then in the next rows decrease a few more loops between the petals.
Knit the chef's hat to the desired height, complete the work and carefully secure all the ends. In such an original headdress, a child can play a cheerful, kind and hospitable chef at the holiday.
How to knit a Santa Claus hat from the eyebrows to the crown
For knitting, measure the circumference of the head, the height of the hat and the width of the headband that will be knitted with an elastic band.
Step 1. Headband: cast on loops for the height of the headband, start crocheting behind the back wall of the loops using single crochets (photo 7),
we knit an elastic band with a length equal to the circumference of the head (photo 9),
we fold the resulting fabric along the length so that the loop with the hook is on the right, we connect the edges with columns behind the front and back walls of the halves (photo 10),
turn the bezel right side out, cast on loops along the edge of the fabric with red yarn using single crochets (photo 11),
We continue to knit the circular fabric behind the back walls of the loops to the size of the height of the hat (photo 12).
Step 2. Decrease loops.
To avoid wedges, we make decreases in random places in the row, marking them with marks (photo 13).
The fewer markers we put, the longer the end of the cap will end up. The marker for the beginning of the row should differ from the others in color or size:
we skip one loop, and in the next we knit a single crochet behind the back wall, we do this decrease at each mark, then we knit two rows without changing the number of loops (photo 14),
for the next decreases, we raise the markers in the current row and move them in a circle to another place. We leave the marker for the beginning of the row in the same position, knit a row with decreases, then two rows without changes, etc., when 10 loops remain, pull the thread from two loops, and knit together with the loop on the hook, tighten the remaining loops (photo 15 ).
Step 3. Make a pompom and attach it to the crown (photo 16).
Adviсe.
1. The first method makes the tip of the cap shorter than the second. If you still need to knit it so that it is longer, then add columns not in each row, but after one or two. The main thing is that the transition to the wider part is smooth.
2. If you need a softer cap, then knit it behind the back walls of the loops.
Good luck and joy in the New Year!
Another MK on Santa Claus's hat:
In order not to forget the address of the page and share with friends, add it to your social networks:
Do you want to know news about competitions or master classes?
Tags: Knitted hats, DIY hats, New Year's crafts
Attention! It is better to write urgent questions in the comments on the website (form at the bottom of the page) or, better yet, directly by email. There are no notifications about comments from the VKontakte form! This form is more for feedback. 
How to knit a New Year's hat from the crown to the eyebrows
To work, measure the distance from the crown to the eyebrows and the circumference of the head.
Step 1. Top of the cap:
We make a ring with red thread, knit 6 tbsp into it (photo 1),
knit a connecting loop (photo 2),
we make a rise from two air loops, in the same loop we make 1 st/1n, then in every second loop we knit 2 st/1n,
in the next row we make 2 st/1n in every fourth loop, then in every sixth, etc., until we get the size of the head circumference (photo 4).
Step 2. Bottom of the cap.
We knit several rows without changing the number of loops. For us, this part will have the shape of a pipe, the length of which is equal to the height of the cap. The headband is knitted from white yarn using single crochets (photo 5) or puffy stitches (photo 6).
Step 3. Attach a pompom to the top of the head.