I nod at you with my large copper head. I used to be a coal-burner, I let out steam bravely. At least I’m still pot-bellied, important, metallic, but more often, guys, I’m electric these days.
CARNIVAL COSTUME “SAMOVAR”
consists of elements: 1. Vest 2. Turtleneck (finished) 3. Shorts 4. Hat
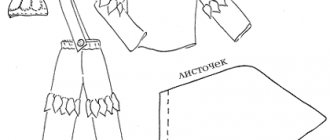
| Recommendations for choosing fabrics and accessoriesFor the costume you will need: ready-made yellow turtleneck, yellow fabric for shorts, copper-colored brocade or jacquard for a vest, elegant braid, lining fabric, tape for lampshades (or PVC tape for transporting large items), adhesive padding, scraps of white and blue satin, padding polyester. Description of workVest. The vest pattern looks like this: Shorten any suitable shelf pattern by cutting off the lower part along a horizontal line 3 cm below the armhole. You will get a coquette. Next, cut out a strip whose length is equal to the chest volume x 1.8. The width is selected individually, depending on the height of the child and the desired length of the vest. Mark deep darts along the top and bottom of the rectangular piece so that the original length is maintained in the finished form (see pattern diagram). Sewing. Reinforce the yoke with a gasket. Sew shoulder and side seams. Sew “wings” into the armholes and trim with braid. Cut the scalloped stand-up collar on the bias (see sketch), sew it cleanly, and stitch it to the neckline. Close the sewing seam with tape. Next, reinforce the lower part of the shelf and back with a gasket. Stitch the darts. Do the same for the lining. To add volume, sew in lampshade tape (or PVC shipping tape). Sew the yoke to the bottom, close the seam with braid. Sew a cuff along the bottom of the product, made similarly to a stand-up collar. Close the sewing seam with tape. Sew Velcro contact tape (Velcro) along the entire length at the back. Sew a samovar spout and a turning key from the main fabric, stuff it tightly with synthetic padding, and sew it to the vest by hand. Turtleneck. Choose a turtleneck in a harmonizing color. Trim the sleeves and cuffs with braid (see sketch). Shorts. Using any suitable pattern (for example, pajama pants) from a fashion magazine, sew shorts. Insert an elastic band into the belt. Trim the bottom of the trouser legs with braid. Cap. Sew a cap from white satin (see pattern and job description here >>>). Make the band jagged (see sketch). Make a Gzhel applique from blue satin (see motif). Sew additional parts from white satin: spout, lid, handle. Fill the nose and handle tightly with padding polyester and sew it to the hat by hand. Makeup and accessories. Draw rosy cheeks using a cosmetic pencil. Hang a small bunch of dryers around your neck. |
From the archive of photo competitions:
Description, sketch, diagrams: Lyudmila Orlova, drawing of the Samovar costume, “Gzhel” motif: Elena Krampets, coordination and layout: Tatyana Evtyukova
The material was prepared specifically for the children's portal "Sun" and published on October 30, 2009.
For personal use only! Republication in other publications is prohibited!
Source
DIY samovar costume for children
The important, glowing Russian samovar is a colorful hero who has migrated from fairy tales and poems to children's plays and holidays.
In order to create such an image, you need an appropriate suit. Many parents wonder how to make a samovar costume for a child using available materials? After all, you need to convey its volume, and also make a separate faucet and teapot. In this article you will find several ways to solve this problem. We will tell you how to make a costume for children with your own hands.
How to make a samovar costume
Despite the fact that at first glance the idea itself may seem difficult to implement, in fact, the level of difficulty is determined by you yourself.
Simpler options are created faster. However, if you spend more time and materials, the result will be more solid and elegant. We offer several ideas for you to choose from.
Made from fabric and foam
Materials
To work you will need:
Completing of the work
IMPORTANT! If you do not need a large volume or want to make the suit more mobile, you can use padding polyester instead of foam rubber.
You determine the shape of the base to your taste. It may have three holes for the head and arms. Or one large one, through which the entire upper body is threaded. But then the base should be held securely under the arms, without squeezing the torso.
From fabric
If you don’t have foam rubber or padding polyester, for a boy you can sew an ordinary sleeveless shirt from brocade .
You need to leave more fabric in the belly area for a “pot-bellied” appearance and gather the hem with an elastic band. This will be our basis. The sleeves can be sewn separately or worn underneath the shirt. You can also combine the two by sewing short, wide gold brocade sleeves onto the base and wearing a white shirt underneath.
For a girl, you can sew a dress from the same brocade. The volume of the samovar can be conveyed through a fluffy skirt, which can also be tapered downwards. To do this, you need to wear a fluffy petticoat underneath, which should not be visible. Another option is to make your own structure from hoops or, again, foam rubber.
From paper or cardboard
If you don't want to bother with sewing, there are easier and more economical ways to create a samovar costume. For this you will need large format paper and old cardboard boxes from large household appliances .
IMPORTANT! It is recommended to use light weight paper to reduce the risk of it peeling off.
So, we got two halves of the samovar: front and back. All that remains is to fasten them on top with straps that will hold on the child’s shoulders. To ensure stability of such a suit, you can also put straps on the sides from below.
Samovar faucet
A separate issue is the creation of a crane.
Many people do not recommend adding such an element at all, since it may look incorrect, especially if located close to the groin area. However, this problem has a solution. The tap may be located in the solar plexus area . Appliques made of fabric or colored paper in the form of eyes are attached above it, and below it in the form of a mouth. Then it does not cause inappropriate associations.
The crane itself can also be drawn and cut out, like an applique. You can also make a three-dimensional form from foam rubber or padding polyester covered with fabric.
How to create a samovar costume
Despite the fact that at first glance the idea itself may seem difficult to implement, in essence the level of difficulty is determined by you yourself.
The most common options are created more quickly. But, if you spend more time and materials, the result will be more complete and elegant. We offer several thoughts for you to choose from.
Made from fabric (the structure of tissues of living organisms is studied by the science of histology) and foam rubber
Materials
To work you will need:
- foam;
- calico or other compacted tissue (medical system of cells and intercellular substance, united by a common origin, structure and functions)
; - furniture edge;
- dressed fabric (a medical system of cells and intercellular substance, united by a common origin, structure and functions)
of golden, silver or copper color, for example, brocade.
Completing of the work
- Cover the foam rubber with calico in such a way that a volumetric base emerges. In the center, also at the top and bottom, secure it with a furniture edge.
- Make a brocade pattern, taking into account seam allowances. It is necessary to cut it in such a way that it is possible to moderately cover the resulting base. You can use a ready-made pattern.
Use the remaining fabric (a medical system of cells and intercellular substance, united by a common origin, structure and functions) You can use it to create panties or shorts or use it as an additional decorative element.
IMPORTANT! If you do not need a larger volume or you want to create a suit that is as flexible as possible, you can use synthetic padding instead of foam rubber.
You determine the shape of the base to your own taste. It may have three holes for the head and arms. Or one huge one, through which the entire upper part of the body is threaded. But then the base must be held securely under the arms, without squeezing the torso.
From tissue (The structure of tissues of living organisms is studied by the science of histology)
If you don’t have foam rubber or padding polyester, you can sew a regular sleeveless shirt from brocade for your little boy . It is necessary to throw more tissue (The structure of tissues of living organisms is studied by the science of histology)
in the tummy area to recall the “potbelliness” and gather the hem with an elastic band. This will be our basis.
The sleeves can be sewn separately or worn under a shirt. You can also combine both of these options by sewing short wide sleeves made of gold brocade to the base and wearing a snow-white shirt underneath.
For a girl, you can sew a dress from the same brocade. The volume of the samovar can be conveyed by the fluffy skirt, which can also be tapered downwards. To do this, you need to wear a fluffy petticoat underneath, which does not have to be visible. Another option is to make a system of hoops or foam rubber on your own.
From paper or cardboard
If you don’t want to bother with sewing, there are the most common and economical methods for creating a samovar costume. For this, you will need large-sized paper and old cardboard boxes from large household appliances .
- Draw a frontal silhouette of a samovar on cardboard, the size of a child’s torso, then cut it out along the contour.
- After this, circle the resulting figure on a second cardboard sheet in order to get the back part of the samovar. Cover the purchased sides with paper.
IMPORTANT! It is recommended to use light weight paper to reduce the risk of it peeling off.
- Then color the silhouettes so as to get an image of the samovar in front and behind.
- If you don't know how to draw, you can go from reverse. First, you need to find a suitable image on the Internet and print it at any copy center (the main thing is not to make a mistake with the format). After what to cut out, and according to the acquired silhouette, trace the figure on cardboard, cut it out and glue it together.
Headdress - teapot
It is made according to the same principle as the suit itself.
Moreover, cardboard and fabric options can be completely combined with each other. First, the cap itself is made . It can also be voluminous, the shape is given by foam rubber or padding polyester. The top is lined with the same fabric as the main suit.
Separately, synthetic padding parts are created: spout, handle, lid. They are also covered with fabric and attached to the main headdress: a spout and handle on the sides, a cap on top.
A teapot can also be made from a small piece of thick cardboard. You need to cut out the silhouette and color it, and then secure it on your head with an elastic band. Make sure that this design does not fall over the eyes and does not squeeze the child’s head.
How to sew a Russian folk costume for a boy: step-by-step description
Men's Russian folk costume is more prosaic. The appearance of the kosovorotka did not reveal the affiliation of its owner to any class. Wealth could be determined by the fabric - silk and satin were the prerogative of the rich, rags and canvas were for the poor. Such shirts are worn over trousers, untucked, belted with a silk or woolen belt, with tassels at the ends. A perky detail of the men's national costume was the cap - a headdress made of velvet or cloth with a straight or semicircular visor, covered with leather or fabric. Ports, sewn from cloth or canvas, acted as trousers and were tied at the waist with a gashnik. Could be any color. Traditional shoes are bast shoes.
Shirt for Russian costume
For assembly you need linen or cotton fabric and sewing supplies.
- The presented scheme is one of the simplest to implement. Enlarge to the required size, transfer to fabric and cut with allowances of 1.5-2 cm. You will get 1 base, 2 sleeves. and 2 gussets.
- The gusset is stitched to the base of the sleeves.
- We collect all the details and sew them on.
- We bend the edges of the sleeves and make a stitch. Then we also process the bottom.
- Neck treatment:
- All that remains is to sew on the embroidered ribbon or ribbon!
Shirt belt
A wool braid or the same ribbon with which the collar is decorated can act as a belt for a braided shirt. Or you can sew it to a rectangle of the required length, cut from the main fabric, then turn it inside out and sew it up with a hidden seam.
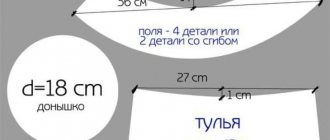
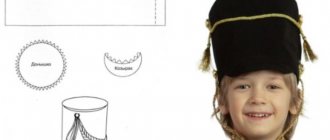
Pattern and sewing of a cap for a Russian folk costume
The easiest way to make a cap is to cut it out of cardboard, cover it with suiting fabric and sew it.
You need to know the circumference of your head, add 1 cm for allowances. This is the main part, we cut it out and cover it with fabric. The next part should be 7–9 cm larger; it is done according to the same principle. Complete with a round piece that fits the size of the middle part. The visor is about a third of the size of the head circumference. It can be covered with shiny fabric, for example, satin. The finished cap can be decorated with a strap and a large flower!
What to combine with a samovar costume
Under the bottom of such a suit, black or white clothes are worn . It is allowed to use items that match the main color or with decorative elements made from the same fabric as the base.
Shoes depend on the child's actions in the performance. If he needs to move a lot, then these should be Czech shoes of the same color as the bottom . They can also be decorated with fabric from the base. If dance numbers are not expected, then you can put the child in elegant sandals of the same color as the base.
A colorful detail can be beads made from bagels or dryers on the neck , and, of course, rosy cheeks .
Source
How to make a samovar costume
Despite the fact that at first glance the idea itself may seem difficult to implement, in fact, the level of difficulty is determined by you yourself.
Simpler options are created faster. However, if you spend more time and materials, the result will be more solid and elegant. We offer several ideas for you to choose from.
Made from fabric and foam
Materials
To work you will need:
Completing of the work
IMPORTANT! If you do not need a large volume or want to make the suit more mobile, you can use padding polyester instead of foam rubber.
You determine the shape of the base to your taste. It may have three holes for the head and arms. Or one large one, through which the entire upper body is threaded. But then the base should be held securely under the arms without squeezing the torso.
From fabric
If you don’t have foam rubber or padding polyester, for a boy you can sew an ordinary sleeveless shirt from brocade . You need to leave more fabric in the belly area for a “pot-bellied” appearance and gather the hem with an elastic band. This will be our basis.
The sleeves can be sewn separately or worn underneath the shirt. You can also combine the two by sewing short, wide gold brocade sleeves onto the base and wearing a white shirt underneath.
For a girl, you can sew a dress from the same brocade. The volume of the samovar can be conveyed through a fluffy skirt, which can also be tapered downwards. To do this, you need to wear a fluffy petticoat underneath, which should not be visible. Another option is to make your own structure from hoops or, again, foam rubber.
From paper or cardboard
If you don't want to bother with sewing, there are easier and more economical ways to create a samovar costume. For this you will need large format paper and old cardboard boxes from large household appliances .
IMPORTANT! It is recommended to use light weight paper to reduce the risk of it peeling off.
So, we got two halves of the samovar: front and back. All that remains is to fasten them on top with straps that will hold on the child’s shoulders. To ensure stability of such a suit, you can also put straps on the sides from below.
Samovar faucet
A separate issue is the creation of a crane. Many people do not recommend adding such an element at all, since it may look incorrect, especially if located close to the groin area. However, this problem has a solution.
The tap may be located in the solar plexus area . Appliques made of fabric or colored paper in the form of eyes are attached above it, and below it in the form of a mouth. Then it does not cause inappropriate associations.
The crane itself can also be drawn and cut out, like an applique. You can also make a three-dimensional form from foam rubber or padding polyester covered with fabric.
DIY Russian folk costume patterns
The patterns we have collected will help you sew a Russian folk costume for any height. Even those who have never dealt with sewing can sew a Russian folk costume using patterns.
DIY Russian folk costume for girls
1. Making a sundress for Russian folk costume is quite simple. First, we take measurements from the child. The sundress of a Russian costume consists of:
- front panel 1 piece;
- back panels 1 piece;
- straps 2 parts;
- inserts 2 parts;
- plating of the upper part 2 parts.
The pattern below is prepared for children with a height of 120 to 140 centimeters.
This pattern must be transferred to the selected material and cut out. The material must be chosen in red, blue or orange colors. Pay attention to the brightness of the fabric. Such material should emphasize the peculiarity of the Russian costume.
We begin to assemble our costume according to the following algorithm:
- First, we sew together the elements of the front, back and inserts on the sides;
- then the top;
- sew the straps;
- We decorate the edges of the suit's sundress with red fabric.
- Russian folk costume is ready.
DIY kokoshnik for Russian costume
Kokoshnik is a headdress that was worn on holidays in Rus'. Only married women could wear it. All this began in the 16th century. The kokoshnik looked like a high crown, to which a cloth was attached, behind which the hair was hidden.
Making a kokoshnik with your own hands is not a problem if you have the desire and the necessary materials:
- cardboard;
- textile;
- scissors;
- glue;
- accessories: lace, braid, rhinestones;
- tape measure.
First we need to make the base for the kokoshnik. We will make it from cardboard. Please note that the kokoshnik should go from ear to ear across the forehead. This is the algorithm you use to measure distance.
Next we need to cover the front of the kokoshnik with fabric. To do this, we place the kokoshnik on the fabric, step back 2-3 centimeters from each edge and draw a contour. Next, we cut along the contour and begin the constriction. We use glue to secure the fabric. At the same stage, we glue the tape that will support the kokoshnik on the head.
Now let's move on to the decorative aspect. We take the fittings that you have chosen for the kokoshnik and finish the front.
The kokoshnik is ready!
DIY kokoshnik for Russian costume photo
DIY Russian folk costume for a boy
The Russian folk costume for a boy consists of two parts - a kosovorotka (shirt) and trousers. In order to sew a blouse, we need:
- Fabric – linen or cotton;
- Sewing machine;
Using this pattern, sewing a kosovorotka will not be difficult. To begin with, we will cut out our future shirt from the fabric using the pattern. We get the main part, 2 sleeves and 2 gussets.
- Sew the gusset to the edges of the sleeves, as shown in the photo.
- We apply the resulting parts to the main part and sew them using a machine.
Now you need to bend the sleeves and sew them. After this we stitch the base.
The braid is ready. Let's now move on to the decorative part. First, let's make the neck:
- Decorate your shirt with a beautiful ribbon
Congratulations! The braid is ready.
DIY Russian folk costume photo
DIY Russian folk costume video
Source: https://svoimi-rukam.ru/krasota-i-zdorovye/kostyumy/russkii-narodnii-kostum-svoimi-rukami/
Headdress - teapot
It is made according to the same principle as the suit itself. Moreover, cardboard and fabric options can be completely combined with each other.
First, the cap itself is made . It can also be voluminous, the shape is given by foam rubber or synthetic padding. The top is lined with the same fabric as the main suit.
Separately, synthetic padding parts are created: spout, handle, lid. They are also covered with fabric and attached to the main headdress: a spout and handle on the sides, a cap on top.
A teapot can also be made from a small piece of thick cardboard. You need to cut out the silhouette and color it, and then secure it on your head with an elastic band. Make sure that this design does not fall over the eyes and does not squeeze the child’s head.
Additional items
Additional elements of the hero's New Year's costume include a helmet, boots and a wicker belt (scarlet sash).
Helmet for a hero
There are several options for making a heroic helmet. It can be glued together from thick cardboard and then painted, or directly made from a piece of foil insulation.
The algorithm of actions is the same in all cases.
Stage 1:
- The circumference of the child's head is measured (a measuring tape runs along the back of the head, extends above the ears and connects above the eyebrows).
- 2 cm is added to the resulting value (margin for movement).
- The result is divided by 6 (the helmet consists of six identical wedges).
Stage 2:
- On a blank sheet of paper, draw a triangle, at the base of which lies a segment equal to the value (head circumference + 2 cm) / 6 cm. Let's call the ends of the segment the letters A and B.
- This segment is divided exactly into 2 parts.
- A line 20-22 cm long is laid upward from the central point (if the child is small, it is better to choose the smallest value.) Let's call the top point the letter B.
- At points A and B, vertical lines equal to 6-8 cm are drawn (6 cm - for 2-4 years; 7 cm - for 4-6 years; 8 cm - for 6-10 years).
- These lines connect to point B.
- It turns out to be a wedge.
- The blank is cut out, applied to cardboard or foil insulation and traced 6 times.
- The future helmet is cut out and glued together using a glue gun or Moment glue in a circle. The result will be a headdress that resembles a crown.
- The wedges are glued together.
That's it, the hero's helmet is ready. If it was made of cardboard, all that remains is to paint it silver. The insulation product does not require additional processing.
Heroic boots
To sew boots for a hero, you do not need to master all the intricacies of the shoemaker's profession. It is enough to use the simplest option - make high overlays for shoes that will be fixed on the foot using elastic bands (they run along the sole).
Stage 1:
- The red fabric is folded in half with the right side facing inward.
- The children's sock is outlined on a white sheet of paper and extended along the shin (if high boots are needed).
- The sock pattern increases on all sides by 2-3 cm (increase for shoes) and another 1 cm (increase for allowances).
- The pattern is cut out, transferred to the fabric, and the material is cut.
- You get 4 identical blanks.
Stage 2:
- The resulting 4 blanks are sewn together in pairs along the sides (the top and bottom remain open).
- The upper edge of the boot is folded to the wrong side by 2 cm and not stitched to the end (1.5-2 cm of fabric remains open).
- The bottom edge of the shoe is turned to the wrong side by 1 cm and stitched.
- The underwear elastic is cut into strips, the width of which is equal to the width of the child’s foot (measured by shoe) + 2 cm for fasteners.
- Elastic bands are attached to the bottom of the boot (2 pieces per 1 boot).
- An elastic band is inserted into the upper edge of the heroic shoe through an open hole. Its length should be 2-3 cm less than the circumference of the child’s lower leg.
Braided belt
The hero's New Year's costume is almost ready. The only thing left to do for such a strongman is a belt. For this:
- Three red decorative cords, the length of which is 2-3 times greater than the child’s waist circumference, are braided.
- The ends of the cords unravel a little.
- The belt is tied over the chain mail - this makes it convenient to insert a light sword into it.
What to combine with a samovar costume
Under the bottom of such a suit, black or white clothes are worn . It is allowed to use items that match the main color or with decorative elements made from the same fabric as the base.
Shoes depend on the child's actions in the performance. If he needs to move a lot, then these should be Czech shoes of the same color as the bottom . They can also be decorated with fabric from the base. If dance numbers are not expected, then you can put the child in elegant sandals of the same color as the base.
A colorful detail can be beads made from bagels or dryers on the neck , and, of course, rosy cheeks .
Source
DIY samovar costume for children: for a boy and a girl, with a pattern
Maybe I'm addressing this in the wrong topic, sorry in advance. I have a problem. For the performance, the girl needs to make a samovar. Preferably huge so that it looks comical. Unfortunately, you can't just draw it. I was wondering what material to make it from. I thought it was made of foam rubber, but I needed a stable structure, since the samovar should stand on the table. Probably need a frame? Can you advise how to make it, I also don’t know what to make the legs, lid, handles and spout from and how to attach them? Maybe someone has already done something similar or seen the pattern. I am hope for your help.
I wanted to make a three-dimensional circle or cylinder out of foam rubber, cover it with fabric or gold paper, and cut out the legs and lid from cardboard (although I can’t yet imagine how to make these parts) and sew them to the body. But the biggest problem is that, in my opinion, all this will not stand. The carton legs will not support the weight of the structure.
Post edited by Olku
— Apr 17 2008, 18:16
DIY attributes for the Russian Samovar dance
Svetlana Kholeva
DIY attributes for the Russian Samovar dance
DIY attributes for the Russian Samovar dance
Dear colleagues, today I would like to present a master class on making attributes for the dance “ Russian Samovar ”
made
from scrap materials. made cups and a samovar will decorate the dance and the holiday itself with their uniqueness, unusualness and brightness.
For our "service"
you will need:
1. Ceiling slabs (foam)
.
It is advisable to choose slabs with a smooth surface, but I had textured ones on hand , and they also look quite interesting.
Progress
Apply a drawing of the samovar and cups to the plates , then cut them out. Cover with base (I use pink for cups, yellow for samovar )
.
Let dry. Then glue the circles onto the cups, paint the bottom and handle. Draw the face of the samovar : eyes, handles, nose. Attach (or sew)
elastic bands with a stapler.
This is such a wonderful service I got
Children and spectators were delighted; the autumn holiday turned out to be bright, colorful and unforgettable.
Do-it-yourself anemometers (for children in the preparatory group) Experiment “Spoon anemometer” For the experiment you need: an adult assistant; tea spoon; screwdriver; wire; large screw; sheet of plywood measuring approximately .
Attributes for playing in a store, cafe with your own hands In my group “Rays”, parents helped in creating attributes for role-playing games. Each. “Attributes for Maslenitsa with your own hands” Dear colleagues! Our favorite holiday, Maslenitsa, has come and gone. Nowadays, I really want to show modern technologies to children.
DIY attributes for the role-playing game “Shop” To gain gaming experience and the ability to develop a game plot, it is necessary to teach children the game. In play, the child shows initiative and creativity.
Trees made with your own hands Love for nature is a complex feeling that includes emotional responsiveness, and the desire to protect and increase natural resources and interest in. Didactic games for fixing colors, made with your own hands Everyone knows that didactic games and exercises are a very effective method in teaching and raising children. I want to introduce. Do-it-yourself simulator games for the development of hand motor skills Each teacher pays great attention to the development of hand motor skills in preschoolers. I also try to ensure that my students have. Do-it-yourself dolls WELCOME TO MY WORKSHOP Six-handed doll We play Kudelitsa with her. It was given to the owner to help in all matters. This is ritual. Master class “Attributes with your own hands” For the children's matinee dedicated to our mothers, in our second youngest group, according to the script, it was thought that our girls would be chickens. Do-it-yourself samovar with sweets “Come in for tea.” Photo report I bring to your attention this samovar with sweets inside. The idea came to me immediately, since I made this samovar as a gift for myself.
DIY samovar costume for children
The important, glowing Russian samovar is a colorful hero who has migrated from fairy tales and poems to children's plays and holidays.
In order to create such an image, you need an appropriate suit. Many parents wonder how to make a samovar costume for a child using available materials? After all, you need to convey its volume, and also make a separate faucet and teapot.
In this article you will find several ways to solve this problem. We will tell you how to make a costume for children with your own hands.
DIY herald costume
Many mothers keep photos from children's parties for many years as cherished memories of their children's childhood, so you always want your child to be dressed brightly and originally. If the herald appears in a folk tale about the Tsar-Father and the boyars, the European outfit will look quite strange. It’s better to try to make a herald costume for the New Year in the Russian style. To do this, you can rent a boy’s folk costume with trousers that are tucked into red boots and a blouse shirt.
However, to obtain the desired result it will have to be supplemented. To make the herald's costume for the New Year a success, make a pipe for it as described above and a hat. To do this, sew something like a soldier’s cap from fabric of a bright color, for example red, and add a fur trim along the bottom edge. You can also make a sash and give the boy a large scroll with the inscription “Decree” in his hands.
Now you know how to make a herald costume with your own hands. The photos presented above will help you choose the option that best suits your child.
How to make a samovar costume
Despite the fact that at first glance the idea itself may seem difficult to implement, in fact, the level of difficulty is determined by you yourself.
Simpler options are created faster. However, if you spend more time and materials, the result will be more solid and elegant. We offer several ideas for you to choose from.
Made from fabric and foam
Materials
To work you will need:
Completing of the work
IMPORTANT! If you do not need a large volume or want to make the suit more mobile, you can use padding polyester instead of foam rubber.
You determine the shape of the base to your taste. It may have three holes for the head and arms. Or one large one, through which the entire upper body is threaded. But then the base should be held securely under the arms, without squeezing the torso.
From fabric
If you don’t have foam rubber or padding polyester, for a boy you can sew an ordinary sleeveless shirt from brocade . You need to leave more fabric in the belly area for a “pot-bellied” appearance and gather the hem with an elastic band. This will be our basis.
The sleeves can be sewn separately or worn underneath the shirt. You can also combine the two by sewing short, wide gold brocade sleeves onto the base and wearing a white shirt underneath.
For a girl, you can sew a dress from the same brocade. The volume of the samovar can be conveyed through a fluffy skirt, which can also be tapered downwards. To do this, you need to wear a fluffy petticoat underneath, which should not be visible. Another option is to make your own structure from hoops or, again, foam rubber.
From paper or cardboard
If you don't want to bother with sewing, there are easier and more economical ways to create a samovar costume. For this you will need large format paper and old cardboard boxes from large household appliances .
IMPORTANT! It is recommended to use light weight paper to reduce the risk of it peeling off.
So, we got two halves of the samovar: front and back. All that remains is to fasten them on top with straps that will hold on the child’s shoulders. To ensure stability of such a suit, you can also put straps on the sides from below.
Samovar faucet
A separate issue is the creation of a crane. Many people do not recommend adding such an element at all, since it may look incorrect, especially if located close to the groin area. However, this problem has a solution.
The tap may be located in the solar plexus area . Appliques made of fabric or colored paper in the form of eyes are attached above it, and below it in the form of a mouth. Then it does not cause inappropriate associations.
The crane itself can also be drawn and cut out, like an applique. You can also make a three-dimensional form from foam rubber or padding polyester covered with fabric.
Very often, kindergartens host days of Russian culture, where children often have to dress in Russian costumes. Boys dress in loose-fitting trousers and a wide shirt tied with a belt. As for girls, it’s mostly a long, floor-length sundress, a variety of shirts and hats. Headdresses can be all kinds of ribbons, headbands, wreaths or kokoshniks.
To make it as easy as possible to sew a Russian costume for a girl, let’s take an old, unnecessary mother’s dress.
The main thing is that it is at least in style, or in the pattern on the fabric, made in the style of Russian folk costume . You will also need fabric, it can be calico or chintz, the main thing is that it matches the dress well in color and texture.
You will also need braid, thread, elastic band, scissors, etc. Let's look at how to sew a Russian folk costume for a girl.
Blouse
If you don’t have a suitable dress, then you can sew a simple shirt from a suitable fabric using a pattern from Burda magazine No. 10 for 2003, model 151 .
To begin, take the dress and push the bottom part away from the top. If there is no seam along the waistline, then simply cut at this level.
From the top part we will make a blouse for a sundress, and from the skirt we will make inserts into a sundress.
First, let's sew a blouse. To do this, we will sew in the upper part of the dress. Since the dress is my mother’s, it is obviously too big for my daughter. We mark the seam line by hand and cut off the excess, leaving a margin for allowances.
Sew along the marked line with a regular stitch.
We process the edge using a zigzag or overlock.
We bend the bottom of the product and also sew it with a regular stitch.
We sew an elastic band onto the sleeves, since our dress used to have a fastener in the form of a loop and a button, we need to use an elastic band to connect this place.
First we sew on one side, then we sew the second part onto the elastic band.
Then you should sew the elastic around the entire perimeter of the sleeve: slightly stretch it and sew it with a regular stitch, so that when we release the elastic, folds will form. If the elastic is thick, then you should sew it two or three times: two lines are applied from the edges, and one in the middle.
We turn our shirt right side out. Since the sleeves have elastic bands, even if they are too big for a girl, they can easily be lifted up and they will be in the shape of a lantern.
Sundress
Let's move on directly to sewing the sundress. We measure the child’s chest volume, add about 40-50 cm to this value (depending on how wide and loose you want to make the sundress) - this will be the width of the fabric. Then take the fabric and fold it in half in width. We measure the length from the back, starting from the chest line, going down along the spine to the ankle or heels (depending on the desired end result) - this will be the length of the fabric. In my case, the suit was made for a girl 116-120 cm tall (5-6 years old), TG – 50 cm, product length – 84 cm (toe). Thus, the width of the fabric was 80 cm, and the length was 84 cm.
We set aside 15 cm in width at the top, in the place where there is no fold in the fabric.
Then you need to draw a straight line from this measurement to the lower left corner of the fabric to get a so-called bevel. It is better to do this with a long ruler or apply a meter and tighten it well.
Draw a straight line to the corner of the fabric and cut along the marked line. On the other hand, where the fabric folds, we do not cut off the corner. This section will be gathered with an elastic band.
From the skirt of the dress we cut strips of fabric 10-15 cm wide. These strips of fabric will serve as inserts in the sundress.
We connect the strips together with a regular stitch, folding them with their right sides inward.
We process the edges in the same way as on a shirt using a zigzag or overlock. Then we apply our polka dot strip to the yellow fabric (to the place where the bevel is made), we fold them with their right sides inward and stitch them on a typewriter. Don't forget to process the edges of the product.
We do the same on the other side.
As a result, you should have a sundress without straps. The polka dot fabric insert should serve as a connecting element.
It remains to process the top and bottom of the product. First, let's work on the top: take our sundress and turn it wrong side out, then fold the top of the product 1 cm. Then fold it another centimeter and sew it on a machine.
We will leave about ten centimeters unstitched at the back. We will sew an elastic band into this place so as not to make any locks or extra fasteners. Since we initially added 40-50 cm to the chest volume, then cut 30 cm along the bias (15 cm on one side and 15 cm on the other side), the top of the product is free for a child and wider than the OG by 10 -20 cm.
We insert the elastic into the hole formed and sew it on one side.
We cut off the elastic; its length should be half the size of the hole left.
We sew the second end of the elastic on the other side, all that remains is to sew along the entire length of the elastic. To do this, tuck one end under the presser foot, insert a needle into it and lower the foot.
We pull the second end towards ourselves until the fabric straightens out, and you should hold the fabric behind the foot so that the stitching goes smoothly.
Place three or four lines along the elastic.
The top of the sundress has been processed; now the straps need to be sewn on. We take two strips of fabric 20 cm wide, 20-25 cm long and fold them lengthwise with the right side inward.
We sew the two edges of the product together with a regular stitch and process it with a zigzag.
Through the hole left, we turn our strap right side out. Sew along the perimeter of the strap with a regular stitch. We wrap the untreated ends inward and also stitch them.
All that remains is to sew the straps to the sundress.
We cut off a 10-15 cm wide strip at the bottom of my mother’s dress and sew it onto the bottom of the sundress, 8-10 cm from the edge, having first folded the edge of the strip inward to create a beautiful aesthetic appearance.
We adjust from above, retreating from the edge 1-2 mm.
From below we also fold a strip of polka dot fabric inward, going around the yellow fabric, and stitch it.
All that remains is to sew decorative braid around the perimeter and our sundress is ready.
Headdress
And finally, we’ll sew a headband. To do this, cut a long strip of fabric 13 cm wide from the yellow fabric.
We finish the edges of our strip with a hem stitch.
Fold it in half lengthwise and sew along the perimeter.
We fold our strip so that folds of equal width are formed, put decorative braid on top that will hold them, and pin them together.
We sew along the decorative braid using a machine. At the ends of the bandage you can sew an elastic band or make any other fastener and the bandage is ready.
That's all, our costume in the Russian folk style is ready, all that remains is to try it on the child and wear it with pleasure. Other folk costumes can be viewed here .
Author of the material: Helen-Winslet
Headdress - teapot
It is made according to the same principle as the suit itself. Moreover, cardboard and fabric options can be completely combined with each other.
First, the cap itself is made . It can also be voluminous, the shape is given by foam rubber or padding polyester. The top is lined with the same fabric as the main suit.
Separately, synthetic padding parts are created: spout, handle, lid. They are also covered with fabric and attached to the main headdress: a spout and handle on the sides, a cap on top.
What to combine with a samovar costume
Under the bottom of such a suit, black or white clothes are worn . It is allowed to use items that match the main color or with decorative elements made from the same fabric as the base.
Shoes depend on the child's actions in the performance. If he needs to move a lot, then these should be Czech shoes of the same color as the bottom . They can also be decorated with fabric from the base. If dance numbers are not expected, then you can put the child in elegant sandals of the same color as the base.
A colorful detail can be beads made from bagels or dryers on the neck , and, of course, rosy cheeks .
Suit fabrics
The materials deserve special attention. They should be natural and colored for sundresses, white, light for shirts for girls and plain for pants, with a small pattern for shirts for boys.
If girls cannot choose the necessary ornament for a sundress, a plain fabric is allowed, onto which a wide braid with a floral ornament is sewn. But with the assortment of our online store, choosing fabric for Russian folk costumes will not be difficult.
We can offer chintz, silk, brocade, velvet, satin. A variety of braids and sewing are also available.
DIY samovar costume for children: for a boy and a girl, with a pattern
Maybe I'm addressing this in the wrong topic, sorry in advance. I have a problem. For the performance, the girl needs to make a samovar. Preferably huge so that it looks comical. Unfortunately, you can't just draw it. I was wondering what material to make it from. I thought it was made of foam rubber, but I needed a stable structure, since the samovar should stand on the table. Probably need a frame? Can you advise how to make it, I also don’t know what to make the legs, lid, handles and spout from and how to attach them? Maybe someone has already done something similar or seen the pattern. I am hope for your help.
I wanted to make a three-dimensional circle or cylinder out of foam rubber, cover it with fabric or gold paper, and cut out the legs and lid from cardboard (although I can’t yet imagine how to make these parts) and sew them to the body. But the biggest problem is that, in my opinion, all this will not stand. The carton legs will not support the weight of the structure.
Post edited by Olku
— Apr 17 2008, 18:16
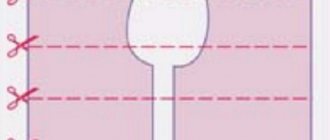
Cutting fabric
Steps:
- The material is folded in half lengthwise (right side inward) and secured with sewing pins.
- The Di value is divided in half and laid down from the fold line of the fabric.
- The width is drawn in accordance with the sketch.
- The width value is divided in half and marked on the fold line.
- From this point to the right, down and left, a value is calculated using the formula: (head circumference + 5 cm) / 2.
- A semicircular line is drawn, on the side of which a vertical slot 15-20 cm long is drawn. It is cut only in the front, the back remains without cuts.
- On the fold line of the fabric, 2 more rectangles are drawn, the length of which is equal to the value of Dp, and the width is 15-20 cm.
- 1-2 cm allowances are added to all workpieces, and the material is cut out.