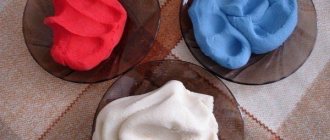
Craft material
Disposable tableware is designed for use when traveling outdoors, where there is no opportunity or desire to wash dishes after eating.
Such dishes are made from the following materials:
- from paper;
- made of plastic;
- from foil.
All this material does not cause allergic reactions and is environmentally friendly. If you are not lazy and wash disposable dishes after a picnic, you can get excellent material for crafts.
How to make a spaceship
Do you want to please your children with something unusual?
Are you attracted to stars and space? Other civilizations? In this case, a flying saucer or spaceship craft will surely delight your kids.
To do this you will need:
- Disposable plastic plate;
- Glue gun;
- Small plastic salad bowl;
- Two disposable cups.
In order to implement the idea it is necessary:
- Turn the salad bowl upside down;
- Glue a plate to it;
- Attach the legs in the form of cups.
To implement an unusual idea, you can use buttons, CDs, plastic bottles, and foil. In a word, everything that the imagination extends to.
Operating technique
When making crafts from disposable tableware, craftsmen use different techniques. After looking at photos of crafts made from disposable tableware, it is not always clear how different types of tableware can be assembled into one composition.
The main types of technology are:
- connection with staples, a stapler acts as a tool;
- gluing parts with PVA glue;
- cutting out shapes and parts with a paper knife or scissors;
- placing craft elements on skewers.
Panel "Clown"
Author: Elena Ivanovna Suverneva, additional education teacher. MAOU DO TsRTDIU Kamensky district, Varvarovka village. Work for the competition in the “Golden Hands” category.
Making
the “Clown” panel can be recommended for children from 7 to 12 years old.
This is an interesting, exciting job with excellent results. Master class “Clown with balloons”
For the clown you will need: • a cardboard plate; • colored paper; • cardboard; • PVA glue.
1.Cut strips of colored paper 1 x 8 cm, orange for hair.
2.Glue the strips onto the edge of the plate in 2 rows.
3.Cut out the elements of the face from paper: 3.1.Circles with a diameter: • 4cm – nose; • 2 cm - cheeks; • 2 cm - eyes; • 1.5 cm - pupils.
3.2. Two triangles of red and white - lips. 3.3. Arcs of black paper - eyebrows.
4.Glue the facial elements.
5.Cut out a triangle, a circle for a cap and a bow from paper.
6. We design the clown’s head.
7. Making balls. For the balls, take a cardboard circle with a diameter of 5-6 cm. Strips of colored paper in three colors.
8.Glue the strips onto the circle in three rows.
9.Make 3 balls.
10. We place the balls under the clown’s head at different levels. Secure with strips of cardboard or thread.
11. The clown can be decorated with sequins or sparkles.
Homemade crafts
How interesting it is to look at crafts made from disposable tableware with your own hands at exhibitions of children's creativity. Children participating in these exhibitions proudly conduct master classes for lovers of applied arts.
What can you see there!
How graceful is the white lily, collected in a composition of plastic spoons.
What a wonderful lampshade is a pineapple made from yellow spoons.
Funny faces of animals, beasts, birds can be obtained from ordinary disposable plates, you just have to use your imagination with them.
Snowmen
In addition, you can make quite funny snowmen from the same plastic plates. To make such a craft, you don’t even have to cut the dishes. In this case, the snowmen will turn out to be relatively large in size.
In this case, the sequence of actions is quite simple:
We recommend reading:
- Crafts from scrap materials - the most beautiful and interesting crafts from scrap materials (105 photos)
- Hedgehog craft: master class on how to make a hedgehog craft with your own hands (140 photos and videos)
- Crafts from seeds - step-by-step instructions on how to make cool crafts from seeds (125 photos)
- We take two plates. The first plate will become the body of the snowman, the second - the head. It is advisable to use dishes of different sizes, as this will allow the craft to look more natural.
- We connect the plates. In order to connect the plates, we use a hot-melt gun or an ordinary stapler.
The resulting snowmen can be hung around the apartment, thereby helping to create a festive New Year's atmosphere.
New Year's crafts
Disposable tableware makes excellent crafts for interior decoration for the New Year. And what cool Christmas tree decorations you can make from them!
New Year's crafts made from disposable tableware can be in the form of original panels with symbols of the year according to the zodiac sign. To do this, you need flat white plates; they, like an artist’s blank canvas, await painting.
Taking a green plate and carefully cutting out the middle, we get a Christmas wreath, which you can decorate with sparkles, balls or small cones and hang on the wall.
Garlands in the form of bright fans strung on a cord can decorate a wall. If the plates are cut into 4 parts. Glue beads and colored foil figures to them, and we’ll get bright fans.
Snowmen made from disposable white cups are always relevant for the New Year, refresh and decorate the interior.
Painting with giant flowers
Using plastic plates you can make a panel with interesting and beautiful large flowers.
In order to implement this original idea, you need to prepare the following materials:
- Plastic white plates – 15 pieces;
- Plastic yellow plates - 3 pieces;
- Large wooden board;
- Brown felt-tip pens or markers;
- Blanks - butterflies, bees, drawings with flowers, grass.
In order to make giant flowers you need to do the following:
- Draw funny smiley faces on yellow plates using felt-tip pens and markers;
- Place plates painted with smiley faces in the middle;
- Glue white plastic plates to the painted smiley faces;
- To ensure that crafts made from plastic plates do not stand alone, you can build a picture, decorating them with cheerful butterflies and bees, placing drawings with flowers in the center. You can also place grass in the middle. On a large wooden board, lay out all the details of flowers, herbs and other elements to your liking.
Children's crafts
Toys that children will “live” for several days will definitely get boring for them. Children's inner world is structured in such a way that they constantly want new fun. If you buy toys for them every week, you can go broke.
Children's crafts made from disposable tableware will help solve this problem. With what pleasure they will make their own toys from scrap materials and then play with them. A nice, plump penguin will turn out from a round glass of black or brown color.
His body is ready, this is the glass itself. Glue two small eyes and a cardboard nose in the shape of a triangle. Two ovals cut from the same glass will serve as wings. They need to be inserted into the slots on both sides.
The penguin's paws will be feet cut out of light cardboard with three wide-open toes. By gluing them to the base of the body, you can get a cute little penguin.
Panel from a plate and foamiran
The author of the work is Natalya Ivanovna Kolmogorova, teacher of additional education, State Budgetary Educational Institution Secondary School No. 2 named after V. Maskin railway station. Klyavlino, Samara region, JV "Prometheus".
The panel that I suggest you make will not require a lot of time and money, and it looks simply excellent. Even a child can do it, of course, under your strict guidance.
So, for work we need:
- disposable paper plate with a beautiful ornament;
- foamiran of various colors;
- thermal glue gun;
- scissors;
- ribbon;
- beads;
- iron.
Work order, step by step:
1 — Let’s prepare a suitable plate and foamiran of various colors.
2 - Cut out leaves from green foamiran, cutting the edges on both sides.
3 - Let's prepare flowers of various shapes and shades, cutting them out of Thomas.
4 - Use an iron to shape the leaves and flowers. To do this, after heating the iron, we apply the workpiece to its sole. While the foamiran is heated, carefully stretch it between your fingers, giving the flowers and leaves volume.
5 — This is what flowers look like after ironing...
6 - Using a heat gun (Titan glue does not cope well with this task), glue beads and flowers onto the plate.
7 - We complement the composition with green leaves and a bow. Now all that remains is to glue the ribbon to the back of the plate and hang the panel on the wall.
Crafts master class
What beautiful paintings are made by folk craftsmen from disposable tableware. A master class on making crafts from disposable tableware helps beginners who love creativity to make gifts and interior wall decorations.
A vase with a bouquet of yellow tulips is a spring motif for a three-dimensional panel. You can use black glossy cardboard as a base. A vase cut out of colored foil and glued to the bottom of the cardboard looks gorgeous against a black background.
You need to lay out flower templates with leaves on stems on cardboard so that the picture is voluminous and fits well on the base.
Using green foil, we prepare long stems using the twisting method and glue them to the background of the picture so that they go into the vase. We glue the leaves from the same foil to the stems, leaving the other end not glued. This will give the picture volume.
The tulips will be yellow spoons glued to the stems with the convex side facing out. The number of colors is determined by the desire of the craftsman himself.
Such a picture, placed in a beautiful frame, will be a real decoration of the interior.
Old doesn't mean bad
Almost everyone has old plates that take up space and are a pity to throw away. “What to do with them?” you ask. You can make an art object out of old plates with a little imagination. By painting and decorating an old plate you will get a wonderful photo frame.
You can also make an unusual flowerbed design from old plates. And it will also be a wall decoration for the interior if you, in an original way, following the color scheme of your interior, paint your dishes with acrylic paints and hang this splendor on the wall.
Christmas decorations
Always during the Christmas and New Year holidays, the interiors of the rooms and the tree itself are decorated with cute angels. Christmas tree crafts made from disposable tableware can also be made in the form of angels, which should be hung on the tree.
To do this, it is best to take a small silver or golden plastic saucer. Using a simple pencil, mark the middle of the saucer. Fold the top towards the middle of its side. The silver angel dress is ready. Using the template, cut out the head with hairs. Draw eyes, nose and mouth on the face. Paint your hair a slightly yellowish color and glue beads onto it to create something like a crown.
Cut out the wings according to a template from a transparent plate. A stapler will help connect the wings and head to the main figure. To prevent the staples from being visible, it would be a good idea to glue decorations to these areas. A narrow satin ribbon, folded in half, in the form of a loop, will help you hang the angel on the Christmas tree. You can use this technique to make several figures of angels, Santa Claus, Snow Maiden and other characters.
What is papier-mâché?
The technique called papier-mâché originated in China back in the second century. Translated from French, this name means chewed or torn paper. In ancient times, various things were made from such a plastic mass, from kitchen utensils to unusual armor for warriors, which were then varnished.
Gradually, this technique spread throughout the globe, gaining the greatest popularity in European countries. Today, many things are made using the papier-mâché technique, mainly interior decorations.
Interesting crafts
Disposable tableware allows creativity to fly. Interesting crafts made from disposable tableware give confidence that human hands are capable of much.
If you have an outdated clock in your home, you can always update it and breathe new life into it. Taking plastic spoons of a color that best suits the dial, cut off the long handles. Leaving a length of 5 cm.
Glue the spoons with the curved side in a circle on the back of the clock. Place spoons close to each other so that there is no free space. Then, after waiting until the first row sticks well to the clock, glue the second row.
It turns out beautifully when 3-4 rows are glued. Since the spoons are glued to the front side of the watch with the concave side, the frame of the watch visually resembles scales. The watch will look stylish and elegant, decorating the interior.
Examples
Of the simplest and most joyful crafts for a child, it is better to focus on a garland. Its parts are prepared according to a single template, and creativity can be dedicated to any holiday, including Birthdays.
Frame
You can do this craft with a very young child. It is just a warm-up before real needlework.
You need to equip your baby with felt-tip pens, pencils and markers and allow him to put a pattern of his choice on the plate. A photo is pasted into the decorated saucer. The frame is ready. All that remains is to mount it on the wall.
Garland of snowmen
You need to take several small plastic or cardboard plates and decorate each of them as a snowman’s face. You can use pencils, felt-tip pens, colored paper, tape, and tinsel for this. Whatever comes to mind. The idea is that each snowman should be individual.
Therefore, each plate is a separate product. You can make the New Year's attribute for several days, either together or in turn. The number of faces required will be enough to cover the entire planned length of the connecting line.
When they are all ready, you can sell the fishing line through the edges of the former saucers or additionally equip them with hooks. The kid will be happy to see the results of his work, looking at the wall or ceiling decorated with them while the chimes strike.
You can decorate a Christmas tree using the same principle. If you draw the contours of the figures into the plates by hand or according to prepared templates, and then cut them out and decorate them in all sorts of ways.
Christmas tree decoration
- For the product you need to take a green plastic plate. Or paint any other one in the desired color with acrylic paint or gouache.
- Wait until the paint dries.
- Cut the saucer into three identical triangular pieces
- Connect the parts using PVA in a herringbone shape.
- Make a hole in the crown and thread a bright thread through it, ending it with a loop.
- The product can be decorated with any decorative material. Beads, sequins, and buttons will be used.
Mask
- Based on the sample or selected picture, the bottom of the plate is shaped in the form of an animal face, a funny face, or a mysterious facial expression of an unknown creature.
- The contours of the eyes are formed with a pencil.
- A child can cut out eyes under the supervision and control of an adult.
- Ears are attached along the outer contour if an animal was chosen as the subject.
- Thread an elastic band into the holes on opposite edges.
- For greater effect, the tiger's mustache or noses can be glued as separate elements using PVA glue instead of drawing.
Not only cups and plates can be used. Disposable spoons are an excellent preparation for artificial flowers. You can make a whole bouquet for March 8th. All kinds of patterns for cutting out snowdrops, tulips and roses can be found on the mentioned resource.
Bouquet of tulips
In order to create a charming masterpiece you will need:
- disposable spoon quantity: 5 pcs. on a flower;
- corrugated colored paper;
- glue;
- tassels;
- green electrical tape.
You need to cut out squares from red or pink paper and wrap a spoon in each of them. Assemble five decorated spoons into a flower, connecting their edges with electrical tape.
When the required number of flowers are ready, a bouquet is formed. First, you need to make a stem and leaves from green paper. The finished bouquet can be given to your mother on March 8th.
Kitchen crafts
Products made from disposable tableware can perfectly decorate and enliven the kitchen interior. The material, utensils, is closest in functional properties to the kitchen.
Panels of plates, frames for still lifes of spoons, forks and knives, decorative plates, all these crafts will perfectly characterize the owners of the house. Creative people will definitely notice the imagination, skill, and perseverance of their household members and appreciate them.
And how a Christmas tree made from green tablespoons will decorate the kitchen during the New Year holidays.
Disposable tableware is an inexhaustible source of creativity. All you have to do is apply your imagination, the desire to teach children to see beauty in any object at hand, and inspiration will appear to make crafts with your own hands.
Application of plates
It will be a joy for children if you entrust them with a plate, because on it you can only draw a mouth, eyes, nose, after painting it yellow and the cheerful sun is ready. You can glue drinking straws as rays.
At the initial stage of training, you can choose this option, diversifying it, in addition to the sun, with various faces. Having mastered the technique well, you can move on to more complex ideas, such as a painting, the appearance of animals, etc. The child will be happy to create something with his own hands.
You can also make clothes for doll characters with your children. It is even possible to create them for children; for example, a hat made from a plate will look very beautiful in the form of a four-leaf clover or a crown.
It would be a good idea to play a game with children where a group of children does not see the image of an animal made from dishes, but must guess it. The second group asks leading questions, unobtrusively making the task easier.
Photos of crafts made from disposable tableware
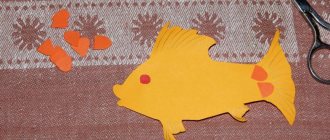
Chicken in shell
For such a craft, you can combine two types of plates - plastic and paper. The shell will be made from plastic, and the chicken itself will be made from paper.
Progress:
- On a paper base you need to draw a chicken, coloring it yellow on both sides and adding all the necessary details;
- The plastic plate is cut at the top in a zigzag pattern. The bottom should be larger than the top, as if the chicken had hatched from the top of the egg;
- Now all that remains is to glue the upper part of the shell to the chicken’s head, and the lower part to its body, as if the chicken is peeking out of the egg.
DIY decorative plates
Creating decor for your own apartment or an original gift is an interesting and exciting activity.
One of the types of applied creativity is the decoration of plates; they usually decorate the kitchen interior.
So if you decide to add some zest to your own kitchen or make a beautiful and cozy gift, then decorative plates made from scrap materials with your own hands will come in handy.
A plate made in the same color scheme or matching the interior will help you save money on buying expensive decor and will make your home truly original, cozy and beautiful. Where to start?
Decorative plates are created using a wide variety of techniques and using various materials.
This can be decoration using decoupage and quilling techniques, decoration with ribbons, different types of painting - stained glass, dotted, marble and others.
As a basis, you can take either an ordinary ceramic plate or a clay plate, or cut out a circle of plywood of a suitable diameter and work on it.
Decorating a plate using decoupage technique.
To work, you will need a round base, a bowl of water, glue, a brush, scissors and acrylic varnish, as well as a suitable image - a postcard or a printed drawing.
Apply 5-7 layers of acrylic varnish to the image, allowing each previous layer to dry thoroughly. When all the varnish has dried, place the image in a bowl of water for 10-15 minutes, then remove and separate the paper from the varnish layer.
We cut out the desired fragment of the design, place it on a plate and fix it on it also with varnish.
You can secure the plate to the wall using a rope or a lid with a ring from a tin can, secured with strong adhesive, and also place it on the table using a special stand. The result is a wonderful decoration with a minimum of costs.
Painting a decorative plate.
If you know how to draw or just like to draw, then you should definitely try painting a plate. There are several ways to do this: stencil painting, dot painting, stained glass, artistic painting and others. Each artist will be able to choose a method according to his taste and strength.
For drawing, acrylic paints are used, which are self-drying and require baking, and special markers for glass and ceramics.
If you have enough experience in drawing or your soul requires improvisation, you can create a pattern right on the go or use the art painting technique, when a plate becomes a canvas and entire pictures are created on it.
It will be easy for a beginning artist to work using stencils or using the dot painting technique.
Spot painting.
Dot painting is a technique of drawing and creating contours using dots, which creates a spectacular three-dimensional image. Plates decorated in this way look as if they are embroidered with beads or seed beads.
To work, you will need acrylic paints; you can paint with them directly from the tube, or, if this method seems difficult, use a small brush or toothpick.
First practice placing dots of different sizes and maintaining the same distance between them.
Before work, degrease the surface. For a beginner, the best option would be to use a transparent glass plate, on the back of which you can glue a pattern template. You can also transfer the drawing onto a plate using tracing paper. We begin work by drawing large general contours, then move on to small details.
We leave the plate to dry thoroughly during the day; you can speed up this process using a hairdryer or by baking the plate in the oven for half an hour at a temperature of about 160 degrees.
After complete drying, secure the design with varnish. Decorative plate in mixed media.
When creating a decorative plate, the final result depends only on the master, who can use not only various techniques, but also their combinations. For example, to create a plate like the one in the photo below, we will use the decoupage technique along with dot painting.
So, we prepare the base and degrease it. Next we work using the decoupage technique. We select a suitable image, treat it with varnish and let it dry. Soak it in water, separate the design, cut it out and fix it on the plate, not forgetting to leave a free edge for painting.
After the varnish has dried, we paint the edge of the plate, and also add volume to the drawing using the dot painting technique and cover it with a finishing layer of varnish. Do not forget to properly dry all layers of work.
The result is a wonderful decorative plate in the Provence style, which can easily decorate a suitable interior or become a very original gift.
Of course, there are many techniques for decorating plates, for example, more complex stained glass painting or marble techniques.
However, you should not immediately strive for complex work, as we see that even the simplest techniques give an amazing result in the end if you put in a little effort and add inspiration.
Don’t be afraid to try, make mistakes, look for suitable ways, and creating decorative plates will give you many pleasant emotions.
- Finally, a small selection of master classes on decorating plates quickly and easily with your own hands:
[media=https://www.youtube.com/watch?v=b4hN6lk9y4M]
Source: https://sdelala-sama.ru/podelki/4305-dekorativnye-tarelki-svoimi-rukami.html
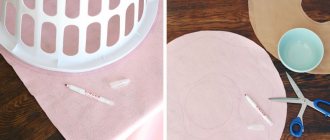
Video material
So our DIY paper plate is ready, which can be successfully used for storing all sorts of small items or as a fruit vase. Show your imagination and paint the plate to your liking, and it will become a wonderful decoration in your home.
A paper plate is an excellent addition to the interior of a children's room, as well as the kitchen. Hanging on the walls, paper plates are an excellent substitute for paintings. And made in a bright and colorful style, such plates will undoubtedly delight your baby. Let's figure out how to make a plate and what we need for it. Today, there are several ways to make a paper plate.
Before you make a paper plate, choose the method that suits you and make sure you have everything you need ready.
DIY decorative plates using decoupage and quilling techniques
The kitchen renovation has finally been completed and everything around is sparkling clean. But why does the interior look boring and dull? There is clearly a lack of “zest” that creates that amazing atmosphere of home comfort and warmth that always characterizes the kitchen.
And this can be done by decorating the walls using elements of kitchen paraphernalia. Such decor will not only enliven the interior, but will also harmoniously connect the entire design into a single whole. Wall decorative plates look very impressive on the kitchen walls.
You can decorate them with your own hands using different methods, and the most popular technique is decoupage.
Options for decorating plates
By deciding to create your kitchen decor with your own hands, you can not only save money, but also have the opportunity to decorate the plates exactly in the style of your interior and make them truly unique by applying original drawings or your favorite images from photos. And if you also know how to draw, you will surely create truly unique decorations for the kitchen or as a gift to your loved ones.
Having taken on this work, you will be amazed by the variety of decorative options for wall plates, each of which is interesting in its own way:
- decoupage;
- quilling;
- stained glass;
- decor with ribbons;
- point technique;
- glass painting;
- marbling.
You can use acrylic paints, with the help of which an ordinary plate will turn into a decorative one. But if you don't know how to draw, print out a drawing or photo that you like and transfer it to a plate using carbon paper. Then, armed with paints and brushes, paint it.
Ceramic plates are great for painting. The paint on them is not only easy to apply, but also adheres well.
Get your children interested in your creativity, and as a result, your wall collection of decorative plates will become a family heirloom. Long-forgotten old plates and the remains of grandma's set will sparkle with colors under your hands and find a new life by decorating the walls in the kitchen.
Wooden plates made in sgraffito style look very impressive on the walls of a small kitchen. They create a very cozy atmosphere and perfectly decorate the room. Just don’t forget that hand-decorated plates are just decoration and you can’t put food in them.
We invite you to familiarize yourself with the most common plate decorating techniques.
Decorating a plate using decoupage technique
A plate made using the decoupage (appliqué) technique will be an original decorative decoration for the walls of the kitchen or dining room. This method is easy to learn, just follow the guidelines below.
To work you will need:
- drawing (postcard or photo from the Internet);
- plate (dish);
- water container (deep bowl);
- glue;
- scissors;
- paint brush;
- acrylic lacquer;
- a tin can with a ring for opening.
Let's start with the design:
- Apply acrylic varnish to the image with a brush. Make 5-6 layers, covering each new layer after the previous one has dried.
- Place the varnished image or photo on paper in a container of water for 15 minutes.
- Remove it from the water and separate the paper from the layer of hardened varnish.
- Cut out the desired fragment from the drawing with scissors.
- Place this part of the photo or picture on a plate and fix it on top with acrylic varnish.
- To attach the plate to the wall, use a tin can lid with a ring. The back side of the plate should be degreased and the can lid should be glued to it with any strong adhesive.