The famous Russian animated series “The Fixies” has become very popular and beloved among children. No wonder. He teaches kids many useful and interesting things. Cartoon characters can answer the most incredible questions in such a way that even adults find it interesting. Fixies have become beloved and close characters. That is why many people want to transform into their favorite heroes at the carnival. It’s not difficult to make a fixie suit, we’ll tell you more about it. The work does not require any super materials. Everything you need can be found at home.
Wardrobe Master class New Year Sewing Fixie suit “Fire” Glue Ribbons Threads Fabric
Hello everybody!
I want to share with you the costume of the fixie Fire. Like many other children, my seven-year-old son asked me for it for the New Year. There are already several examples of fixie suits in the country of Masters, but I decided to exhibit mine too. I worked on this costume for 2.5 days (day and night). To create the fixie, I took: fabric (fleece - yellow, raincoat fabric - red), lining fabric, synthetic padding, crimson satin ribbon, wide yellow elastic band, buttons or zipper, red and yellow threads to match the color of the fabrics, instant glue. I tried to reproduce this costume exactly like the real Fire. There are, however, some shortcomings and discrepancies in the sizes of some parts. Before I started, I looked through all the pictures with Fire and chose a few of the most optimal ones. Here they are.
I started looking for patterns, but didn’t really find anything. After thinking a little, I didn’t bother too much and took my son’s usual sweater and pants, not very wide, but not tight. I redrew it onto regular A4 paper, having previously glued it together. Then I transferred this pattern to the fabric and cut it out, leaving a margin of 1.5 cm along the entire edge (allowances).
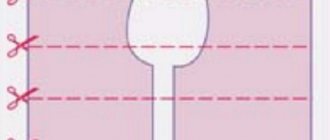
The suit consists of three layers. These layers are visible in the photo. The first layer was sewn from red and yellow fabric. I chose the cheapest and most suitable one to keep its shape.
Since the suit consists of two different fabrics in color and structure, I marked on the pattern where one fabric would end and the other would begin.
To make the suit more voluminous, I added padding polyester as a second layer. But before that I divided it into three layers. The original thickness was 1 cm. The only disadvantage of this layer is that the child will be very warm in it. But my son’s Christmas tree was held in a cool room, so this was a plus for us.
On the sleeves I sewed strips of equal width along the yellow fabric. To get the same relief as Fire.
Here's a larger picture.
And the third layer is lining fabric. I'm not a professional, but an amateur, so first I folded all three layers and sewed them together. For convenience, I secured it with needles so that the fabrics did not run away. And then I “decorated” the costume. These shortcomings are visible in the photo.
Afterwards I started sewing on the costume design. To do this, I took a medium-width ribbon and a wide elastic band. The tape lay down in the form of suspenders. It gathers when sewing, so I did it slowly and carefully.
And the elastic was sewn onto the belt so that it did not tighten too much.
I sewed pockets on my red raincoat pants. I also took a scarlet satin ribbon to match the color and sewed stripes like these on the front.
I still had a small piece left from the elastic, from which I made a detail like Fire’s at the back.
Only mine is just square and not so voluminous.
I couldn’t find a light plastic buckle, so I sewed it directly from fabric using elastic.
I sewed all the details (sleeves, front, back, etc.), and this is the result. How to properly sew parts can be found on the Internet.
The symbol in front is “Thousand!” cut from the same fabrics as the suit itself. I took the pattern from Elena Guseva on the website https://stavsneg.ru/novosti/fiksiki-kak-sshit-znak-tydyshh.html/. She needs to overlog them, but I didn’t have the opportunity or time, so I just sewed a circle of yellow fabric without fear that the fleece would unravel and glued my fingers to it with glue for a moment.
DIY fixie suit: pattern, sewing tips
The famous Russian animated series “The Fixies” has become very popular and beloved among children. No wonder. He teaches kids many useful and interesting things. Cartoon characters can answer the most incredible questions in such a way that even adults find it interesting. Fixies have become beloved and close characters. That is why many people want to transform into their favorite heroes at the carnival. It’s not difficult to make a fixie suit, we’ll tell you more about it. The work does not require any super materials. Everything you need can be found at home.
FIXICS ON THE INTERNET (official links, groups)
Fixies
- Russian animated cartoon series for the whole family. Created based on the story “Guarantee Men” by Eduard Uspensky. The series “The Fixies” is part of the large-scale media project “The Fixies,” designed for a wide international audience. Development of the project began back in 2006. Since December 13, 2010, he has been appearing in the TV show “Good night, kids!” on the channel "Russia-1"
Website:
https://fixiki.ru
Youtube channel:
https://www.youtube.com/user/fixiki
Who are fixies?
Before you start creating a New Year's costume, you should decide what kind of character you want to appear before others. Who are fixies? This is a family in which parents Papus and Masya, their children Nolik and Simka and grandfather Dedus live. The new characters in the series are Vert's classmates, Igrek, Shpulya and Fire.
The head of the Papus family is distinguished by a bright mind, extraordinary responsibility and intelligence. In any difficult situation, he is able to find the right solution, come to the rescue, troubleshoot problems and talk about the essence of his work.
Mommy Masya is the support of the family and its head, she is involved in raising and teaching children, telling them how to care for equipment. Happy to help Papus if he needs help with repairs.
The wisest fixie is Grandpa Dedus. It was he who opened a school for young people, where they learn the basics of science. The laboratory where the school operates is headed by the kindest scientist Genius Evgenievich Chudakov. A little absent-minded, but very smart and responsive.
And, of course, the main characters are Nolik and Simka. When planning a fixie costume, these are the characters that are chosen most often. The daughter is nine years old, she is responsible and smart, the youngest Nolik is only five, he always wants to play, and often gets into trouble.
Fixie suit for a boy. Nolik
All the characters in the series have unique outfits. Nolik is different from everyone else with his gorgeous blue hair. You need to start sewing a costume with a hat, which will help create the image of Nolik. For work you will need the following materials: foam rubber, glue, scissors, ruler, pencil, spray paint.
You need to cut out a rectangle 20 cm wide from foam rubber, the length will be equal to the size of your head. Having retreated 10 cm along the entire length, you need to draw identical triangles and cut them out. The blank resembles a crown.
When combining triangles into one vertex, you need to glue them all together. See the pattern in the photo. You will get a cap, this will be the base.
Now we cut out various geometric elements from foam rubber, which we will then paste over the base. The parts are glued in a circle upwards; they should fit snugly against each other.
After the base is covered with various foam geometric shapes, give the cap time to dry. Take a can of blue paint and paint the item. It is better to do this outdoors in protective clothing. Leave the cap to dry. Mandatory part No. 1, which is included in Nolik’s fixie costume, is ready.
Fixik Nolik made of plasticine. Modeling for children.
You can make the characters of the modern and, by the way, very useful for children to watch animated series “The Fixies” yourself with your child. It is best to make it from plasticine. We offer a method of handmade crafts from plasticine using the example of Fixik Nolik. In order for a plasticine figurine to turn out as similar as possible to one of the main characters of the animated series, you need to choose the right material.
Plasticine should be soft, of high quality, and should not crumble. An alternative to it is polymer clay, which in its structure is no different from plasticine. A craft made from such a material can then be made as hard as plastic using heat treatment.
For the craft you will need:
- Plasticine in purple, blue, white, black and light blue;
- Stack;
- A small rod for the base of the craft, you can use an ice cream or lollipop stick.
We make a blank for the figurine’s head; for this, you need to roll a small ball from purple plasticine.
Next, we model the nose: the plasticine is pulled out a little from the center of the previously made ball; just squeeze it lightly with a “pinch.” Using a stack we draw a mouth on Fixie’s face.
Next you need to make the eyes. To do this, roll two small balls of white plasticine like a pancake and attach them to the workpiece. From black we make the same balls, slightly smaller in size, and attach them to the white one on top. If you wish, in order to “revive” Nolik’s eyes, you can stick another small piece of white plasticine on each eye. To prevent eyebrows from blending into Fixik’s complexion, it is better to make them from blue material. Roll them out lengthwise and glue them. The head preparation is ready.
We take blue plasticine and roll it into a ball, make a small notch so that it is convenient to glue it to the head blank, and draw stripes with a stack.
We firmly glue the two resulting blanks together.
We take blue plasticine and make a blank of the torso and legs from it, so that it is proportional to the head.
From the middle we cut the stack evenly into two halves, it should turn out the same as in the photo.
We roll two more pieces of plasticine into a “sausage” shape and fasten it at hand level.
In order for the craft to be stable and the head to hold tightly, we recommend securing the base: insert a rod from a pen or from a lollipop, whatever you can find, into Nolik’s body. The lower part of the legs should be bent.
We connect the obtained parts together. The craft is ready!
If you find an error, please select a piece of text and press Ctrl+Enter.
Olesya Selikhova
About the author: Psychologist, specialist in the field of family relationships and raising children. I love drawing, modeling, needlework and any interesting creativity. Mom raising two children and a wonderful wife!
heroes and characters
Share with friends:
We also recommend watching!
How to make a boy from plasticine.
How to make Luntik from plasticine.
How to make a slime from plasticine.
How to make Lego from plasticine.
How to make a swan from plasticine.
Modeling of Master Yoda from plasticine (Star Wars film)
How to mold a girl from plasticine.
Modeling Homer Simpson from plasticine
How to make a city from plasticine.
Assassin made of plasticine. Modeling lesson.
Plasticine war. We make a children's applique.
How to make Winx from plasticine.
Nolik's clothes
Nolik's clothes are also blue. You can take a regular turtleneck to match the color of a ready-made jumpsuit. If you are good at sewing, then make a complete fixie suit with your own hands.
You will need blue fabric. Fleece is perfect for this product. Create a pattern for the back, front and sleeves. It is important to calculate the dimensions correctly. You can take your son’s old unwanted turtleneck as a basis, rip it open and transfer the details onto the fabric. Don't forget to leave seam allowances. The front and back parts need to be sewn together, sleeves and collar must be sewn on. The top of the suit is ready.
Using the same method, using old sweatpants, cut the trousers onto the fabric. Sew the trousers. For convenience, insert an elastic band on top. The top and bottom of the zero are the same color. This makes the costume look more realistic.
Hat-wig for Simka
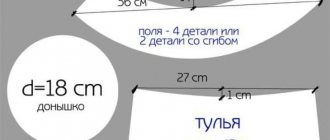
If you decide to create a Simka costume, then you also need to know how to make a wig cap for this character. As in the case of the hat for the zero, you will first need to make a base. To do this, it is necessary to cut a rectangle from foam rubber 1 cm thick, the length of which will be equal to the volume of the head plus 2 cm for the “seam”, and the height – approximately 30 cm. Next, three horizontal lines must be applied to this rectangle - the first at a height of 9 cm from the bottom edge , the second - 20 cm, the third - 22 cm. After this, on each of the lines, as well as along the upper edge of the rectangle, you need to make markings in increments of approximately 4 cm, and it is important that all “steps” are the same. Then, focusing on these points, you need to draw isosceles triangles with the vertex on the third line between the first and third lines. The same triangles should be drawn between the top edge of the rectangle and the second line. The top of these triangles should be on the second line. So, the vertices of the upper and lower triangles will intersect between the second and third lines. Upon completion of the marking, it is necessary to cut out the shapes so that they are connected by vertices.
Simka's hat.
When work on the workpiece is completed, you can proceed to gluing. First you need to glue the resulting part into a circle, and then the lower parts of all the elements together. That is, the result should be a hat with a “tuft.” Next, in order to make a ponytail like Simka’s, the upper elements of the cap must be glued to one another like an accordion. The hole formed on the top of the head must be sealed with a “star” cut from foam rubber in the same shape.
Now all that remains is to make the hair strands. To do this, cut out two triangles from foam rubber with a base of 4-5 cm and a height equal to the height of the cap to the top of the head. Then these triangles are glued into a corner and attached to the base. The entire front part of the cap is covered with similar blanks. Next, two side strands are made in the same way - they should be 10-15 cm longer than the first ones. After this, we move on to creating the back part. Starting from the sides and ending at the back of the head, the length of the strands should be gradually shortened. The last two strands located at the back of the head should be flush with the base. When all the parts are in place, you need to cut out blanks that can be used to close the resulting holes. All that remains is to paint the product with orange paint and you can use it for its intended purpose.
DIY fixie suits.
DIY fixie suit. Simka
When choosing a fixie outfit for a girl, many prefer Simka's look. A bright orange suit and a wig of the same color will make Simka's New Year's costume very noticeable among the other characters of the carnival. The wig cap can be made from the same foam rubber as for Nolik.
We make the base exactly as described above. Then we cut out not various geometric shapes from foam rubber, but long ribbons in the form of elongated triangles. Glue them in a circle to the cap, they will imitate Simka's hair. Then you need to collect the tops of the foam curls and secure them, leaving a “bun”, see the example in the picture where the characters are depicted. In this case, the wig needs to be dyed bright orange or pink and also allowed to dry.
Jumpsuit for Simka and Nolik
Both characters' outfits should consist of overalls, mitts, shoes and a wig cap. We suggest starting to create a costume by preparing the overalls, since this element of the outfit is almost the same for Simka and Nolik. The only difference between the clothes of these characters is the color scheme. So, Nolik’s suit should be blue with blue stripes, and Simka’s suit should be orange with red and yellow stripes.
You can make a jumpsuit in the following two ways:
- Buy a ready-made jumpsuit
in blue or orange (depending on which character the costume is being created for) and sew blue or red “patches” in the appropriate places, and on the chest the corresponding logo - the so-called “Tydysch” sign. - Sew a jumpsuit yourself
. Of course, this method is more labor-intensive and requires special skills, but if you have the necessary knowledge and equipment, then perhaps it will be easier for you to sew a jumpsuit than to look for a ready-made one. And of course, it is important not to forget about additional details, including the logo, belt and patches.
Fixie suit.
In order for the clothes to be as similar as possible to those worn by fixies, when decorating them, you should look at the picture with cartoon characters.
Simka clothes
The pattern of Simka's fixie suit resembles the pattern of ordinary children's pajamas. To create clothes you need to take bright orange, yellow and red fleece. On orange fabric, cut out a model according to old patterns of children's pajamas in the desired size. Leave 1 cm at the seams. Simka's suit has red and yellow inserts. You can simplify the task and sew multi-colored stripes on the sides of the pants and at the waist. An option is a red fleece vest, which will be worn over orange pajamas.
As for shoes, you can make them from ordinary house slippers. Take the same orange fleece and line the top of the slippers. Cut strips from red material and add inserts to the product that will act as decoration.
Shoes and mitts for fixies
The final details in Simka and Nolik’s costumes are mittens and boots. Simka's mittens should be pink, and Nolik's should be blue. You can either sew these items of clothing with your own hands along with overalls, or buy them separately. As for shoes, the easiest way to make them is from indoor felt boots of the appropriate color. It is important not to forget to decorate your shoes with blue or red stripes.
You can familiarize yourself with the assortment in more detail in the catalog of our online store.