Manufacturing methods
A DIY hat pincushion can be made in different ways. Use any method you like:
- Based on a pattern using cardboard circles.
- Without templates, but with a ready-made base in the form of a circle (disk) for the margins and a plastic jar for the upper part (crown).
In the first case, you do not have to draw the details on paper or transfer them to fabric, but, on the other hand, you need to find the appropriate blanks. The downside is that you are limited by the size of the prepared base, for example, the diameter of a CD.
In the second case, you can make a hat of any size and proportions. The only limit will be your imagination. But here you will have to draw a pattern with a compass and transfer it to the material, as well as make your own base from cardboard.
What materials and tools to prepare
In order for you to get a beautiful pincushion-hat with your own hands, you need to prepare the following:
- Textile.
- Scissors.
- Threads.
- A needle.
- Filler.
- Ribbon, braid, lace and other decor.
The remaining accessories should be chosen depending on the method you will use to make the souvenir. If you need to draw a pattern, then you will have to take a sheet of paper, a compass and a pencil. If you are working with a ready-made base, you will need to find the workpiece itself (disc and jar). Whatever option you decide to use, there is no need for anything complicated or expensive. All elements can be found in every home.
It is worth remembering that it is better not to use foam rubber as a filler, as the needles in it quickly rust. Take holofiber, padding polyester or leftover fabric.
DIY hat pincushion: master class
Let's look at the simplest option, when not patterns are used, but blanks. For the fields, look for a circle. The easiest way is to use an unnecessary computer disk. For the crown, take a plastic round jar.
The sequence of actions will be as follows:
- Cut two circles from the same fabric, such as fleece.
- Glue the padding polyester onto the disk.
- On the wrong side of the fabric circle, place a disk with padding polyester (filling facing up).
- Gather the edges of the material remaining outside the workpiece onto a thread.
- Cut off the bottom of the plastic jar and place the workpiece on the second circle of fabric;
- Gather the fabric onto a thread as well.
- Fill through the hole with padding material.
- Sew the top to the bottom with a blind stitch.
- Decorate the joint with ribbon or something else.
So, you have a beautiful DIY hat pincushion. The master class allows you to understand how easy it is to make such a souvenir. It is worth noting that the sizes of the circles are cut out in accordance with the blanks that you found, with the addition of allowances for assembly (about two centimeters).
Panama pincushion
For production you will need:
- textile;
- threads;
- CD;
- ribbons, lace and so on - for decoration;
- filler;
- cardboard (3 cm wide, 21 cm long) for the form, but not necessary;
- glue gun (optional);
- needle;
- scissors.
Let's start our master class. Step 1. Draw two circles on cardboard, 19 cm and 13 cm. Next, we apply the cardboard patterns to the fabric, outline with chalk (soap) and get two parts from the fabric.
Step 2. Take a large circle, stitch along the edge, make an indentation from the edge of about one centimeter. There is no need to fasten the thread; leave a tail of about ten centimeters. Place the disk on the fabric and tighten the thread so that the disk remains inside the fabric, tie a knot. You can use thick cardboard instead of a disk.
Step 3. For the second circle, which is smaller, we also mark along the edge. We make a ring from a cardboard strip; the easiest way is to fasten it with a stapler. We put a ring and filler into the fabric blank. Cardboard will help give the hat its shape, but if you don’t have it, you can do without it. We finish the top part of the hat, pull the fabric tightly and completely sew up the hole.
Step 4. Glue the top part of the hat, the crown, with a glue gun to the bottom part; for reliability, it is better to sew it with more thread.
Step 5. We begin to decorate our hat. We close the seam line with lace and tie a ribbon on top. We make a rose from a satin ribbon, or take a ready-made one and sew it to the resulting headdress. It turned out to be a cute pincushion!
Symmetrical and asymmetrical option
The DIY pincushion “Hat” can be made not only using different sewing methods, but also several models. If you have chosen a product that will have a crown and brim, it is easy to arrange them relative to each other in two ways:
- Strictly centered.
- With offset.
In the first case, you will receive a traditional hat, in the second, a model reminiscent of a beach summer version, when a visor is made to cover the face from the sun. Both models, even made from the same material, will look different. So if you like to experiment, try all the ideas.
Decorating the product
We looked at several options for making a do-it-yourself pincushion hat. The product will look beautiful if it is sewn carefully, but the whole effect lies in the decoration. One of the simple decoration options that can be used is a satin ribbon, which just needs to be sewn at the junction of the crown and the brim. The ribbon can be a contrasting color or in the same tone, slightly shading the top and bottom. You can add braid or lace on top of the satin ribbon.
If the top and brim are made of fabrics of different colors or different textures, the ribbon can play with one of the colors or be contrasting. It all depends on your taste, and it would be important to know the character of the person for whom the gift is being prepared, taking into account his color preferences.
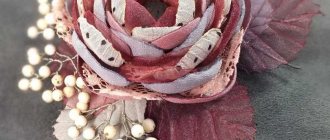
A pincushion hat will look beautiful if you make a decorative bow. It can be made from satin ribbon, or you can use all kinds of decorative flowers, twigs, and beads. If a pincushion hat or miniature beret is made of a single-color fabric, they can be decorated with bead embroidery or appliqué on the sides of the crown and along the brim (if we are talking about a hat). Every needlewoman who knows how to work with a needle and scissors, choosing original material and decorative finishing, will make a wonderful gift with her own hands - a pincushion hat.
Today we will sew a pincushion in the form of a miniature flirty hat. For needles, small pads stuffed with cotton wool or synthetic padding are usually used. Sometimes needles are stuck directly into a skein of thread. This is very inconvenient for storing needles. The hat that we will sew can lie on the dressing table, on a table or bedside table, or hang it on the wall. Such a pincushion will not spoil, but, on the contrary, will decorate the interior of your apartment, or will become a nice gift for a friend. To make a pincushion hat you will need a small piece of cardboard, any fabric and your choice: lace, ribbon or flower. The process of creating our hat:
1. Draw a circle on cardboard. To do this, you don’t need to have a compass; you can simply trace the outline of the plate with a pencil. Cut out a circle and another small strip of cardboard for the walls of the pincushion. 2. We fasten a strip of cardboard with thread and stuff it with cotton wool.
3. Cut a piece of fabric twice the diameter of the circle and stitch it along the edge of the fabric with a seam, as they say, “on the vein.” We wrap the cardboard circle with this fabric. We tighten the thread so that the edges meet approximately in the center of the cardboard circle.
4. We also cover the cotton wool with a cardboard wall with fabric. At the same time, try to evenly distribute the folds of fabric on the walls.
5. Now all that remains is to sew the upper part of the hat (with cotton wool) to the brim of the hat, that is, to a cardboard circle covered with fabric. By sewing them together, you will hide the unsightly pulled edges of the fabric. The hat is almost ready.
6. For decoration, I take a regular satin ribbon. First you need to make a bow. The bow will turn out even if you wrap the ribbon around an object and then tie it in the middle. You can use a comb for this, like in my photo.
In the 19th century, women's hats reached their peak of popularity; every fashionista had all sorts of styles and models. Hats were decorated with silk ribbons, ostrich feathers, fur, and precious stones. Women usually did not even leave their rooms without hats. And appearing in public or going outside without a hat was considered bad manners. We stock up on ribbons, beads, lace, feathers and take on the role of a “milliner”—a hat-maker. Let's immerse ourselves in the atmosphere of past centuries and make a “Hat” pincushion with our own hands, an assistant from disks, yarn, fabric and other materials.
DIY pincushion: patterns
A hat is the simplest and safest option for such a functional item. It’s easy to sew this souvenir without a template at all. It is enough to simply cut out a circle according to the shape of a blank, for example an CD, from which a three-dimensional object will be formed in the future due to assembly. This option was discussed step by step above.
If you want to sew the brim and crown from several multi-colored parts, it is better to first draw the patterns on paper. The basis will again be circles, and then divide them into the required number of elements of any size and shape.
The third option, when you definitely can’t do without a pattern, is to form the volumetric part of the hat not by assembling it with a thread, but using several elements (from two, to six or eight).
Each detail will look like a petal cut off from one edge. For this option, it is better to take a ready-made pattern, although you can build it yourself if you haven’t found a sample with the appropriate number of parts or their proportions.
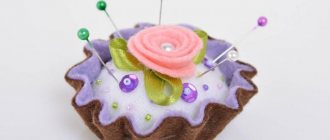
How to make a donut pincushion?
- Of course, it can be made from any material, but it is from felt that this pincushion will look very realistic!
- Take a disk and cut out an outer and inner circle on it in 3 parts (2 for the base and 1 for the glaze).
- Make pink frosting with a slightly larger inner cutout and rounded edges.
- We went over all the details with an overcast stitch Although the felt does not fray, it will look much more attractive.
- Using multi-colored threads, we run wide stitches across the pink felt, creating shavings.
- a connecting seam between the stitches to sweep the parts together.
- Fill with padding polyester and close the circle completely!
Appetizing pincushion
Exquisite mini beret
To make your own pincushion (hat) quickly, make it borderless. In this case, you will need to cut two circles of the same diameter from cardboard. One will be used as the base-frame of the beret hat itself, and the second is used to close the assembly (thread tie) of the upper part. The principle of operation will correspond to the one used to make a hat with a brim, only here the lower part will be the same diameter as the upper one. The decorative “bottom” is easier and faster to sew on than the brim.
How to make a pincushion from disks?
- No less simple, but interesting option. There are disks in almost every home - take 2 pcs.
- We also cut out circles from the fabric that are 2.5-3 cm larger than the discs.
- Glue will not help in this case. Therefore, we make darning stitches like this so that the fabric itself is held on the disk.
- In the second case, first we embroider flowers (or use other decor) and decorate them. We insert the padding polyester between the disk and the fabric and stitch it, as in the first option.
- All that remains is to connect the two sheathed disks together and close the seam with cord or tape.
Pincushion made of discs
Complex option
When you have enough time and you know how to sew, you can make a beautiful pincushion with your own hands if you make a hat whose crown is made of separate parts resembling petals in shape.
Typically, the upper part of the product is made of six elements. They can be cut from the same material, but alternating contrasting tones or simply different in shade looks much more impressive.
The operating principle in this case will be as follows:
- Cut out the crown piece from paper.
- Cut out three petals from two types of fabric.
- You begin to sew sequentially adjacent ones on the wrong side. Use machine stitching or hand stitching.
- Turn the product inside out and put in the filler.
- The fields or just the base (lower part) are done in any way described above.