by Alexey | Tools | Wednesday, December 15, 2021
| Follow Make-Self.net on Facebook and be the first to read our articles. |
A router is a very useful tool in woodworking. It can be used for shaping wood, drilling various holes, cutting grooves, finishing edges and much more. It's hard to imagine any complex project without it.
A router table may be the most important tool a carpenter can use.
Most people use routers as portable tools. While this is a viable option, a table-mounted router is safer to use and can perform its functions on a whole different level. If you're looking to build your own router table yourself, you've come to the right place. We've rounded up 13 of the best DIY table designs.
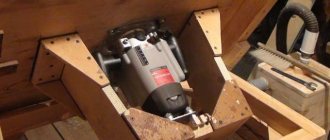
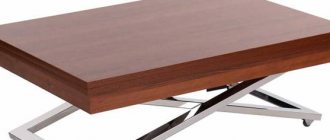
Folding milling table
This briefcase-sized design transforms into a fully functional router in minutes and folds up for storage just as quickly.
A full-size router table can be a great solution—if you have the space. But if you only use the router occasionally or need a mobile solution, this might be a good solution. This benchtop tool provides all the precision and stability you'd expect from a full-size router table.
How to make it yourself
Before starting work, you need to prepare the required components:
- Base.
- Bottom bar.
- Top bar.
- Screw 4.2*38.
- Vertical element 254*70*10 mm.
- Handwheel nut M8.
Source orgstanki.ru
How to make a parallel stop for a router with your own hands:
- First you need to prepare a flat base, on which the accuracy of the finished tools depends.
- You can take any oblong-shaped object as a stop.
- Prepare two rods for connection.
To make a stop using the second method you will need:
- melamine 125*900;
- plywood 125*900;
- plywood 75*900.
Instructions for creating a stop:
- Place the rails on melamine and make holes in three places.
- Attach the pieces of plywood to each other using glue and nails.
- Attach the port from the vacuum cleaner to the glue, inserting it into the hole.
- Attach the melamine lining to the stop using screws.
- Place the corners on the back side.
Source pinimg.com
The video clearly shows the process of creating a rip fence:
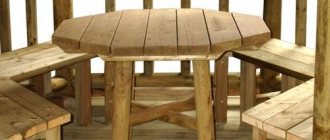
Spacious milling table on wheels
If you're a fan of Ana White, then you know that she has everything you could ever want to build.
It's no surprise that she has a great plan for helping you build a great router table. It has ample storage and work space. I hope you enjoy it as much as we do.
Manufacturing a lift for different types of router
Craftsmen at home most often use an ordinary car jack to construct a milling lift. Less common are designs using a threaded rod or chain drive, as well as microlifts.
When getting started, it’s worth remembering a number of basic rules:
- All lift parts for a router must have high rigidity, especially the frame. This increases the safety of the master during work and affects the accuracy of workpiece processing.
- The lifting mechanism is designed so as to be able to not only quickly install and remove the router, but also replace the cutting attachments on it.
- For high-quality processing of most materials, a stroke of 50 mm is sufficient.
Jacking
The most standard and easiest to manufacture type of elevator for a workbench. The position of the router here is adjusted using a machine jack.
Jacking mechanism
The lifting device for the router is made according to the following scheme:
- Take a sheet of plywood or chipboard with a thickness of over 15 mm. A box is made from it, which is attached to the bottom of the desktop. This will be both a protective casing and a support for the entire structure.
- A hole is drilled in the table into which the working head of the power tool will go.
- The router is attached from the bottom of the tabletop to the movable part of the lift, and the jack is connected to the bottom wall of the support casing
- The metal or textolite base plate will move along fixed axes.
One of the joining options
Interesting! The lift for the router can be equipped with an electric drive, but this is more expensive.
With threaded rod
To make your own lift for a router, you will need a small threaded rod, as well as a support disk and a flywheel. The work is carried out using the following technology:
- A circle up to 2 mm thick is cut out of a wooden board with a circular saw or jigsaw, which will serve as a support base for a hand router.
- A recess with a diameter of 1 cm is drilled in the center of the circle. A threaded rod over 5 cm in length is installed in it, which is attached to the wooden circle using two nuts and washers.
- The bottom of the threaded rod connects to the flywheel.
- A flange nut is inserted into the bottom of the hole where the bottom of the stud goes. This will be the most important part that controls the movement of the lift.
Connection order
With chain drive
Making a milling elevator with a chain drive with your own hands is more difficult and takes longer, but the result will be worth it. If all stages go correctly, the hand router will move up and down smoothly and without the slightest interference. The design of the lift includes several parts:
- special frame;
- moving insert;
- tension mechanism.
On a special frame, the upper and lower milling plates are connected to each other using pins. They are assigned the role of the main working mechanism. By moving insert we mean a plate made of two layers, between which are placed nuts with sprockets installed on them. The drive sprocket is mounted on the shaft using a bushing. The ratio of teeth on the driving and driven sprockets should be 1 to 2. The role of a movable insert can be played by a standard bicycle chain.
Bicycle chain used
In addition, for the lifting mechanism to function correctly, it is necessary to provide sufficient tension to the chain drive. For this purpose, a metal crescent is installed. One of its corners will be under tension, but this will not prevent the crescent from turning freely. An eccentric is placed nearby, the rotational movement of which will increase or, conversely, decrease the pressure on the crescent. Due to these measures, reliable chain tension will be obtained.
With chain drive
Microlift
The microlift will allow you to regulate the movement of the milling machine and set the angle of inclination of its axis with an accuracy of a millimeter. Here you will need a running nut and a cable. The manufacturing algorithm is as follows:
- A support platform for the lower elevator roller for the router is fixed to the work table.
- A pin is installed as a moving mechanism. Using a turning machine, it is adjusted to the required dimensions.
- A cable is attached to the bottom of the support platform, on which a loop is then made.
- The flywheel is installed, and the loop is attached to the running nut in the guide.
Microlift allows you to adjust millimeters
Professional milling table at half the price
This table includes all the best features found in store bought router tables at half the price! We have had the opportunity to study and use most of the router tables available on the market. Based on this experience, we developed our own fully functional and easy to assemble desk. The detailed project can be viewed here.
Manufacturing of devices for processing poles and balusters
Each master can independently make accessories for a hand router that will satisfy his personal needs. For example, a milling machine is used to process bodies of revolution—objects that have a round shape. These include pillars, balusters and other wooden elements that have a similar configuration.
But in order to achieve a positive result, it is necessary to prepare a device that makes it easier to cut grooves in the rotating bodies. With its help, it will be possible to make longitudinal grooves and process along a circular contour.
Wood router attachments
The design of such a device consists of the following elements:
Woodworking device in detail
- housings;
- mobile milling carriage;
- disk for setting the rotation angle;
- fixing screws ensuring immobility of the workpiece being processed;
- locking screw.
To get started, you need to place the baluster into the device body, securing it with screws. Using a rotary disk, the part is placed at the desired angle and secured with a locking screw. Next, a carriage with a milling cutter is set in motion, which cuts a groove along the entire length of the workpiece. To cut the next groove, the fixation of the product is loosened and it is again positioned at the desired angle.
It is advisable to perform all these operations with an assistant who will slowly rotate the workpiece. The operation of the device can be automated by equipping it with a drive from an electric drill or the most primitive screwdriver.
Wall cabinet for router
This compact storage cabinet does double duty as a top-notch router table while also holding all your accessories.
With plenty of storage and a built-in desk, this cabinet allows you to knock two important items off your list. And here's what's interesting: it takes up very little space. The secret to its compactness is that it folds out when you need it and retracts when you're done.
What should a saw table be like?
When setting up a stationary area for processing materials, several nuances must be taken into account.
- The structure must be stable and rigid.
- The material from which the table is made must be strong and durable.
- It is important that the table surface is perfectly flat.
- Grounding must be provided.
Circular saw table design
- The table must be equipped with devices that ensure the safety of the operator.
- The saw start button should be located within easy reach.
- A place should be provided for collecting sawdust, which should be easily accessible.
- The work area around the table should not be cluttered, as this increases the risk of injury.
Taking into account the above, you can be confident in the reliability of the installed structure and the good quality of the workpieces being processed, regardless of the amount of work.
Table for circular saw - photo
The main components of the table: frame and smooth surface for placing workpieces.
The material from which structures are made varies depending on the purpose, installation location and frequency of use. For domestic needs, you can make a structure from boards and plywood and install it, for example, in a garage. Working with large volumes of materials implies increased requirements for the strength and reliability of the structure. The best solution in this case would be a frame made of a metal profile. To reduce vibrations and provide greater stability, many even concrete the legs into the floor.
Some tips for setting up a table:
- the saw blade must be positioned strictly perpendicular to the table surface;
The saw blade must be positioned strictly perpendicular to
- the standard and optimal size of the tabletop is 1.2 x 1.2 m, but it can vary depending on individual requirements (if the tabletop is long, additional support legs may be needed);
- the height of the table depends on the height of the master, usually it varies between 0.8...1.2 m;
- it is more convenient for the operator if the table is installed on legs rather than on solid sheets, for example, plywood;
- the width of the slot into which the disk attached to the bottom is inserted should not exceed the thickness of the disk by more than 2 mm, otherwise the tool may quickly fail due to clogging with chips;
DIY circular table from a hand-held circular saw
- the circular saw should be placed in the center of the table so that there is no strong shift in the center of gravity;
- It is recommended to place the saw control buttons on the table top or the top of the table leg.
Important! In many models of saws, holes for attaching the sole to the table are already provided by the manufacturers.
Example of a reinforced workbench for a circular saw
Milling small parts
Several router table accessories make it easy to achieve safe and accurate results.
The problem with small workpieces is that there are large holes in the tabletop, and the stops can cause small parts to get stuck. This can ruin the project and be unsafe. This router table attachment holds small parts and allows the workpiece to be pushed past the router bit for precise and safe cutting.
Follow us on Pinterest for more interesting articles.
Useful short videos from Make-Self.net
Circle milling
To perform tasks at home, a device that can make it easier to cut round blanks may be useful.
For example, a compass is often used, which you can create with your own hands.
This device is made according to the following scheme:
From available elements, a piece of plywood, self-tapping screws, a wooden wing and a bolt with a nut are used to make the device. You will also need a router, saw and screwdriver. A small marking is made on a piece of plywood. A platform is outlined on it, the length of which is 15 cm and the width is 5 cm.
It is important that the length exceeds the processing radius, and the width exceeds the size of the router pad. Holes are made for the mounting bolts (their diameter is 2-3 cm). Perka is used for drilling. A groove is cut through the middle strip
It is necessary to ensure that its width does not exceed the size of the axle bolt. A recess is made at the bottom of the plywood sheet to accommodate the nut and washer. Another nut is secured in a wooden wing. Now you can assemble the main axis. Instead of a stud, use a bolt with a sufficient length, having first sawed off its head. The compass is installed on the router and the functionality is checked.