The halter is a very important element of a horse's equipment and is used to carry the horse in the hands, to secure it in the stable or during transportation. Any horse should have this piece of equipment and should be taught to use it from a very young age. Today, in any horse shop you can find a wide variety from leather and synthetic halters to rope halters. However, you can make a halter for your horse with your own hands. We'll talk about this in this article.
Master class – synthetic halter
Tools and materials
Video “Weaving a rope halter”
Comments and Reviews
Halter sizes
So, a halter for a horse is a free headband without a bit and, like a bridle, is fixed on the animal’s head using straps or carabiners. Their structure is almost identical in different species, they differ only in size and material. Leather ones are more durable with good care, but are impractical for everyday wear. But for everyday work, synthetic halters for horses will be more convenient, which you can do without fear of getting wet or dirty. A type of rope halter - halter - is made of durable nylon cords and secured to the head with knots.
Halters are used for calm horses or for show breeding of thoroughbred horses. They are quite impractical in everyday life, although they are popular among amateurs.
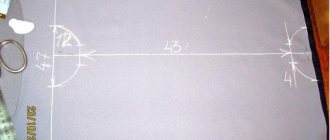
In order for a halter to be practical and safe to use with a horse, it must be the right size. Therefore, before you start making it yourself, take a very responsible approach to taking measurements of the horse’s head. Do not do it by eye, you need to take accurate measurements. If it is small, it can rub the skin on the head; if it is large, it can easily come off at the most inopportune moment.
Scheme for taking measurements from a horse's head
Master class – synthetic halter
If the dimensions are taken, you can proceed to the selection of materials. We recommend making your own synthetic halter, which can be sewn with strong threads. It is more difficult to work with leather, as it requires some skill. If everything is ready, you can get down to business.
Tools and materials
- Durable synthetic straps;
- fleece or soft velor;
- sewing machine;
- strong threads;
- needle, scissors;
- awl;
- other tools as needed.
The request returned an empty result.
Step-by-step instruction
- Knowing the size of the horse's head, draw up a diagram of the halter and measure each strap to the correct size. You should get seven straps with allowance for stitching.
- Thinner material straps need to be double stitched. If you are ready to take them, then additionally you can only sew the edges.
- We attach a buckle or carabiner with a ring for fastening the halter to the top left side of the head strap. To adjust the length of the buckle, we make holes at the other end of the strap. To work with a carbine, immediately measure the required size of the neck strap.
- We leave an empty ring on the lower strap at the junction with the fastening strap. For this, either a chomp, or a cord, or an interchange will be attached to the halter.
- We connect all the straps using rings. An additional fastening with a buckle can be made on the capsule strap to adjust the size of the guard.
- We sew thin fleece or velor onto the inside of the snatch and back strap to prevent chafing.
- To see more clearly how to make this type of equipment for a horse, watch the video from newfriz sun.
Rope halter
Do you have a young horse and want to train him to a halter? It's easy to do it yourself. To do this you will need regular other rope and the ability to tie knots. Stick to the plan and you will succeed.
Step-by-step instruction
- First of all, you need to learn how to tie double knots. They hold and fix the rope well and do not put pressure on the horse's skin.
- Tie a simple knot, but do not tighten it. The end of the rope must be brought behind the first knot parallel to the loop. Then a second knot is tied inside the first one.
- Now you can tighten two knots at once at the same level. The result will be a cross knot in the shape of the letter “X”.
- Once you learn how to tie knots, the rest will be quick and easy. Since all you need is to have measurements and tie knots according to these measurements to get the desired part or side of the halter top.
- For more details, see the diagram in the video.
Sorry, there are no surveys available at this time.
What do we build from?
To recreate the most comfortable stay for pets in a stable, when constructing it you need to resort only to porous materials.
After all, they create natural ventilation and retain heat perfectly.
Due to the fact that it is not recommended to use various types of heating here, it is better that the materials for construction have high thermal resistance.
Brick is best suited for fencing, as it meets all the requirements for materials for stables.
Materials for arranging floors in a building must have low thermal conductivity, and also high moisture impermeability and not have slippery surfaces.
The outside of the building can be painted with lime. Proper use of materials allows you to achieve the desired microclimate in the stable. We will consider the horse stall and its dimensions below.
Video “Weaving a rope halter”
Everything will work out quickly and easily if you learn how to tie knots correctly. The knitting pattern is shown very well in the following video from Diana Galunova.
In nature, horses do not require any additional equipment. Pets need equipment that will allow the owner to easily control the horse and also protect the pet from the cold. It is also important to remember about horseshoes; without them, domestic horses, unlike their wild counterparts, have a very difficult time. Fans of making their own everything necessary for their pet not only receive exclusive equipment for the animal, individually tailored to it, but also significantly save their budget. When made with high quality, homemade products are not inferior to purchased ones, and sometimes even surpass them.
Description of the stall
A stall is a place where horses are kept without a leash; individuals of different ages, sexes and sizes can be accommodated here. The stall creates the necessary peace for the animal, protects it from the outside world, controls mobility and protects it from external influence. Compartments are required to preserve the healthy condition of horses, to protect them from cold, rain and frost.
Read also: iTunes Com Bill withdraw money
In addition, these premises are a mandatory attribute for training an animal - the stall, with its modest space, disciplines the animal, limiting its playfulness.
The compartment for horses in large stables measures three by three meters. These values are chosen taking into account the dimensions of the horses and the minimum financial costs. Territory sizes that are less than nine square meters cannot be allocated for an animal.
Halter
A halter for a horse is necessary for convenient removal of the animal and direction of its movement. They put it on the head. A halter also allows you to secure a horse in a stall or in a pasture. Externally, a halter looks like a bridle that does not have a bit and has one rein. Hold the horse by the halter strap on the left side in the cheek area. All human movements must be calm and not cause sudden jerks in the equipment. Otherwise, the horse will become frightened and may cause serious injuries.
Leather halter
You can make a halter from leather or rope. The second option is preferable for pets with delicate skin. They make a halter after first taking measurements of their pet's head.
To make the item, you need to take 7 soft straps lined with fleece 4-5 cm longer than necessary (will be used for seam allowances). A carabiner clasp should be placed on the left side of the back strap. The straps are connected to each other according to the scheme using strong metal rings of sufficient size.
Diagram of a fabric halter
The leather will rub the skin on the horse's muzzle, and therefore the poll strap and the fastening strap must be hemmed with fleece, folded in half. Thick flannel will also work.
Rope halter
A halter is made from rope using knots. You need to take a soft synthetic rope of sufficient strength. There are different schemes for linking equipment, and you can choose the one that is most understandable for yourself. The process of making a halter from leather belts is quite complex, and if possible it is better to purchase it ready-made. The rope one can only be made independently.
Types and types of buildings
- Modular design is a pre-fabricated structure using a modular system; it is transported to the buyer in a fully complete set, together with ready-made stalls. The components of this structure provide the buyer with a wide choice, because with their help it is possible to assemble a stable of any size and scale. The assembly uses elements made from high-quality galvanized steel with a width of 4.5 to 7 cm, a thickness of at least 3 mm and up to 6 mm. It is recommended to clad the outer side of such a building with wood of various species or other finishing materials with the addition of insulation. Its thickness should be at least four centimeters, but no more than six centimeters. The construction of a modular structure takes a maximum of two weeks. The price of such a house for a horse is approximately five thousand euros per horse.
- Tent structure - such an arena is formed from a prefabricated frame using metal arched structures. The approximate width of the building can be from five to fifty meters, and the length is negotiated individually between the supplier and the customer. The strength level of an awning structure, as usual, is calculated based on the indicator that determines the snow load on it, because different intervals are maintained between the arches. The uniqueness of the tent building lies in the transparent coating of its material, which gives the entire structure a high degree of strength. Thanks to this transparent “roof”, the stable receives constant natural light. In addition, it gains the ability to withstand large temperature changes. Such a building can be erected quickly and easily; it is distinguished by durability and reliability during operation. Often, tent structures are used as buildings for stables; they can be assembled in twenty days. The cost of structures varies and depends on the size of the arena, for example, 22 meters x 42 meters of tent construction will cost approximately 80 thousand euros.
In addition to types, stables also differ in types.
Today, experts present buildings of open types, with the presence of stalls or levadas, standard and active, and also of a combined type.
More often there are buildings whose stalls are located indoors, but there are also those where they are located outside.
Only the horse owner can choose a successful suitable variation, depending on his financial capabilities, the number of horses, and also based on the needs of the animals themselves.
Bridle
Unlike a halter, a horse bridle has a bit or snaffle - a special metal ring that is inserted into the horse's mouth. A bridle is required for riding. It is made with your own hands as follows:
- A piece of soft belt equal to 3 lengths is cut from one corner of the mouth to the other through the cheeks and back of the head, making a 10 cm allowance for the seams;
- A piece of the strap is cut off from ear to ear - it will be the frontal one. The allowance is also 10 cm;
- The volume of the chin strap is determined by adding 3 cm for the comfort of the horse to the length obtained after the measurement;
- Assembling the belts according to the instructions.
The reins are sewn to the bridle last, choosing their length depending on your own convenience. It will change according to the growth of the animal and the rider.
Bridle
When choosing a ring for a bridle, you need to make sure that it fits comfortably in the animal’s mouth without touching the teeth. The mucous membrane of a horse's oral cavity is delicate, and it can be injured even with your fingers when putting on a bridle. For this reason, it is important that the bit is smooth, without cracks or nicks. Every owner knows how to make a bridle for a horse with his own hands.
blanket
Horses cannot tolerate frost without harm to their health. To be in good condition, they need, like people, outer clothing, which is a blanket. The blanket looks like a blanket. There is no need to buy a ready-made blanket, because it is very easy to sew it yourself.
To obtain measurements the following are measured:
- Length from chest through legs (sides) to tail;
- Length of the back from the withers to the beginning of the tail.
When taking measurements is impossible, you need to rely on the average table used to sew blankets in workshops. A DIY horse blanket is as comfortable as possible for the animal.
blanket
Using a standard pattern, adjust it to the size of your horse. After this, all the details are cut out from the selected fabric (cotton for summer, wool for winter). You need to add 15-20 cm to the seams. First, all the elements are swept away, and then stitched on a sewing machine. For a winter blanket, you also need to provide a lining. A fastener is made in the abdomen and chest area. At the discretion of the owner, it can be made of Velcro, buttons, carabiners (preferred) and large metal buttons. Blankets should be summer and winter, as well as light wool, which are put on the animal if it sweats during work in cool weather. You can’t put on a warm blanket right away, but a light, slightly insulated one is necessary. As soon as the animal has cooled down, it is wrapped in warm clothes. Knowing how to sew a horse blanket can save you a lot of money.
Arc for harness
The bow is the main part of the harness (harness) and connects the shafts to the clamp. If there is an urgent need and certain skills, you can do it yourself. Ideally, buy this piece of equipment made by professionals. An arch is needed to hold the tugs perpendicular to the clamp. This helps prevent injury to the horse's neck when riding on uneven roads. Harness riding without an arch is unacceptable.
Parade arc for harness
Elm wood is suitable for the arc. Birch, oak and hazel can also be used. It is necessary to harvest wood at the very beginning of sap flow. The tree is sawn into blanks. The edges of the workpieces are trimmed, giving them the desired shape.
Bend the workpiece after steaming it, as without this it will crack. It is most convenient to steam the arc in a bathhouse. A bending machine is used for bending. The arc must be bent without jerking. They do this in two or three people. When the workpiece bends heavily, it is steamed again.
After the arc is bent, its ends are fixed with wire and left until the wood dries. The dried arc is removed from the machine and final processing is performed. It is sanded and painted. In the old days, arcs were painted and decorated with intricate carvings. With artistic abilities, this can be done now, turning this part of the harness into an exclusive one. A bell or bell is required on the arc, and it is attached to the zge (metal loop).
Horse in harness
Making an arch yourself is justified only if the horse owner loves and knows how to work with wood, and is also willing to spend a lot of time on the work. Harness for a horse is necessary even if it is rarely harnessed.
Whip
During horse riding, a horse whip is used as a means of control, telling the animal what to do. It is strictly forbidden to use the whip as punishment. It is used only in cases where the pet cannot figure out what is required of him. Depending on how it is used, the horse understands what they want from him.
At horse races, control of the horse occurs exclusively with the whip, since the stirrups are raised high and the rider loses the ability to control the horse, squeezing its sides with his feet. The longest whips are used when training horses in dressage. Their length reaches 1 m 30 cm. A standard whip has a length of 70 cm.
Whip with leather clapper
The whip can be made from different materials: plastic, leather or synthetic. They vary in weight and flexibility. The whip is bought in specialized stores or made independently.
To make a whip you need:
- 2 laces;
- A tip designed for a summer fishing rod;
- A small piece of leather;
- Metal D-ring;
- Sewing threads.
The whip is made in a certain sequence. To begin with, cut off the ends of the laces. The hollow cord is put on the fishing rod immediately, and its core is first pulled out of the braided cord. The ends of the lace are secured with knots and lubricated with glue. 2 laces and a ring are attached to it, after which everything is wrapped with thick thread. Next, a piece of leather is cut into a deep fringe. The leather is glued and then the fringe is woven into the laces in a spiral.
Jumping whip
To give the whip a factory look, a thermal tube is stretched onto the braided cord. The firecracker is made from leather folded in half, which is glued and stitched. A hand strap loop, similar to the one found on mobile phone cases, is attached to the ring.
It is unacceptable to hit the animal hard. The whip should not cause pain. The horse also responds to the rider’s aggression with aggression and can throw off an inexperienced rider, which is fraught with serious injuries.
How to set up a horse barn
If the horse is kept not in a stable, but in a barn adapted for this purpose, a stall is made in it, a manger with hay is installed next to it, a feeder and a drinking bowl are secured. Bedding is laid on the floor.
Stall
Until the beginning of the twentieth century, horses were kept in stalls; Some farms still keep working horses this way. The horse was tied next to the feeder in a small fenced-off area - if necessary, he could lie down, but could not turn around. Standard stall dimensions are 3 x 3.7 m. The minimum stall size suitable for ponies is 2.4 x 2.4 m.
Feeders and drinkers
When a horse chews, it scatters grain to the sides, so the feeder and drinker should be kept away from each other. Their wall mounting prevents them from tipping over. A wide box-shaped container mounted on the wall of the stall will be sufficient for distributing feed. The height of the feeder is 1 m. Length is 1–1.2 m. Width is 30 cm. The hay is placed in special mangers: they must be deep enough to hold the hay and not have holes so that the horse does not get caught in his foot and is injured , if he decides to lie next to him.
Wall-mounted hay racks and nets are not recommended for everyday use, as horses normally feed with their heads bowed. The drinking bowl is installed at a height of at least 0.9 m from the floor so that two horses can drink from it. Horses can use an automatic water bottle if you decide it would be more efficient. But some horses like to play with the automatic sippy cup - opening the valve and having a small shower in the stall.
Litter
The horse is kept on bedding, its thickness is 10–15 cm. Straw, sawdust, and peat are used for it. Straw is considered the most effective because of its softness, ability to retain heat and allow moisture to pass through well.
Every day, part of the contaminated litter is removed, uneven areas are smoothed out, the entire layer is compacted, and 6–8 kg of new litter is added. Dirty litter can be easily collected and burned. You can also sell it as fertilizer or substrate for growing mushrooms.
Saddle
Making a saddle with your own hands is difficult, and you should not do it unless absolutely necessary. Professionally made, it is safe for the horse and rider. Only a person associated with professional production can independently make a high-quality saddle. There are many recommendations on how to make a saddle for a horse.
Saddle
Before you start making a saddle for a horse with your own hands, make a model of it. For this, a dense wire is applied to the animal’s back behind the withers and bent clearly along the contour of the body. Next, according to the resulting pattern, the outlines are transferred to cardboard. A model is cut out of cardboard and applied to the back of the animal. It must exactly follow all the curves. Afterwards, a tree is made according to the model and then the saddle is assembled.
Tree of saddle
An amateur will not be able to make a saddle correctly. You cannot skimp on this piece of equipment, and you still need to buy a high-quality saddle made by a master.
How to make a horse cart with your own hands
5 minutes to read the article The times of dashing horse-drawn troikas and carriages have long since sunk into oblivion, and with them the main attribute of the Russian harness - the arc. Being a very important part of the harness, the movement and safety of the entire crew depended on its quality. It is not surprising that master craftsmen have always been revered on a par with blacksmiths and saddlers. Today, such skill is mastered by only a few people who have passed on their knowledge and skills from their grandfathers and great-grandfathers. We will lift the curtain on this “great” task and tell you how to make a horse arch with your own hands.
It is the main attribute and important part of the Russian team, on the quality of which the movement and safety of the entire crew depends.
Horseshoes
You can make horseshoes yourself only if you have your own forge and experience in creating them. This product is not expensive, and you should not experiment, endangering yourself and your horse by making dubious homemade horseshoes.
Horse shoeing
Making your own equipment for a horse is, of course, an interesting and exciting endeavor, but most often unjustified, since unprofessional accessories do not meet quality requirements and can even be dangerous.
The bridle is the first “horse” accessory that appeared immediately after the domestication of the animal. Its modern appearance is very different from what it was in the ancient world. But in order for it to fully perform all its functions, you need to know what it is made of and how it works. This fully applies to horse halters.
An ancient bridle from Tibet, kept in the Metropolitan Museum of Art (USA)
Contents of step-by-step instructions:
Traditions and rituals
Since ancient times, people have attached special significance to many household items. And the bridle was no exception. And since the horse was a person’s most active assistant a hundred years ago, this item was endowed with various magical properties. Therefore, different peoples have many rituals in which this attribute is present.
First of all, bridles are in demand in traditional wedding rituals. For example, among the Turkmens they threw it over the bride’s clothes, and the groom tried to use these ropes to remove the headdress from his future wife. This ritual is intended to remind you of the obligatory submission of the other half.
The bridle is an object for ritual actions among the Turkmen
In Rus' it was believed that this item was able to protect the wedding procession from the evil eye. When the sorcerer left the newlyweds’ courtyard, he went to the stable and blew on the bridle. It was also not customary to buy a horse without this item. It was believed that this would make it worse for her to get used to the new home. The Kazakhs put a bridle in the boy’s bed every day. According to their beliefs, such a ritual will help raise their son to be a good horseman. After receiving baptism, Ossetians performed this ritual for some time. A bridle was placed in the hand of the deceased man and the horse was led around the grave.
The Russians also had a wedding ceremony with ammunition.
What is a bridle, its structure
A bridle is an element of horse harness that allows the rider to control the animal and acts as a “steering wheel.” It sets the pace, guides, and stops the horse. This is possible thanks to a part inserted into the area of the mouth without teeth - a snaffle, mouthpiece or other similar element.
There are several types of bridles:
Snaffle type
This type consists of the following elements:
- straps - corner, forehead, chin, cheek (adjustable);
- snaffle;
- occasion;
- capsule (may be missing).
Diagram of a simple snaffle headband
Snaffle type bridle
This bridle is considered universal. It is ideal for use by novice horse breeders and is characterized by its simple design. It is often used during training.
Mouthpiece type
In such equipment there is a mouthpiece, which is connected to a bit, as well as a mouthpiece rein. These bridles are necessary when maximum precision in executing commands is important. Unlike the previous one, the capsule here is a mandatory design element. Often such models are used in police mounted patrols.
Cowboy type
Such bridles are made from leather belts - quite thin, which allows you to quickly repair the harness in case of a break. The cowboy look is adapted to all conditions of horse control. And the main motto here is convenience, since the shepherds spent most of their time in the saddle.
Cowboy bridles are:
- single-eared, with ear loops;
- slotted, on the wide corner belt of which there are holes for threading the ears.
All the elements here are just belts, without a noseband, but often with a mouthpiece and a snaffle. The cowboy bridle has one more feature: it has separate reins. If the animal fell, it immediately got up quickly, without getting tangled in the straps.
Cowboys had specially designed bridles that prevented the horse from getting tangled in the straps
Hackamore
This is the name given to a bridle that does not have a bit. Its role in this case is played by the nose strap. It presses on the face, chin and bridge of the nose, transmitting the rider's commands. The force of pressure depends on the material used to make the harness.
Attention! Hackamores should not be used on poorly trained animals. They are used in exceptional cases in case of trauma to the oral cavity of a horse. In equestrian sports, they can only be used by experienced riders who have developed trusting relationships with their charges.
Side pool
This option is used on horses participating in racing. This is an intermediate option between a halter and a bridle of the simplest design. This model has separate cheek straps and reins. This design is convenient when the rider needs to instantly unbridle the animal. In addition, there is no unnecessary pressure in such a harness. If necessary, the site pool quickly turns into a halter. This simplifies the feeding process and allows for rest. Such bridles are convenient for long hikes.
Homemade bridle
You can make such an accessory yourself at home. The proposed model consists of several elements.
To sew a bridle you will need:
- belts about 1.5 cm wide - made of leather, canvas or other dense, strong materials;
- metal rings ø3 cm;
- snaffle (sold in horse shops);
- silk thread.
To accurately reproduce the required model, take an old bridle, measure the length of the parts, and sew. If there is no suitable specimen, then measure the horse’s head:
- From the edge of the mouth to the ear, along the cheek and back of the head to the opposite edge of the mouth.
- Forehead width.
- Chin width.
Add 10 cm to the lengths obtained from points 1 and 2, and 3 cm to point 3 (these are seam allowances). For the reins, take a comfortable length.
Make a bridle like this:
- Cut off the length obtained from step 1 of the measurements from the belts. This piece forms the cheek straps and the nuchal loop.
- Cut the length according to the width of the forehead. The ends are tucked in, forming loops through which the frontal part will be placed on the cheeks.
- The chin detail is made in the same way.
- Collect the bit and rings.
- The edges of the cheek straps are sewn to the rings.
- They secure the reins.
Attention! Before using new ammunition, you need to make sure it is durable.
Video - What is a bridle for a horse?
Types of equipment and their decorations
Traditionally, equipment for harnessing horses includes:
In order to choose the right harness, an individual approach to each horse is required, since its physique, dimensions and personal characteristics will be of significant importance.
The art of decorating your stallion has been known since the times of the Scythian peoples and Tatar invasions. Horse owners tried to decorate their equipment with silver, gold, and precious stones, not to mention the use of ribbons and bells.
The decorations were made with high quality, no expense was spared on them, because they had to fit the horse perfectly, not interfere with its movement and be comfortable for it.
Scythian horse jewelry, found during excavations and presented in museum collections, has gold and silver plates and is made in the form of convex metal foreheads.
In the 17th century, it became especially popular in Russia to create jewelry for horses, which very often looked like real masterpieces of handicraft. For their manufacture, goatskin, morocco fibers, silk braid were used, and copper and gilding were used as frames.
On the horse's head there was a grip with balls and tassels. On the occasion of the celebration, the horse was decorated in a special way, replacing simple chains with beautiful ones with silver rings.
Turkmens, as in ancient times, still consider horse jewelry to be a subject of high national art. Precious and semi-precious stones and metals are used in their manufacturing process.
Traditions and beliefs associated with the creation of accessories are cherished, honored and passed on to the younger generation. In the forehead part of the harness of a Turkmen horse there must be a carnelian stone, which acted as a talisman for the horse.
The bridle was made of thin leather straps coated with silver, with carnelian inlay at the junction of the straps. The elegant decoration emphasized the beauty of the horse. For modern bridle decoration, various shaped metal plates, coated or uncoated, made of precious metals are used.
The cape was embroidered with precious threads, often depicting the family coat of arms or the warrior's motto, richly decorating it with stones and silver plates.
Halter
This part of the harness is a bridle to which the bit is not connected. It is used when it is necessary to take a horse out of the paddock, and also when there is a need to secure the horse on a leash in a level position.
For these purposes, decoupling belts are attached to it. A halter is always used in combination with a chumbur.
An everyday halter is made from leather straps, rawhide or thick braid. The festive version can be decorated with pom-poms or embroidered with beads, and rings made of precious metals can also be used to make it.
The advantage of a braid halter is that you can wash your horse without removing it. When choosing a halter for your horse, you should also pay attention to the country of origin, since English ones are softer, and Belarusian ones are stiffer, which means they will last longer in use.
Leather halters last longer than braid halters, but require more care, since the leather should not be allowed to dry out; moreover, if it gets wet, it can mold and tear.
But when wet, raw material becomes limp and stretches, losing its previous shape.
When choosing a halter, be sure to take into account the size of the horse: there are special ones for ponies and for heavy breeds.
Headband
This is a decorative element that is part of the horse's harness and is attached to the head strap under the ears on both sides. It practically does not perform a functional role, but is only a decoration.
The headband is made from leather or woven from nylon cord, decorated with leather or silk fringe, embroidered with beads, precious or semi-precious stones.
Moscero
This is a traditional Spanish decoration that is actually a forehead piece. It is decorated with tassels made of threads or beads. When the horse swings its head, the tassels on the moscero, scattering in different directions, drive away annoying insects that bother the animal.
Moscero can also be decorated with metal elements and embroidered with stones and beads.
Bib
This decorative element is often made in combination with a forehead, sometimes with a cap. It is often made using the macrame technique, woven or knitted from threads, abundantly decorating the bib with pompoms and fringes, and embroidered with beads and sequins.
Bibs are made from leather, decorated with ornaments and rivets. Thanks to modern technologies, horse accessories can not only be sewn, but also made from LED elements so that horse equipment looks more impressive, for example, during circus or night performances.
The horse's croup is also decorated in combination with other accessories, so that the overall appearance is harmonious and beautiful. Decorations can be: The last type of decoration of a horse is very original: for example, on the horse’s croup, skilled specialists (necessarily with the help of several assistants) can create:
How to put on a halter
It is necessary to be able to correctly put a halter on a horse, and then the ward will always have a good mood and non-resistance to the owner’s commands. They do it like this:
1. Approach the animal from the left side, since most models are produced "left-handed". They take the halter in the left hand and show it to the horse. Chembur (a rope used to tie a horse into a halter) is thrown over the withers or over your hand.
2. Thread the muzzle into the loop.
3. The back strap is placed around the pet’s neck.
4. Secure the ammunition.
Attention! When putting a bridle on a horse, you must always remain calm. Animals feel fear, which is transmitted to them.
Some horse breeders recommend taking a different route. They advise not to put the loop directly on the nose, but to first throw the free end of the rope over the neck, hugging the animal, and then encourage it to tilt its head to get into the loop. They consider this method not only more convenient, but also useful for training a horse.
For horses that are afraid of the bridle, as well as foals with short teeth for the bit, such a device can be turned into a side pull. Then you need to insert metal rings into the nodes on the sides of the head. Reins are attached to them, which makes it possible to ride a horse.
Video - Putting a halter on a restless foal.
How to build a stable correctly
If you have created a good general plan with all utilities, all that remains is to work out in detail the individual structural elements. The degree of comfort for animals depends on how correctly the materials are selected and the calculations are made.
Foundation
The foundation of the stable is assembled from ready-made blocks, which are laid in a trench; This type of foundation is called prefabricated strip foundation. This is the fastest and easiest installation method - you do not need to fill the formwork and wait for it to dry.
The top of the structure will be covered with a layer of concrete. It is leveled and walls begin to be erected. The gaps between the blocks and the foundation are filled with coarse sand or crushed stone. The outer part of the blocks can be treated with bitumen mastic to protect them from moisture.
Walls
The optimal material for building walls is wooden logs with a diameter of 20–23 cm. Wood retains heat well and maintains an optimal microclimate. Brick or concrete masonry is not recommended for use due to the fact that brick easily cools down in cold weather and heats up in hot weather.
To keep the indoor temperature in the positive range, you will need to lay 1.5–2 bricks. The northern wall is made thicker than the southern one by 25%. To make it equally comfortable inside, the minimum thickness of a wooden wall should be 20 cm, and a brick wall should be 2 times thicker.
Roof
Most often, gable and single-pitched roofs are used, which prevent snow from sticking in winter. Covering - metal tiles or slate. When laying the ceiling, use a ceiling board at least 5 cm thick. The top of the board is covered with a clay mixture. The main task of such a mixture is to ensure moisture resistance and eliminate drafts.
The height of the ceiling should allow the horse to comfortably raise his head without worrying about hitting the ceiling. For ponies and small breeds, a standard height is convenient - no lower than 2.4 m. For long-legged trotters, the desired height is no lower than 3 m. Make sure that there are no nails sticking out of the boards and that there are no unprotected lamps hanging from above, which the horse could hit.
The most important element is the floor. Its main qualities:
- low thermal conductivity;
- moisture resistance;
- dryness;
- strength;
- no slipping in autumn and winter.
An adobe floor is considered optimal. Its composition is a special “cushion” of layers of crushed stone, lime, and clay. The minimum floor thickness is 150 mm. The obligatory slope of the floor from the outer wall inwards is at least 1.5 cm. The slope is necessary for the convenience of cleaning excrement. This type of floor needs to be repaired once a year due to the fact that hooves make it uneven. More modern floor coverings are made from clinker tiles. Advantages of this floor:
- moisture and frost resistance;
- immunity to mechanical damage and high wear resistance;
- absence of dust in contact with hooves, unlike clay;
- maintaining a presentable appearance throughout the entire period of operation;
- a reliable barrier that prevents the penetration of rodents.
Windows and doors
Windows provide natural ventilation and light. There should be quite a lot of them, since natural light is important for horses. Hinged window designs are better than monolithic ones because they are easier to keep clean. Windows must be double glazed. The minimum distance from the floor to the window is 1.5 m, but not higher than 2.1 m. The inner side is covered with bars. The window size is about 15% of the total wall area.
The door can be sliding or hinged. The doors to the stall, like the partitions, are made half solid with a lattice upper part. Height - to the ceiling, width - at least 1.2 m. A strong latch is required. Doors (two) to the stables are installed at the ends of the building.
Rules for using a halter
When handling a simplified version of the bridle, you must follow a number of rules:
- If the horse is led out with a halter, then the reins are held closer to the head. This way she will understand that she is a follower.
- They are always located on the left, do not go forward and do not lag behind.
- Care must be taken to prevent the animal from kicking, which is possible even with docile charges.
- The horse should not be allowed to be active while wearing a halter, to avoid injury and loss of control over the animal.
It doesn’t matter who or what the ammunition was made from - by a loving owner or by employees of a large enterprise. The main thing is that it is comfortable and does not injure the animal. Then the horse will not have any fear of the straps, he will be calm and submissive.
Nikolay Zhuravlev chief editor
Author of publication December 13, 2018
Did you like the article? Save so you don't lose!
- Author: Maria Sukhorukikh
Rate this article:
- 5
- 4
- 3
- 2
- 1
(0 votes, average: 0 out of 5)
Share with your friends!
Construction of a summer stable and insulation
Summer quarters for horses do not require registration, as they are not permanent buildings. It is easier to build and there are no special requirements.
The most common option for building a summer stable is the frame construction method. Using timber, boards, fasteners and a level, the frame and frame of the room are assembled.
The walls are assembled from lumber using insulation. A wooden floor is being installed. Windows and doors are inserted into the openings.
When laying ceiling and roof beams, take into account the slope to organize drains. The beams are hemmed with a board, a heat-insulating layer is laid on top, and a special film is nailed with a stapler. Plywood with moisture-repellent impregnation is nailed on top. Next, the slate roof is installed.