The orchid can rightfully be considered one of the most exquisite and sophisticated ornamental plants. The flower has earned the love of many fans thanks to its unusual structure and variety of shades. If there are no living beautiful orchids in the house, you can easily make one from artificial materials. Foamiran orchids do not require daily care, but they bring a lot of pleasure to their owner.
Little tricks for creating an orchid
An orchid is an unusual plant that has a structure that differs from other, common flowers. It has two side petals, three sepals and a petal in the center of the flower, reminiscent of baby lips. Color ranges from white to deep purple and dark red. The most attractive in its beauty is the cymbidium - this subspecies of flower can be made of artificial material, for example, plastic suede. Such a flower is no different from a living plant; it will decorate the interior of any room.
The main advantages of foamiran are the following qualities:
- plasticity - the material easily stretches and changes when heated;
- it can be easily cut with scissors;
- finished products can be washed well with plain water;
- foamiran is environmentally friendly;
- the variety of shades makes it possible to create flowers that are as similar as possible to living orchids.
- Foamiran can be purchased at any store that sells craft supplies.
Options for composing compositions and their features
The internal contents of the florarium are determined by its design. First of all, you should decide on the location of the decor and its type, whether it will stand on a table, windowsill or hang on the wall. Then the dimensions and shape of the glass greenhouse and the type of plantings are selected. After carefully studying the characteristics of each plant and possible neighborhood options, you can begin to compose compositions.
Desert
An unpretentious florarium is suitable for those who do not have enough time to care for plants. The main element of the composition are succulents (agave, cactus, aloe). They are able to accumulate moisture and are ideal for dry areas. Miniature bushes will take root in any closed or open container. For the soil, use earth, sand, decorated with ceramic chips and small pebbles.
The “desert” composition can consist only of plants in the sand or be supplemented with artificial elements. Single cacti look good in a large vase or aquarium. Stones of different sizes imitating rocks are placed next to the central figure, and a mini-bonfire is made from sticks. For the full effect, you can add plastic Indian figurines, a toy car and other themed little things.
Mountains
The basis of the composition is a high-mountain landscape. Plants for such a florarium can be divided into two types: inhabitants of forest foothills and greenery of rocky semi-desert plateaus. Dry areas are characterized by semi-desert plants, while forested areas are characterized by moisture-loving plants. More often, compositions are composed of Gesnerian and climbing types.
If the mountains in the aquarium are to be surrounded by greenery, the soil should be rich, rich in organic matter and well-drained. For desert compositions, you need to prepare pebbles. In the center of the vase there are stones with sharp edges, chips, and irregular shapes. Plants for the “mountain” florarium do not require special care. It is enough to maintain the desired temperature and add moisture as it evaporates. For a greater aesthetic effect, you should use narrowed containers (rectangular aquariums, boxes).
Forest
The composition can imitate moist deciduous forest of tropical regions, coastal, multi-tiered forests. The basis of this decor will be greenery. It is not at all necessary to look for exotic plants. Properly selected available options will fully convey the idea. You can use one type of plant, placing it in one plane, or several, planting it in tiers. The tallest and fastest growing ones, for example, ivy, are placed in the background, while low-growing ones are planted in front, making it possible to view all the elements of the composition.
Since all greenery is planted in the same soil, it is necessary that it has the same requirements for it, the need for moisture. The soil must be of a complex composition, including sand, leaf soil, and peat. To maintain constant humidity, you can place a glass of water behind the glass, decorating it under the pond. If the greenhouse is an open type, the plants should be sprayed daily with a spray bottle.
Orchids
Semi-closed florariums are an ideal place for growing capricious orchids. Such structures provide constant humidity and conditions as close as possible to the natural tropics. Their size can be any - either a rectangular glass box or an elongated miniature vase will look great.
It is important to create favorable conditions for flowers to grow. In an environment acceptable for other plants, they will constantly be in a depressed state. You can plant single flowers or combine them with other types of epiphates. You will get a wonderful composition if you plant ferns and peperomia at the bottom of the container. A glass house for orchids can be called an orchidarium if the following conditions are met:
- Lighting installation. They use special phytolamps, but ordinary ones - daylight - are also suitable;
- Ventilation system. The glass structure must contain openings and fans for fresh air;
- Communications. Openings must be provided for electrical wires and other functional elements;
- Fasteners, protective elements. Necessary to ensure stability of the elements of the composition and maintain the isolation of the florarium.
Bonsai
A harmonious oriental craft behind glass with a bonsai tree will fill the room with comfort and tranquility. A smaller copy of a natural element is complemented by stones, moss, greenery, wood chips and themed plastic figures. You can create a composition using different styles and types of plants. The miniature version will look great:
- Carboniferous landscape;
- Pond and fountain;
- Ferns and mosses;
- Latin American design;
- Grotto and other surface relief.
Water
Creating a water garden and maintaining it requires a lot of effort. This florarium imitates a real water body. Only water-loving crops can be grown in it. Thanks to modern technologies, organizing an indoor paludarium has become much easier and more accessible.
The water garden container must be airtight. You can fill it with any plants that are usually used for aquariums or mini-gardens. Cryptocorynes, lagenanders, and anubias are suitable. The ground part of the composition is decorated with classic crops for such a design - cissus, tillandsia. If the upper area requires the presence of pots, you can use any moisture-loving plants. The back wall of the aquarium can be decorated with epiphates, pebbles, and shells.
Making a pattern for a future orchid
There is probably no person who doesn’t like orchids. These colorful flowers of unusual shape are considered to be a symbol of the tropics.
Orchid petals vary depending on the type of plant. To create a pattern you will need:
- flower core;
- "sponges";
- petals (five pieces);
- stamens and styles (for some subspecies).
The most common variety is phalaenopsis; the flower size of this plant ranges from 5 to 15 cm. You can make a stencil of just one petal and the middle (sponges) to assemble the phalaenopsis from plastic suede. Even a beginner can easily make a template for an orchid; you just need to listen to the advice of professional craftswomen.
To make a pattern for a cattleya orchid, you will have to additionally create two different types of petals, and in the case of a cymbidium, you will need a template for the middle of the flower.
Templates (stencils) are prepared from thick cardboard or very thick paper. First, choose the type of flower, then make templates and transfer them to sheets of plastic suede.
The main stages of making cymbidium from foamiran
Before collecting a cymbidium flower, you need to prepare a column, a tongue and five petals. You can use your own imagination, use the ideas of other craftswomen, or use the following recommendations:
- Draw a vertical line 6 cm long, then at a height of 3 cm you need to draw a transverse line perpendicular to the vertical one and mark 1.5 cm on it in both directions. Connect the resulting points with a smooth line - you get a leaf.
- For the column template, you need to draw a rectangle, the width of which will be 1 cm, and the height will be 6.5 cm. The corners are smoothly rounded and an incision 3 cm deep is made on one side.
- To create the tongue you need to draw a heart and a circle. The width of the heart is 4.5 cm, the height is 3 cm. The radius of the circle is no more than 1.5 cm, and the circle is placed above the heart so that the figures touch each other. Trace the outline of the resulting figure - that’s it, the tongue is ready.
The finished stencils are placed on foamiran plates, traced along the contour with a special stick (knitting needle) and then the details for the future flower are cut out. The color of the cymbidium can be any; everything here depends only on the imagination of the master. Most often, the most striking element of an orchid is the “lip”; the remaining petals can be tinted using pencils or acrylic paints. And now we invite you to familiarize yourself with a step-by-step master class on creating a delicate lilac orchid branch.
What kind of florariums are there?
Florariums can be closed or open, tabletop, floor or wall. But the main thing is wet tropical or dry succulent.
Closed florariums
a complex version of florariums, since an ecosystem with its own microclimate is created inside the container. Once the plants are planted, the container closes tightly and no further maintenance is required. Such mini-ecosystems are difficult to calculate correctly, and, as a rule, they are short-lived.
Closed florarium
Open florariums
A simpler version of florariums, this is what we will consider in more detail.
Separately, you can also distinguish orchidariums (compositions with orchids) and florariums with bonsai .
Open florarium with echveria
How to make an orchid sprig from foamiran?
In this master class we will make an orchid sprig from foamiran. It will decorate your room and complement the flowers that have already faded.
To create it you will need:
- green, lilac foamiran;
- purple pastel;
- damp foam sponge;
- awl;
- scissors;
- thin and thick wire;
- black beads;
- iron;
- foil;
- glue gun
We cut out the templates for the orchid, which are given above in the article. Choose the color of foamiran that you like best, and to tint the middle, take a darker shade of art pastel. For one flower we prepare one blank of each template. We trace all the templates using an awl or a toothpick. We outline petal number 2 once, and then its mirror image opposite. That is, you should get a double part that is connected in the middle.
Let's make two unopened buds: one from green, the smallest, and the second, a little larger, lilac.
Using purple art pastels, we will completely shade the middle of the orchid under No. 1. Template No. 2 will be shaded only in the center, shading closer to the edge of the petals. We will also tint the blanks for the buds. First you need to moisten the foam sponge, apply pastel to it and then paint the foamiran. After this, let the paint dry.
Let's give each piece a shape. Heat up the iron and lay out petal No. 1 for about five seconds. At the same time, constantly press down on the middle and the foamiran will begin to bend. Drop the petal onto the table. In the same way we prepare the fom for the buds.
In the remaining blanks, we process each petal separately. Apply to the iron for 2 seconds, stretch the middle with the fingers of both hands.
Let's start assembling the orchid branch. We cut the wire 15-20 cm long, string one bead, which we place in the middle, and twist the ends of the wire under the bead.
We pierce the wire at the top point of part No. 1. Then we pierce the center of the remaining petals. You can fix each layer with super glue.
For the buds, we will make drop-shaped foil blanks of such a size that they fit in the petals.
We pierce the middle with an awl and thread the wire. We connect the ends under the wide base of the drop.
We collect the buds, glue all the petals in a circle to completely cover the foil.
We wrap the stems of orchid flowers with green tape. Then we collect the twig starting from the smallest bud, to which we attach a thicker wire. We gradually move down the branch, distributing the flowers evenly.
This is how easy it is to make an orchid sprig with your own hands.
An artificial orchid, just like a living flower, fits perfectly into any interior; it looks natural in a flower pot, being a worthy decoration for any window sill. The only disadvantage of such a product is exposure to sunlight, under its influence the petals may lose their color.
Formation of side lobes
To shape the elements of the orchid inflorescence, heat the iron by setting the thermostat to the second position. First, shape the buds by placing the piece on the surface of a heated iron for a few seconds. As soon as it heats up, immediately remove it from the surface of the iron in the shape you need.
We attach the side petals to the iron one by one. We apply the first, protect the second from the hot surface. We quickly press the warm petal onto the mold to get a textured print. Then we apply the second one, and protect the finished one. We also press the heated second one onto the mold to obtain an impression.
Finished petals with veins must be slightly pulled by the edges and with your fingers, form indentations in the center to give a natural effect. The petals will look like in the photo of hand-made orchids.
Orchid for gift decoration
As you know, foamiran makes very beautiful hair accessories or interior flowers. But few people thought that any gift could be decorated with such flowers. Today we suggest making a delicate orchid for gift wrapping.
Materials and tools:
- - orchid template;
- — silk foamiran (iveri color);
- - Iranian yellow foamiran;
- - bright yellow silk foamiran;
- — pastel blue, turquoise, yellow;
- - acrylic red paint;
- - gold acrylic paint;
- - needle;
- - sponge;
- - scissors;
- - brush;
- - acrylic varnish;
- — mold of orchid petals;
- - instant glue;
- - iron.
We cut out all the details of the orchid from thick paper - there should be three templates. For orientation, a pattern of an orchid is presented on a piece of notebook paper and all dimensions are indicated.
We attach the templates to the foamiran, trace and cut out the details.
We tint the details of the petals with blue and turquoise pastels, starting to make strokes from the center to the edges.
Apply yellow pastel.
We tint the middle with blue and yellow pastels. Paint the cut blue.
We cut out a mini-strip of 0.5x1 cm from bright yellow fom and make a fringe on both sides.
Dipping the tip of the needle into red paint, we draw rays and dots.
Fold the mini-piece in half and glue it in the middle, without touching the fringe.
Let's return to tinting the petals - enhancing the blue color (in the center). Shade the pastel with a sponge.
We tint the back side of all parts in the same way as the front side, but not so brightly.
After heating the petal on the iron, apply it to the mold and press it with your fingers. We repeat this process with all the petals separately. Place the center on the iron. We wait until the part heats up, takes a convex shape and flies away from the iron.
We form a wave at the edges of the petals. We heat a small area and stretch it with our fingers.
Let's go through blue pastels again. By tinting according to the created texture, we prevent paint from penetrating deep into the surface. This way we get a beautiful marble pattern.
Cover with varnish. Apply varnish to the center piece on each side. Let's dry it.
Apply a drop of gold paint to the sponge and blend it along the petals and the middle (on both sides).
We glue the yellow fringe into the part that will be the center of the orchid. Glue the two main parts with the petals (in the middle).
Glue the finished center to the petals.
We pack the gift and decorate it with a delicate orchid flower.
Foamiran orchid in the interior
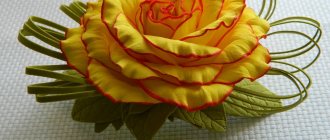
A phalaenopsis or cymbidium in a glass vase will look very delicate; a white orchid looks especially sophisticated and delicate - such a flower, made of plastic suede, is quite difficult to distinguish from a living plant. A black orchid branch goes best with white and gray shades.
An artificial orchid made from foamiran is suitable for decorating a hair hoop, hairpin or brooch. It can be attached to a wedding boutonniere or added a small branch to a wedding bouquet.
Many people consider the orchid a symbol of beauty, love, tenderness and perfection. A flower created with your own hands can be a kind of talisman for its owner. Today you can cope with such a task without any problems thanks to numerous master classes from professional needlewomen.
Self-assembly of the bouquet
Necessary tools during the work process:
- Capsules for floristry on legs
- Wire
- Coconut fiber
- Sharp knife
- Tape
- Package
- Decorative elements like clothespins, bows, lace, etc.
Procedure:
- The capsules are wrapped in coconut fiber and filled with water. An orchid is placed inside each one in such a way as to prevent air from entering. This is a fundamental point when forming a composition.
- Next, the author must use his imagination: add greenery or decorative elements, wrap it in paper, film, or put the bouquet in a cardboard box. Who likes what more?
Working with material
In fact, working with such material is quite simple. Very often daffodils and Thomas orchids are made from this material. Even a beginner can master the technology. First, certain objects are cut out with scissors, for example, geometric shapes, hearts, flowers or petals.
A specific hole punch is used to create an openwork edge or create holes. Volumetric particles are created by fingers by stretching the material and then maintaining this configuration. Sheets are of the same tone . If you need to get color transitions, you will have to create them yourself. Dry pastels are perfect for this. If you complete all the manipulations sequentially, you will get a gorgeous foamiran orchid that can be placed in a pot. Using the ready-made instructions, creating a flower is not difficult.