What to do with your child in his spare time. The best choice to do crafts. Together with your children, you can make wonderful crafts, toys, decorations, souvenirs and gifts with your own hands.
Homemade products will help not only decorate the room, but also furnish the interior in an original way for any themed holiday. We suggest using natural products as ornamental materials. At the height of the apple season, edible crafts will bring pleasure to both baby and mother.
Applique caterpillar made of colored paper: how to make it in kindergarten
It is best to start introductory classes with children by appliquing a caterpillar from circles. For
Caterpillar appliques can be made from circles as a blank if a small child cannot do this process smoothly and accurately.
Circles can be of different sizes and colors. You can play with the application according to your imagination and capabilities.
Materials:
- Colored paper
- Pencil
- Glue
- Leaf for background
Draw a future applique picture on a piece of paper to use it later as a template.
Transfer the leaf onto green paper, and the circles of the caterpillar’s body onto yellow paper.
Make three more red paper circles and yellow feet.
Let’s make a composition on a white sheet of paper and glue all the details
You can create a template for the caterpillar applique yourself or print it out.
How to choose apples
We select fruits without visible damage. The choice of color and size depends on the idea of the craft. The colors of apples go well in any combination, but for a snowman it is better to take light-colored fruits, and for a caterpillar to choose fruits of the same color.
The size and shape of the fruit can give you ideas for crafts. You can use small and large fruits. If you are planning a figurine with a head, use a larger apple. There are no strict rules here, give free rein to your imagination.
Important! Before starting work, wash the fruit thoroughly and dry it with a towel.
Paper caterpillar for children: how to make it yourself
You can make a beautiful caterpillar from colored double-sided paper. Cut part of a green sheet of paper into strips. Let's attach each strip
A paper caterpillar template can be drawn or printed.
Assemble the caterpillar by attaching the head on both sides.
LiveInternetLiveInternet
DIY caterpillar craft is a great craft option for kids. They will happily make a caterpillar from lids, pom-poms, socks, plasticine, paper, kinder eggs and other materials. Let's look at several options for making this wonderful craft.
Caterpillar from Kinder Surprises.
Necessary materials:
- double-sided tape - multi-colored knitting threads - Kinder egg cases
Manufacturing process:
1. Tear off a square from double-sided tape, stick it on the top of the kinder, lightly press the edges, remove the film. 2. Wrap the remaining part of the kinder around the circumference. Tear off the joints with a small margin. 3. Wrap the bottom of the kinder and press with tape. 4. Make blanks in the form of stripes from colored threads. 5. Stick the threads onto the tape, pressing firmly. 6. Glue the eyes onto the front link of the caterpillar; this must be done before gluing the craft with threads. 7. Secure the caterpillar links with thread or an elastic band, and place a bead on one end. Tie a thread tightly around the bead. 8. To allow the track to bend, leave some free space between the links. 9. Secure the last link with a button. 10. The kinders themselves can be filled with rattles in advance. The craft from Kinder eggs is ready!
DIY sock caterpillar.
Necessary materials:
- sock - buttons or sequins - 3 pieces - millet - toy eyes - braid - red felt-tip pen - thread and needle - scissors
Preparation: 1. Take a sock and fill it with millet. 2. Tie the filled sock at the top with braid. Tie it in such a way that you can make a lapel. 3. Sew sequins along the trace of the sock. You can also use simple buttons. 4. Glue eyes on the upper half of the sock and draw a mouth with a felt-tip pen. 5. Tie the sock with braid to form the torso and head.
DIY pom pom caterpillar.
Necessary materials:
- green pompom - 3 pieces - beige and brown pompom - 2 pieces each - thread - white cardboard - black beads - hook - brown wool threads
Manufacturing process: 1. To make the craft, use pompoms of different sizes: a small brown pompom for the tail, use the largest pompom for the head. For the body, use 3 green medium pompoms. 2. Prepare the thread, take the largest brown pom-pom and the largest green pom-pom, fasten them together. The pom poms don't need to be pulled too tight to keep the track moving. 3. Attach the remaining pompoms in the same way. 4. Cut out the eyes from white cardboard, sew on 2 beads, sew the finished eyes to the head, draw a thread through the center of the pompom. 5. Weave the legs from brown yarn and tie knots at the ends. 6. Turn the caterpillar onto its back, tie each pigtail in the place where the pompoms are attached.
DIY paper caterpillar.
Necessary materials:
- ovals made of multi-colored paper - felt-tip pens - glue
Manufacturing process: 1. Cut out ovals of the same size from colored paper. 2. Make a fold on each oval. 3. Glue each oval with the horizontal side to another oval. Glue all the other pieces in the same way. 4. Decorate the face using markers.
DIY educational caterpillar.
Necessary materials:
- multi-colored satin ribbons - flat tulle - 50 by 15 cm - plastic plugs - 4 pieces - needle - threads - a small piece of foam rubber, cotton wool or synthetic padding - a rattle ball - a copper sponge for dishes - buckwheat, rice, beans and other cereals - a handful raisins - a piece of rustling paper or cellophane - a button - a hat clip - a piece of faux fur - a piece of red satin ribbon
Manufacturing process:
1. Fold the fitting in half and sew it like a stocking. Do not sew one edge. 2. Form a ball from padding polyester, push it to the base, press tightly, and tie with a satin ribbon. 3. Pour rice into the second link, tie with a satin ribbon, add buckwheat to the third, and beans into the fourth. Tie each link with a satin ribbon. 4. Place a dish sponge in the fifth link, a ringing ball in the sixth, and a handful of raisins in the seventh. 5. Form the final link as follows. Take a piece of cellophane, roll it into a cone, secure it with tape, put it in the tail of the caterpillar, and sew it up. 6. Sew a piece of faux fur, a nose button, a hairpin, and a ribbon tongue to the first link. 7. Make the paws: make holes in the lids, thread satin ribbons through them, make a triple knot. 8. Sew the other end of the ribbon to the sixth and second links. Burn the ends of the ribbons with fire to prevent them from unraveling.
https://chudo4child.ru/podelka-gusenica-svoimi-rukami.html
DIY sock caterpillar: step-by-step instructions
Making a new toy for a child is not at all difficult and does not require much effort or complex skills. A toy made from a caterpillar sock is simple to make, and a schoolchild can make it himself, and a mother will try for a baby. Don't throw away mismatched socks if one gets lost, because it can be used to create a toy.
A sock with toes will look funny. You will also need a filler (holofiber or padding polyester)
Materials:
- 1 sock
- Filler
- Hair ties
- Needle and thread
- Satin ribbon
- Yarn
- Beads
- Felt
- Scissors
First stuff each finger and a little trace to create the head. Tie with thread.
To hide the thread, tie a hair tie.
Tighten the last part with thread and secure. We close the seam with felt.
Sew beads instead of eyes and embroider a mouth.
A satin ribbon from which you can make a bow around the neck will give the sock caterpillar craft a funny look.
Ladybug
Making a child's favorite bug will give a child a lot of joy.
You will need:
- Medium apple;
- Skewers;
- Grape berry;
- Sharp knife;
- Lemon juice
- Chocolate dragees;
Work progress:
- The apple must be divided into two parts, removing the core;
- Sprinkle with lemon juice to prevent the pulp from acquiring
- On the apple you need to make a shallow cut and several indentations on both sides with a sharp knife;
- Fill the side cavities with chocolate dragees;
- Insert a toothpick into the edge of the apple and string a grape onto it;
- Insert two apple slices into the stem of the grape berry. They will be a kind of antennae for the bug.
Ladybug is ready! In the photo of crafts made from apples you can see how appetizing such a ladybug looks with specks of chocolate dragees.
Plasticine caterpillar for children: step-by-step modeling of crafts
Children begin to play with plasticine from an early age, since all mothers know that they need to develop fine motor skills. Kids are interested in creating some objects or animals with their own hands. One of the simplest topics for working with plasticine can be called a caterpillar craft.
Materials:
- Plasticine: green, red, yellow
- Toothpick
- Two black beads
First you need to make several balls of different sizes from green plasticine.
Connect all the balls together, with the largest one being the head. Make antennas with red plasticine balls at the ends from pieces of toothpick.
Attach beads for the eyes to the caterpillar's head, and a red ball of plasticine will make a nose.
Use yellow plasticine to make spots on the caterpillar's body.
Colored balls will make the caterpillar even brighter and funnier
Hedgehog made from apples
For this craft you will need several toothpicks/skewers, an apple, allspice and berries.
We cut the fruit in half: one part will serve as the body of the animal, the other as the muzzle.
We make needles for the hedgehog by inserting skewers and toothpicks into the upper part of the apple, and connect the body with the head of a forest animal, previously cut out in the shape of a triangle and decorated with pea eyes. Attach the berry to the base of the triangle to create a nose.
You can make a flooring for a homemade hedgehog from leaves or twigs.
Make a caterpillar with your own hands for kindergarten
Kids love all kinds of performances, so you can make a caterpillar that moves.
Materials:
- Green paper
- White napkin
- Green cocktail straw
- Scissors
- Hot glue
- Toothpick
- Skewer
- Black felt-tip pen
- Glue
We make a green leaf from a piece of green paper. Place a wooden skewer in the bottom center and press down on the paper.
Roll the napkin onto the tube and glue it. Pinch the napkin towards the center and pull out the tube. Cut a 2 cm piece of tube to attach to the leaf
We put a piece of green tube on a skewer. Attach part of the caterpillar to one edge of the skewer. Attach the second part to the green tube. Using a black felt-tip pen, draw dots along the body. Glue a piece of green tube to the leaf.
It will move due to the fact that you pull the wooden skewer.
Carving a swan from an apple
Any celebration will look spectacular if the festive table is decorated with a homemade swan made from an apple. To do this, you will need to take a large apple and cut it into two parts in such a way that one of them ends up with a stalk.
After which you should take a large part and, turning the flesh down, cut out two parts at right angles. The result should be a blank that resembles the “back” of a swan:
- In the future, a small incision should be made in the protruding part so that the swan’s neck can be attached to the “back”
- The previously cut parts will serve as wings. From them it is necessary to cut out several slices of different volumes, retreating approximately 5 millimeters from the edge and connecting them.
- After which we begin to work on the second part of the cut apple. From it you should cut out a neck and a head, which can be decorated with cloves. We insert the workpiece into the recess that was made in the “back”.
The swan is ready!
The described technologies are simple to implement and amazing in their final form.
DIY felt caterpillar: master class
Felt is a suitable material for making a caterpillar educational toy with your own hands. Made from felt, it will be soft and easy to use. Thanks to the bright colors of this material, the caterpillar will turn out colorful.
Materials:
- Felt
- Sintepon
- Velcro
In order to get a caterpillar, 2 circles for each part of the caterpillar - that's 9 parts. The front and back will be the same color.
You also need to cut out flowers, eyes, legs - 18 legs and horns.
You need to make 18 paws - smaller circles. The legs will be inserted into the middle of the circle, the circle needs to be folded and the edges sewn.
Small parts need to be sewn to the workpiece
This is how we make caterpillar legs
Glue two large circles of the same color together. Between them there will be a round padding polyester.
Fasten all the parts with a pin, and put the legs inside.
Attach each leg with a pin
Attach Velcro to each part of the caterpillar with hot glue.
Every child will want to spend time with such a funny caterpillar.
Selecting Tools
To make your own jewelry you will need the following tools and materials:
- A set of fruits and vegetables: apples, grapes, olives, berries;
- Natural ornamental material: cones, leaves, twigs. They can serve as both additional decor and the main element of the composition;
- Toothpicks. Will be needed for fastening parts, installation on a base;
- Knife;
- Stationery: markers, colored paper for details, cardboard, plasticine, glue, double-sided tape;
- Foam blanks on which it is convenient to attach fruit;
- Cardboard boxes, trays, sheet metal, dish, plywood and plastic are used as a basis for massive structures;
- Decor: ribbons, beads, braid, sparkles, paints.
Several life hacks for creativity that will help you make colorful, neat crafts quickly, uniquely and for a long time:
- Before use, all components must be thoroughly cleaned of dirt, dust, washed and dried well;
- To prevent the apple cut from darkening, moisten it with lemon juice;
- Cutting tools for shaped crafts must be sharpened. The work will then have smooth, rather than torn, edges. Precisely cut parts according to the template will allow you to assemble a beautiful composition;
- When working with sharp objects, help children, explain safety precautions to them and carefully observe the work process;
- Sometimes the idea for a craft appears while choosing craft material. Show your imagination and creative skills. The ability to combine different textures and colors will help you create unusual, unique souvenirs.
DIY children's craft caterpillar made from cotton pads
A variety of applications can be made from cotton pads. First of all, a snowman comes to mind, but this is far from the most interesting thing that can be made from cotton pads. A cute caterpillar may be missing from your spring craft project.
You don’t even need to tell me how to make a caterpillar from cotton pads, because it’s so simple. The discs can be pre-painted in any colors you wish. On one circle we depict the face of a caterpillar - we draw eyes and a mouth.
You can leave the cotton pads undyed.
The application made from cotton pads can be diversified with decorative elements - cut out the sun from paper, or grass.
Apple Snowman
The “White Fill” variety is well suited for a snowman because of its light shade of skin. But you can take any other color combinations.
Additionally
- peppercorns;
- carrot;
- toothpicks.
The craft can be made from 2 or 3 apples, the main thing is to choose the size in descending order.
A smaller apple is attached to the largest apple. For stability, you can cut off the base of the first one.
Cut the carrots into pieces 5 mm wide. Use the tip of a knife to cut out the shape of the mittens. Attach to a toothpick and secure into an apple. Leave some space between the mitten and the apple.
We decorate the snowman with peppercorns. We use them to lay out the buttons on the apples, eyes and mouth. The nose is a triangle cut out of a carrot.
You can place a piece of apple on your head, in the form of a semicircular cap, or a cylinder of carrots. You can leave the tail of the stalk, it will give the snowman a perky look.
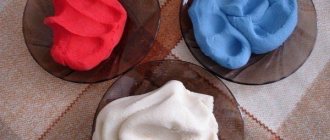
Salt dough caterpillar: how to make one with a child
It is best to start working with dough with simple crafts, and this could be a caterpillar dough craft. There is nothing complicated in its manufacture, because the caterpillar consists of balls of different sizes.
To make the dough for sculpting a caterpillar we will need:
- Flour
- Salt Extra
- Water
- Gouache
- Toothpick
- Brush
Mix flour and salt in equal proportions and add a little water. Knead the dough and cool slightly. Roll into a large ball and flatten it a little. From this piece of dough we will make a leaf using a toothpick.
We’ll put a ball on the leaf that will play the role of the caterpillar’s head. We make horns from two toothpicks.
Attach small dough balls to the ends of the toothpicks. Place eyes on a large ball. Place other balls behind the head - the body of the caterpillar. Place the dough piece in the oven at 100 degrees for two hours.
After the craft has cooled, you can paint it.
What souvenirs can you make yourself?
Apples are used to make original decorations for the festive table in the form of swans, owls, flowers, and serve effectively. This especially pleases the children. They build fruit towers, New Year's candles and wreaths, and children's crafts. Fragrant souvenirs will delight colleagues at work and friends. Apples will be an excellent solution for school or garden fairs.
Accordion paper caterpillar with tube
You can make a fun caterpillar toy from cocktail straws.
For this you will need:
- Piece of corrugated cardboard
- Cocktail straw hot glue
- Scissors
We cut out leaves from cardboard and paint them green.
In the tube you need to cut out the part below the accordion and bite out a small piece on top
The part with the accordion on the tube needs to be processed with scissors - make cuts along the accordion and cut out the middle.
Decorate the caterpillar with a felt-tip pen
We insert the narrow part of the tube into the uncut part and attach it to a cardboard piece.
Apple cockerel
Apples can be used to make a rooster symbolizing the sun and warmth. To do this, you need to take two fruits of different sizes, carrots, black peppercorns, and toothpicks.
Washed and dried apples should be connected to each other in such a way that a smaller apple is attached to a larger apple.
For stability, you can slightly trim the base of the first fruit. Then carefully make holes in the top apple and insert peppercorns into them. We got eyes.
Next you should make a tuft of carrots. To do this, cut a small apple and place carrot slices in it.
You can also use plasticine instead of natural ingredients.
How to make a caterpillar from plastic caps
There are plastic bottles in any home, because we all love to drink juices, milk and other drinks. You don’t have to throw away the lids, but use them for creativity. The caterpillar is interesting as an educational toy because you can make moving parts.
If you attach several beads between the two covers, the caterpillar will be movable.
You can make holes in the center of each cover and stretch a rope, then the caterpillar’s body will also move
Depending on the availability of house covers, each caterpillar may turn out to be original
Other craft materials
You can use more than just paper to create cartoon caterpillars.
Interesting works come from:
- chenille wire
- plasticine
- natural material
- vegetables and fruits
- threads and pompoms
- beads
- salt dough
- leaves
- cocktail straws
- egg packaging and containers from Kinder Surprise.
- bushings
If your children like this insect, experiment, use your imagination, and perhaps you will come up with a new idea for creating caterpillars.
How to make a basket
- First you need to break the box and find the board that has survived without cracks;
- Soak it, leaving it for 15 minutes;
- Slowly (so as not to break) connect both ends and secure with electrical tape;
- Leave to dry;
- Seal the joint with masking tape;
- Cut a cardboard circle to the diameter of the basket;
- Glue the bottom to the base of the basket using hot glue.
You can paint the basket one color, or you can make it multi-colored. For such a craft made from fruit boxes, a floral ornament is appropriate.