Embroidery has long been one of the popular types of decorative and applied art. Today, many craftswomen resort to an original technique - embroidery with silk ribbons - to create colorful three-dimensional products.
This type of needlework is used in many design areas and is subject to craftswomen who show perseverance, patience, and their own view of the item being made.
Materials and tools for work
The main material is tapes, a huge assortment of which can be found on the shelves of specialized stores. They vary in size, material and color.
You should pay attention to their lightness and strength. These qualities will allow you to preserve the basic properties of the tapes during numerous interactions with them.
Master class for beginners step by step
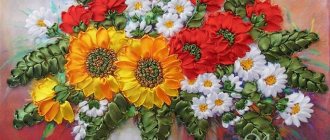
The process will be carried out on napkins in any color, and you yourself decide where you want to depict the pattern. The main idea in our business is to embroider a pattern. So, let's start with the flower arrangement - chamomile and spikelet inflorescences.
- Take a napkin measuring 30 by 30 cm and straighten the edges of the napkin with zigzag scissors (you can simply process the edges of the napkin using a sewing machine).
- We make a sketch of the design of our pattern, and then we stretch our napkin onto the hoop.
Chamomile stem
We take a needle with a green thread, fold it three times, and sew the stems. So we embroider the stem using the “back needle” technique.
Chamomile petals and spikelet inflorescences
Let's begin the process of attaching the ribbon to the needle. It is necessary to cut off about thirty centimeters of white and cut off its edge diagonally. Then we pull the cut edge into a needle with a wide eye and pierce it two centimeters from the eye of the needle. Thus it was secured.
Now we’ll make a beautiful knot at the other end of the ribbon, which will remain on the wrong side. This means we fold the edge twice half a centimeter and pierce it.
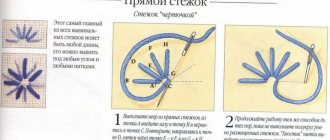
Now let's move on to the petals. According to the applied pattern from the middle of the flower, you need to bring the needle and ribbon from the wrong side to the front side and embroider the petals with a straight stitch. So we do this slowly, carefully forming 6 petals.
Next, with a pink one 60 cm long, which was secured into a needle, we make inflorescences of spikelets according to the drawing on the base. The principle is the same as that of chamomile - straight stitch.
flower leaves
We will create two leaves using twisted and straight stitches. We prepare a 4 mm green one, 50 cm long. We attach it to a needle in the same way as the previous working tapes. Using a twisted stitch we make the vein of the flower leaf. Using a straight stitch, we sew leaves from the embroidered veins that fit tightly to each other.
Next, following the pattern, we embroider leaves on the stems under the inflorescences of the spikelets using a ribbon stitch. You can vary the creation of leaves by using a straight stitch with a curl in the same way.
Addition to the ribbon pattern
Now that the pattern is embroidered, you can decorate the core of the flower. You can complement the elements with beads, sequins or seed beads. You can also sew the decoration between the leaves. Form a bow at the base of the flower arrangement and sew it on.
You have already tried to embroider the simple pattern I suggested on a napkin. Now you can choose a more delicate composition of a floral motif, for example, roses, and embroider it on the tablecloth.
Types of tapes used
Silk ribbons are what craftsmen most often choose for their work. After all, they have many advantages: softness, elasticity, lightness. Used to create a sophisticated and sophisticated piece.
With their help it is easy to embroider even the smallest flower with a complex shape. When working with them on both sides of the product, an equally interesting “grain” texture is obtained.
The variety of color palette attracts and fascinates, helps in creating real masterpieces. It is worth saying a few words about the disadvantages of this attribute.
Silk ribbons are capable of:
- burn out after a certain time;
- shed when groomed;
- easy to wrinkle.
However, these shortcomings do not stop the craftswomen.
Transparent ribbons - this attribute is available in solid colors with various shades (from light tones to the darkest colors).
Due to their ability to drape, these ribbons make embroidery a decorative and elegant product. The rich palette gives extraordinary expressiveness. They are a unique addition to working with satin ribbons.
Satin synthetic ribbons - this common material made of polyester or silk acetate is most common among embroiderers due to its qualities.
Distinctive characteristics:
- rigidity and good strength;
- high level of moisture absorption;
- drapes beautifully;
- long service life;
- the tapes are not electrified during operation;
- luxurious color palette;
- affordable price.
This material is recommended for beginners who love ribbon embroidery.
There are also homemade tapes. Experienced embroiderers personally cut ribbons from silk fabric for their work.
They choose it based on the intended version of the product and cut it on the bias. Quite often, such ribbons are used to decorate peonies and roses.
Homemade ribbons also include components tinted with paints intended for batik.
Light-colored tapes are used for coloring.
Each individual type of tape is characterized by its own advantages and disadvantages.
The necessary material for such embroidery also includes embroidery fabric. Experts advise starting to learn ribbon embroidery on a special canvas.
But almost any fabric is suitable for embroidery. It all depends on the plot that you have to work on. Romantic bouquets look more attractive on thin fabric in warm colors.
For large flowers, natural or dyed linen fabrics will be more suitable.
Also in the box there should be simple threads for sewing on individual elements.
It is desirable that such threads match the color tone of the ribbons used. Other types of embroidery thread may be needed.
In addition to the material, you should also take care of the necessary tools. What you need to have on hand:
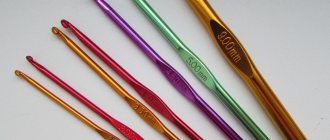
- Embroidery needles. This tool must be extremely sharp with an acceptable ear. They are made of high strength steel. Characterized by perfect polishing. Available in various configurations and lengths. The eye width of the needle indicates the size of the needle. A large ear is an indicator of a small size and vice versa. The run-up is from 13 to 24. It is better to acquire a large number of these devices, as this will allow you to rationally use embroidery material and significantly speed up the time it takes to complete the work. Experienced craftswomen who work with additional decorative elements use ordinary needles as well as beaded needles in their work.
- Scissors. When embroidering with materials such as ribbons, it is advisable to use extremely small scissors. At the same time, they must be sharpened. In specialized retail outlets for needlework, you can pick up special scissors for embroidery. Among needlewomen they received an affectionate name - Tsapelki. An excellent option are tailor's so-called “thread cutters”, which are durable, stainless and durable tools. The main thing is to use them for their intended purpose and carefully care for them.
- Hoop. The most necessary device for creating high quality compositions. Thanks to them, the fabric on which embroidery is performed always has an ideal structure. This is simply necessary to obtain even seams and stitches. Hoops are available in various sizes, so it is easy to choose the right option for a specific size of fabric.
- Special machine. The ideal option for embroidering with ribbons is a special design that is installed on a table or on the floor. In this case, the embroiderer’s hands are free, which will greatly facilitate the embroidery process and make it comfortable and more enjoyable.
It is worth taking care of the availability of:
- head pins;
- pincushions;
- thimble;
- sewed;
- small pliers;
- matches (lighters).
You should start working after fully preparing the materials and tools, since the process of embroidering with ribbons is painstaking, and being distracted by purchasing the missing components is an unpleasant task.
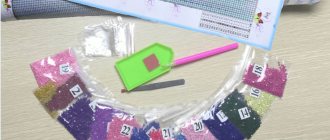
Today it is absolutely easy to purchase ready-made needlework kits of this type.
Additional composition elements
At the end, iron the work and therefore fix the petals properly
It is very important to iron the product only from the wrong side. The thin texture can stick to the iron and the sunflower will literally burn. Most people do not complement the composition with other colors, considering it unnecessary
It’s a great idea to highlight the composition using wildflowers and herbs. They must be made using the same olive iris thread. You will get a spectacular bouquet of wildflowers that will decorate any room in your home in the form of a picture and will certainly attract interest. And even more so if you decorate your coat or blouse with them.
Don’t be afraid to experiment and add something new to traditional techniques, this is how new directions appear in the world of HAND MADE. There are a huge number of specialized sites on the Internet where lessons for beginners will allow you to improve your skills and become a real professional.
There are countless different seams and stitches in needlework. See our sections on embroidery of various kinds of flowers and pictures. I wish you success and patience in creating masterpieces with your own hands! Have a good mood and inspiration.
Tape selection
The range of this embroidery material is striking in its variety of sizes, structures, and color palette. When choosing ribbons, it is necessary to take into account the following fact: for large motifs, fairly wide ribbons are used, and vice versa.
Also, large width tapes are necessary if overhead elements are created in the work. Ribbons of different widths can be used in one work, which only makes the embroidery more effective.
Tapes are divided into two types:
- tapes with an edge (often framed with a thin metal rod);
- decorative attributes (such tapes are not recommended to be washed).
When working, you should not use tape longer than half a meter, as it may curl or fray.
A few additions to the above about silk fabric ribbons:
- There are two types - simple and melange varieties;
- simple ribbons have one specific color;
- melange ribbons are multi-colored, and the coloring can be located in different directions;
- silk ribbons (so-called English or Australian) are particularly soft, but very dense, thanks to the special weaving of the threads;
- Indian ribbons have a very delicate structure, their surface is perfectly smooth.
Satin ribbons can be either single-sided or double-sided products. Most often they are used in an interesting technique with bending the tape.
It is quite difficult to work with transparent tapes. But if you master such skill, then products embroidered with such ribbons are extremely beautiful and impressive.
The use of textured material, such as velvet or velor ribbons, will add sophistication and luxury to the work.
There is plenty to choose from.
Hardanger and Florentine patterns for embroidering napkins or linen
One of the embroidery options is hardanger. This is a type of openwork embroidery, which is so called because it has Scandinavian roots (Hardanger Bay is in Norway). The embroidery technique has existed for quite a long time, because according to some sources it was known in Persia and Egypt. The technique itself assumes the presence of strict symmetrical floss patterns.
You might be interested in this: How to sew a beautiful doll from threads and fabrics
Florentine embroidery or bargello is another ancient type of needlework. With its help, colorful three-dimensional patterns and ornaments are created on clean fabric. Figures embroidered in this way have both sharp and rounded shapes. This style of embroidery is often confused with satin stitch. The difference is that the Florentine version has a rather limited directionality and stitch sizes.
Satin stitch embroidered napkin
How to embroider a tablecloth with a cross: tips
Before embroidering on a tablecloth, you should learn how to work with napkins. They are not so big and you don’t feel sorry for them if they fail at the first attempts. The most preferred material for embroidery on a tablecloth is cotton threads. It is not advisable to use beads and buttons to decorate tablecloths and napkins. It is best to use, of course, patterns. Cross-stitch designs are more difficult to apply than patterns.
Embroidering a tablecloth with your own hands is quite simple
How to embroider a linen tablecloth correctly
Linen is an ideal material for cross stitch. Napkins, tablecloths, bedspreads and even underwear are made from it. Linen is very similar to canvas and is a smoothly woven fabric. This means that the number of longitudinal and lobar threads is the same. This will help you easily count the spaces between patterns or crosses.
You can simplify your work as follows:
- Pull tightly;
- Use needles from 26 to 28;
- Do not embroider half crosses;
- Do not use a pencil for marking;
- Pay attention to the crosses and their evenness.
It’s easy to sew threads to the canvas with a cross
Ribbon embroidery: how is it useful?
Do not underestimate this type of needlework. After all, he:
- does not burden vision;
- calms the nerves;
- impressive works;
- unique mesmerizing technique;
- fantasy and creativity;
- The embroidery technique remembers royal hands, it is “the fun of kings.”
We can talk about ribbon embroidery endlessly, but it can change and transform life.
Performance technique
A piece of fabric is inserted into a hoop to make it easier for needlework and determined with a floral arrangement. Such flowers are simpler than other plants, as the picture implies even stitches.
There are more than 22 types in total, but in our case, only two will be required. There is nothing complicated; even novice needlewomen can cope with this task. Cut off a white one, approximately 30 cm long, pull it through the eye of the needle and stop the needle at a distance of 5 cm from the end. A puncture is made in this place and a needle is pulled through. This way you will secure the piece and it will not slip. The second end needs to be burned with a lighter so that the threads do not fray and the structure does not unravel. It is created, as mentioned above, with a simple stitch.
It is very important after each piercing of the fabric to correct the embroidery and form the correct petals in your picture. Many novice needlewomen make the mistake of tightening the stitch too much; ultimately, the fabric underneath will wrinkle and the product will lose its aesthetics. Repeat the straight stitch in a circle, and then move on to making the middle of the flower. The color used for it is yellow. It is also used to make stitches with a curl.
French knot in daisy embroidery
If you can't do this, as an alternative, use a thick wool thread of the same color and simply sew up the middle. If you have experience and want to make it voluminous, you can decorate the middle with French knots. Knots are made using a simple principle - the needle is twisted around three times and pulled through the canvas. The end result is a neat knot.
Preparatory stage
The pattern can include many different elements to further decorate the tablecloth or napkins. Let's look at what we need:
- cotton, linen or gabardine fabric;
- hoop;
- pencil;
- satin ribbons width – 1.2 cm (white), 7 mm (pink), 4 and 7 mm (green)
- floss threads green and light
- for decoration beads, beads to your taste
- needles with a large eye and regular ones for sewing
- scissors;