The concept of foamiran
This material is pleasant to the touch, soft and pliable, reminiscent of rubber suede. It is based on synthetic material. It is very elastic. Crafts made from such material look incredibly aesthetically pleasing. It does not cause allergic reactions, so parents buy it for crafts for their children without fear.
What can be made from it: dolls, clothes for dolls, flower arrangements, figurines of animals and much more.
Advantages of working with the material
Working with foamiran is very interesting, since this material has the following positive characteristics:
- It allows you to create realistic objects. Due to this, the crafts turn out to be visually attractive - they can be given as interior decoration.
- Despite the attractiveness of the product, the material is easy to work with. Even a child can handle it when making it.
- Fomiran is flexible and soft when working; it can be used to create products of any shape and complexity.
- It’s not scary to wrinkle such crafts - they can be easily returned to the desired shape by slightly straightening them with your hands. Thanks to this quality, foaminar (or soft suede, as it is also called) is indispensable for making clothing decor.
- Products do not fade, fade or crack over time.
But don’t think that this material doesn’t have its own shortcomings.
Master class on making crafts
For lovers of applied arts who have mastered working with various materials, a relatively new type of synthetic material for crafts will be of interest. You can learn how to work with it, as well as options for types of crafts, by watching a master class on creating crafts from foamiran.
Step-by-step lessons in the master class will help novice creators create their intended craft carefully and without mistakes.
Creating autumn leaves from foamiran: part 1
Our kindergarten is actively preparing for the autumn holiday, and we, the parents, help it with this. As a responsible parent, I volunteered to make pins for the children in the shape of autumn leaves so that our group would be the most beautiful at this holiday. The leaves turned out wonderful: bright, light and very similar to real ones.
The fashion model is my beloved five-year-old son Temochka.
You will learn how to make such wonderful pins in my detailed master class! So, right from the start, let's go! Part #1:
To make leaves we will need foamiran in autumn shades. I took olive, burgundy, coffee, yellow and orange.
Cut out sketches of autumn leaves from paper. To do this, I collected different leaves from the Internet, adjusted them to size (so that they looked beautiful on children and were not huge), printed them and cut them out.
We distribute the sketches: which ones we will make from which foamiran.
Slowly and methodically trace all the leaves with a regular toothpick.
We cut out the blanks with scissors.
We additionally process some leaves with curly scissors.
We cut out complex leaves in layers, i.e. each component separately.
To imitate wind-worn, holey leaves, we will make several holes on our blanks. The holes should not be even, so an awl will not work. I came up with the idea of making them with a broken toothpick (and the more crookedly it breaks, the better).
You can paint foamiran with anything. I like to do this with oil paint from Winzor&Newton, Winton and Artisan series (fine pigment, evenly applied, Artisan is a water-soluble oil, i.e. can be washed off your hands with plain water).
We will apply the oil with a regular sponge. A construction sponge for windows is very convenient (buy once and use for a lifetime).
We take leaves of a yellow base color. We emphasize the edges with Indian red, in some places we tint them with green (we make sure to go over the holes to further emphasize them). Don't forget about the back side (it also needs to be painted).
Option with burgundy, orange and brown.
Here are orange, brown and white.
Brown and burgundy.
And in this leaflet we combine warm shades with green.
Orange and burgundy.
Painted yellow blanks.
To make the edge more frayed, use a lighter to burn some parts of the leaves. Be careful, foamiran can catch fire, but the flame can be easily extinguished by simply blowing it out.
Similarly, we tint all the cut blanks. It's easy to select colors by looking at photographs of living leaves on the Internet;)
Prepare the spray solution. We dilute the acrylic paint a little with water. I used acrylic in two colors - dark purple and green.
Using a toothbrush and your finger, spray the leaves. Dry and repeat the same on the reverse side.
To make the leaves look like real ones, they need veins. To imitate them, we will need special molds.
Set the iron to maximum and turn off the steam. We take the mold in one hand, and the future sheet in the second. Place the sheet on the hot surface of the iron and...
...and immediately, without wasting a second, we apply hot foamiran to the mold, trying to align the central vein with the center of the sheet. Press with your fingers. The mold in the photo is the most popular and most often used when working with foamiran. If you don't have one, be sure to buy it! I recommend! This mold is called universal, because... with its help you can make not a specific leaf of a specific plant, but a lot of leaves. There are a lot of leaves with such a network of veins and you will definitely need it.
Almost finished birch leaf.
For leaves of this type, we apply each half-petal separately to the iron and print it separately on the mold. This is the only way to create a radial network of veins.
To make leaf cuttings we will need #22 floral wire. For complex leaves, the components of which we cut out separately, we will use thinner wire No. 28.
For each leaf, we separately try on the wire and use wire cutters to cut off the required length. In order for the pin to have a stiffening core, the wire will need to be glued from the very top of the leaf (if we were making leaves in a bouquet or wreath, the wire would not even reach the middle).
Using cyanoacrylate second glue, glue the pieces of wire to the leaves. To do this, lubricate the wire with a toothpick and press it in the center along the sheet. If you carefully coat the wire with glue, you can press it with your hands. But often glue appears out of nowhere and instantly glues your fingers together. Therefore, it is still more convenient to press the wire to the sheet with a clean toothpick.
Continuation of this master class in Part No. 2
PS If you liked this master class, please put your like in the upper right corner ("like" button). I will be very grateful!
Types of crafts
Making crafts, especially during leisure time, is a wonderful and useful pastime. This fascinating process captivates all family members, unites and unites the family team.
It often happens that your hands are skillful, but your imagination is lacking; in this case, photos of crafts made from foamiran, which can be found on sites telling about applied arts, come to the rescue.
There are many types of crafts:
- dolls and clothes for them as gifts and for children to play with;
- souvenirs in the form of figurines of animals and beasts;
- bouquets of flowers for decoration of wedding processions and halls;
- flowers for hairpins, headbands, hair combs;
- New Year's toys for the Christmas tree.
Do-it-yourself Christmas tree cones from foamiran
From foam you can easily make a wonderful decoration for the Christmas tree or a small gift for loved ones for the New Year. Even a child can do this craft! Let's get started.
We will need
- foam blank in the shape of an egg (can be any size)
- foamiran sheet
- glue gun
- large diameter hole punch
- a thread
For this craft, silver or gold-colored material is best suited.
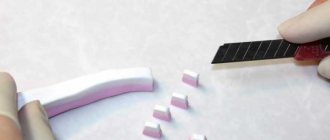
- Make holes in the foamiran sheet using a hole punch.
- We begin to glue the resulting circles to the foam blank in rows. We glue in the direction from bottom to top.
- We layer the circles on top of each other, forming a semblance of scales.
- Glue an additional circle in the center to the top of the cone, and attach a gold or silver thread to it. Ready!
Make several of these cones and decorate the New Year tree with them or give someone a beautiful handmade souvenir.
Instructions for creating crafts
By browsing the Internet, you can get a lot of ideas for making crafts. Each type of craft comes with instructions for creating crafts from foamiran.
Those who are starting to craft with this wonderful material for the first time are recommended to start with the simplest types of crafts. So, following step by step in mastering the skills of making crafts from artificial suede, you can achieve unprecedented mastery.
Note!
- DIY military crafts step by step: 150 photos of the best craft ideas for children for school or kindergarten
- DIY crafts for May 9 step by step: 150 photos of the best crafts for Victory Day
DIY crafts for February 23rd step by step: master class with photos and descriptions of how to make crafts for Defender of the Fatherland Day
Types of foamiran
Marshmallow Silk
Glitterny
Foamiran with flock Foamiran with a pattern Perforated
3D foamiran Foamiran with adhesive base
Textured Decorative Embossed
Velvet
DIY crafts
Options for crafts can be gleaned from the surrounding reality, and then try to make crafts with your own hands.
People with a developed wild imagination create truly masterpieces. It is quite possible to create fairy-tale characters, transfer them to an unreal setting, dress them in unusual clothes, all this can be done from synthetic suede.
The crafts turn out to be soft, airy in appearance, and incredibly beautiful things. Handmade crafts, a wonderful gift for significant dates, necessary accessories and decorative items displayed on shelves.
Foamiran bull for the New Year 2022
You can make an original decoration for a room or a New Year tree in the form of a symbol of the coming year. The process is quite simple; you will need shiny foamiran of several colors, blanks for eyes and nostrils (black), ribbon, braid and a small bell. The work is carried out like this:
- Using the templates, cut out the details, after which a bull's face with eyes is made, you can paint on his mouth. Then you need to bend each piece halfway with the front side inward.
- Glue the halves together so that you get a toy from three blanks, then it will look good from all sides.
- Glue a ribbon on top, and attach a ribbon bow and a bell at the bottom.
Advice! You can change the size of the craft if you change the image scale when printing the template.
You can use foamiran of several colors to create different decorations. The easiest way to glue parts together is with a glue gun, as it hardens very quickly and there is no need to wait. Accessories for the eyes and nose can be purchased at any craft store.
We make our own crafts
Pleasant, velvety to the touch DIY foamiran crafts look great on the shelves of the “Creative Achievements” of the household.
Packaging for New Year's or holiday gifts made by the children themselves will incredibly please parents and grandparents. How proud they will be that their beloved children created such beauty.
For your friend's birthday, it is appropriate to give a hairpin or headband decorated with faux suede flowers. No one will have such an accessory, it is exclusive.
Note!
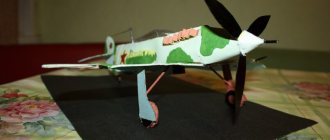
- DIY airplane craft: the best options for creating an airplane from paper, cardboard and plastic. 120 photo ideas
- DIY crafts for March 8 step by step - a review of the most beautiful crafts for International Women's Day (120 photo ideas)
- Diaper cake for a girl - 180 photos of ideas for original diaper cakes + DIY instructions with examples of finished products
Let's start creating crafts
Beginning needlewomen try to acquire, at first, basic skills in working with porous material. Learn to use its rich properties. Foamiran crafts for beginners are not full of variety.
As a rule, these are elementary floral motifs. Even simple types of flowers made from this material look extremely elegant if you carefully study the instructions for working with the material. Painstakingness and accuracy are the key to the fact that your work will become more complicated with each new craft.
Tender rose
Rose is the queen of flowers. A flower beloved by many women can be made from foamiran; moreover, it will not wither and will please the eye for a long time.
You will need:
- green and pink foamiran;
- scissors;
- glue;
- a piece of foil;
- thick wire.
Master Class
- From foamiran we cut out two types of petals of the future rose, identical in shape. But different in size. You should get 5 petals of each size.
- Place each petal on the iron and use your fingers to stretch the edges.
- We make a small ball from a piece of foil and attach it to the wire.
- Glue a small petal around the ball.
- So we glue petal by petal in a circle, forming a bud.
- We make leaves from green foamiran and glue them to the stem.
The foamiran rose is ready! I recommend watching this video!
Realistic rose from foamiran, flowers from Thomas Tsvoric
The most delicate flowers
The art of creating flowers from foamiran is considered a new direction in applied creativity. This is such an exciting activity that it is gaining more and more popularity not only among children, but also among adults.
Flowers made from this material are distinguished by their naturalness and sophistication. Sometimes it seems that they are real, only picked from a flower garden.
A vase decorated with a bouquet of roses or tulips becomes a decoration for a table or windowsill.
And how cute the flowers look on a girl’s crest or headband.
New Year's candles decorated with such flowers become exclusive, as do Christmas wreaths decorating a fireplace or front door.
Christmas tree
There are several manufacturing options. There is a simpler one, which is suitable for beginners, and there is a little more complicated one. Let's start with the relatively complex one.
The algorithm of actions is as follows:
- Cut out squares from foamiran. It is advisable, which is quite understandable, to take green material.
- You need to make a lot of cuts on the squares, but not all the way: each strip should hold on to the uncut base.
- Using an iron heated to the minimum temperature, you will need to warm up the workpieces: the fringe will bend slightly - this is what we need.
- The cone, the base of the Christmas tree, can be made from a sheet of cardboard or paper by simply folding it so that the lower part is wide and the upper part ends with a point. The edges of the sheet can be secured with glue.
- All the blanks prepared from foamiran remain to be glued to the base from bottom to top, so that each top row is covered by the bottom row.
Beads, small stones, and ribbons can be used as decorative elements. Now let's look at a simpler option. Offer to make such a Christmas tree for your child - he will cope and will only enjoy the process.
The algorithm of actions is quite simple:
- Have your child make a cone out of green paper or cardboard. Foamiran will also do: it will be even better. The edges can be secured with glue.
- Now you need to use a hole punch or scissors to prepare decorations: stars, hearts, snowflakes - whatever. Tip: use different colors of foamiran.
- All that remains is to secure the blanks on the already finished cone.
Crafts schemes
Making crafts from porous rubber with your own hands is not very difficult. But, at the initial stage of mastering the skills of working with it, you need schemes for creating crafts from foamiran. With their help, the entire process of creating a craft becomes clear step by step.
The diagrams indicate the number of parts that will make up the craft, give advice on choosing colors, execution techniques, and the tools used. They help to accurately reproduce the type or model that you have chosen as an example.
Experienced needlewomen do not really need diagrams, they have already perfectly mastered all the working techniques, but for beginning creators, craft diagrams are necessary.
Bouquet of flowers
Crafts made from foamiran for children can have different shapes and sizes, but most often artificial suede is used to make a variety of flower arrangements. Flowers made from foam material, thanks to its ability to take any shape, look as realistic as possible and are easily tinted.
A bouquet of foamiran is an excellent alternative to natural floral decor used in decorating rooms, holds its shape well and is easy to clean with ordinary water. You can include any flowers in the bouquet, decorating them in the desired color scheme.
You can make foamiran from:
| Color options | Their features and where they are used |
| Roses | They are considered the most common option when creating any bouquet, they are quite simple to perform, and if you accurately follow the steps of the master class, they turn out to be an exact copy of real flowers. |
| Peonies | They are distinguished by lush inflorescences and require special perseverance during production. Their color and shape can be any, and as an addition, they need to be decorated with a plant or leaf composition. |
| Orchids | They are traditionally used in wedding decor and are quite complex to perform, requiring careful work on each inflorescence. |
| Lilies | Strong-smelling plants, traditionally used to decorate weddings and special events and often replaced with artificial analogues for decoration. They are made using sheet patterns and frame wire. |
| Snowdrops | Spring flowers require special precision in detail during production. Performed exclusively in inflorescences. |
An original and affordable version of a flower bouquet for a child will be a chrysanthemum inflorescence made using:
- sheets of colored foamiran;
- dry (or wax) pastels;
- floral wire with a diameter of 0.5–1 mm;
- Portable bouquet holders;
- satin ribbon 0.25 cm or 0.5 cm wide;
- half a foam sphere (about 15 cm in diameter);
- thin metal wire;
- strong fishing line;
- glue gun;
- any heating device (iron)
- nail scissors;
- cardboard;
- pencils.
Before creating a chrysanthemum inflorescence from foamiran, you need to print or draw hexagons, according to which the petals will be created. For one drawing you will need 3 types of them: with a diameter of 4 cm, 5 cm, 6 cm.
Stages of work:
- From foam rubber you need to cut 4 pieces of each hexagon. To do this, a strip of suede cut from a sheet should be folded in several layers.
- The finished blanks need to be shaped into leaves by making a small cut in the middle of each edge. It should be done so that it does not reach the middle of the petal. The edges of the workpiece need to be rounded to the shape of a flower petal.
- To make the middle of the bud, the 2 smallest hexagons need to be supplemented with cuts, making 2 of them at the edge of each petal, while giving them a rounded shape.
- The finished blanks need to be given a natural appearance and color using floral pastels, painting the edges of the petals and slightly shading the middle of the flower. Violet pastel should be applied to some of the light-colored blanks with light strokes along the edge. This should be done with light movements, creating the effect of a natural flower arrangement.
- Painted blanks need to be given the correct shape. This should be done with the iron turned on at minimum power. As soon as it warms up, you need to apply foamiran to it for 2-3 seconds. The heated petals must be removed from the surface of the iron and folded so that folds are formed. After this, the blanks are twisted and crumpled.
- To make foliage, a rectangular piece of green color is cut out of foamiran. Together with the silicone mold, it must be leaned against a hot iron and heated for no more than 10–15 seconds.
- On the removed sample, you need to cut out a full leaf, and then stretch and bend its edges.
- To create a flower, you need to cut an 8 cm piece of floral wire and bend a small loop at its end, then place it in the center of the flower as a core.
- Before completely retracting the wire, you need to apply glue to its end with a glue gun.
- The second blank for the core should be cut in half and glue should be applied to the green-painted part. After this, you need to carefully wrap first one and then the other half of the flower around the wire, securing them with a glue gun. This action should be carried out alternately with workpieces of all sizes.
- For strength, the floral floral base must be covered with PVA glue, after first removing the main part intended for attaching fresh flowers. The remaining base and handle of the base should be secured with ribbons or a glue gun, and the finished flower should be placed in its center.
- The entire surface of the base must be filled with flowers, and in the spaces between them you can glue leaves folded in half.
- At the final stage of creating a bouquet, the base and handle of the floral base can be decorated with satin ribbons.
Children's crafts
Looking at children's crafts made from foamiran at an exhibition of children's creativity, you are delighted with the beauty and variety of types of crafts. Some of them have practical applications, others are interior decoration, and others are toys for children.
In all crafts you can feel a piece of the child’s soul invested in the creation of their creation.
Volume appliqués made of faux suede look unusual and chic.
How many ideas for creating souvenirs, gifts and luxurious jewelry are demonstrated by the exhibition participants.
Bookmark from toys
This bookmark craft looks quite original and unusual. To make it you need the following equipment:
- Matches or lighter. They are necessary to heat the ends of the paper clip.
- Scissors and knife.
- Clip.
- Small plastic toy.
First you need to cut off part of the toy. After this, you need to warm up the paper clip. To avoid getting burned, it is better to hold it with pliers. You need to insert a paper clip into the prepared part of the toy. She will go in there without any problems, as she will be hot.
After cooling, you can insert the product between the pages. It will look as if the toy is sticking out from inside the press.
Craft templates
These are essentially patterns used to create crafts. Templates for crafts can be printed from the Internet, or you can draw them by hand if you are confident in your talents and have considerable experience in needlework.
The template is used to transfer the figured pattern of the craft onto a sheet of porous rubber. It could be a flower petal, an element or part of a car, a Christmas tree toy, or a doll.
To economically cut all parts of a craft from one sheet, they all need to be placed as close to each other as possible, outlined with a pencil or pen, and then cut out. You need to cut it carefully, slowly, following all the tips given in the diagram and instructions for creating the craft.
Skye's costume - "PAW Patrol": with a pattern on the fabric
We bring to your attention another costume of Skye from Paw Patrol - this is a cartoon in which the rescue dog has not only beautiful pink clothes, but also special glasses.
Skye's costume from Paw Patrol
To make this Sky costume for a dress you will need:
- Finished pink T-shirt without a pattern.
- The fabric for the skirt is shiny or with sequins. In our master class supplex.
- Tulle for a petticoat.
- Special marker for black textiles.
- Silver paint for textiles.
For the Sky helmet and emblem you need:
- Gray and pink felt.
- Silver foamiran with glitter on an adhesive base.
- Glue Moment Crystal to hold the parts together.
- Fabric markers.
Fabric marker
For the helmet and glasses you need:
- Pink shiny fabric as a base.
- Hood pattern.
- Yellow felt for ears.
- Pink felt for glasses.
- Any filler to fill your glasses.
- Elastic band, in our example it is black.
- Silver foamiran with adhesive backing.
Master class on sewing a Sky costume for a girl:
- First, take a pink T-shirt and mark it with a simple pencil. After this, carefully draw the necessary lines under the ruler with a textile marker.
Be careful, the textile marker cannot be washed!
Draw the details of Skye's costume on the T-shirt
- In those places where the silver paint should come into contact with the black lines, first paint with paint, and only then draw neat lines under the ruler with a marker.
Apply silver paint first
- When the drawing is ready, you need to put interlining on it and iron it with an iron. This will ensure the paint adheres securely.
Ironing the drawing with an iron
- We sew the skirt according to a simple pattern, cutting it in the shape of a rectangle. Our dress will have a pink fabric skirt and a full petticoat. Sew them together, form pleats at the top, and then baste them to the T-shirt.
Hand basting skirts to T-shirts
- Try to make the T-shirt fabric slightly longer than the seam on the skirt. This way the seam will not prick the child. Sew it on a sewing machine.
We securely sew skirts and a T-shirt for Skye's costume
- When the base of Skye's costume for the girl is ready, it's time to work on its small details. Let's start with the emblem on the chest. Print out a picture of the logo or draw it on paper. Cut out all its details from felt.
Felt gray base and pink sky emblem overlay
- You can glue the parts together with a glue gun or transparent glue, for example, Moment Crystal.
Gluing the parts of the PAW Patrol badge together
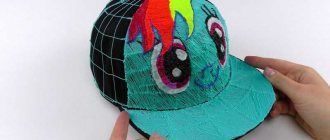
- We make a shiny bezel for the badge from glitter foamiran.
Decorative part made of foamiran with adhesive backing
- glasses from pink felt. Cut two identical circles, and rectangular strips longer than necessary. It is more convenient to determine their exact length later, after we apply them to our circles around the perimeter.
Felt blanks for glasses
- Sew the felt pieces together with a regular needle and thread.
Sewing voluminous glasses for a sky costume
- Make decorative “glasses” for glasses from glitter foamiran and a decorative frame from pink felt.
"Glass" for glasses
- The glasses still need a black elastic bridge and round felt pieces for the bottom. Before sewing them on, we stuff the glasses for Skye’s costume with holofiber or other filler.
Ready-made glasses for a suit
- The ears need to be cut out of sand-colored felt. Make them big enough to make our Skye costume look like a cartoon character.
Skye's ears
- the helmet using the hood pattern. It should consist of three parts: two side parts and an insert in the middle.
We sew a helmet for Skye using the hood pattern.
For those who want to learn more about how to sew such a Skye costume for a girl, the following video.
Glitter and beauty
Shiny foamiran is a chic, sparkling material for crafts, generously endowed with a sprinkling of sparkles.
Crafts made from it are distinguished by sophistication and extraordinary charm. It is used to make decorative bows for girls, to create Christmas tree decorations, fantastic flowers, butterflies, hearts, decorating hairpins and headbands.
As an addition to an evening dress, flowers made of shiny synthetic suede are distinguished by their beauty and grace.
The practicality and pliability of the material makes it indispensable in use.
Applied creativity has attracted people's attention since ancient times. For some it was entertainment, an interesting way to spend leisure time, for others it became a hobby for life, which also brought additional income.
In any case, this is a useful and very exciting creativity that develops in people an aesthetic perception of the world around us.
Beautiful crafts for the New Year 2022 from foamiran for sale
Let's look at how to make New Year's lanterns that are suitable for decorating a Christmas tree or room decor. If you do everything carefully, the products will look no worse than factory ones, and they can be successfully sold at various New Year's fairs or via the Internet.
Manufacturing instructions:
- Cut out 4 wall blanks in the form of windows with cross-shaped partitions. You will also need a bottom to match the size and 4 triangles for the roof.
- Glue the walls, it is best to do this with superglue in the form of a gel, you only need a little of it. Then attach the bottom and make a roof.
- In the upper part, use a small composition in the form of a pine cone and twigs, and add a rope there as a pendant.
- Decorate the surface with a spray that imitates snow.
Advice! You can attach a matte film to the inside of the flashlight. Office files are suitable for this.
You can decorate lanterns in any way if you have interesting ideas and the result is good. Remember: if the products are going to be sold, you need to pay attention to their ideal appearance.