Choosing the right material
The choice of material is the very first and most important step in the manufacture of any keychain. The material must be of high quality in order to maximize the use of a beautiful item. Some give the keychain mysterious meanings: a talisman for good luck, a talisman or protection against damage from the evil eye.
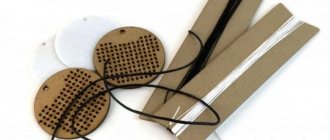
List of materials from which a keychain can be made: office paper, sewing threads, fabric, beads for embroidery, plasticine for modeling, various elastic bands or ribbons, amulets stones.
Various hooks, pieces of straps, bottle caps, strings, pencils and much more are also suitable. Images of some materials can be seen below.
DIY keychain for car
There are many different options for car key fobs. Using these instructions, you can make a keychain with a car number to give it a special personality and belonging to a specific car.
The main working tool is a file (a metal file works best). You will also need stationery scissors, a knife, and a paint brush (small diameter). If you don't have a brush, you can use a cotton swab.
The choice of file depends on the material that will be used as the base.
- If plywood is used as a base, a file for woodworking is required.
- When choosing plywood, special attention should be paid to its strength and thickness.
- A sheet of plywood, 5-6 mm thick, is the best option.
Decorating bottles and cans with old keys
And old keys will also help with this.
To make the same craft as in the left photo, take:
- glass bottles;
- thread or twine;
- keys.
Wash the bottles, if they have labels, put them away. Tie the dry bottles with thread, at the same time fixing the keys here.
In such containers you can store various bulk products, as well as leave notes for family members.
To decorate the bottle as in the middle photo, take:
- glass jar;
- a piece of lace material;
- threads;
- keys;
- button;
- a needle.
Measure the size of the jar, cut out a piece of lace of the appropriate size. Wrap the jar with this material, tie a satin ribbon or wind a rope around the neck. Sew a button of the same color here, you can put a key on it.
And to decorate the bottle, as in the legal photo, just tie the neck with a beautiful thread and fix the keys here. You can put flowers in such a container by first pouring water into it.
Use a bottle to create a metal one. You will cover glass containers with keys
But then you will need to carefully break the glass, remove it, and you will have a bottle of keys
You can create a glass in the same way. And to make round balloons to decorate the room, you will need to inflate a balloon, then cover its surface with keys. When the glue dries, burst the ball and remove it.
Read how to decoupage boxes, plates, champagne bottles
Making a key fob with a car number
First you need to cut a blank similar to a car license plate (rectangular) from metal or plywood sheet.
Plexiglas can also be used as the main material. A product made from it will take on an aristocratically beautiful and unique look.
The edges of the cut rectangle must be processed with a file, then with fine-grained sandpaper.
This way we prevent splinters and small metal residues from getting into the skin and protect ourselves from injury. An example is shown in the photos below.
When the workpiece is completely ready, the state number of the car for which the key fob is being made is printed on the printer and stuck on. Excess protrusions are trimmed with scissors.
Laminating paper will increase its service life. The product will be protected from moisture, weathering and accidental damage.
The number is glued to the workpiece using double-sided office tape or special glue for wood or metal. When the keychain is ready, a small hole is drilled at its edge to thread the ring through. A key or additional paraphernalia will be attached to this ring.
A thick layer of varnish gives the product a realistic convexity. Car varnish works well. An example of a finished accessory can be seen in the photo below.
Decorating bottles and cans with old keys
And old keys will also help with this.
To make the same craft as in the left photo, take:
- glass bottles;
- thread or twine;
- keys.
Wash the bottles, if they have labels, put them away. Tie the dry bottles with thread, at the same time fixing the keys here.
In such containers you can store various bulk products, as well as leave notes for family members.
To decorate the bottle as in the middle photo, take:
- glass jar;
- a piece of lace material;
- threads;
- keys;
- button;
- a needle.
Measure the size of the jar, cut out a piece of lace of the appropriate size. Wrap the jar with this material, tie a satin ribbon or wind a rope around the neck. Sew a button of the same color here, you can put a key on it.
And to decorate the bottle, as in the legal photo, just tie the neck with a beautiful thread and fix the keys here. You can put flowers in such a container by first pouring water into it.
Use a bottle to create a metal one. You will cover glass containers with keys
But then you will need to carefully break the glass, remove it, and you will have a bottle of keys
You can create a glass in the same way. And to make round balloons to decorate the room, you will need to inflate a balloon, then cover its surface with keys. When the glue dries, burst the ball and remove it.
Read how to decoupage boxes, plates, champagne bottles
What other keychains are there?
A car keychain in the form of a license plate for a car is not the only product option that you can make yourself. Appearance, purpose, materials used are limited only by the author’s imagination.
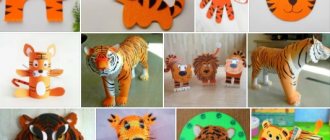
Above we discussed the answer to the question: how to make a car key fob with your own hands. However, you can make a product from beads, paper or other available materials that you are lucky enough to find at home.
Below are photographs of various keychains made from different materials that any beginner can make. For example, the algorithm is analyzed: how to make a keychain from beads with your own hands.
Decorative and stylistic design
Decorating is a fascinating creative process. Thanks to him, a boring and faceless product can turn into a work of art. By decorating your creation, you will be able to show remarkable imagination and discover hidden talents in yourself and acquire new skills.
If the craft has a wooden or plastic base, you can decorate it using the decoupage technique. It is quite simple to implement. A thin layer of PVA glue is applied to the surface, then a selected fragment of a napkin with a beautiful pattern is fixed and secured with transparent varnish. The napkins consist of three layers. For decoration, use the top one, on which the image is applied. There are many options for such napkins. There are products that imitate stone, granite or wood. Using this technique, you can quickly decorate it and give it an interesting, original look.
There is another technique, the name of which is similar to the first. It goes by the name – cardboard. To successfully use this technique, you will have to find a variety of pieces of cardboard and fabric. By combining them randomly or according to a drawing, you can create a unique pattern. The good thing about this technique is that it doesn’t require any money, just a little patience and accuracy.
Wooden products can be decorated using a burning device. The image is transferred using tracing paper or simply drawn on the lid of the cabinet and then burned out. The same tool will help you create unique embossing on leather or foil.
Stickers, paint, glitter, beads, shells, miniature decorative elements and even figurines are often used for decoration. Such decorations will make the accessory unique.
Conclusion
Fill your interior with unique things. If you are a creative person, standard accessories are not for you. Handmade work into which people put their souls always attracts glances and collects admiring comments. An original handmade key holder will become the highlight of your home and will give you ideas for further creativity. It can be accompanied by an original lamp, a mirror in an unusual frame, a decorative panel, an umbrella stand or a shelf for newspapers. Having mastered one of the manufacturing techniques, you can fill your home with cute little things that will fit together perfectly.
Making keychains from beads
This product can be made in different shapes, colors, themes. The choice of which depends entirely on the imagination of the author.
Before starting production, a beginner can use a ready-made example of creation or come up with his own (pre-draw on paper). Whatever option is chosen, the creation principle will be approximately the same.
Master class “Golden key for Pinocchio”
Gulmira Nadyrova
Master class “Golden key for Pinocchio”
Pre-New Year's efforts are in full swing. The New Year's party is coming soon, which means it is necessary to prepare the attributes. The golden key will help our fairy-tale heroes open the door and save the Snow Maiden.
For work you need: paper, cardboard, pencil, glue, scissors, gold wrapping paper .
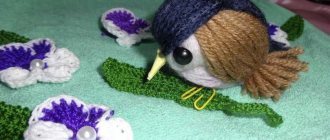
Draw a key .
Cut out a key from cardboard .
Glue onto wrapping paper on both sides and cut out according to the silhouette.
The key for Pinocchio is ready.
| The golden key opens that is called a dream! |
Happy New Year, colleagues! I sincerely wish you that the next year will be more successful than the previous one and that all your dreams will come true.
Questionnaire for parents of children attending the Golden Key kindergarten Dear parents! We ask you to take part in a study of the problems of preschool education. This survey will help improve our work.
Lesson summary “Pinocchio and the Golden Key” Pinocchio and the Golden Key. Objectives: To generalize children’s ability to distinguish and name the properties of objects - color, shape (circle, square, triangle, etc.).
Final direct educational activity in the middle group “Golden Key” Objectives: - to identify the acquired knowledge, ideas, skills that children received during the school year; - improve the ability to find.
Final lesson in mathematics in the middle group “Let's help Pinocchio return the golden key” Final lesson in mathematics in the middle group “Let's help Buratino return the key” Educator: Ilyinova.
Summary of the final GCD in mathematics in the preparatory group “Let's help Pinocchio find the golden key” Synopsis of the final GCD in mathematics in the preparatory group “Let's help Buratino” Goal: repeat and summarize the material studied during the year.
Summary of the lesson on FEMP “Let's help Pinocchio find the golden key” Program content: Learning objectives: Identify the ability to correlate a number with the number of objects. Identify skills: distinguish shape, color,...
Master class on the use of TRIZ technologies in the MBDOU “Golden Key” Dear teachers, today we will go on an exciting journey to the TRIZ planet. But before you go on this journey.
Methodological development “Children and Parents Club “Golden Key” Theatrical activities are one of the types of activities that can add variety to a child’s life and give him joy. Theater.
New Year's performance in the preparatory group "Golden Key" New Year's performance in the preparatory group. Golden Key. Children enter the hall to the music - “Polka” music. Strauss. Presenter. Hurry.
Project “Theatricalization of the fairy tale “The Golden Key, or the Adventures of Pinocchio” Type of project: informational - creative. Duration: short-term – 1 month. Project form: group. Project participants: children, teachers,...
Preparatory stage
Before you start making a keychain with your own hands, you need to draw a diagram or find a ready-made diagram for making such products. Then, the necessary materials are prepared so that during the work you will not be distracted by searching for them.
List of required materials:
- A set of beads of one or several colors, depending on the chosen color;
- The fishing line on which the beads will be attached;
- Stationery scissors;
- A diagram so that the product turns out exactly as originally intended;
- A ring for key rings on which keys will be placed.
Key holder shelf
For those who want to get two pleasures at once, you can install a shelf or even a lockable drawer where you can put things you need in the hallway or cute figures.
- You can make a similar furniture set from wooden boards or use a ready-made frame from the store. Inside, you can provide additional shelves for useful little things or leave a large space for larger items.
- Hooks can be placed on the side wall of the structure or inside the cabinet.
- If you attach a door to the shelf, you will get a wonderful closed cabinet that will allow you to keep your hallway tidy. Such an item will also come in handy when there are curious children in the family who want to get into the most unnecessary places.
- The original shelf can be made in the most unusual shape. In addition to the usual quadrangles, triangular, oval, and round objects are used.
Creating a keychain after preparation
There are many schemes on the Internet for making keychains on various topics. A master can easily find a suitable diagram on the topic: how to make a keychain from paper and beads.
The photo below shows a variant of the scheme for creating a beaded product in the shape of a flower.
Creation algorithm:
- The fishing line is cut and bent in half;
- The beads are threaded through the first end to the middle, the second is threaded through it.
- The next row is placed on a larger bead. This manipulation ensures the naturalness of the future flower.
- After the middle, the number of beads in the row decreases. An example can be seen in the picture below.
- The core of the flower can be made using a large bead of a bright color (yellow, red or another).
- Finally, all elements are fastened together, and the core secures the structure.
This product can be easily attached to items of clothing, hand luggage or to a key ring. It will not be difficult for a beginner to make it, because the algorithm describes all the nuances: how to easily make a keychain from beads.
Using the same principle, you can make a product from any available materials.
Key holders without hooks
The traditional model can be made into a more original design if you use ordinary magnets. They are pre-attached to the bottom of the shelf.
The larger the magnet strip, the easier it will be to hang keys on it. Clothing accessories are placed on the top of the shelf or the surface is used to arrange decorative items.