It is known that any equipment, even from well-known manufacturers, sooner or later fails. This makes it all the more pleasant to give it a second life, making useful devices for everyday life and recreation out of it. In this article we will tell you how to make a barbecue from the drum of a washing machine for frying food over coals.
Advantages of making a barbecue from a washing machine tank
Among the positive characteristics of a barbecue made from an old washing machine it is worth noting:
- high degree of resistance to elevated temperatures;
- presence of anti-corrosion coating;
- convenience during operation;
- safety during use;
- high level of wear resistance;
- long service life;
- relatively light weight of the structure;
- there is no need for intensive disinfection of the drum;
- no difficulties in assembly/disassembly;
- mobility;
- compact dimensions of the fryer;
- sufficient number of holes for air passage;
- economical fuel consumption (coal, firewood, briquettes);
- no difficulties in care;
- interesting appearance;
- there are no restrictions in terms of design.
You can make a convenient and practical barbecue from a drum from a washing machine in one day if you have the necessary tools in your arsenal
Main advantages and disadvantages
A homemade grill has the following advantages:
- durable due to the large thickness of the metal;
- thick metal allows the grill to provide more uniform heating of the prepared dishes;
- Rigid disc design reduces welding skill requirements. In most cases, welding work may not be required at all to make a barbecue;
- variety of execution options.
- The extremely low cost due to the use of waste materials is also important.
However, there are also some disadvantages:
- it will be difficult to warm up such a grill if you place it on cold and damp ground;
- The lack of legs does not allow the device to be installed on a wooden floor.
Certain difficulties may arise when transporting a device that is not dismountable and cannot be folded.
What materials and tools will be required
To quickly make a barbecue from a washing machine drum yourself, you need to acquire the following set of accessories:
- a tank from a broken washing machine;
- scraps of fittings/pipes for a stand 80 cm long;
- metal plates;
- bolts and nuts (10 mm) 6 pieces each;
- roulette;
- marker;
- Bulgarian;
- hacksaw for metal;
- file;
- welding equipment;
- angle grinder with brush attachment;
- a brush with stiff bristles;
- pliers;
- set of wrenches;
- electric drill;
- anti-corrosion heat-resistant paint for metal surfaces.
Smoking rules
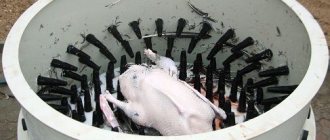
After the alteration, you can smoke meat, lard, fish, vegetables and other products in the washing machine. The essence of the process is that sawdust is poured onto the bottom. They are brought to smoldering by burning a fire or a working electric heater. Products are laid out on racks. A small gap is left between them so that they are well enveloped in smoke.
By opening the loading door you can regulate the temperature inside the chamber
Smoking rules depend on the selected recipe and product. For each option, the recommended temperature is maintained inside the chamber. You can reduce it by opening the lid or loading door.
Cold smoking is always long-lasting. For example, meat or homemade sausages, according to some recipes, must arrive in smoke for several days. Hot smoking is always fast. Sometimes 2-3 hours are enough for complete readiness. Vegetables smoke even faster.
How to make a grill from a washing machine drum
To make an original mobile barbecue from a washing machine tank with your own hands, you must follow the following step-by-step instructions:
- Disassemble the body of the failed automatic washing machine and carefully remove the drum from it. It is important to take your time here and do everything very carefully so that the surface remains intact and without damage.
- Using a sharp knife, it is necessary to remove all rubber seals and plastic elements on the tank. After this, you need to get rid of dust, debris, and scale on the outer and inner walls of the container. In difficult places where plaque is deeply ingrained, it is worth using a brush with stiff bristles. An angle grinder equipped with a brush attachment will help.
- By using welding equipment, legs are attached to the drum from a household appliance. For these purposes, metal pipes in the amount of 3 pieces and a diameter of 40 mm are perfect. They are mounted to the bottom of the base.
- After all the preparatory measures, it is necessary to clean the welded structure - the future barbecue - with a soap solution. Then degrease it using a rag and a solvent (white spirit, acetone). The surface after this treatment should dry well in the open air.
- The cleaned drum should be coated on the outside with a heat-resistant compound for metal, including the legs of the grill. Acrylic paint for painting metal surfaces and silicone enamel, which contains a resin-based varnish, are very popular. For greater effect, paint is applied not in one layer, but in two or three. Between procedures, you need to let the previous layer dry thoroughly. Thanks to painting, a homemade grill made from a drum from an automatic washing machine will be reliably protected from corrosive changes, which will significantly extend its service life.
- This DIY roasting pan is ready for use.
Advice!
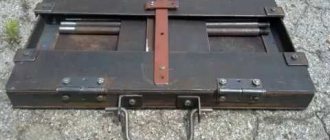
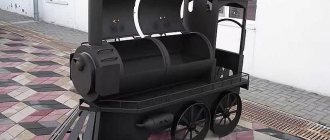
For greater stability, the barbecue from the washing machine tank must have 4 points of support. There is another interesting option for arranging a barbecue, where there is a rectangular hole in the side of the tank. This design is intended for grilling food. Here you will also need to make a door so that the temperature inside the chamber does not decrease. The body of the tank can be cut crosswise using a grinder, connected with bolts, and get a full-fledged mobile roaster, which camping lovers will appreciate.
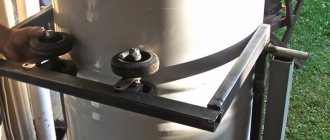
There are several ways to install a stand made of metal pipes to a drum grill:
- Using welding equipment or bolts. Racks made of suitable material are mounted to the side fastenings of the structure’s body. If you need a mobile version of the barbecue, which is perfect for outdoor enthusiasts, then the standard type of connection - bolts - will do. To ensure the stability of the roaster, the legs are joined together using a metal bridge.
- The ends of the reinforcement (rods) must be bent from the edge, retreating 100 mm, and maintaining an inclination angle of 100-120 degrees. To make them easier to use, they are first flattened with a sledgehammer. A tripod is made from iron pipes and fixed to the cylinder axis using a welding machine. This simple move will allow the barbecue to rotate.
- If you do not have welding equipment, you can follow the following technology: mark points for 2 holes on the bends of the legs and make them using a drill and a drill. Their size should be 6-8 mm. Then attach the blanks to the bottom of the drum, using them as a sample, and make similar holes. All structural elements are connected using bolts that are suitable in both length and size.
- For a homemade barbecue, you can use a ready-made stand made of safe materials, non-flammable and durable. The main thing is that it fits in size. A metal stand for ornamental crops and flowers serves this role perfectly.
Different hearth designs
If a simple hearth on legs seems too boring, then you can modify your homemade product. Decorating the “base” is simple: just experiment with the base, top part or the entire surface of the drum. The most suitable option is selected depending on personal preferences, available materials and desired functionality.
- Unusual base. Unsightly legs made of crosses or metal plates can be replaced with openwork stands made of twigs. For example, a fireplace placed on poles bent in the shape of the letter “S” looks impressive. Elongated or asymmetrical supports look beautiful, as do bricks and even an iron base from an old chair.
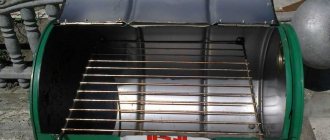
- Grate on top. You can not only make a fireplace in your dacha, but also turn it into a barbecue. You just need to find a metal base for the future “lid” of any shape: round, rectangular or square. Afterwards, all that remains is to lattice it with rods, fix it with a stand at the bottom of the drum and sand down the unevenness.
- "Stone Ring". For a concrete “foundation” it is necessary to calculate the required diameter, make formwork and fill everything with heat-resistant cement mortar, adding rigidity with reinforcement or stones. Afterwards we dig a hole, install the rim and fix the drum in it. In a similar way, a “border” is made from rock or brick.
The fireplace from the drum of a washing machine can also be used as a barbecue.
- Well. If you plan to use the hearth outdoors, it is recommended to take care of the roof. An excellent option is to make a “well” grill. It is enough to weld two metal supports to the side walls of the drum, and attach the gable roof to them.
- "Two-story" hearth. If you have a second washing drum or other metal container of similar size, it is easy to upgrade the stove with a second “floor”. You just need to weld the found reservoir to the lower cylinder. Afterwards, you can place the cauldron or saucepan directly in the top hole - a large distance to the fire will provide the ideal temperature for cooking.
- Table with fireplace. An interesting solution would be to install a “fire” directly into the tabletop. The material does not matter: furniture can be made from wood, metal or concrete. The main thing is to provide a gap between the fire and the tree, and secure the drum with strong iron pipes or profiles.
- Gas firebox. If desired, the hearth can be heated not with wood, but with gas. But you need to be able to connect the pipes to the drum, make connections and connect the system to the gas cylinder, not forgetting about safety precautions.
A fireplace made from a washing machine will become not only a place for cooking or heating, but also an unusual decoration for a summer cottage. Thanks to the perforations on the walls, the flame looks gorgeous in the dark, especially after decorating the homemade product with legs or a border.
Interesting:
- What can be done from an old washing machine
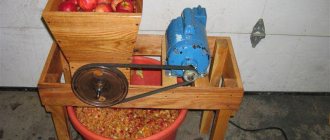
- Crusher-chopper for apples from a washing machine
- DIY washing machine tank repair
- Mini washing machines for summer cottages
- Review of mini washing machines with spin for the garden
- Stainless steel washing machine drum weight
Reader comments
- Share your opinion - leave a comment
Decoration of the barbecue
It is not necessary to paint a homemade grill from a washing machine drum. The design can fully cope with the effects of adverse environmental factors. But it is still recommended to paint the stand, especially if a material with a low degree of resistance to moisture and temperature changes was used for its manufacture. It is better to use stainless steel for these purposes.
Not only for beauty, but also for convenience, it is worth considering a canopy that will save the barbecue with kebabs in rainy weather. It is also good to provide special holders for forks, tongs, skewers, and necessary accessories. If desired, you can improve the stand for the grill or skewers on top of the structure.
What is the difference between drums and automatic machine?
In fact, such options are distinguished according to several criteria: from the company to the drum loading volume.
An excellent barbecue grill can be made from a washing tank with a narrow washing machine and front loading. The meat will brown perfectly on this design and will also be very juicy.
Reference! The advantage of such a washing drum is that minimal coal is needed.
Standard washing machines are equipped with large capacity washing tanks. They make excellent fireboxes for firewood; you can cook barbecue on them not only with skewers, but also on a grill. Many users cook in a cauldron using such drums.
Recommendations
Additional practical tips include the following:
- The ends of the pipes must be processed, since under their own weight they gradually go deeper into the ground.
- A good solution would be to make a stand, a kind of platform made of concrete mixture and cement mortar. The depth should be about 15 cm.
- It is necessary to install wooden valves at the lower ends of the pipes, after flattening them with a hammer. They are fixed using self-tapping screws.
- A barbecue made from a drum from an unnecessary washing machine can be effectively used as a fireplace while relaxing in the garden, outdoors, or on a personal plot.
Video on how to make your own grill from a washing machine drum.
How to make a roasting pan?
Do-it-yourself children's car: step-by-step description of making a homemade car (95 photos)
First of all, it is necessary to take measurements of the frame on which the roaster will later be attached. It is best to make the dimensions of its box slightly larger than the cast iron frame. Thus, it will be possible to attach steel corners by welding to the bottom of the fryer, which will fix it. Thanks to these details, such a structural element will not move during use.
Welding a steel box and a cast iron frame from a sewing machine at home is extremely problematic, so you can secure the box using bolts, as well as using a frame made of corners, which can be placed on top of the base.
The height of the sides of the brazier should not be too high - this will reduce the consumption of firewood. However, if the sides are too low, then there is a risk that the food being cooked on the grill will burn because it is located too close to the coals. The optimal height of the sides is from 15 to 20 cm. It is recommended to make several small holes in the side walls of the roasting pan for oxygen access.
All prepared and cut parts of the fryer are fastened together by welding. A frame of corners is also welded in the lower part, or holes are drilled in the bottom for fastening to the frame using bolts. A fully finished barbecue can be supplemented with all kinds of shelves and a stand - they will ensure the convenience of preparing food. In addition, the resulting device can be decorated with various ready-made decorative elements made from forging.
How to make a grill from a sewing machine, see the video below.
Preparation
Dismantling
First you need to remove the drum and dismantle all the plastic parts.
A grinder, a screwdriver, a hacksaw, and pliers will come in handy.
Cleaning
To give a presentable appearance, a heavily soiled tank needs to be tidied up: cleaned of dirt and limescale. This can be done using a torch and a wire brush.
You can also wipe the drum with a brush dipped in 9% vinegar, use a special anti-plaque agent, or soak it in a 1-2% warm solution of citric acid and water.
Lawnmower
The lawnmower is a homemade product made from an engine from a washing machine, and is in no way inferior in functionality to the factory model. In addition to a stable and strong frame, a casing is required to protect the person from injury and the motor itself from leaves and dirt.
The base can be made from scratch or you can take a frame from a cart or an unnecessary stroller. A sheet of metal is attached to it, then a casing and a special bumper in the front and rear parts.
Before the first start, you must make sure that all elements are insulated and connected correctly.