- 17421
- 16-10-2020
- Author: Mysekret Team
- 0
We all remember the prickly hats knitted by our grandmothers, which made our foreheads itch very much. But the most important thing is that they were knitted for us with love; they kept us warm in the cold season. We invite you to learn how to knit the same warm and cozy things, but from softer and more delicate yarn. Thanks to detailed master classes and video lessons, today we can knit such products ourselves. And we will start with crocheting mittens. Of course, they can be knitted with knitting needles, but with a crochet it will go faster.
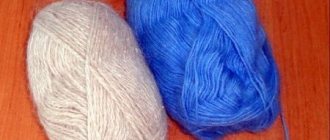
Choosing yarn for knitting mittens
When choosing yarn for mittens, you need to ensure that it is not only beautiful, but also warm. If the mittens will be worn by a child, then the threads should be hypoallergenic , which will not get wet quickly and can retain heat longer.
For men, coarse thread in rustic shades is traditionally used. If a man spends a lot of time outdoors, then it is better to make double mittens lined with fleece or other “warm” fabric.
Women's mittens come in a variety of colors and patterns, so the thread is chosen so that the pattern is clearly visible on it. And for warmth, you can knit mittens in 2 threads, one of which will be down.
Children's mittens are best knitted from hypoallergenic yarn
The ideal winter yarn is wool. It could be sheep's wool. The downside is that it is prickly, but after a few washes the product becomes quite soft. Goat wool or down is also suitable, but the thread of such yarn is usually thin, so a product made from it should be knitted in several threads or used in pairs with other yarn.
Yarn with a high acrylic content is not expensive, but it does not hold heat well enough and also gets wet quickly. If you knit mittens from such threads, then they need to be additionally insulated with a lining, especially if they are worn by children.
You should especially carefully choose yarn for very young children. It should not cause or provoke the development of allergies.
The following yarn composition is suitable:
| Alpaca | Ideal for small children. Hypoallergenic and retains heat well. |
| Merino | In rare cases, it can cause allergies, but is still recommended for children's products. To reduce the risk of allergic reactions, acrylic can be added to wool. However, the artificial additive will cause heat loss. |
From a maintenance point of view, acrylic mittens are the easiest to care for. They will not be damaged by moths during storage, are easy to wash, and do not form pills. Alpaca mittens are also wearable and do not lose their presentable appearance for a long time, but they should be washed by hand or on the gentle cycle of the washing machine.
It is not recommended to use yarn containing angora. It quickly rolls down, losing its appearance and thermal qualities. For active children aged 2 years and older, it is better to choose a mixture of wool and acrylic. This will allow the mittens to be washed more often with the possibility of drying on a radiator. And you can additionally insulate them by making them double with an inner fleece or knitted part.
Mittens from Estonia.
Below are the words of the author Irina Petraitis
I love knitting from old museum exhibits. This time mittens from Eesti Rahva Muuseum (Estonia) Attention - year of manufacture 1883!!! Place - Eesti, vald Lobotka, küla Mikitamäe, talu Matsi Vasila (Estonia, Lobotka parish, Mikitamäe village, Matsi farm Vasila). I found the diagram in a wonderful bourgeois book
Yarn “Village” TKF (brown, art. 3657; white, art. 2440; gray, art. 1507) and “Khutoryanka” TKF sand, art. 0194. Yarn parameters 170m/100g.
Knitting needles No. 2.5 with elastic and No. 3.0 (or No. 3.25) basic knitting. Elastic 2*2 44 loops, 21 rows, at the end add 4 loops. In the main work there are 48 loops.
From the elastic to the finger there are 15 rows, from the elastic to the decrease - 42 (45) rows. I leave 9 loops on the finger.
Closing with a “house” in 2 paths.
Finger.
Set of 24 loops. If desired, you can gradually reduce to 21 loops. 15 rows, then decrease.
Knit! Touch this historical heritage. And every loop will remind you that the original is already 136 years old!
Calculation of the amount of yarn by hook number
When starting to knit, it is important to correctly calculate the consumables. Otherwise, at best, there will be unused balls, at worst, there may not be enough thread for the item.
Calculation of the amount of yarn
The hook size is usually indicated on the product and is indicated in millimeters. However, there are products where the marking is not indicated, in addition, the numbers on foreign-made hooks may not correspond to Russian ones.
The hook size is the diameter of the hook head, which can be measured with a caliper. Another way to determine the size is to make a hole with a crochet hook on paper and use a ruler to measure the width of the resulting hole.
When choosing a hook for a specific yarn, you need to ensure that the size matches or is close to the thickness of the thread. This can be checked by placing the thread directly into the hook. The thickness of the thread should not protrude beyond the boundaries of the folded part, but also should not be too loose in the recess.
A mismatch between the hook and the thread will result in the knitted product being either loose or very dense. The packaged skein of yarn will usually indicate the recommended hook size.
You can use it as a guide, but it is always better to knit a sample. Depending on the cost and structure of the yarn, sometimes it is necessary to buy 1 skein in order to correctly calculate the volume that will be required to make the item.
Before crocheting mittens (diagrams and description below), you need to knit a sample of the product
Calculation of thread according to the sample:
- knit a 10 cm x 10 cm sample with the main pattern,
- wash to determine shrinkage,
- count the number of rows and loops in each row,
- unravel the sample and measure the length of the resulting thread,
- Using the pattern of the desired product, you should calculate how many similar samples will fit on it.
By multiplying the number of required squares by the calculation data, you should determine the exact number of rows, loops in a row, as well as the meterage of the threads. The meter of thread and the weight of the skein are always marked on the purchased skein. Accordingly, having calculated the length of the threads, you can determine the number of skeins. It is recommended to buy 50-100 g more threads in case of yarn shrinkage.
In addition, thread consumption will depend on the pattern. Braid patterns always require more yarn, while openwork patterns can, on the contrary, save money. An incorrectly sized hook can also unjustifiably increase yarn consumption.
Calculation of loops for knitting mittens
First of all, you need to determine the size of your hand - calculate the length of the wrist, hand, fingers
If you incorrectly calculate all the dimensions, then your product will turn out unsightly and crooked, so pay special attention to this step
Detailed instructions for determining the correct size of mittens are already on our website.
After all measurements have been taken, start knitting the sample. This will be needed in order to correctly count the number of loops.
Correctly taken measurements will greatly simplify your work
The control sample is ready. Now attach a ruler to it and count the number of loops in 1 cm. Multiply this number by the length from hand to wrist that you calculated earlier. Divide the last number obtained by the nearest smaller integer multiple of 4. For example, you got the number 54 from multiplying the number of loops of 1 cm by the length of the hand to the wrist. The nearest integer that will be divisible by 4 without a remainder is 52. Its and take it.
This is how the number of loops for the mittens is calculated.
After this, build a diagram based on the measurements already taken. The pattern will serve as a guide for you.
use this diagram to make two patterns
The base part is ready. You have decided on the sizes, patterns, patterns, color and texture of yarn and knitting needles. Now read the rules for knitting mittens on 3, 4 and 5 knitting needles.
Preparing for knitting
Crochet mittens, diagrams and descriptions of which are given in magazines and on the Internet, complicate the choice of the craftswoman with their variety.
Sizing
An easy way to determine the size and make a pattern for mittens is to trace your palm on paper, with your fingers lying relaxed , slightly apart.
When deciding on the size, you need to make sure that the elastic fits tightly to your wrist, but does not press; The fingers inside should be free, but not too spacious. You can also use the average data from the table if it is not possible to measure your hand.
Pattern selection
Since mittens are crocheted simply and quickly, the craftswoman can knit several products for different looks. Mittens with braids are always in fashion.
Beginners in crocheting can use double crochet or single crochet stitches. If the appearance of such a product seems too simple, it can be “complicated” with strips of yarn of a different color.
Mittens are an accessory where you can use leftover threads, which knitting enthusiasts usually have in abundance.
Crochet mittens, patterns and descriptions of which are offered by the authors, can be designed for different seasons. The colder the season, the denser the fabric should be. Openwork patterns can only be used for products for warm autumn.
Knitting density
The knitting density is affected by:
- selected pattern,
- ratio of hook number and thread thickness,
- thread tension by the craftswoman, which is individual for everyone.
By experimenting with each of these criteria, you can achieve the desired density of the product - make it warmer or less. For example, a classic single crochet stitch will make the item warmer than a single crochet stitch. The thinner the thread relative to the hook, the more gaps there will be between the loops.
What is the purpose and benefit of scratches?
After the baby is born, you will notice that his fingernails are quite a decent length. It will not be possible to cut them off right away. The maternity hospital is not allowed to do this. And it’s unlikely that you’ll be able to cut your nails every day at home. In addition, you cannot cut the nail plate too short - you can accidentally injure a tiny finger.
Coordination of movements in newborns is not formed, so they constantly move their arms and legs chaotically. Often, when moving their hands, babies scratch their face and tummy. This can happen even if the nails are trimmed. Scratches are a rather undesirable phenomenon. The baby's immunity is very weak, and any minor damage to the skin can lead to the development of infection.
To prevent the baby from harming himself with his nails, scratches for newborns were invented. They are small mittens without a compartment for the thumb. They are secured to the handle with a soft elastic band or cord.
This accessory will come in handy from the first days of life until 2-3 months.
Helpful advice: Today you can buy vests, bodysuits and overalls, which immediately have special mittens sewn to the sleeves. If you stock up on such items of clothing, then you don’t have to purchase scratch mittens separately, or you can buy a couple of pieces in case you need to put short-sleeved clothes on your baby.
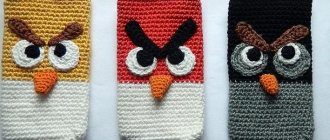
Crochet mittens for small children: a simple master class for beginners
Mittens designed to look like kittens are suitable for children aged 2 to 4 years. In addition to standard chain stitches, double crochets and single crochets, the work uses embossed stitches. This type of columns gives greater thickness and density.
Thus, knitted mittens will not only keep warm better, but will also be able to stay dry longer, which is important for young children. To prevent the increased density of the product from leading to excessive rigidity, you need to use soft yarn.
Relief columns can be front and back:
- Facial.
The embossed double crochet stitch is made in the same way as a regular double crochet stitch, but the hook should not be threaded through the loop of the previous row, but behind the stitch. Having grabbed the thread, you need to pull it out with a crochet hook and then knit it like a dc.
- Purl.
The purl stitch should be knitted by inserting a hook from the reverse side of the stitch of the bottom row.
For the mittens you will need:
- hook No. 1-1.5,
- yarn with angora, desired colors.
- 4 medium-sized beads for making eyes (color optional from green to black),
- 2 larger beads for the nose (can be replaced with buttons),
- needle,
- black threads, regular sewing threads or floss.
Mitten
First you need to dial 4 air points. and close them in a ring:
- 1st row: you need to tie the air. loops so that you get 11 dc.
- 2-3 row: 2 air.p. for lifting, then in each loop of the row in turn you need to first knit a dc and into it a relief column with the front grip of the lower column. Total – 48 p.
- Rows 4-18: 2 chain stitches on the rise, then you should alternate the relief columns (1 front and 1 back). Total – 48 p.
- On the 19th row it is necessary to make a hole for the thumb part.
- 19 r: 2 air.p. for lifting, sc, chain of 11 air. p., in the 12th loop, sc, you need to finish the row by alternating faces. and out. relief columns.
When knitting the second mitten, remember that the slot for the finger must be placed symmetrically, i.e. not at the beginning, but at the end of the row. Next, knitting the mittens should be continued similarly to rows 4-18 and applied to the child’s palm, achieving the desired length.
Rubber
For the elastic, it is advisable to take yarn in a contrasting color and knit 5 rows in the same pattern as the palm (1 knit stitch, 1 purl stitch).
The final row should consist only of half-columns.
Thumb wrap
When knitting a finger piece, you should start from the wrong side. In the first row, from one edge of the hole you need to make 2 chain stitches, 2 incomplete dcs and knit the resulting loops together. Also knit on the other edge; the rest of the row is knitted with the main pattern.
To determine the length of the finger part, it is recommended to apply it to the hand of the future owner while working. If this is not possible, then you need to knit 8 rows with the main pattern, then pull all the loops together by knitting double crochets together. The thread should be cut, leaving a tip long enough to secure it on the wrong side.
Next, the mittens need to be decorated. For the ears you need to knit 4 triangles. There will be 5 loops at the base, 3 in the next row and then 1 loop. Having attached the 2 parts to each other, they should be sewn together and carefully sewn to the mitten by the base.
Beads must be sewn in place of the eyes. Then use black thread to make a mustache, securing the elongated loops, and sew the cat’s nose on top.
Helpful tips to make the process enjoyable and efficient
Before crocheting mittens, it is important to take into account the following recommendations:
- It is recommended to wash your hands before knitting.
- It is best to buy yarn with a reserve.
- You should understand the scheme and clearly define the stages of work.
- It is recommended to decide on the size before the process by first measuring your hand and thumb.
- To determine the knitting density, knit a small sample.
- When working, it is better for novice craftsmen to use a special row counter.
- If you need to unravel some part, it is better to use a thin hook.
- To preserve vision, it is recommended to use a light or dark background for knitting.
- The remaining ends after knitting should be crocheted along the row.
To decrease loops when crocheting, it is not recommended to skip the loops of the previous row, but to grab two loops at a time (that is, knit one single crochet over two single crochets of the previous row).
Crochet scratches for newborns: instructions
The value of scratches for newborns is difficult to overestimate. As a result of the chaotic hand movements that babies make, they can injure themselves. At best, they will be scared; at worst, an infection may occur in a fragile organism. Therefore, scratches are a necessity. Crochet mittens (patterns and descriptions are simple and accessible to beginners) for newborns are knitted in one evening.
To work you will need:
- threads - cotton of contrasting colors,
- hook – No. 2,
- satin ribbon, thickness 5 mm.
Stages of work:
- It is necessary to make an amigurumi ring. For this you will need pink cotton.
Make a ring-loop 2.5 cm from the tip of the thread. Having passed the working end of the thread between the index and middle fingers, you need to insert the hook into the loop and pull the thread forward.
Next, you should crochet the working thread through the resulting loop. The resulting loop is not taken into account in the calculation. Next, on a large ring you need to knit 6 single crochets and pull the tip of the thread to tighten the ring.
Amigurumi technology is used here to ensure that the hole that always forms at the start of knitting is as invisible as possible.
- In the first row on each loop you should increase 1 sc. There will be a total of 12 loops.
- 2nd row: *sc, increase* (6 times). Total 18 p.
- 3rd row: * 2 sbn, increase * (6 times). Total 24 p.
Then continue knitting with white thread.
- 4-12 p.: 24 p.
- In the 13th row you need to switch to the pink thread again and knit 24 stitches.
- 14 r: 2 lifting loops, ssn, air.p. through 1 loop of the previous row 1 sbn. Until the end of the row you should knit according to the pattern *2dc, dc*. The row of connections ends.
- The 15th row is the final one, it should be knitted with a shell pattern according to the pattern *in the second loop from the hook 5dc, sc*. You need to repeat the pattern along the entire row. Next, the thread must be cut and secured. By analogy, you should knit a mitten on the second hand. You need to thread a ribbon into the resulting holes of the 14th row and tie a bow.
DIY scratches for newborns
After birth, the baby will need a lot of clothes: overalls, bodysuits, caps, socks, etc. Also, expectant mothers should purchase an accessory such as scratchies for newborns.
They look like little mittens without a thumb and protect the child from his own hands.
The most precious and beautiful things are made with your own hands, so below we will talk about how to sew or knit this important accessory.
What are scratches for?
Very often, children are born with long fingernails, which cannot always be cut in time. And when cutting them, it is advised not to leave them too short. Because of this, babies scratch themselves, because all their movements are absolutely chaotic.
It is precisely this problem that special mittens for newborns will eliminate. Some people think that they are harmful because they do not allow the skin of the hands to breathe and do not allow the baby to tactilely explore the world around him. The accessory also prevents him from holding a rattle or bottle.
However, it should be remembered that scratches are dangerous for the skin of a newborn: due to weak immunity, an infection can develop.
How are scratch mittens different from regular mittens? Because they don't have a thumb compartment. As a result, the finished product looks like a bag, which is held in place by an elastic band or a beautiful ribbon. If you wish, you can sew or knit it in the form of a regular mitten, but then you will have problems putting it on.
Each child is different, so it is difficult to say how long you will need to use scratches. For newborns, they may not be needed at all, and some children will have to wear them until almost six months.
Most often, they wave their arms sharply during the first 3 months, but it all depends on the mother’s opinion. Experts advise using them as little as possible - after all, the baby must develop and get used to his hands.
Babies start reaching for toys at about two months, so it's worth letting them touch and examine everything.
If it becomes noticeable that the child is showing interest in surrounding objects, then it is better to remove the mittens from him. It happens that inexperienced mothers do not know how to do the right thing. Then they should adhere to a period of three months. However, the accessory can only be worn at night.
Selection of material and tools
These special mittens can be purchased and can also be sewn, knitted or crocheted. For newborns, in this case, you will need natural materials.
For sewing, it is best to use flannel, kulir, knitwear or any other fabric that is pleasant to the touch. It should not cause irritation (possible heat rash), so it is better to choose a material that is not too thick.
For two scratches you will need: two pieces of fabric measuring 180x130 mm, a regular elastic band 140 mm long, a needle, thread.
To crochet them, you need to choose a yarn. In this case, it is better to choose thin cotton, for example, VITA Pelican. For work you will need: yarn (you can take leftovers), hook No. 2 and a beautiful ribbon measuring 5x600 mm.
The mitten can also be knitted from natural yarn, although acrylic is also suitable (for example, Jiffy Yarn Fisherman). An acrylic product will keep your hands warmer if it’s cool at home. The work is done on five double needles No. 2-4, i.e. you need to knit in the round. You can cut a piece of ribbon or knit a cord from yarn.
Sew scratches
Before you start sewing, you need to prepare a pattern. To do this, take tracing paper (a sheet of paper) and draw a rectangle measuring 90x130 mm.
We round the upper edges of the future mitten and cut out the blank. Let's prepare the elastic band right away: take the desired length and cut it in half.
You should decide on the location of the seams, which can be internal, external or hidden (between layers of fabric).
We take the finished pattern, place it on the fabric and trace it. We cut out the parts, lean them against each other and sew them together, leaving a hole for the handles. We apply the elastic to the bottom edge of the product, turn it in 2 cm and stitch it. We decorate ready-made scratches for newborns with ribbons, bows, embroidery or lace. If desired, you can increase the length of the cuff - then the elastic will no longer be needed.
Crochet
We crochet 4 loops, connect them into a ring and start knitting in the round. If possible, you can try on the mittens on your baby or use the sizes indicated above. They are knitted in single crochet stitches, and at the end the rows end with a connecting loop.
We work with rows like this:
– First: 2 lifting loops and 7 columns.
– Second: 2 lifting loops, 2 columns in each column of the previous row.
– Third: 2 lifting loops, alternately knitting 2 stitches into one, 1 stitch, etc.
– Fourth: 2 lifting loops, alternately knitting 2 stitches into one, 2 stitches, etc.
We continue to add loops until the width of the product reaches 80-90 mm. We continue working without adding (about 7-10 rows). To move to the cuff, we make decreases: we reduce each row by 2 loops.
Next, we knit the cuff either with an elastic band (knitting needles) or double crochets (crochet). For newborns, beautiful lace around the edge of the product is suitable. Finish the work and cut the thread.
We repeat all the steps for the second scratch and decorate both with ribbons or laces.
Crochet mittens for boys step by step
Crocheted mittens, with diagrams and descriptions suitable for boys, differ little in technique from mittens for girls.
Currently, manufacturers of children's clothing make bright, multi-colored clothes for boys, so accessories can be not only in traditional men's colors: black, gray, dark blue. The pattern of striped blue and white mittens is designed for boys aged 4-6 years.
Materials for work:
- yarn - 2 colors,
- hook No. 2-3.
Stages of work:
1. Elastic band.
You need to dial 12 air into the chain. p., two of which will be used for lifting. Next you need to do 10 dc and 2 dc. p. for lifting. The cuff should be knitted with a rectangular fabric. Therefore, after each row, the knitting needs to be unrolled.
The next row is also dc, but you should pay attention to the type of knitting of the stitches. The loop of the previous row should be grabbed by the front wall of the loop. Then you should unfold the knitting and knit a dc with a grip on the back wall of the loop of the bottom row.
The elastic should consist of 14 rows, in each of which the grip will alternate when performing the dc. When the elastic band is finished, it must be folded in half and “sewn” from the wrong side along the edge using single crochets, the thread is cut and secured. We decorate the edge of the product with a “crawfish step” binding.
Crochet mittens - patterns and descriptions of knitting mittens for a boy
2. Mitten detail.
You should start knitting the mitten directly with white yarn. The edge of the elastic must be tied with sc so that there are 32 of them. The work must be continued with sc. You need to knit 4 circular rows.
On the 5th row you need to leave a slot for the future part of the thumb. To do this, row 5 is filled with sc to the place where the finger should be. After this, the knitting unfolds and with the help of 1 air. The instep stitch continues in the opposite direction to the location of the second end of the slot for the thumb.
According to the diagram presented, the slot corresponds to 4 loops, but depending on the size of the child’s hand, it can be increased. Having reached the second end of the slot, you need to tie 4 air. etc. and secure them on the other side of the hole.
The work should continue with blue yarn and sc. You need to make 6 rows. Then you need to change the thread back to white and perform 6 more rows. The last stripe in the mitten will be blue. After the white stripe, you need to switch to the blue thread and perform 1 row in the same way as the previous ones.
Next you should start decreasing the loops. Decrease is carried out by 2 loops in each row and only in the places where the mittens are folded, until the fabric is completely closed. The result should be a pattern similar to knitting mittens.
3. Thumb.
The slot left for the finger needs to be tied with 12 sc. And perform 7 more rows with such columns. In the next 2 rows you need to decrease every 2nd stitch. After this, the remaining loops should be closed once, the thread should be cut and secured. The second mitten should be knitted similarly to the first, taking into account the mirror position of the thumb and color transitions.
Mittens with “Flagella” and “Pigtail” patterns
Mittens are a necessary attribute of the winter wardrobe. After you have mastered the initial basics of knitting the simplest mittens on knitting needles, it’s time to try knitting mittens with a pattern. The most popular and favorite patterns are flagella, braids and their simultaneous combination (diagrams and detailed descriptions are given below in the text).
It should be noted that such raised patterns look good on smooth yarn, but on knotty, boucle or fluffy yarn they are simply lost and, in fact, unnecessary.
Pattern "Flagellum"
Pattern for serial knitting of the “Flagella” pattern:
Flagella are almost always knitted on a contrasting field, on a fabric of purl loops - this way the pattern is better drawn.
For the sample (report), you need to cast on 12 loops on a knitting needle and knit 9 rows according to the pattern:
- 1 rub. - 1 pet. chrome, purl 3, knit 4, purl 3, 1 chrome.
- 2, 3 and 4 r. - knit according to the pattern.
- 5 rubles – 1 pet. chrome, purl 3, knit 2 pet. transfer to a pin before work, then knit 2, knit 2 removed onto a pin. pet. and all the rest - according to the scheme.
- 6,7 and 8 rubles. - knit according to the pattern.
- 9 rub. - repeat 5 p.
Note. The abbreviation should be understood as:
- R. - row;
- pet. - a loop;
- chrome – edge;
- persons – facial;
- purl – purl.
Pattern "Pigtail"
Pattern for serial knitting of the “Pigtail” pattern:
Braids are knitted similarly to flagella, by moving the stitches in one row “behind” and “in front” of the work. Pigtails look very beautiful on mittens in combination with flagella.
For the pattern sample, you need to cast on 12 loops and knit 15 rows, according to the diagram:
- 1 rub. - 1 pet. chrome, purl 2, knit 9, purl 2, chrome 1.
- 2 r. - knit according to the pattern.
- 3 r. – 1 pet. chrome, purl 2, knit 3 pet. transfer to the pin behind the work, then knit 3, knit 3 removed onto the pin. pet., 3 persons. and all the rest - according to the scheme.
- 4, 5 and 6 r. – knit according to the pattern.
- 7 rub. – 1 pet. chrome, purl 2, knit 3, knit 3 pet. remove with a pin before work, then knit 3, knit 3 removed with a pin. pet. and all the rest - according to the scheme.
- 8, 9 and 10 r. - knit according to the pattern.
- 11 rub. - repeat 3 times. and further - according to the scheme.
Note. The abbreviation should be understood as:
- R. - row;
- pet. - a loop;
- chrome – edge;
- persons – facial;
- purl – purl.
Crochet mittens for girls
Crochet mittens, the diagrams and descriptions of which are suitable for older children, require more practicality and must have tightly fastened parts. Satin ribbons and appliqués made of felt and ruffles are not suitable for such products. Mittens knitted for girls aged 6-8 years.
To work you will need:
- yarn of 3 colors - purple, peach and raspberry,
- hook No. 2-3,
- needle.
Stages of work:
1. Elastic band.
You should start working by tying out the air. loops in the amount of 40 pcs. Then the chain must be closed into a ring.
1st row: 3 air. p, *stepping 3 loops of the chain into the 4th one should be knitted together. column, retreating the next 3 points. You need to knit 5 dc*. The pattern should be repeated until the end of the row, except for the last loop, where instead of 5 dc, you need to make 4 dc, which are connected in a chain of air. p. beginning of the row.
2nd row: Changing the color of the thread to peach, you should perform 3 chain stitches. with connect. a column that will be in the middle of the fan of the previous row. The main pattern must be repeated in such a way that 5 dc fall into the gap between the crimson fans and connect. the column was above 3 dc of the bottom row.
Row 3: You need to use purple thread for knitting. You should knit by analogy and make sure that the fan pattern is placed in a checkerboard pattern. From rows 4 to 6 you need to repeat the previous 3 rows.
2. Mitten.
The main part of the mitten should be crimson. From the elastic you need to knit 10 rows of sc. In the next row you need to leave a slot for the thumb. To do this, knit a chain consisting of 9 air. loops, which should be knitted using sc, skipping 9 loops of the previous row.
You need to continue working with the main pattern for another 13 rows. From the 14th row you need to decrease the loops. If it is possible to try on a mitten for a child, then the point of reference for the beginning of the decrease will be the place of the first phalanx of the middle finger - where the finger bends. After the first row with a uniform decrease, there should be 30 stitches left in the row.
In the next row, you need to decrease in every 5 loops. In the remaining rows in every 4th, 3rd, 2nd loop, respectively. In the last row, you need to decrease in each loop, then fasten and cut the thread.
3. Thumb.
The finger should be knitted in a circle, using single crochet stitches. You need to knit 10 rows or a length corresponding to the distance from the base of the thumb to the middle of the nail. Finish knitting the finger by decreasing in each loop, after which fasten and cut the thread.
4. Bow.
To make a bow, you need to knit a chain of air loops, using threads of 3 colors at the same time. From the resulting chain you need to form an even bow and firmly sew it to the mitten.
Simple models for beginners
Master class for beginners:
This model of mittens is suitable for beginners. Suitable for any age. For work you will need: hook No. 5; mohair or angora (preferably one color). Before starting, it is recommended to decide on the size for casting on a certain number of loops. Then they are closed in a circle, and the base is made using a simple elastic band technique until the end of the little finger. Then each row needs to be reduced by 2 loops, and the remaining ones need to be closed and finished.
Simple elastic band pattern:
The finger for the mitten can be made separately or after finishing the whole process, leaving special slots.
You need to knit your finger in the same pattern as the mitten itself, in a circle around the hole left in advance. Towards the end, decrease evenly by three stitches in the last two rows and tighten the thread.
How to leave a hole for the thumb: measure its volume and divide the size in half. Next, we retreat this “in half” with the addition of air loops, usually 2-4 cm, depending on whether these are children’s mittens or adults. We attach the resulting chain to the knitting of the mittens, and continue creating the tube further.
There is another option for simple knitting mittens. After the circle (ring) is cast, it is recommended to do it with simple single crochets until the end of the little finger. Finish the left and right parts using decreasing stitches. Perform the finger using the same technology.
In the photo there are also diagrams of mittens for beginners:
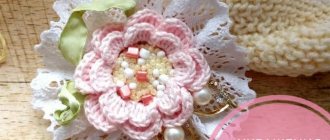
How to decorate mittens: ideas, description
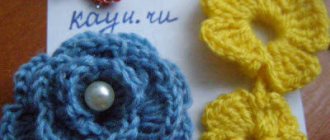
Options for decorating mittens can only be limited by the imagination and skills of the needlewoman.
For example, you can do:
- Cross stitch of a simple pattern.
- Embroidery can also be done with satin stitch, ribbons, beads or beads.
Any handmade accessories are suitable for decoration. For example, pompoms or buttons.
- Applique with other knitted details.
- Heart applique.
Video lesson:
Mittens from a women's set.
A chain of thirty chain stitches is knitted. They are connected into a ring, after which an air loop is made, and a single crochet is knitted, then a chain loop is knitted again, two are skipped and a double crochet is made in the third, a double crochet is knitted, then another one is knitted in the same loop, then a chain loop and two again double crochet.
Again, two loops are skipped, and the third is knitted with a chain loop and a single crochet. The resulting fan pattern is repeated - two loops are skipped, and a chain loop and two double crochets are knitted into the third. The pattern is repeated.
Openwork children's mittens
Mittens using openwork patterns can be knitted for children in the off-season. Acrylic, cotton, and viscose are suitable for such products.
The ease of making crocheted mittens allows you to make several pairs, spending very little time on the work. Thanks to the diagrams and descriptions available on the Internet, each pair can become an original accessory for any clothing.
Author: Vorobyova Nadezhda
Article design: Natalie Podolskaya
Male version
This model is suitable for any age. The knitting process is based on an adult. If you need to knit mittens of a smaller size, then you should reduce the number of loops by half (for primary school age). You will need: hook No. 5; any yarn of 2 different colors. Steps for crocheting men's mittens:
- Cast on about 46 loops and connect them, forming a ring and the future base.
- Knit 5-6 rows with an ordinary elastic band (1st row concave with a crochet, 2nd convex with a crochet).
- Then make 2 double crochets.
- You should cast on 6 loops and skip the same number from below.
- Knit approximately 8-9 rows until the end of the little finger.
- Then knit further, decreasing each row by 2 loops.
- Knit the last stitches together and finish the work.
- For the finger, cast on 6 loops and knit similarly to the warp 4-5 centimeters.
- On the last part of the product, decrease the loops, then finish the work.
We sew scratches for the little ones with diagrams and descriptions
If you want to dress your child in knitted scratches, you can sew them yourself at home. To do this, you will definitely need a machine to professionally process the seams. First of all, you need to make a pattern. The diagram is shown below.
It is best to sew scratches from natural cotton, which does not irritate the baby’s skin. Make sure you have some rubber to keep the scratches from coming off the handles. Fold the fabric in half and attach it to the pattern. Take a pencil and trace the material along the pattern. Cut the fabric along the outline. And now do the same for the other scratch. Start making the elastic, which should be slightly smaller than the bottom of the fabric. Place the elastic near the edge of the workpiece and wrap it in the fabric, making about two turns. Attach the elastic to the fabric in this position using a sewing machine. The rubber bands should be on two scratches. Turn the fabric over and machine stitch it with a zigzag stitch. Now place the product face up. The scratches are ready! You can decorate the mittens with ribbons, bows and beads.
Knitted embroidery technique
Since we are talking about embroidery on knitted items, it is worth talking a little about the technique, thanks to which, when putting on mittens, you can easily forget about winter snowstorms.
Skilled needlewomen most often use the following as the main material for such embroidery:
- Threads. It will be necessary to select a special embroidery thread that would match the thickness and texture of the knitted product. There are three types of seams: “through a row”, “solid” and “in a pattern”;
- Ribbons. They are mainly used to embroider flowers and bouquets. As a rule, you will have to create all the schemes yourself or look for alternative sources;
- Beads. Delicate and iridescent beads will look good on a dress or blouse, but they are completely unsuitable for embroidery on mittens.
Using each of these materials requires certain skills, since the technique of embroidery on knitted fabric is more complex than embroidery on fabric.
Let's start with the circular pattern
In order to knit the “body” of the product, that is, a circular fabric, you need to cast on a number of additional loops onto the elastic band.
NOTE!
- How to crochet a flower to decorate clothes: diagrams with explanations and photo ideas of flowers for clothes (80+ photos)
- The best options for DIY knitted hats: step-by-step instructions and tips
- How to knit a shirtfront simply and beautifully with knitting needles for children, women and men: useful tips and instructions (80+ photos)
If these are mittens for you or a loved one who can try on the product while knitting, then be sure to take advantage of this opportunity. If not, then there will be about 1.5 times more loops for a circular fabric than for an elastic band.
We knit a dense fabric with a single crochet to the beginning of the thumb. Cast on chain stitches in the thumb area (the number depends on the size of the thumb, approximately 6-10 stitches). Skip this formed hole and knit the fabric with a single crochet in a circle further.