Rose is a very popular and beloved flower. But, unfortunately, all its beauty quickly fades. You can make this flower with your own hands from beads. A beaded rose will delight you with its blooming appearance all year round. If you don’t know how to make a rose from beads, then this master class with step-by-step photos will help you master the technique of weaving roses from beads.
Materials for creating one branch
- Red beads 40 grams,
- Green beads 30 grams,
- Red wire 0.3 mm,
- Green wire 0.4 mm,
- Gerbera wire 0.8 mm,
- Thick braided wire
- Red sewing threads
- Green floss threads
- Transparent glue or varnish.
Individual elements need to be woven in stages, and then connected into a branch with flowers.
Video lesson:
Red roses
This is not just bead embroidery - the roses are voluminous and very similar to real flowers. To work you need 0.2 mm wire, flexible aluminum wire, scissors, Czech-made red and green beads, sewing threads and floss. The French technique of creating petals is used, and detailed diagrams of the work are provided.
In each row, the petals have their own size, differing in the size of the wire arches and the number of beads placed on them. The beads are pre-assembled onto a wire wound on a spool. In this way, rose petals are formed in the required quantity.
Petals
The petal of the first row is made with a wire 65 cm long.
- To do this, bend it 10 cm from one of the ends, making a loop, and twist the ends.
- Place 8 beads on the short central axis.
- Place 11 beads on the working wire.
- Twist the ends of the wire together to form a rounded arc.
- Cast on 11 more beads and make an arc on the other side of the central axis.
- Make a second row of arcs, adding 15 beads to each of them.
- Make 3 more such rows, adding several beads to each of them.
- From the upper edge of the petal, cut off and bend the end of the wire.
- On the other side, twist the ends of the wire together.
- For a rose you will need 2 of these petals.
The following rows of beaded rose petals are woven according to the following pattern:
- 2nd row – 80 cm wire – 8 beads on the axis – 6 rows of arcs – 3 petals;
- 3rd row – 95 cm wire – 8 beads on the axis – 7 rows of arcs – 4 petals;
- 4th row – 110 cm wire – 8 beads on the axis – 8 rows of arcs – 5 petals.
The fifth row of petals must be woven on a base of three axial wires. To do this, twist together a 15 cm long wire and a 100 cm long wire at a distance of 7.5 cm from the edge.
The three short ends of the wire will play the role of axes, and the long end, together with the beads, will be braided around them. For each of the arcs of the first row you need to collect two beads, then the number of beads increases.
In total you need to make 9 rows of arcs. Twist the ends of the wire. For a rose you will need 6 such petals.
For greater decorativeness, the last row of each petal can be made of beads in a contrasting color, for example, white, yellow or burgundy.
Making rose petals using plasticine
Sometimes professional craftsmen advise using a plasticine base to make beaded roses for beginners. In this case, you will need to sculpt a special blank, similar to the shape of a plant petal. To avoid plasticine sticking to the beads, it is recommended to lubricate the surface of the plasticine base with Vaseline.
Then the beads need to be strung on a silk thread and laid out on the surface of a plasticine base. The workpiece should be fixed using regular varnish. Next, the beads are separated from the plasticine and the Vaseline layer is removed with warm water.
At the final stage of creating the petals, a layer of varnish is applied to the second side. All that remains is to collect the details of the plant based on the general plan. For a rose you will need to make 10 identical petals.
Sepals
The sepal is woven in the same pattern as the petal, but its ends are not rounded, but triangular.
- For it you need to take a green wire 20 cm long, also make a loop and put 9 green beads on the short end of the wire.
- You need to collect a larger number of beads onto the working wire and screw it to the axial wire at an angle of 45 degrees so that the corners are sharp.
- You will only need to make one row of arcs. In total you will need 5 of these sepals.
Video lesson:
Little rose
To work you will need:
- pink and green beads;
- green and silver wires;
- green thread for decorating the stem;
- pliers.
Large petals are woven on silver wire. The process of petal formation is described in detail. Each subsequent turn has a larger number of beads. The result is a neat triangular petal. Five stamens are made and twisted together. Next, the flower is assembled into one whole. The petals are connected by twisting the wire. Leaves and sepals are crocheted from green beads in the same way. The wires of the leaves are twisted and wrapped with green thread.
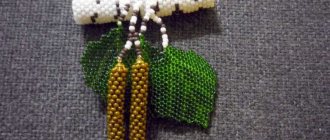
Leaves
For a rose you will need leaves of two sizes.
They weave in the same way as the sepals, according to the following pattern:
- Small leaf – 40 cm wire – 7 beads on the axis – 4 rows of arcs – 3 pieces;
- Large leaf – 50 cm wire – 9 beads on the axis – 4 rows of arcs – 3 pieces.
Video lesson:
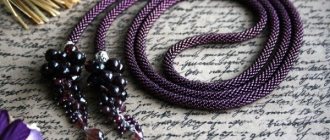
Pink rose
The required number of petals of various shapes and sizes, flat and concave, and a core are knitted from pink beads. It tells in detail how to proceed, how many beads to collect, how to twist the wires together. All these blanks are knitted in a similar way, only the number of rows and the number of beads in each of them changes.
Leaves are knitted from green beads and attached to a thick wire that represents a stem. The middle is attached to the upper end of the stem, then the leaves - as their size increases. Once the large petals are attached, they need to be bent outwards to create a beautiful rose.
Assembling a twig from leaves (instructions)
Large and small petals must be collected separately into two branches of three pieces.
- For the base you need gerbera wire 15 cm long and attach one end to the base of the leaf.
- Starting from the base, wrap all the wires together for a length of 2 cm with floss threads.
- Next, attach one more leaf to the stem on both sides and continue wrapping another 4 cm.
First steps
Using the French rose beading technique, you will first need to create a bud.
Each petal will require special attention, and the final appearance is formed during the process. The scheme is quite simple: by making an axle out of metal, you need to attach a half-meter piece of the same diameter to it. Place five beads inside and wrap them in eight arcs, forming a circle. In order to maintain the correct shape of each workpiece, the leg rotates 90 degrees.
Assembling a large branch
Cut a piece of thick wire 30 cm long. Cut off the braid from it with a stationery knife. Attach the end of the wire to the base of the center of the flower. Wrap it close to the base with red thread.
- Next, you need to roll both petals of the first row into a tube at one end and, connecting them to the stem just below the base of the center of the flower, continue to wrap them with threads. Bend the upper edges of the petals slightly to the sides. Each next row of petals should be attached slightly lower than the previous one.
- First you need to give each petal a slightly convex shape so that the petals seem to hug the base of the bud.
- They need to be attached one at a time, nesting inside each other. The petals of each subsequent row must be placed in a checkerboard pattern relative to the petals of the previous one.
- Having completed each full row, you need to straighten the ends of the petals to the sides. Cut the end of the thread and secure it with glue.
- Now you need to take the sepals and start screwing them one by one to the base of the flower with floss threads. Distribute all sepals evenly around the flower. Bend them in an arc in different directions. Continue wrapping the stem with thread.
- At a distance of five centimeters from the flower, attach the first small branch of leaves and continue wrapping. After another three centimeters, attach a second sprig of leaves on the other side of the flower. Continue wrapping the thread around the stem until the very end. Cut the end of the thread and secure with glue. Instead of floss, you can use floral ribbon.
- According to the flower assembly scheme, you can also collect one or two rose buds. Each bud will consist of a center and the first two rows of petals. When assembling a branch, the buds must be placed between the leaves.
A finished rose branch or even a whole bouquet can be fixed in a glass, vase or pot. To do this, you need to fill the ends of the branches with plaster or cement and decorate the surface with sisal.
Today we learned how to make a rose from beads. You can decorate your own home with a bouquet of such roses or present it as a memorable gift. Almost any woman will be delighted.
And since it is quite simple to weave a rose from beads using this master class, each of us has a chance to receive a bouquet of these flowers from our own children for their birthday, March 8th or Mother’s Day.
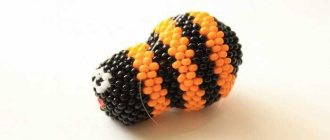
Brooch in the shape of a rose
The rose-shaped brooch consists of 3 layers and a middle. It is created using the mosaic weaving method. Each layer of a flower consists of 5 petals.
Petal weaving:
- 20 beads are collected per thread (bottom layer). The needle is passed in reverse order through every second bead. One additional bead is woven into the empty spaces (every other)
- Having created a side, the petal needs to be unfolded. An additional needle is taken and the second part of the element is formed.
- In the middle the petal is pulled together for relief.
- Depending on the weaving of the flower parts, the number of beads may increase.
- The middle layer requires 25 beads.
Having made the necessary structural elements, the brooch is assembled using beads located in the central part of the blanks. The middle is placed in the spaces between the petals of the main tier. The apex is located above the components of the middle.
The upper tier is sewn to the central beads so that it is positioned vertically in relation to the rest of the flower.
- A clasp is attached to the back of the rose.
The process of making a rose from beads is a long, labor-intensive, exciting job. By following weaving patterns and techniques, you can make a unique decoration for your home, clothing, or an original gift for loved ones.
Article design: Vladimir the Great
Photo of roses made of beads
0
Master class with step-by-step photos
Beading is a fascinating process that not only delights you with hand-made masterpieces, but also contributes to the development of creative abilities in women and girls. There is nothing more beautiful and more valuable than something made with love and care.
But what to do if the basics of beadwork have been mastered, but complex things just don’t work out? Don't know where to start and how to do it correctly? This is exactly what our article will discuss.
The proposed scheme for executing this instance will be understandable even to needlewomen with zero ideas and knowledge.
Let's start creating a flower from beads:
To complete the first elements, a single long wicker blank made using the mosaic technique is used. Primitive bracelets - baubles - are woven using the same principle. Therefore, understanding the technique of making roses is not difficult.
But for those who are not familiar with mosaic weaving, let's look at what it is. Mosaic weaving is one of the types of creating a flat canvas. The elements in which are located strictly vertically and between the beads of the previous row. The product comes out a little loose, but at the same time durable and more attractive than simple parallel weaving, where the beads are located strictly above each other.
We make a rosebud.
We thread the isothread or fishing line into the needle. We tie a triple knot. We thread the bead and stretch it to the end. We thread a needle between the two threads and tighten the loop, fixing the element. This way, the outermost bead will securely hold the entire row and thread.
We continue working according to scheme 1.
Take bead #2, 3, 4, 5, 6, 7, 8. Move them to the first one. Insert the needle into bead #5. We string bead #9. We pass the needle through #3.
We string bead #10. Pull the needle through the first one. We unfold the future element for a more convenient approach to the side of the canvas. We hook #11 and #12. Pull the needle through the 10th. We continue to weave the first element according to pattern 1.
After some time of weaving, the need arises to tie a knot, because... the thread ends. To properly fasten a knot, you need to remember two rules: 1.) The knot should always be on the wrong side and in the intended lower outer row of the fabric. To prevent the knots from sticking out unattractively on the upper open petals of the product. 2.) The number of knots tied one after another should be at least three. After all, with everyday use of the product, poorly secured knots can come undone and dissolve all the created beauty. Therefore, tie knots through each bead, and only then cut the thread.
We weave the strip to the desired length, approximately 22 - 25 cm.
Ideas and instructions for making a small bud
First of all, it is important to remember that Chinese beads are characterized by their fragility and unevenness, and the best in this regard are Czech or Japanese, therefore, if you want to get a truly beautiful creation, then choose more expensive models of fittings.
But you can conduct training on cheap products. For our rose you will need yellow and green beads, as well as a wooden skewer and copper wire.
To create a flower, we start by cutting 30 cm of copper wire, and then string a green bead onto one end and pull it towards the center, after which we string two more through both wires.
Using a similar pattern, you need to weave 4 rows, in which there will be 3, 4, 4 and 2 beads, and then tie them in a knot and thus make as many as 6 components. This way we will weave a leaf.
For the petal, the technology is similar, only for it you need to make eight in a row of 1, 2, 4, 6, 8, 10, 12 and 14 beads. The last, ninth row will become the edging of our petal. To do this, you need to collect beads through the very first layer and tie them with a knot. Thus, slowly, we make five petals.
As in the previous step, we make the edging, threading it through the very original layer, and then make a knot. You should already have 4 of these petals. Now you need to weave 3 leaves in a similar way, but of different sizes.
Our simple rose weaving pattern for beginners went smoothly into assembly. To do this, you need to take two small petals, bend them a little and insert them together, and tie a knot at the bottom so that the structure holds. In this way, the entire rose bud is formed, correcting where something looks ugly or gluing it discreetly with instant glue in places of poor adhesion.
It is necessary to walk around the entire circumference of the bud with copper wire so that the bud holds and does not fall, and since the beads are gold in color and the wire is copper, nothing will be noticeable, but try to hide it.
At the bottom of the bud we tie the leaves with wire, and a wooden skewer must be wrapped with wire. Remember to add larger leaves as you go by wrapping the wire around the stem.