Often you have to puzzle over what to give your boss or colleague for their anniversary. In order for the gift to be remembered for a long time and to please the hero of the day with its originality, it is best to put in a little effort and make the souvenir yourself. In this case, a universal gift would be a money tree, namely a do-it-yourself money topiary. Step-by-step photos and detailed instructions for making an elegant gift will help even a beginner create an elegant miracle.
There is no need to stock up on a large sum of money to work.
The production uses non-original banknotes, which can be easily purchased at a souvenir shop or printed on a color printer.
Tools and materials Time: 6 hours • Difficulty: 5/10
- pistachio shells;
- coins, souvenir bills;
- beads;
- varnish;
- Bath salt;
- plastic plates;
- coil of wire;
- building gypsum;
- golden paint;
- small flower pot;
- drill;
- FUM tape or thread;
- glue.
A tree that brings happiness. Who would refuse such a gift? We suggest making this magical tree with your own hands.
How to make a money tree
Step 1
We make holes in the pistachio shells. To do this we use our drill
Step 2
In order to make leaves for the tree, we will use wire and shells with holes made.
Cut 15-20 cm of wire and tie it to the shells
Step 3
Twist the wires into a spiral
Step 4
To get a small twig, twist several leaves together
Step 5
For a whole branch you need to connect 2 - 3 small ones. We try to replicate the structure of a real tree
Step 6
We connect several whole branches together - we get a small tree (to make it more natural, we copy the structure from living trees)
Step 7
To make the barrel strong, we wrap it with thread or FUM tape
Step 8
Apply golden paint
Step 9
While the paint dries, take a small pot and fill it with plaster. We stick the tree in and wait for it to harden.
Step 10
Painting the pot
Ready!
Author Olga Aksimova
Jar with inscription
A simple and excellent method would be to leave the amount in the bank. To make such an original gift, you will need a small jar with a wide neck. Then wrap the bill and place it in the container.
A pre-cut square (paper/foil) should be placed on top of the jar and tied with threads around the axis. After this, paper with the inscription: “Green piggy bank”, “Big jackpot”, etc. should be glued to the bottle.
Another option is to use a picture attached to threads instead of paper, which will hold the “entrance to the jar.” In addition to all this, it’s worth leaving cool instructions for use for it.
Money tree made from coins
We will need:
- Coins
- Drill or drilling machine
- Gold paint
- Newspaper
- Copper wire
- Aluminum wire
- Disposable plastic plates (deep and shallow) or pot
- Glue (PVA and instant)
- Gypsum
- Stone
- Gouache
- Varnish
- Bath salt
- Zelenka (if there is no green gouache)
- Figurine of a toad with a coin in its mouth (optional)
Step 1
We take coins of the same size and make holes in them. To do this, use a drill or machine for drilling holes.
Step 2
In the place where we will paint the coins, we cover it with newspaper so as not to stain everything around. Lay out the coins and apply gold paint. Don't forget that they need to be painted on both sides.
Step 3
We make small branches. To do this, we fasten 3 coins with copper wire
Step 4
We make large branches. We fasten 3 small branches into one big one
Step 5
From aluminum wire, we make an American dollar sign (you can make any other one you like :))
Step 6
Connecting with copper wire
Step 7
Now we attach the large branches to the dollar sign. To do this we use copper wire
Step 8
Making a pot for a money tree. For this we need deep and shallow plastic plates, PVA glue diluted with water 1 to 1, which must be mixed with plaster. Fill a deep plate with the mixture, insert a chalk into it and fill everything again (tree trunk too). We put a stone on top, for beauty and to make the structure heavier.
Step 9
Take gouache and paint the trunk and pot with brown paint
*We also applied gold paint on top, you don’t have to do this
Step 10
For shine, we coat our wood with varnish
Step 11
That's not all, let's move on to decorating the tree. To do this, we use bath salt mixed with brilliant green or gouache. We glue it around the tree using Moment or any other instant glue
This master class is almost finished. For decoration, we added a toad with a coin in its mouth, you don't have to do this.
Money tree made from banknotes
We will need:
- Clay pot
- Paralon cone
- Wooden chopsticks (you can use sushi chopsticks)
- Money
- Pins
- Toothpick
- Paper
- Scissors
- Glue
How to make a money tree from banknotes
Step 1
Cut off part of the cone and put it in the pot
Step 2
Place a cone on wooden sticks and place it in the pot.
Step 3
Using pins, we attach the bent money to the cone. We do this gradually, in rows, starting from the bottom.
Step 4
After we hang the entire cone, we examine the tree from all sides so that there are no gaps
Step 5
Cut out a star from paper and glue it to a toothpick
Step 6
Place the star on the top of the cone
You can decorate a dollar tree with festive ribbons and bright tags
Is a boat souvenir the most unusual gift?
How to make a ship out of money with your own hands? This type of gift will be appreciated not only by the man, but in general everyone will like it, since such a souvenir looks very expensive, impressive and advantageous. Making it will require a lot of patience and time, but the result is worth it. The birthday boy will be delighted!
So, to make this idea a reality, you can buy a ready-made sailboat at a souvenir store, remove all the sails and attach pre-rolled banknotes.
But the option of making it yourself will be much more difficult, but no less, and even more interesting, than the first method.
Instructions
- It is necessary to take as a basis for the deck any type of basket that resembles in its shape an ordinary boat.
- Then you should lay the foam material and stick sticks into it that will fit in size.
- Then you should cover the finished deck of sticks with paper money and start creating sails.
- After the masts are installed, it is necessary to secure the cables to them (you can use regular rope or thin laces).
- Lastly, attach the banknote sails.
Such a ship model must be moved anywhere with great care and attention, as it has a fragile structure and can fall apart. You can place it in an original box, gift bag or transparent paper, which will help keep the shape in the desired condition. After this, you can remain calm, because the gift will not break and will reach the recipient.
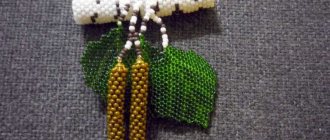
Beaded money tree (bonsai)
We will need:
- Green beads
- Copper wire (thick and thin)
- Old plate
- Foil
- PVA glue
- Construction gypsum
- Gouache
- Varnish
How to make a money tree from beads (bonsai) with your own hands.
Step 1
We take a thin wire and string 9 pieces of beads - we get 1 small leaf. We make 5 of these things and connect them. It turns out to be a small twig
Step 2
Press all 5 branches to form a “heap”
Step 3
From such branches we make full-fledged branches. It all depends on your imagination and ability to be creative. You can make an unlimited number of them
Step 4
We take out thick wire and make a frame for the tree (note again, you don’t have to do it like we did, experiment). We connect thick twigs with thin wire
Step 5
Place it on a plate (pre-wrapped in foil) and see how it looks
Step 6
Lubricate the frame with the mixture (recipe: dilute glue and water 1 to 1 and add building plaster). Don’t forget to coat the bottom of the frame, this will act as a kind of stand
Step 7
Using thin wire, screw the branches to the frame
Step 8
Re-cover the places where the wire is visible
Step 9
Using gouache, paint the tree trunk brown and the lower part (stand) green
Step 10
Varnish
Step 11
Remove from the plate and voila! Using this beadwork, you can make any tree!
Money tree embroidery
DIY cross stitch pattern for a money tree using an embroidery pattern and a step-by-step master class.
Step by step guide on how to cross stitch:
And here are other diagrams:
Using the technology described above and these diagrams, you can make truly amazing trees!
Variations on a theme
Fans of intricate crafts will love the idea of creating a money “crown” in the form of flowers.
To do this, cut two squares from one bill.
Fold each square diagonally and cut along the fold line.
The result should be four triangles. The corners at the base of the triangle are folded up so that the cuts meet in the center of the part.
The corners are bent back.
Related article: Do-it-yourself cup holder in a car
Thanks to the folds in the workpiece, two small triangles are visible at the base of the part. Each of them must be folded as shown in the photo.
The ends sticking out on the sides are folded inward and another bend is made. The opposite sides are glued together to form a flower petal.
The remaining petals are created in a similar way.
A flower is formed from the finished petals.
Flowers are glued to the base in the shape of a ball.
This topiary looks elegant and can add variety to a boring interior.