Made based on a video on YouTube (with Grigory Sokolov in the title role))
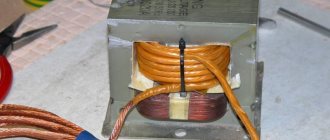
To begin with, I repeated its design. But I couldn’t find the saw blade from frame 63. But I considered it inappropriate to buy. In addition, according to reviews, from 63 used frames. saws are often set on fire and do not hold the blade. I also didn’t want to mess with heat treatment. I got a disk from a circular saw with a diameter of 710 mm, thickness 3 mm. I made an outline of the future machete from cardboard, based on my hand.
How to draw and the manufacturing process are described in detail in Gregory’s video. I wound the handle with a 6mm cord. I sharpened the blade with a grinder and a grinder... And immediately ran to cut down the bushes. Hmmm... And the handle is not very corded. If you fell a few trees, it wouldn't go anywhere. But I was planning more intensive work. Nadys took a plot of land, abundantly overgrown with bushes. There are hundreds of them there. The handle with the cord is thin and uncomfortable, even with rope pads. In general, I instantly softened my hand and earned 3 well-deserved calluses. The palm became red, like the claw of a boiled crayfish. I immediately remade the handle. 2 beech overlays.
As it turned out, the saw blade can be drilled (but the drill must be of high quality, not Chinese).
In addition, another drawback emerged - heavy weight. Gregory has a blade made of 2 mm linen. I have 3 mm with the same dimensions. I sanded the planes a little, but did not make the canvas thinner. My blades came out to 870 grams. With a new powerful handle - 1100 grams. You can't work with one hand for long. I looked on the Internet, many swords weighed from 1 kg to 1.5. Individual copies of two-handed 2.7. However! ! I decided to reduce the width and cut off the excess.
After lightening, the blade came out to be 715 grams, the handle 102 grams. Total weight 817 grams. Total length 565 mm. Handle 190mm.
I liked this weight. The force of the blow did not decrease. Work has become easier and more convenient. Impression. The strongest blows are in the area of the blade at a distance of 15 cm from the handle; it penetrates very powerfully into the wood and there is absolutely no recoil to the hand. Thin branches can be cut as desired. I immediately noticed that you shouldn’t cut at 90 degrees. At an angle it is much easier and deeper. For regular strikes, grip with your hand at the blade, for accented strikes at the base of the handle. For the truly brutal ones - with both hands. Green branches and living trees are best cut. The worst thing is dead wood. The two-handed handle is comfortable. Accented strikes can be delivered with both hands.
Handle made of two halves of beech. The shape is straight. The curved one doesn't roll in my opinion. This is not a saber for backhanded strikes. Tested by practice. A handle that is too wide is bad, as is a narrow one. The cross-section is oval. Fingers should not close. My section is 38x28 mm. But here you need to navigate by hand. The handle has several holes for attaching a lanyard. In my opinion, the lanyard interferes with the work. But it is convenient to carry. Well, or if there is a risk of permanently dropping the tool (river, mountains.) In general, everything on the handle should be smooth, and there should be no protruding parts - your hand will instantly become calloused during intensive work. I coated the handle with wax. I bought it to polish my car. Some kind of carnuba). I haven’t bothered with linseed oil yet. I'll try to bury the blade in Coca-Cola. Although this is not necessary. Doesn't seem to rust. Practice will show. I haven't decided what to make the scabbard out of. Grigory has a tire from a chainsaw. For now, I took strips of thick cardboard from the box and wrapped it with tape. You can transport it in a car or carry it in a bag. I did not sharpen the blade at the top. Straight section only. When you cut down trees near the ground, you often cut them down with one blow and the blade touches the ground (just with the blunt rounded part). However, I’ll sharpen it a little, like a shovel. It will be possible to dig and chop the roots.
General conclusion. The idea was a success. Thin branches, branches and trees 5-6 cm thick are cut down at a time. And it’s much more convenient to do this than with an ax. Factor of. A chainsaw is inconvenient for thin bushes. For thick trees, a chainsaw or bow saw is more convenient. The machete is very convenient for its niche - bushes, twigs, thin trees. In my opinion, you don’t need to weigh more than 800 grams - you can’t swing much. A thin blade (2-3mm), with sufficient mass and speed, powerfully cuts into wood. When struck at the handle, the blade enters 5 centimeters in one stroke. Perhaps the tool will be useful when chopping meat or cutting off the heads of chickens. I haven't tried it. After several days of work, there was not a single nick on the blade. Although I’m lying, a couple of small ones appeared.
The saw was made in the USSR. The steel is good.
Generally . Yes, I’m absolutely delighted!). A kind of knife for a real man. A photo of the hand is attached).
Cutting down trees with one blow is something. A sort of machete one-shot). When you operate with two hands, you feel like a samurai and a real man at the same time. It turned out to be a practical and interesting thing. Somewhat stylish. Cutting bushes is a pleasure. Both a game and a useful thing.
Source: www.drive2.ru
What types of swords are there?
Sword shapes vary depending on the shape and length of the blade.
For example, depending on the length there are:
- Swords with short blades. The length of their blade is from 60 to 70 cm.
- Swords with long blades. Their length is from 70 to 90 cm.
- Cavalry swords. The length of their blade is more than 90 cm.
For a drawing, the length of the sword matters because of the proportions. The longer the depicted sword should be, the narrower its blade should be depicted.
The main thing is not to overdo it, so that the hero’s sword does not accidentally turn into an elegant sword of midshipmen.
Making a blank
After you have decided on the model and selected the material, you need to make a pattern from thick cardboard. It is better to experiment on paper rather than on a blank. After the final edits, the workpiece is outlined on the metal. You need to take a small reserve, leaving allowance for processing.
You can cut the workpiece in 3 ways. Each of them has advantages and disadvantages:
- Laser cutting. High precision method. It is used in enterprises for the manufacture of new parts. This method is good because further processing after it is minimal. It is also suitable for cutting neat holes in solid materials, which is much more difficult to do with a drill. The disadvantage of this method is that it is not available to everyone. In addition, the laser overheats when cutting metal, so the cutting edge may not hold its edge well.
- Waterjet cutting. This is a method of cutting with a jet of water with the addition of abrasive particles. This method is ideal except that it is difficult to access.
- Cutting using a sander. This is the most affordable and time-consuming option. To work with an angle grinder, you need to stock up on used circles that have the smallest diameter. This is necessary in order to make curved cuts. It is dangerous to work with circles of large diameters. Moreover, the cuts will be sloppy. You need to leave a large margin for processing.
Blade sharpening
Since the blade thickness is 3 mm, it is difficult to sharpen immediately. First you need to make gentle slopes that will give the lower cutting part of the blade a wedge shape. For this work, you can use a grinder with a petal attachment. The rotation speed of the grinding machine is very high. It can easily overheat the workpiece and thereby overheat it. To prevent this from happening, you need to work with minimal pressure, without holding the petal circle in one place.
After giving the wedge shape, the blade is further sharpened on an emery machine. In order for sharpening to be accurate, the abrasive wheel should not have runout. The blade is sharpened at low speed with constant cooling with water. The handle of the machete must be made after giving the workpiece slopes, but before sharpening.
What is design like?
Machete knives come in many varieties. Before you make such a tool yourself, you need to decide for what tasks it will be used. If the goal is to create a universal tool, then you can make a machete knife with a wide, massive blade that is convenient to use with both an ax and a sapper shovel.
The classic version did not have any protection for the hand. Because it was only used for cutting down bushes. Military varieties have already received a guard so that the palm is protected during a strike. When making a homemade knife, you can make a small hand rest. This will provide the necessary protection, but will not allow the knife to be classified as a bladed weapon.
Quality checking
Having made a machete with your own hands, it is worth testing it in practice. If the blade is thick enough, you can test its sharpness by chopping small firewood. If necessary, it is worth re-sharpening the blade and adjusting the shape of the handle.
Using the above method and strictly following the sequence of actions, you can make almost any knives, axes, and machetes with your own hands. The main thing is to be creative and not be afraid to learn through trial and error.
Design
To choose a suitable design, just look at several ready-made machetes and photos of knives in a tourist store. Initially, it is better to draw on paper a couple of the most suitable sketches, so that later you can choose a single option, the parameters of which correspond to the possibilities of manufacturing the product using available materials. As an example, you can pay attention to kukri machete knives, the blade of which has an impressive width along the entire plane and noticeably narrows only in the area of the handle.
DIY machete
Don’t be nervous, I’m comparing))))) let’s see what’s written here
It’s not difficult to make a machete with your own hands if you have an old saw, an angle grinder and a sanding disc on hand. We offer a small workshop on how to make a large knife from an outdated two-handed saw. Possessing a large cutting surface and cutting force, the machete is indispensable for making a path through thickets, as well as for preparing camp food and protection from wild animals.
You can make a machete with your own hands if you have an old two-handed saw lying around the house. The flexible and durable blade of a tool that has fallen into disrepair is valuable here.
It's no secret that a machete is just a long and wide knife. Its initial use was in the harvesting of sugar cane and bananas on tropical islands and in Latin America.
Subsequently, agricultural tools turned into a serious type of military weapon, which was repeatedly used in local conflicts. Many will also remember adventure and action films where machetes are shown. Actually, thanks to films, this type of large knife gained fame.
As a peaceful item, the machete is effective for cutting a path through dense thickets of bushes and tall grass. Due to its long length, it can be used for protection from wild animals and cutting up hunting prey.
If you don’t have an ordinary knife or can opener at hand, a homemade machete can also come in handy in cooking. You can use it to open a can of canned meat.
, chop vegetables and herbs to cook a delicious hot meal on the campfire over a stew recipe
.
How to make a machete (knife) with your own hands?
Convenient large machete survival knives will be useful on long journeys when covering impressive distances over difficult terrain, and will also become indispensable assistants in the household. In fact, it is not at all necessary to purchase such a relatively expensive tool. If you have a strong desire, imagination, certain practical skills, the necessary tools and materials, you can make a machete (knife) with your own hands.
Before you begin, you need to prepare the following materials:
- a workpiece in the form of a piece of hardened steel (can be old and slightly rusty);
- waxed thread;
- chalk;
- a piece of durable leather.
- leather finishing wax;
- wood blank;
- epoxy resin;
- metal rivets;
DIY machete making technology
To make a large knife, you will need an old saw blade, long (up to 2.5-3 meters) rope or paracord.
The tools you will need are a grinder and, preferably, a sanding disc, as well as sandpaper.
You will also need a pencil and a ruler, but the latter is more likely for drawing straight lines, because, ideally, a machete made by yourself should correspond to your individual physiological parameters.
So, the length of the cutting blade will be equal to the distance from the elbow part of the arm to the joints of the clenched hand. The part that is rounded at the end is 10 centimeters from the tip to the beginning of the rounding. Moreover, the rounding can be done both from the bottom side, and from the top and bottom (like the bow of a ship, if you stand on the deck).
Descents
A machete is a knife with a characteristic faceted blade surface. To achieve this, it is necessary to process the workpiece until the slopes appear. To perform such work, it is enough to have a grinder and a grinding disc.
Clamping the blade of the future machete in a vice allows you to cope with the task. In this case, the back surface should remain accessible for processing with a grinder. In order for a machete knife to acquire an attractive faceted texture, it is enough to separate the blade and the back surface with a clear, even outline. To do this, a grinder tilted at a slight angle is passed several times along the workpiece blade so that the metal is removed at a distance of 1.5-2 cm from the blade.
Do-it-yourself machete knife: what to make it from?
If a person decides to make a machete himself, then he probably does not want to invest a lot of money in production. Therefore, you can choose used parts or tools as a material:
- Band saw blade. It uses high carbon steel. It is used on sawmills for longitudinal cutting of wood. In addition, there are band saws for cutting metal blanks. The material used in them is much stronger. When making a machete knife, it may be difficult to process this material.
- Car springs. They have different sizes both in width and thickness. Therefore, you can choose any option to suit your model. This is a solid, high-quality material that has one drawback - bending. To eliminate it, you will have to work hard. You can level the spring using a press or using thermal heating. The second option is more preferable, since in this case additional hardening can be done.
- Circular saw blades. They fit perfectly, except for one drawback - it is difficult to find a disk of the required diameter. As a way out of this situation, you can make the handle separately from the body of the blade.
A homemade machete knife will cost much less than a factory knife, but will not be inferior in quality. Made according to an individual project, it can be much more convenient.
Final revision
Sometimes you can't make a tool that's completely satisfying the first time. The problem may be in the sharpening or shape of the handle. After working for some time, the owner may feel the weight of the knife as a drawback. Then you will have to eliminate the shortcomings by modifying the design. For example, a cleaver weighing 1.5 kg can quickly cause fatigue when working, then you will need to cut off the excess part of the blade, making the tool lighter.
If cutting wood is ineffective, you can resharpen the bevels, thereby reducing the sharpening angle. This will allow the blade to penetrate the hard material better. If you don’t like the wooden or plastic handle, you can remove the pads and wrap the handle with cord. Such a handle will definitely not slip in your hand. Thus, you can bring the machete to perfection.
Handle processing
After allowing the wooden handle to dry completely and adhere to the elements of the future machete, it can be shaped. To do this, it is recommended to hold the handle tightly in your hand to feel the edges that cause discomfort.
If you don’t have extra time, you can simply round off all the sharp corners. However, the most convenient to use will be a machete (knife), the handle of which contains special cuts for the fingers. Making cuts will allow you to clamp the product in a vice and then process the handle with a wood rasp. After obtaining the final, expected design, it is advisable to clean the surface of the handle with sandpapers of various textures to achieve ideal smoothness.
Knife case
To protect yourself and others, the machete knife must be in a sheath. To make it, a piece of thick leather or plastic and fabric is suitable. You will also need strong threads or rivets. To make a cover, you need to wrap a piece of leather around the blade. Then outline it with a large margin. This reserve is needed so that rivets can be installed later. After this, the skin is trimmed along the contour.
Before connecting the edges of the workpiece, you should make slits for wearing the case on the belt. You can sew leather loops instead of slits. After the loops are made, the workpiece is folded in half and secured with rivets.
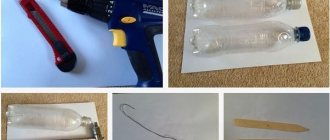
Paper sword
A sword of impressive size will require more durable materials. To make it you will need: 7 thick office sheets, scissors, a stationery knife, hot glue, tape, 4 sheets of any colored paper.
Manufacturing process:
- Just as in previous master classes, the blade of the sword is made by bending to the end of one line along the length of the sheet. 2 such blade components are glued into one and tightly fixed inside. The tip of the sword is made sharp. We wrap the entire blade with a layer of tape, making it dense and shining in the light.
- 2 sheets are glued together on the corner side with tape, then each sheet is rolled into a tube. The tube is attached on all sides with tape to prevent it from unwinding. Another tube is made from two sheets, which is secured with tape between the two previously made tubes.
- It is necessary to make the base of the handle. A white sheet is wrapped around the base with a tube. At the bottom of the leaf tube, a handle made of tubes is attached in the center, which are generally given a triangular shape.
- To close the area where the tubes are attached to the blade, you need to glue a paper figure on both sides to the place where they are glued, which will overlap them. All elements are fixed with hot glue and covered with tape to make the product even more durable.
The result is a durable sword that will serve your child in war games for a long time.
Case
At the end of the work, you should take care of making a convenient case, the presence of which will contribute to the safe operation of the product. Cut out a case in which the machete will be placed - the knife is large enough and sharp, you can use it from a piece of thick leather.
When marking the material for the cover, you must try to replicate the shape of the blade as accurately as possible, not forgetting to leave a few centimeters for the allowances required to create the seams. Having made a Taiga machete knife, which assumes the presence of several functional notches on the back of the blade, you should take these features into account when cutting out the sheath.
The resulting pattern is tried on to the shape of the blade. If everything is in order, then you can start creating holes in the leather along the edges of the pattern. To do this, it is convenient to use a strong awl. You should try to leave equal spacing between the holes. You can connect the individual parts of the cover together by stitching the edges with a leather cord or waxed thread.
For ease of use of the case, it is recommended to sew a small strap to it. Metal rivets will allow you to secure this element. The presence of a strap allows the machete to be securely held in the case. If necessary, the product can be quickly removed from the case by unfastening the rivet.
Japanese paper katana
The katana is known throughout the world as the weapon of the Japanese samurai, who are brilliant in martial arts and are able to repel any enemy. Even in ancient times, eastern warriors used the katana to protect their territories and to conquer new lands.
To create a Japanese katana, the following things will be useful: 3 white and 2 orange sheets, tape and a hot glue gun, 10 wooden popsicle sticks, a ruler, a pencil, a stationery knife, scissors.
Manufacturing progress:
- First, the handle of the katana is made. To do this, place 1 white sheet on a flat surface, measure 2 cm from below with a ruler and draw a straight line with a simple pencil, then bend this part. It is necessary to bend the sheet further, ultimately forming a dense strip of paper from several layers.
- A long strip several millimeters wide is cut out of an orange sheet, then it is scrolled from the bottom of the white strip towards the top. The wrapped strip is secured with tape. Another such strip is cut off and scrolled around, but in a different direction, so that the 2 strips as a whole form zigzags. The second strip is also secured with tape.
- The 2nd sheet of orange leaf is folded several times, forming a dense multi-layered square. All layers are glued together with tape or glue. Using a stationery knife, in the middle of the resulting square you need to make a hole equal to the width and length of the edge of the previously obtained handle, so that the handle fits a few centimeters inside.
- On 2 white sheets, 2 cm is measured from the bottom longest side and the sheet is folded. Thus, it is folded to the very end, forming 2 tight strips. The resulting layers of paper inside need to be secured. It turned out to be a katana blade.
- The blade must be attached to the finished handle. From one of the edges, the katana is applied to the base of the handle from the inside and glued to it with a thick layer of hot glue.
The real Japanese katana is ready! Your child will definitely feel like a real samurai.
Making the handle
Finished wooden plates should be treated with epoxy resin. It is also used to smear the handle of the machete. After this, the plates are placed on both sides of the product and pressed. It is important that the holes in the plates and metal coincide with each other. Then two small pieces of aluminum or steel are inserted into these holes. The handle itself is tightly clamped in a vice. It is advisable for the product to stand for a day. During this time, the epoxy resin should completely dry and harden.
After a day, the vice can be unclenched. If the handle linings were processed before being clamped in a vice, at this stage the work can be considered completed. The master, at his own discretion, if necessary, can smooth out the corners a little in some places or leave everything as is. All he has to do is remove two steel rods from the holes and insert special rivets there. It is advisable to flatten them on a flat surface. If the wooden pads are not ready, then they can be easily processed already installed on the machete, using a sharpening machine or an angle grinder. After this, the handle, like the surface of the blade, needs to be thoroughly polished with sandpaper.
Making the handle
Now that you have looked at the machete (photos of knives of the most suitable design), prepared a rough blank and edited it, it’s time to start making a comfortable, reliable handle. For the handle, old scraps of durable wood are suitable. Having adjusted the handle to the required width and length, it is necessary to divide it into two parts, which will subsequently cover the workpiece on both sides.
Using a durable metal drill of a suitable diameter, holes are made through the wood, handle plates and steel blank. Initially, you should make sure that the diameter of the drill matches the parameters of the metal rivets and dowels for wood that will be used to connect the blade to the wooden handle.
At the final stage, the handle plates and the workpiece are treated with epoxy resin. Next, the final assembly of the handle occurs: metal rivets and dowels are inserted into the holes, after which the entire structure is tightly clamped in a vice and left overnight.
An alternative option for making a handle would be to replace the wooden blank with a strong rope of small diameter. To prevent the handle, made in the form of a rope winding, from unwinding, it is enough to first soak the material in epoxy resin. The winding can be done using any available weaving method.
Construction and materials
Since the cleaver was originally used as an agricultural tool, its manufacture was extremely simple.
- The blade, 3-4 mm thick, was shaped like a long, wide knife with an extension towards the very top and practically no tip.
- The length of the cutting part is about 40 - 60 cm.
- The cleaver was completely devoid of a guard or any kind of cross. For the handle of a machete, a strip of metal or wood with pads for a comfortable grip was most often used. A wrist mount (lanyard) was attached to it.
But if almost any metal could be used for the blade, then the sheath was very important to think through thoroughly. Because the extended upper part of the blade could cut through any tissue and cause damage. Typically, wood covered with leather was used for the case. This not only helped prevent cuts when carrying weapons, but also protected the metal from the high humidity of the tropical zone.
Later, some types of machetes underwent design changes. They have a semblance of a guard and pointed ends of the blade. For convenience, some models now feature a saw blade, as well as additional tools and accessories.
Tools
The manufacturing process of such a blade requires precision, so you should use a ruler, and to be sure, scales, because you need to calculate the approximate weight of the product for the successful operation of the blade in the future. A heavy and bulky tool will be problematic to work with.
To make a machete you will need:
- Bulgarian;
- An angle grinder with a flap grinding wheel or a grinder;
- vice for securing parts;
- drills for metal and wood;
- grinder;
- abrasive paper.