We have been seeing transparent screens and video walls for quite a long time and often, without always even understanding what exactly we are seeing. What are transparent screens used for and what types are they?
In order to interact with AR, it is not necessary to have a smartphone or tablet with a pre-installed application. Today, monitor developers offer another solution - transparent screens. This technology is primarily suitable for use in shopping and entertainment centers, museums and educational institutions, since screens can quickly attract and hold the attention of a large number of people. At the same time, visitors do not need to perform any additional actions to achieve direct eye contact with the AR image.
Transparent screens are backlit, backlit glass displays. Like traditional screens, they can be liquid crystal (LCD) and light-emitting diode (LED, OLED). Transparent LCD displays require additional lighting. On the contrary, screens created using built-in LEDs are capable of emitting light themselves.
Where are transparent screens used?
The military has long used transparent displays in aviation (Head-up display (HUD) or Head-Up Display (HUD) to display navigation, flight and targeting information.
This technology is gradually coming into civilian life. For example, some cars are now already equipped with systems for displaying navigation data on the windshield.
Augmented reality systems also use transparent displays built into glasses. The first were again the military, who began to use helmet-mounted systems with transparent displays to display tactical information. Then manufacturers for the civilian market stepped up. The most famous augmented reality device is Google Glass. They also used transparent displays.
Transparent LED video walls for outdoor installation (media facades) have transformed the streets of big cities; where there used to be a simple building, a large screen appeared. In this article we will not discuss whether this is good or bad, we are simply stating a fact.
Transparent media facades are a kind of compromise. From inside the building you can see through the windows what is happening on the street, but in the field of view there will definitely be structural elements of the media facade that will limit the view. From the outside, the windows located behind the media façade will be almost invisible and instead of the façade of the building, a large LED screen will be visible.
What can a projector screen be made from?
If you are puzzled by the question of how to make a screen for a projector with your own hands without losing quality, first of all, you need to know what material is used in professional equipment, why and what properties will be critical for it.
The standard material is a vinyl sheet with different properties of density, texture, light reflection, and different coating. The situation often arises that only the central part of the purchased material is bright, and clarity is lost towards the edges. It is difficult to achieve high contrast and completely black color on the widely advertised matte screens at home; they are only suitable for conditions of complete darkness. And at home, even at night there is usually a weak light from the windows. There are surfaces with very high levels of light reflection, which create the effect of glowing from the inside, but are not comfortable for the home due to an inappropriate viewing angle: only part of the picture is visible clearly. Canvases in different shades of gray are gaining popularity, allowing for good color depth and clear blacks.
Let's look at what you can use to make a projector screen at home:
- Banner fabric. Sold by advertisers, it is relatively inexpensive, from 300 rubles per sheet. In online stores, the material is sold in rolls of 40–50 meters, so you need to look for outdoor advertising companies in your city and buy the required size from them. The main important property is opacity; the canvas should transmit light as poorly as possible. Material for double-sided printing with an internal black layer is ideal, preferably matte, because there will be glare on the gloss. It’s not at all difficult to make a screen for a projector from a banner yourself, and its quality will be no worse than src=”https://nastroyvse.ru/wp-content/uploads/2017/04/bannernaya-tkan-dlya-ekrana.jpg "class="aligncenter" width="1000″ height="708″[/img]
- Canvas for suspended ceilings. It lures many people because it has a matte texture and can be gray in color; it is easy to achieve perfect evenness (after heating with a hairdryer, it fits perfectly onto the frame). But there is also a significant drawback: transparency is high, so making a projection screen from this material is still not recommended. Unless you put some kind of black film under it, but in this case the question of the cost of the structure arises.
- Various types of hard materials: polystyrene, plywood, marker board, etc. In principle, this is the most budget-friendly option to make your own cinema from improvised materials lying around after renovation. But you shouldn’t expect particularly high picture quality, although the issue of illumination and smoothness of the surface itself are important here. Many people resort to painting with ordinary water-based paint, and it turns out quite well.
- Professional paint created specifically for such purposes. It is advisable to use it at the stage of planning and final renovation of the premises. It only requires a prepared smooth surface and is applied evenly with a sprayer. The range is huge: from regular white to color with the super ability to display 4K mode. Yes, there is a point, the price starts from 500 euros per jar, which is enough for a diagonal of about 3 meters.
Modern technologies for creating transparent screens
Transparent displays - LCD
Transparent displays with diagonals up to 98 inches can be created using LCD technology. The transparency of an LCD display does not exceed 15-20%; therefore, when such displays operate, local darkening occurs in those areas to which the image is transmitted, so they need additional lighting, for example, bright daylight, in order to see the content.
Motion sensors and RFID tags can also be integrated into the system. Then the animation turns into a real reality show: the image on the screen reacts to the viewers’ gestures or changes in the environment (the location of the sun, the brightness of the light in the room, traffic movement, etc.). Through complex animations and their interactive potential, such systems can bring entire buildings to life, blurring the boundaries of reality.
Transparent LCD displays come in different options:
- as a complete solution, combining in one set a transparent display and a special box for placing the demonstrated object in it
- separate transparent display (with or without frame) for embedding in the desired location
Transparent displays - OLED
Transparent displays were further developed with the development of OLED (organic light-emitting diode displays). These screens can emit light on their own, so they do not require additional backlighting.
OLED technology allows the production of a wide range of transparent displays:
- Free-standing transparent displays allow you to create local installations that combine physical objects and content;
- Displays for installation on display glass enhance the impact of advertising;
- Flexible film transparent OLED displays make it possible to create a transparent display on a curved surface.
Based on transparent OLED displays, you can create transparent video walls, including interactive ones.
Another application of transparent OLED displays is the creation of museum display cases, which combine the functions of displaying a museum exhibit and providing information about it on the display.
Transparent displays - LED
Truly large transparent video walls are created using LED technology. The resolution of such a screen is scaled using the settings, increasing up to 8K. It can be used as a standalone screen or embedded in a window or other structure. This display is designed to transfer digital objects into the real world, creating a feeling of mixed reality: meeting cartoon characters or talking to a hologram like in the Star Wars movie.
The use of transparent plastics and design features in the form of a lattice allows up to 70% of light to pass through.
Transparent LED video walls do not “cumber down” the space, and when turned off they do not look like a “Black Square”. In the interior, such a video wall can be used both as an information and advertising screen and as a means of design space.
Transparent displays based on flexible film structure
Transparent video walls can also be created based on a flexible film structure. Such films are simply glued to a transparent base, for example, on glass fences, turning them into screens. The information capacity of such video walls is insufficient, but they can be used as architectural or even advertising screens without any restrictions.
In the novel “Return from the Stars” Stanislav Lem described a multi-level metropolis on each level of which the sky was visible: “There are screens on the ceilings - they convey what is above the ground - the view of the sky, clouds ...”, after 60 years this became possible, there is special LED video walls designed for installation on the ceiling. Currently, this solution, of course, is not for the city, but it can be successfully used in a modern office or shopping and office center. Such transparent video walls are a wonderful solution for glass ceilings in atriums. During daylight hours, transparent video walls do not interfere with the passage of light into the room, but with the onset of darkness they turn into floating screens, which are part of an unusual design.
Transparent displays and video walls are no longer something unusual and rare in our lives. We meet them at almost every step, without even realizing what technologies and technical solutions are hidden behind these amazing transparent video walls.
DIY touch monitor
Recently, in many Hollywood science fiction films, bizarre devices have begun to appear that the characters in the film control with their own hands. For example:
Fragment from the movie “Six Day”
Fragment from the film “The Stepford Wives”
Fragment from the film “The Stepford Wives”
Abroad, touch technologies are already widely used in various products, for example, information touch kiosks, point-of-sale terminals, car multimedia systems, tablet PCs, PDAs and other devices.
This technology is also widespread in Russia; I do not mean handheld computers that are sold in our country. The speed of its spread is apparently limited by the high retail cost of finished products.
Currently, there are about a dozen companies working in this area, and I managed to get a “sensory kit” from one of them for a test. Is it possible to make a touch monitor with your own hands, which would also have a low cost? After reading this review you will confidently say “Yes”.
Touchpad and controller
The touch panel that was provided for testing is manufactured by the Taiwanese company Apex Material Technology Corporation (AMT), one of the largest Asian manufacturers of touch components. AMT's head office and production facilities are located in Taipei, Taiwan.
There are several types of touch panels - resistive, capacitive, infrared and surface acoustic wave screens. AMT9102 belongs to the class of analog resistive touch screens. But there are also resistive panels, multilayer and 4/5/8 wire, this model is a two-layer four-wire.
AMT9102 Specifications:
- Panel dimensions: 332.6 x 257.5 mm;
- Panel thickness: 3.3 mm;
- Active area: 304.1 x 228.1 mm;
- Thickness of the sensitive layer: 0.188 mm;
Electrical Specification:
- Resistance of the circuit section (pressed): 10 MOhm;
- Resistance of the circuit section (pressed): 2 KOhm;
Press response time:
- 10 ms;
Layer resistance:
- Analog: 200~800 Ohm/m2;
- Operating voltage: 5V;
- Operating temperature: -10°C to 60°C;
- Storage temperature: -20°C to 80°C;
- Humidity: no more than 90%;
- Pressure force with a stylus or finger: from 10 to 80 grams;
- Surface density: 3H;
- Durability: 10 million point clicks;
- Transparency: 80%.
Resistive technology is based on the method of measuring the electrical resistance of a part of a system at the moment of touch. To determine the X and Y coordinates, special sensitive layers are used, between which there is another, “neutral” layer.
When the top layer comes into contact with the bottom layer, the electrical circuit is completed and the controller receives X and Y coordinate information from the top and bottom layers, respectively. In order for the controller to distinguish between signals, the currents of the upper layer flow in a direction perpendicular to the lower one. Compared to other types of “dot-screens”, resistive has a high resolution (300 dpi), a long service life (10 million touches), a short response time (about 10 ms) and low cost. But in addition to the advantages, there are also disadvantages, such as a 20% loss of luminous flux.
The controller was taken from the same manufacturer - PenMount 9026. Model 9026 is compatible with four and eight wire designs. The controller is designed for installation inside the monitor case and has an RS-232 connection interface.
Technical characteristics of PenMount 9026:
- Connection interface: RS-232;
- Plug & Play: Full support;
- Maximum resolution: 1024 x 1024 pixels;
- Signal transmission speed to port: 19,200 baud;
- Power consumption: from 5V to 12V;
- Indicators: LED built into the controller;
- Overall dimensions: length 65 mm x width 25 mm x thickness 2.5 mm.
Contents of delivery
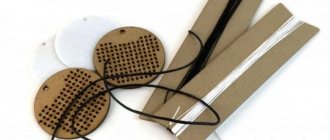
The touch panel is covered with a protective film and packed in a bag in which you can also find eight self-adhesive strips of different lengths. This is where we can finish talking about the AMT9102 delivery kit.
The PenMount 9026 controller is also packaged in cellophane and comes with interface cables and a CD with drivers and software.
Selecting a Monitor to Upgrade
We have a 15″ touch panel, the next step is to choose a suitable monitor. It is not possible to install a touch screen in every display; if everything is more or less clear with a CRT monitor, then you will have to look for a suitable LCD, and we will implant a “point screen” in the LCD monitor.
Initially it was planned to use one of two 15″ models - Philips 150B2B or EIZO FlexScan L355. The fact is that these monitors have a built-in power supply and very limited free space, which is typical for many branded displays. Therefore, installing the controller and panel, in this case, is almost impossible.
As practice has shown, to install the AMT9102 you need about 5 mm of distance between the front panel and the LCD matrix of the monitor. Why 5 mm if the thickness of the touch screen is 3.3 mm, you ask. To connect the “dot screen” to the LCD matrix, special damper self-adhesive pads are used, the thickness of which is 0.85 mm. From all this we get an additional 5 mm.
After an unsuccessful attempt to integrate a touch screen into the Philips 150B2B and EIZO FlexScan L355, it was decided to look for a monitor with an external power supply. It didn’t take long to look for such a display, as the computer market is full of models from “noname” manufacturers.
The choice fell on a 15″ LCD from an unknown manufacturer, which is sold under the name “SoCool”, which literally means “So Cool”. Let's see if he's really that good.
SoCool uses a 15.1″ LCD panel CHUNGHWA CLAA150XH01 with a thickness of only 6 mm, and the boards are mounted on the back wall of the monitor, so there was plenty of space.
Preparing for rework
Before you begin upgrading your monitor, prepare your work area. The main thing is that there are no sharp protrusions on the surface where you place the panel and matrix that could scratch them.
In addition, prepare a clean cloth in case fingerprints appear on the screen. The tools you will need are a needle file with a round profile, a hacksaw and a sharp knife, in case you need to cut the body. Also be patient and be prepared to spend 2-3 hours of free time.
Modernization process
Well, shall we get started? If everything is ready, let's begin. First, carefully remove the front panel and set it aside. For now our attention is focused on the LCD screen. Having loosened the four mounting screws, we demonstrate the panel and move the rest of the monitor to the side.
Brush off dust and remove any foreign objects from the work area before work begins on combining the point-screen with the LCD panel. First of all, thoroughly wipe the surface of the LCD matrix and make sure there is no dust or other dirt on it.
As noted above, the touch panel kit includes special self-adhesive damper strips. First, they should be glued around the perimeter of the screen, naturally to the metal edge of the panel.
Having removed the packaging film from the touch panel, we install the “precise screen” on the LCD matrix, the most important thing is not to confuse the working side of the panel (refer to the inscription in the upper right corner), it should look up. Afterwards, put the matrix + touch panel unit aside. Next, the matrices should be finalized.
The LCD panel is attached to four corner brackets. Using a file, you need to deepen the groove by 5 mm and reduce the height of the bracket accordingly by the same 5 mm, sawing off the upper part with a hacksaw.
When installing the PenMount 9026 controller, be aware of the interface cables. If there is no suitable hole in the back cover of the monitor, make a new one, only when you connect the cord to the controller, do not forget to strengthen it, for example, as shown in the photo or simply tie a small knot.
The controller PCB has two screw holes. In my case, one was enough. The PenMount 9026 measures only 65 x 25 mm (length x width), so finding a place for it was no problem and it was successfully mounted on the back of the monitor.
You must also remember to glue the damper strips to the back of the front cover of the monitor. The remodeling process is nearing completion.
We connect the connectors of the LCD matrix, having previously docked the touch panel with the controller. Having leveled the screen, close the front panel of the monitor. Voila, your touch monitor is ready!
Connection
The controller connects to the computer via an RS-232 interface or simply via a COM port. There are also USB modifications. PenMount 9026 still requires additional power from the PS/2 port.
If the PS/2 connector is occupied by a keyboard or mouse, you can use a “double”, that is, connect the controller to the computer, and the mouse or keyboard to the corresponding controller cable. After this simple manipulation, you can begin installing drivers and calibrating the panel.
Driver installation, calibration
When the OS starts, a new device is automatically detected. Requests for installation should be refused. They must be installed from the included CD as the drivers are included with the PenMount software package. The system on which the drivers and software were installed runs Windows XP SP2.
In the system, the controller with the panel is designated as PenMount DMC9000 and DMC9100. I would like to note that the presented drivers support almost all well-known operating systems, such as DOS, Windows 3.11, Windows 95, Windows 98, Windows ME, Windows NT, Windows XP, Windows CE, Linux and Qnx, but for some reason MacOS remained on the sidelines .
After restarting the computer, an icon with the letters “pm” on a blue background appeared in the taskbar - PenMount Monitor. Through the “monitor” you can select some options, as well as call up the control panel - PenMount Control Panel.
All settings and adjustments can only be made through the Control Panel. The first tab of the control panel is Calibrate, where you can select the setting mode, but more on this will be a little later. The Draw tab is used to check the operation of the panel. The Multiple Monitors tab allows you to enable support for multiple panels.
In the Options you can select either spot or continuous modes. It is possible to duplicate each touch on the touch panel with a sound signal, the frequency and duration of which is regulated in the same menu item. At the time of writing, the latest driver version 4.01 and controller firmware version A1.30 were used.
Let's leave the software description alone and move on to setting up the touch monitor. It’s best not to be lazy and calibrate the “point-screen” using 16 points in the Advanced Calibration mode.
A small circle with a red dot inside will appear on a white background; after clicking on one, another will appear, the same, only in a different place. It’s better to press exactly in the center, on the red dot. For precision, I used a toothpick, but you can use your own finger.
Working in applications
In Windows XP, it's easy to control with the touch of your finger, thanks to large virtual buttons and labels. The sensitivity of the touch screen is high, so you don’t need to put too much pressure on it.
There are no complaints when working in system and office applications. But there are problems in some graphics programs.
It was interesting to see how the touch screen would act as a graphic LCD tablet. It turned out not very good. For example, in Adobe Photoshop 8.0 CS and 7.0 the signal from the “dot panel” was perceived incorrectly by the program. It's the same story in Corel Draw 10.
But in Paint and Corel Xara you can draw as if you were using a pencil on paper. If you figure out the problem that occurs in Photoshop and Corel, the touch display can be used as a graphics tablet. Most likely, the reason lies in the driver.
Cost of touch monitor
If you decide to convert your monitor into a touch screen, I suggest you first get acquainted with the cost of the components.
- AMT9102 Touchpad – $120
- AMT PenMount 9026 Controller - $60
- LCD monitor SoCool - $280
The total is 460 dollars. This is significantly cheaper than a ready-made monitor with a “precise screen” of a similar class. As you can see, touch technologies are quite accessible.
conclusions
My experiment, which I had pinned my hopes on, was a success. Now we can say with confidence that it is possible to create an inexpensive touch monitor that is practically in no way inferior to brands! The areas of application of such a monitor are different and are determined by its functionality. The display can be used to create various exhibition stands, as a monitor for a trading terminal, in the design of museum compositions, as a personal computer monitor for people with physical disabilities or limited mobility.
As you can see, touch technologies are becoming closer and more accessible. And finally, this movement is beginning to gain popularity in our country. A touch monitor is just one type of alternative means of information input and output, but there are also such powerful complexes as information kiosks. We may talk about them a little later.
Flaws
- lack of anti-reflective coating;
- large panel thickness;
- problems when drawing in Photoshop 8.0 CS and Corel Draw 10.
Advantages
- relatively low cost of rework;
- Availability of drivers for all common operating systems;
- ease of modernization.
The AMT9102 touch panel and PenMount 9026 controller were presented for testing by GIDROER.
Manufacturing algorithm
To make a homemade screen for your projector with your own hands in the shortest possible time, it is better to use special instructions. So, let's create a screen for the projector step by step! For example, the following dimensions of materials are taken: fabric - 2.6m x 1.6m, wooden blocks 2500x40x15 mm, aluminum box - 2500x65 mm.
Step 1. Making the frame
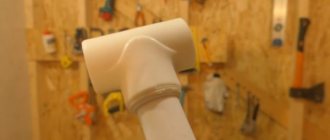
Aluminum boxes in tandem with wooden blocks will make up the frame of your future projector or the frame onto which the projection fabric will later be attached. Two boxes need to be cut to one and a half meters - this is the height of the future projector. Then the box needs to be sheathed with timber. To do this, we retreat along the width and cut the edges with scissors; later you need to bend them and level them with a mallet or hammer. You will need four such corners. We fix it and get a durable, and most importantly, very strong structure!
The main thing is not to forget about the center of the screen and strengthen it. To make the frame for the projector more rigid, you need to secure the tandem of the box and beam in its central part. We connect it in the same way as the previous ones, leaving small holes on the sides.
Step 2. Create the base
The next stage is preparing the foundation or substrate for the projection fabric. How and what is better? To do this, you need to take sheets of fiberboard and cover the entire frame with them. We cut off the excess with construction scissors and smooth it with sandpaper so that the sharp edges of the fiberboard do not later scratch or tear the screen fabric. It is best to fasten fiberboard with a construction stapler with large staples.
Thin felt must be placed on top to minimize possible roughness and unevenness of the fiberboard sheets and staples with which the wooden base was secured.
Step 3. Fasten the canvas
The fabric for the projector should be dense and without seams - the image quality depends on this. You need to pull the fabric onto the base gradually and according to the following scheme: secure it with a stapler on one side - pull it a little so that there are no folds, but without using force. Be careful with the tension! The same thing was done with the other parties.
After securing it, excess fabric must be trimmed with a knife.
Step 4. Prepare the surface for projection
The last step is to paint the stretched fabric for the projector screen twice with white paint using a light paint roller. This will make the screen smooth and as even as possible. For better design and a feeling of completeness, you need to make a suitable frame for the projector screen from slats, and also screw a clamp bar to the back of the structure. When mounting the projector on the wall, it will maintain the balance of the entire structure.
Transparent display - reality or myth?
cavalorn
For print
The photos and videos of the iPhone 5 and iPad with a transparent screen that have excited the public are, of course, fake and created using programs that create the illusion of reality.
But.
The good news is that phones and tablets with transparent screens are quite possible in reality, the bad news is that they are inconvenient.
Docomo and Fujitsu have created a prototype of a transparent display (video) with multi-touch (the touchscreen works on both sides).
This research may inspire designers to take part in some fantastic design concepts from Fujitsu (video) - like this display that switches between transparent and opaque mode: now it shows the words in a book, and a second later the words are translated into another language (similar to pretty Word Lens app (video).
The Concept Phones blog (photo) has been publishing interesting photos of transparent phones for several years now, so as a design feature this is already commonplace.
Against coronavirus: make a transparent protective screen in 10 minutes
Scarcity gives rise to the work of thought: the questions “how to find?” and then “how to do?” become relevant. Swedish nurses, for example, came up with their own version of a protective screen. The good thing about it is that it can be made from quite accessible items.
This screen is made from lamination sheet. To make the mask practical, choose sheets with a higher density. Where can I buy them? Stationery stores are closed right now, but online stores can help.
To work you will need:
- lamination sheet;
- rubber;
- foam rubber (or several kitchen foam sponges);
- glue;
- stapler;
- scissors.
Work process:
- Use scissors to round off the sharp edges of the sheet.
- Place the sheet on your forehead and determine the place where the foam will be located. This is necessary to ensure that there is a distance of a few centimeters (about 2 cm) between the screen and your face.
- Glue the foam rubber to the sheet in the forehead area.
- Staple the elastic band on one side. Adjust its length and secure it. Cut off the excess elastic.
- For added protection, wear a mask.
© dn.se
Would you like a master class on how to make a reusable mask? And you won’t even need a sewing machine...
For work you will need:
- cotton fabric;
- plastic clip (found on a bag of bread or loaf);
- rubber;
- needle;
- threads;
- scissors;
- iron.
© footage from YouTube video
Work process:
- Cut a piece of fabric measuring 36 cm x 18 cm. Iron it.
- Use scissors to make two holes on a plastic paper clip (it will be a nose clip).
- Take an elastic band or a thin rope 80 cm long. Pass it through the holes in the paper clip, measure a distance of 25 cm from the end of the paper clip and tie a knot at the ends.
- Carefully fold the fabric three times, having previously made markings. Fold the lace over the center part.
- Collect the mask. To ensure that it is well fixed, we recommend sewing the bottom part of the mask.
Watch the master class video and repeat!
A little theory
The touch surfaces of screens are structurally a separate element that is not directly connected to the display matrix. Of course, the latest generations of smartphones and tablets use so-called OGS panels, in which the sensitive element is built between the pixels, but it is still controlled via a separate bus. In total, there are three types of touchscreens, each with its own characteristics.
Resistive
Resistive technology for constructing touch screens is the simplest and cheapest. Based on the principle of operation, such touchscreens are similar to computer keyboards. On two layers of a transparent substrate, tracks of almost transparent conductive material are applied. These two layers are located on top of each other with a gap of several micrometers. The upper one is necessarily flexible and bends when touched by a finger, closing the tracks. The further away the fault is, the longer the path the current travels and the higher the resistance. Based on its value (accurate to an ohm), the sensor controller calculates where the click occurred.
Resistive touch screens are cheap, simple, responsive to any object, but not reliable enough (a small cut can damage the touchscreen) and have limited transparency (at a certain angle, conductor tracks even become visible).
Capacitive
Capacitive touchscreen is the most common nowadays (as of 2016). It is more advanced and reliable. The number of layers was reduced to one, its thickness became smaller. A grid of transparent conductors with low resistance is applied to the surface of the touch glass or film. The human body is a poor conductor of electricity and is capable of accumulating electrical charge, therefore, when a finger touches the glass, a small current leak occurs, the location of which is determined by the controller.
Wave
In a wave touch screen, acoustic (ultrasound, surfactant technology) or light (infrared, ultraviolet, PSV technology) waves are used to register touches. A frame is installed around the perimeter of the screen, combining the emitter and recorder. When a finger touches a surface, it absorbs and partially reflects the wave, and sensors register the location.
.
SAV and PSV screens are reliable, absolutely transparent (no mesh of electrodes), have an inexhaustible theoretical resource (in reality depends on the quality of the components), if there is a protective frame, the sensor itself cannot be damaged, and the use of armored glass makes the screen matrix invulnerable. Therefore, they are often used in ATMs, payment terminals, industrial machines and medical equipment. But their accuracy in determining finger coordinates is mediocre. Also, wave touchscreens require regular wiping (dirt on the glass causes phantom reactions).
There are other types of display sensors, but they are much less common. In addition, these methods are difficult to implement at home, so they are not discussed.
Arduino Micro Pro. How to Build a Wacom Cintiq Touch Display
No, we don’t touch the Enter key for now. We look at the open window of the device manager, pick up tweezers/screwdriver and briefly close the GND and RST pads on the Arduino board. There is no RESET button on the board; it could be soldered on the wires, but I’m unlikely to need it more than twice. The microcontroller will reboot and after it, first of all, it will launch the program loaded into it to download the main firmware via a virtual COM port, displaying it in the device manager.
This program includes a timer that will terminate it after some time if the transfer of the main firmware does not begin. It takes a few seconds to wait for this transmission. Just remember the bootloader port number, switch to the console window with AVRDude, correct the port number in the command line, again close the contacts on the Arduino board with a metal object, again wait for the bootloader to be detected and now press Enter.
At the same time, two green LEDs on the board will light up and go out. We unplug the cable from the USB port, insert it again - Windows detects the new device. Download the Wacom legacy driver, install it, reboot. A couple of new devices appear in the task manager:
and in the control panel there is a new icon:
Let's open it. As promised, Arduino emulates a Wacom Intuos 2 tablet. On these tabs you can configure the sensitivity of the pen and eraser, the assignment of buttons...
... active areas of the tablet and display and their mutual mapping.
1. Download and install the driver from PJRC. 2. Upload the USB-Serial firmware to the Arduino using the method described above. 3. Check the device manager for the number of the new COM port. 4. Install and launch RealTerm 5. In RealTerm, select Hex [Space] under “Display”, click “Change”. Select the Port tab, select the appropriate port number and baud rate 19200 in the corresponding drop-down lists. Click "Change" then "Open". 6. Enter *
in the terminal window.
This should be followed by a response starting with C0
, for example
C0 30 00 24 00 7F 01 00 00 00 62
If there is no answer: - the baud rate is set incorrectly (for a digitizer with a touch screen it is usually 38400 baud, for a regular one 19200 baud) - the digitizer still needs to be reset (for example, SU-040-X01 from X41t).
Briefly connect pin 12 on the digitizer connector to ground (pin 14). If there is no effect, switch to 38400 baud (remember to click "Change") and see if you can get the ID-string using *. — RX/TX wires are reversed. Check for correct assembly. — the digitizer is faulty. Check for voltage at pin 6 with the pen held up. Replace the digitizer if necessary. 7. Decrypt the ID-string (about its structure here), a total of 16 bits are used for Max_X and Max_Y. In the example:
C0 30 00 24 00 7F 01 00 00 00 62
1100 0000 0
011 0000 000 0000 0
0
010 0100 0 000 0000
0
111 1111
0
00 0 0 001 0000 0000 0000 0000 0000 0110 0010
Max_X: 011 0000 000 0000 00 Max_Y: 010 0100 000 0000 00 Max_Pressure: 001 111 1111 Max_X = 24576
Max_Y =
18432
Max_Pressure =
255
In principle, the graphics tablet is almost ready. All that remains is to place the digitizer and its harness in a housing that will protect them from mechanical influences. A simple PCB as a body material is quite suitable - the digitizer perceives the pen at a distance of up to 14 mm from its surface, so a PCB with a thickness of 1.5-2 mm fits within this limitation. As, however, the LCD matrix also fits into it, onto which the digitizer can now be returned back.
If it is alive, you can connect a control board to it and turn it into an LCD monitor: Experimental stand before turning it on: It awakens! It's working normally for now. Let's cover the matrix with its original frame with protective glass - and you can write with a special pen directly on the screen: Pressure sensitivity test: So, at the end we got an approximate functional analogue of the Wacom Cintiq 15X interactive monitor - a device, although not new, is still in demand - for about 10% of its cost. Of course, we weren’t very lucky with the donor, but nevertheless, the device is quite suitable for photo editing and simple drawing.
The product was provided for writing a review by the store. The review was published in accordance with clause 18 of the Site Rules.
Source