DIY acorn crafts are a great opportunity to show your imagination. It turns out that you can make a lot of interesting things out of acorns.
Acorns themselves arouse interest and the desire to create an unusual image.
Acorn crafts for children
Acorns
“Crafts made from acorns with your own hands are a great opportunity to show your imagination”!
Acorn men
The people are easy and fun to make. Children love crafts made from acorns and chestnuts. Girls are interested in making magical creatures that live in the forest. And the boys will enjoy making cars and racers.
You can come up with anything you want from natural materials.
To make funny little men and fairies you need to take:
- Acorns;
- Matches or thin branches instead;
- Dried leaves;
- Pencil or marker;
- Adhesives.
If you want you can add:
- Dried flowers,
- Moss,
- Cones,
- nut shell,
- Chestnut peel,
- Ropes.
Today we will make a man out of acorns.
- Take two acorns. Remove the caps.
- Take one more acorn. Draw something like a face on the small acorn.
- Use glue to secure the chestnut peel hat.
- We fasten the head together with the body with a branch, make legs and arms from the branches.
- To make the craft stand firmly on its legs, make shoes.
- Divide the acorn in half - now the little man has shoes. Your first craft is ready.
Dog show
Those who choose acorns as a natural material make their crafts cute and expressive. There is some charm and mischief in them! Something that evokes puppy delight! Maybe that's why acorn dogs turn out surprisingly realistic!
If, for example, you combine two identical oblong acorns so that you get an elongated body and head, add short plasticine paws and a thin tail, hanging ears (a flattened thick sausage) to the figure, and decorate the face, you will get a cute dachshund.
If you attach a small one with a hat to a large acorn with the cap removed using a short piece of toothpick, put the figurine on matchstick legs with feet made from the same caps, and attach a twig with a small spherical growth at the end as a tail, no one can deny the resemblance to a poodle!
Note!
- Christmas crafts - how to make them yourself? 150 photos of the best themed crafts
- Crafts made from stones: creative options for crafts made from stones + step-by-step instructions for making your own, methods and schemes of work
- Crafts from disks: a step-by-step master class on how to create them yourself, creative ideas for crafts of varying complexity + simple patterns for beginners
If you use acorns not only as the body and head, located with the thickening forward, but also as paws and neck, complementing the image with a short tail, bent ears and expressive eyebrows, you will see a real Airedale Terrier.
The same elements of the figure, but the head with a pointed muzzle, and the tail is also an acorn, glued with the thickening down, the ears are sticking out (can be made from seed shells) - a shepherd dog.
Two large acorns (the body is thickened forward, the muzzle is thickened backwards), decorated with medium-sized and thick paws, a thin tail and pointed ears - a pit bull. A small acorn is the body, a round acorn is the head, large erect ears made of pistachio shells are the Chihuahua. Well, why not a dog show?
Acorn babies
This craft will appeal to girls rather than boys.
Take:
- Acorns,
- Hats, Wooden beads,
- Marker,
- Adhesives;
- Felt.
Operating procedure:
- Glue the cap to the bead, glue the acorn below, it will be a small body.
- Wrap the felt strips around the neck and secure with glue.
- Use a marker to draw eyes and a mouth.
- You can take a matchbox and put the little man in it.
- The baby is ready in the cradle.
Below are photos of these crafts made from acorns.
Composition of animal figurines
The shape of acorns allows you to create the most unusual figures for creative exhibitions:
- Fat pig.
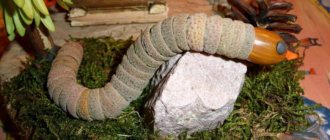
- Fairytale Serpent Gorynych.
- Wise Owl.
- Forest squirrel.
To make all of these crafts, plasticine and auxiliary natural materials are used - pine cones, nuts, leaves.
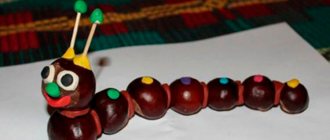
Animals made from acorns
Anyone can make animals from acorns. It’s especially nice to make crafts from acorns with your own hands. Take the following materials: glue, matches, small eyes.
- To make an adorable dog, take a couple of acorns without a hat, black and white plasticine, and dried leaves.
- Fasten two acorns together with plasticine or glue for reliability.
- Make a nose out of black plasticine, and make small pancakes out of white plasticine and put black dots on them. The eyes are ready.
- Make ears from dried leaves and attach them to the sides.
- Do not remove the plasticine too far; we will use it to form the dog’s paws and tail.
- The dog is ready, in addition to it, make a bone or a bowl.
New Year's tree toy
Materials
We will need acorn caps and a base for decoration. The basis can be a ready-made smooth plastic Christmas tree toy in the form of a ball, a foam ball purchased in advance in a store or made independently from paper.
In order to make a ball out of paper you will need PVA glue, water, good quality toilet paper (pack of 4 rolls) or 1 roll of paper towel, gouache. We prepare in advance a thin decorative cord about 20 cm long, acrylic rhinestones or sparkles.
Tools
The following tools are needed: a knife, flat brushes made of bristles No. 15-20, a small bowl, a glue gun.
Progress
- We clean the caps with a knife, cutting off the protrusions remaining from the cuttings, making them flat. The number of caps depends on the size of the ball.
- If we don’t have a ready-made ball, then we make it ourselves from paper. Add 2 tablespoons of PVA glue to a container of warm water with a volume of about 1 liter. Unwind a roll of paper and put it into the water in pieces, stir. The result should be a homogeneous, not very liquid, but not too thick mass. Let's let her stand.
- We unwind the second roll of paper and begin to form it into a tight lump the size of a fist. Periodically lightly moisten your hands with water. To make this lump, you can take cheaper paper.
- We begin to coat the resulting lump with the prepared paper pulp in an even layer, squeezing out excess water from it. We form a ball, trying to give it an ideal shape. Place it on a piece of polyethylene or newspaper and leave it to dry. The drying process can be accelerated in the oven at low temperature. Place foil on a baking sheet!
- In a foam or paper ball, when it dries well, secure a loop of decorative cord. To do this, use a sharp stick or the back of a brush to make a puncture in the ball about 1.5-2 cm deep. Using the same stick, insert the ends of the loop coated with glue into it. We are waiting for the glue to dry. If a ready-made toy was used for the base, then it should already have a loop!
- It is advisable to apply a colored primer from a mixture of dark brown gouache and PVA glue to the white ball. Let's dry!
- Now we take the caps from the acorns, drip glue from a hot-melt gun onto them and slowly begin gluing them in circles around the place where the lace is attached as the glue hardens. You can not drip on each cap, but squeeze a little glue onto the wide lid and dip them there. Follow safety precautions when using a glue gun - hot glue!
- The main thing is to take your time! Gradually seal the entire ball. It already looks impressive on its own, but if you glue one acrylic rhinestone or glitter into the center of each hat, it will turn out even cooler!
Be sure to gather an army, make a bracelet or Christmas tree decoration with your child. Entrust him with simple operations and enjoy communicating with him! To prepare for school, develop mental arithmetic while working, counting acorns, matches, toy soldiers and anything else! Don't forget to take photos of your masterpieces to create a personal creative portfolio and just as a keepsake!
Autumn mood
An autumn wreath of acorns is something incredible. It looks incredible, and making this wreath couldn’t be easier!
Tools:
- Acorns;
- Vine;
- Glue;
- Clear nail polish;
- Wire;
The skeleton of the wreath will be the vine. We fasten the ends with wire so that our wreath does not unravel and is stored for many years. Simply glue the acorns onto the vine until you fill the entire wreath.
Cover the wreath with clear varnish so that the wreath can please your eyes for a long time.
What materials can be used for creativity?
When preparing for the creative process, you can choose not only sketches, but also materials for further use. It’s good if you can combine several materials and techniques in one product, which will diversify the learning process and interest children of different ages.
An original paper mushroom craft for children made using the appliqué technique looks just as great as mushrooms made from fabric or thread. For the little ones, it is better to choose the modeling technique and plasticine; older children will be interested in drawing wild mushrooms in a clearing or embroidering them with threads and ribbons.
Crafts from acorns for the New Year
Many people don’t know what crafts to make from acorns for the New Year. Crafts on the eve of the New Year look quite interesting and are easy to make.
Required tools:
- Styrofoam ball;
- Sequins;
- Hats;
- Glue;
Take a foam ball and start filling it with caps so that the tails are inside. Sprinkle with glitter. Attach a festive ribbon to the top and hang it on the Christmas tree.
Master classes on making crafts
Thanks to the popularity of acorns, craftsmen today have a wide variety of models available to work with. Among the interesting ideas, the following options should be highlighted:
- Autumn basket with acorns.
- New Year's garland of acorns.
- Compositions for kindergarten in various variations.
- Original butterflies.
- Forest mushrooms.
All work has detailed instructions for the work being carried out. If necessary, the master can use educational video lessons on creating crafts.
Bells made from acorns
Tools:
- Adhesives;
- Glue;
- Acorns;
- Ribbons.
First stage:
- Remove the tops from the acorns.
- Glue the bells into the hats.
- Make bows, carefully glue the bells to them by the hats.
- We came up with a wonderful product, it goes with absolutely everything.
Mushrooms
Consumables:
- Acorns;
- Chestnuts;
- Plasticine;
- Sheet.
Progress:
- Take an acorn - it will be the stem of a mushroom;
- Chestnut is a hat;
- We collect the fungus using plasticine;
- You can also make a clearing from plasticine, or you can place mushrooms on a maple leaf.
There can be a lot of such mushrooms. Collect leaves of different sizes and make a large clearing. You can also make a hedgehog from plasticine and place it between the mushrooms.
Pig and acorns
You will be surprised how you can create a real work of art from two objects! Just take an acorn without a cap and glue ears, a tail, and also elements of the muzzle to it from plasticine.
This talisman can be easily made by a small child, without the help of an adult.
Favorite cartoons
Acorns are a wonderful material for making figurines of cartoon characters. The necessary additions can be made from improvised and natural materials, plasticine, or drawn.
Like, for example, the anime hero Totoro: his face with a dazzling smile and tummy are drawn, his ears are made from the sharp tips of toothpicks, and his mustache is made from fishing line or wire.
You can make Minions or Winnie the Pooh in much the same way, but it’s better to make his ears and paws out of plasticine. Plasticine will also come in handy for anyone who plans to create a collection of Smeshariki out of acorns.
Focusing on the originals, we sculpt the missing parts and attach them to the base. Such work will seem like fun even to the most notorious fidgets!
Cute pig
Take:
- Acorn;
- Button;
- Markers;
- Four matches;
- Branch;
- Awl;
- Maple seeds;
- Glue.
Operating procedure:
- The button will serve as our heel.
- Glue it to the place where the acorn's cap was.
- Using a marker, draw two dots in place of the pig's eyes.
- To make the ears, simply take maple seeds and secure with glue just above the eyes.
- Poke an awl at the bottom of the acorn. Insert matches into these 4 holes - our legs are ready.
Using the same algorithm, we make a tail and insert a twig.
Mushrooms made from chestnuts and plasticine
This is the simplest option, which, moreover, requires working with your fingers. Let's get started.
To make mushrooms from chestnuts you will need:
plasticine of light colors, preferably yellow or white;
halved chestnuts, i.e. those with one side flat;
a sheet of cardboard to create a composition in “autumn” colors - brown, yellow, orange or red;
modeling board;
stack.
Chestnut mushrooms: job description
This work is designed for children who are confident enough to work with plasticine and will be able to roll a sausage, pinch the plasticine into pieces, and give a piece of plasticine the desired shape.
So, from yellow or white (or maybe brown) plasticine we sculpt legs for future chestnut mushrooms. We roll thick sausages and then blunt them on both sides.
We attach a flat part of the chestnut to one of the ends of the sausage and “smear” its petals onto the chestnut. This is necessary so that the structure holds securely and does not crumble as soon as the plasticine hardens.
Then we apply the second part of the mushroom stem to the cardboard in the same way.
Let's make some mushrooms.
We decorate our composition. To do this, we fashion a small leaf from yellow plasticine; We draw veins on it with a stack and stick it to the cap of one of the fungi.
We roll out the yellow plasticine into a thin, thin sausage, which we then pinch into pieces with our fingers.
It is better to pinch rather than cut into a stack, so that the ends of the fragments become thinner. These are yellowed blades of grass.
We stick them around the mushrooms.
Acorn men, method 2
For the product you will need:
- Matches,
- Glues and of course acorns (with and without caps).
Operating procedure:
- To make the head, take a small acorn. He must have a hat on.
- For the body, take a larger acorn and remove the cap from it.
- Connect two acorns with a match. Use a felt-tip pen to mark the little man's eyes and mouth.
- Arms and legs are made using the same principle from matches.
- Make shoes from the halves of acorns so that the completed structure holds well.
Each craft can be decorated with beads or any other decorations of your choice and color.
Interior details
The embodiment of interior ideas with crafts made from acorns allows you to look at familiar things in a new way.
This is how a mirror in a frame made of this natural material looks very original. Cover it with either caps or the fruits themselves.
To create an autumn vase with a candle, take:
- a transparent vase or jar;
- grapevine;
- acorns;
- a thick candle.
Place the vine rolled up in a rope downwards. Place a layer of acorns on it. Add pine cones for beauty and a couple of cinnamon sticks for scent. Place a massive candle in the middle of the composition.
Oak fruits make stylish napkin rings. It's very easy to make them. To do this, pierce the acorns with caps (they are more beautiful this way) with an awl and connect them into a ring with wire.
If you show your imagination and add cones, twigs, autumn leaves and dried flowers to the acorns, you can decorate the wall with a wonderful autumn panel.
Vase of acorns
For the vase we will use a bucket. This craft made from acorns and plasticine is easy to make.
- Attach the acorns with glue or plasticine, or you can coat them with varnish to make the vase last a long time.
- To make a vase, you can take a jar if you don’t have a bucket:
- Also, having previously painted the acorns, you can put them on a decorative bucket.
Acorns, especially, make an incredible tree of happiness.
Materials and tools for work
The following materials may be useful for creating crafts:
- Plasticine.
- A knife for cutting plasticine, a sharp stationery knife.
- Awl.
- Scissors.
- Felt.
- Durable glue.
- Decorative elements (beads, buttons, decorative mesh).
- Metal wire.
- Acrylic lacquer.
- Decorative paints with a glossy sheen.
For some creative ideas, you can use cardboard and multi-colored corrugated paper.
Christmas tree made of acorns
Even adults are fond of this children's craft made from acorns, because it is a pleasure to make.
- You can make a beautiful Christmas tree from the caps of acorns for the New Year.
- Polystyrene foam in the shape of a cone will serve as the basis for the craft, glue and, of course, the acorn cap.
- Now cover the foam with caps.
- Leave the product for a while, it should dry thoroughly. If desired, cover the Christmas tree with paint.
Looking at this Christmas tree, you will immediately get into a New Year's mood. It perfectly complements the decor.
Benefits of working with acorns
Among the advantages of working with acorns, the following points should be noted:
- Availability of consumables.
- Natural base for creating crafts.
- Strength of the resulting products.
- Excellent compatibility with other materials.
- A large number of models available for independent work by the master.
Acorns are an excellent material for creating a lot of beautiful and original crafts. These works can be used at children's exhibitions, as creative work with a child at home, for holiday decor.
Photos of crafts made from acorns
0