Getting ready to create it yourself
Half the success of creating tilde dolls with your own hands is a good choice of materials. And in order to select them correctly, you need to know what the most important features of the tilde are, what exactly makes it stand out from other products.
- So, the first thing is straight lines. Tilda bunnies are always lush. If the tilde shows any animal (cat, dog, elephant or bunny), its silhouette in any case will become soft, comfortable, without harsh lines.
- The second is the convention of the face. Or faces. Dotted eyes are most often embroidered with “knots” or created with a marker; the nose is also small, can be flat or large. And, most importantly, it's blush. Blush, by the way, is created using the most ordinary “human” cosmetics or watercolors.
- Third – Color and shades. The color scheme for the tilde is most often bright, but calm. Toys made from pastel-colored materials look very interesting. If you take the fabric as a sprint, make sure that the pattern is not too large - the pattern should fit the size of the doll. And it is important not to overload the toy with serious variegation. If in doubt, you can only take two different fabrics - one for creating the body, the second for clothing the product.
Now that we have studied the theory a little, we can move on to practice and create a Scops Owls bunny with our own hands.
Materials for the master class
The fabric from which the body of the toy is sewn. In most cases, tildes are made from natural materials such as cotton or linen; you can take calico. It is very comfortable for beginners to sew the body of a bunny from fleece; it is a fairly soft fabric that will hide all errors, if any. There is also a special material for sewing tildes, but it is very expensive.
If we take unbleached linen or cotton, if desired, we can easily tint it ourselves. To do this, take strong tea or coffee and add table salt to it at the rate of one tbsp. l. per liter of solvent. The salt will set the color.
Then put the material in this infusion and “cook” it for twenty minutes over low heat, stirring occasionally. After “cooking” the material will need to be rinsed in cold water, dried and ironed.
Be careful - you need to dry the fabric without kinks, otherwise the shade at the folds will be more saturated than on the rest of the product.
The fabric from which the bunny's clothes will be made. You can use the same linen, cotton or fleece. It would be great if the fabric had a small pattern.
Threads of the same tone as the material. Threads are also needed to embroider the nose and eyes (floss).
Padding material.
Various buttons, beads and other cute little things.
If you wanted to create a standing hare tilde, the pattern will also require the wire itself. The wire should not be very thick and should bend quickly. If desired, bunny ears can also be made erect with your own hands using wire.
Sew the body master class, pattern
- We cut out the patterns from the paper and place them on the fabric, which has been previously folded in half. You can trace the patterns with a pencil, but then the material will need to be washed after stitching so that traces of drawing are not noticeable. A good option is to take a special marker; its traces on the material disappear the next day after use. This marker can be purchased at specialized sewing stores.
- We need to transfer the body, arms (2 pieces), legs (2 pieces) and ears (one common part) to the material. The ears can be created from various fabrics, that is, one piece can be sewn from fabric of the same color as the body, and the second from the toy’s clothing material. It will turn out that the inner side of the hare's ears will differ in color from the body, it looks just great.
- If you want the hare's ears to stand up and not droop, you need to cut the piece in half (to sew them to our head) and insert a wire into them.
- Be careful - the pattern is given without seam allowances, so you need to “add” five or ten mm. When cutting parts from material, create cuts at certain bend points.
- We sew the pieces by hand or stitch them on a machine. To prevent the material from moving, you can secure it with pins.
- Let's turn out the stitched parts. It is more comfortable to do this with a pencil or sushi stick.
- We will fill the parts with padding polyester or holofiber. We stuff the legs and arms loosely so that they can be bent.
- If we create a standing hare, we need to insert wire into the legs.
- Slowly sew the legs and arms to the body.
We have a blank, to which all that remains - the most important thing - is to add details and, of course, sew clothes. If you want to make a rabbit, you can follow the same master class.
myhobby.guru
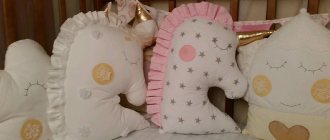
A toy with which you can fall asleep while cuddling is called a Scops Owl. The Scops Owl toy's eyes are always closed.
Pattern of a Scops Owls hare
Put it next to you, And cover it with a blanket, You’re favorite toy. Your soft animal. And, snuggle it quickly, Your nose will become warmer. All the kids are already asleep, And it’s time for you, baby!
hm-notes.ru
I'll show you how to make this or a similar Scops Owl animal.
You need to draw an approximate carcass, then fold the sheet in half and cut it out. Or you can just cut it out, symmetry is not necessary. It will be a bunny)
But maybe a cat. A bear, a dog, a fish, etc. Who do you want to sleep with?
