| Bus [347] |
| Aerial platform [7] |
| Motorhome (Camper) [10] |
| Ladder [7] |
| Tank truck [171] |
| Aerodrome equipment [67] |
| Snowmobile [18] |
| Concrete mixer [16] |
| Car [558] |
| Bulldozer [30] |
| All-terrain vehicle [53] |
| SUV [242] |
| Truck [442] |
| Rink [22] |
| Carriage [16] |
| Harvester [25] |
| Crossover [21] |
| Passenger car [1283] |
| Minibus [48] |
| Minivan [12] |
| Moped [16] |
| Motorcycle [120] |
| Pickup [94] |
| Loader [49] |
| Crane [48] |
| Fire truck [151] |
| Trailer [211] |
| Dump truck [94] |
| Sports car [524] |
| Sports prototype [24] |
| Tractor [106] |
| Trolleybus [70] |
| Tractor [255] |
| Van [198] |
| Tow truck [13] |
| Excavator [57] |
| Electric bus [12] |
| Miscellaneous [71] |
Motorcycle made of paper, prefabricated paper models download for free - Civil engineering - Catalog of models - “Only paper”
Brakes. If only one brake (for example, the front brake) may be sufficient for a bicycle, then it is better to play it safe and install them on both wheels. The rear one can be used as the main one, and the front one as an auxiliary one, to adjust the speed.
Expert opinion
Strebizh Viktor Fedorovich, leading construction foreman
If only one brake, say the front one, is sufficient for a bicycle, then it is better to play it safe and install them on both wheels. If you want to clarify something, please contact me!
DIY baby rocking chairs
There are a lot of rocking chairs on store shelves today. They have a wide variety of shapes and types. But it often happens that the price range does not allow you to purchase the model you like. One of the best options in this case is a rocking chair made by yourself. The child will be delighted, especially if he observes and participates in the process of its making and experiences the finished result.
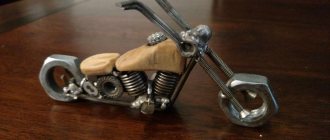
Possible list of materials for creating a motorcycle from a bicycle
So, turning a bicycle into a homemade motorcycle, the most common option for a set of parts is the following:
- engine;
- pulleys;
- drive belt and tension roller;
- fasteners.
One way or another, making a motorcycle from a bicycle is far from a cheap pleasure, so sometimes it’s better to think about whether it would be advisable to do this or whether it’s better to buy a new moped or at least a ready-made bicycle motor.
Peculiarities
A rocking chair is a figure that rocks due to a specially rounded base. The figurine can be anything: a horse, an elephant, a cradle, just a chair and any animal that comes to mind. Previously, such swings consisted of a wooden base, which was not very convenient, because the hardness did not allow you to relax. Today, the frame is covered with soft fabric and stuffed with foam rubber or sponge. It turns out to be a whole rocking chair - convenient and comfortable, fully replacing the child’s seat.
The benefits of a rocking chair are great. This is not just a toy for a child to have fun with, but also a good way to develop coordination and balance. And thanks to the pendulum effect, it relaxes and calms the child. It is not for nothing that doctors recommend it for the prevention of diseases of the musculoskeletal system. Also, such a simple toy will save your stools and chairs from swaying, broken legs, and scratched floors.
Recommended for children from one to 7 years old.
Steps on how to make a motorcycle yourself
There are several stages in creating a motorcycle with your own hands:
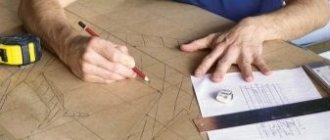
Choosing a homemade motorcycle model
Before starting work, everyone who is going to assemble any thing should have an idea in their head. It is fundamental to creating a really good thing. It is very important to imagine the design and all the technical features of your future creation.
Drawing of a future motorcycle
Any master does not necessarily need to have the skills of an artist in order to draw his future creation. It is very important to indicate on a piece of paper those features of your motorcycle that are worth paying attention to.
Important:
It is necessary that everyone who makes a motorcycle with their own hands has a visual image of the future masterpiece.
Purchasing parts to create your own motorcycle
At this stage you will have to spend a little of your money. To create a motorcycle with your own hands, you need to purchase a large number of elements, including an engine, wheels, frame, and various metal pipes.
Assembly
At the final stage, it is necessary to assemble all the parts together to obtain a homemade vehicle. To do this, it is very important to have knowledge of how all the components and systems of motorcycle equipment work.
Advantages
A handmade toy has a number of advantages:
- Availability. The high prices for store-bought rocking chairs are sometimes confusing; this is a budget way out of a problematic situation.
- Communication. Oddly enough, but such a toy teaches a child to love animals. The kids take care of them, feed them, wash them and even put them to bed.
- Safety. When you make it yourself, you will be confident in the quality of the toy. This applies to the materials from which it is made and to the design of the product itself.
- Things made with your own hands have a special, warm energy. If you also involve the child in this, for example, ask him to hand tools or hold elements, then the work will bring even more benefits in family cohesion.
DIY motocross motorcycle
Despite the highest technical performance of such a motocross model, it is quite possible to assemble it yourself. Of course, nothing prevents you from simply buying a ready-made model, but not always factory samples are able to satisfy all the desires of a particular motorbike enthusiast, besides, such a purchase will certainly not be cheap, and a homemade motorcycle will save a significant amount of financial resources. However, here it is necessary to strictly comply with all installation requirements, otherwise the end result may be very disappointing.
Materials and tools
To work you will need:
- plywood (at least 18 millimeters), boards / furniture board;
- wood glue;
- drawings or templates, patterns;
- paint and brush for decoration;
- thread or rope for decoration;
- jigsaw;
- router (optional);
- drill;
- chisel;
- sandpaper of different grain sizes;
- pencil;
- ruler.
Here are the minimum necessary materials and tools for making a simple model of a rocking horse.
How to make?
Making a horse out of plywood is not difficult if you have ready-made templates for cutting. You can find them on the Internet or draw them yourself.
Here is one example of patterns. They can be scaled and printed, or hand-drawn on regular newspaper.
Stages of work:
- We place the pattern on the plywood and trace it. To prevent the pattern from moving, we attach it to the plywood with masking tape. We cut out the blanks with a jigsaw along the drawn lines. The plywood or boards for the head, supports and seat should be at least three centimeters thick for greater strength. We make the holes necessary for fastening in them with a drill and jigsaw, and tap them with a chisel.
- Next, according to the diameter of the holes, we make sticks from the board to connect the parts.
- All elements must be sanded with sandpaper. First, take a coarse-grained one to remove all the unevenness, then sand the roughness with a fine-grained one until smooth. It would be a good idea to use a router to round all the corners of the horse.
If the plywood at the place of the cuts becomes empty, then fill it with glue or a special putty.
Introduction
These sheets, which can be used for making crafts and structures, may differ:
- number of layers of veneer - three-layer, five-layer and multi-layer;
- the type of wood from which the multilayer sheet is made (deciduous or coniferous);
- according to the degree of processing of the surfaces of the plywood sheet (sanded on one or both sides, not sanded).
Building codes and standards
To learn more about the building material in question (about the classification of the entire plywood nomenclature, grades, standard sizes produced), which can be purchased for the manufacture of many products and crafts, it is recommended that you familiarize yourself with the following documents:
- GOST 3916.1-96 “General purpose plywood with outer layers of hardwood veneer.”
- GOST 3916.2-96 “General purpose plywood with outer layers of softwood veneer.”
Schemes, drawings and patterns for products made from plywood sheets
Computer drawing programs
Today you can easily find a diagram, a pattern for a plywood structure, so that you can then prepare any drawing using computer-aided design systems (including the above cat pattern). Next, use a plotter to print it onto a paper sheet of the required format.
Popular drawing programs are the easiest to learn and can be used in 2D and 3D modeling, including for plywood structures:
- "KOMPAS" is a complex of automated systems with the ability to prepare drawings in accordance with the standards of the ESKDI and SPDS series;
- AutoCAD is a two- and three-dimensional computer-aided design and drawing system.
So, if you cannot find a detailed drawing of the plywood product you need, then the application capabilities of the given software will help you make a full-fledged drawing using any diagrams and patterns posted on the Internet.
The price of the construction plywood from which the kayak is made is simply incommensurate with the pleasure that the person who made it with his own hands and who loves rowing boats will receive.
Appearance of a single-seater boat, drawings of which are given below in the article
The Eskimo kayak is the same kayak among the Aleuts - a traditional rowing boat of the Arctic peoples. This boat can be single, double or triple. Let's post drawings of a plywood kayak for one person.
For this kayak, plywood sheets were purchased - 1525 x 1525 (mm), thickness 4 (mm).
The algorithm for building a rowing boat from plywood sheets is, in principle, general, with the exception of some nuances. A step-by-step procedure for cutting, processing and assembling a kayak can be seen in the video in this article.
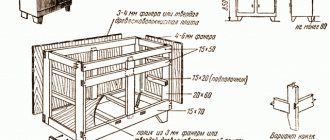
Plywood table - simple and functional
Clear drawings of a plywood table with your own hands, which will be easy to implement even for a person without special carpentry skills and experience. Table cover (1 sheet) - 1300 x 600 x 16 (mm) Inner wall (1 sheet) - 1170 x 400 x 16 (mm) End wall (2 sheets) - 450 x 740 x 16 (mm)
Side cases
A fairly common source material for cases are canisters.
Plastic
The following video shows how to make plastic side cases from 28L cans.
Judging by the video, they are made quite simply, and the functionality and appearance are at the same level. We recommend viewing.
Metal
In a similar way, you can make side cases from metal, or rather from metal canisters.
Mounts for different motorcycles are different, so we will not focus on them, but will look at the entire step-by-step manufacturing process:
Stainless steel side cases
The base of the case is a sheet of stainless steel, bent into an oval and attached to a wooden bottom.
Thanks to the thin walls, voluminous drawers were obtained.
The lids are also made of metal and are secured with fabric straps. The straps also allow you to attach additional cargo on top, which significantly increases the volume of transport.
Next, we cover it with self-adhesive film to match the color of the motorcycle.
The saddlebag mounts are made individually for each motorcycle model.
a very beautiful and inexpensive option for long journeys.
Plastic cases from tool boxes
A simple and quick option to get comfortable panniers for your motorcycle. No need to be fancy with lids and fittings, no grinder or welding required.
Plywood constructor
Various plywood construction kit drawings are now gaining more and more popularity. Assembling such models from safe material is a very useful activity for children and teenagers. Such crafts will become good examples of collections and will decorate the modellers' corner.
The stages of work on installing a tank model are as follows:
- The plywood is sanded (first with medium-grain sandpaper and then with fine-grain sandpaper);
- The drawings are carefully transferred through carbon paper onto sheet plywood material sanded with fine-grained abrasive.
- In the corners of the contour transfer, through holes are drilled with a drill (drill 3 mm or more);
- Attach the file to the jigsaw and start cutting out the elements of the tank;
Sawing can be done even by a child
Note! Cutting out parts must begin inside the contours of the tank blanks, and only then around the office itself.
- After cutting out all the parts, sand them again with sandpaper, removing the burrs left from the file;
We polish every detail
- Start assembling the parts.
Advice! When assembling the model's plywood assemblies, have different types of needle files on hand so that you can fit the elements together at any time.
- After adjusting all the parts, you can start gluing them (for example, with PVA glue, “Titan”);
Advice! In order for the components and elements of the tank to grip each other more firmly and reliably, you can tie them with thread or rope for a while after gluing them.
- The cannon can be made by cutting the wooden handle of a watercolor brush or from other auxiliary material;
- If desired, you can apply a side number or other inscriptions and patterns to a tank, or any other model, using an electric burner;
- For greater preservation and decoration of the model, they can be coated with varnishes and paints.
The model of the tank is made of plywood with a thickness of (3 – 5 mm), the plywood elements were sanded, joined with “Titan” glue, primed and coated with acrylic varnish and paint. The photo shows the result of the actions described above.
Car – retro (old Mercedes)
Note! When you transfer these drawings of a plywood machine with your own hands onto the plywood sheets themselves, do not forget to transfer the numbers.
When assembling the model itself, look carefully at the numbers.
In this case, the process is carried out according to the following algorithm, in accordance with digital notations:
Gun
Drawings of a pistol made of plywood model "Bulldog". When assembling, we follow the same rules as when assembling a machine: the same numbers must be mounted with each other. Pistol parts(1)
Pistol parts(2)
Advice! This model of pistol is best coated from a bottle of spray paint; for a better resemblance to the original, layers of black paint can be applied.
Dinosaur
When designing, drawings of plywood dinosaurs, for example, those presented below, can be made in any scale you need according to the presented pattern in a drawing program for a computer.
Tips for preparing and assembling plywood crafts
Some useful tips and warnings:
- When transferring patterns and drawings onto plywood, use the thinnest and sharpest pencil lead. It's even better to use a used ballpoint pen, then the lines will always be the same and the copy paper won't be torn by the ballpoint. It is convenient to transfer drawings to plywood using a laser printer.
- For better fastening of parts, where possible, it is recommended that the width of the grooves correspond to the thickness of the plywood sheet.
- There are two types of files with large and small teeth. It is more convenient for beginners to learn how to use a thick file, and cut out small parts with a thin file, already having some experience and skills in using a jigsaw.
- The files must cut from top to bottom, so pay special attention to the correct fastening of the file in the jigsaw.
- Files can easily break, so cut carefully and do not allow parts to hang on the saw blade.
- When purchasing a file, make sure that the teeth are sharp, and that the file itself should not bend easily, but rather be firm. It’s not the flat ones that are easy to use, but the so-called “twisted” files – they can be used to make cuts in any direction.
- For those who enjoy cutting out structures from plywood sheets as a hobby, there is no need to purchase a band saw; it is enough to purchase a jigsaw. Although everyone is an amateur, some craftsmen still often resort to a hand jigsaw when they “need to get a feel for the material.”
How I assembled a motorcycle, part 1
In general, in 2013, I went crazy and bought a dead MT 10-36 with a sidecar. This unit started up from time to time and even less often even drove (
100 km before replacing the cylinder-piston group), I reached my destination on a rope, because after 3 km it stalled and could not start thanks to the licked finger of the kick starter (the creator of the splineless shaft be thrice damned). In general, after 5 hours of riding on a cable, I got to my home garage.
The first thing we purchased was a helmet (cheap - the first mistake), a kick finger - (the second mistake, enough for 10 factories), an ignition switch, spark plug tips, Lucky Molly 10W40 MoS2 oil, an acid battery and steering column bearings, and the stroller was also dismantled .
During my wanderings around the motor market, I became acquainted with a veteran, and I’m not afraid of this word, rickets of the MOTO movement, Khaba, who set me on the true path of alcoholism and provided me with a kick and a life-giving finger that set the engine in motion.
The frame/chassis was also assessed and, as a result, I purchased a ready-made solution for a converted frame (extended) with a front fork and wheels from a 1982 HONDA sabre. (hydraulic front brake with an anti-wedge and two brake discs on the front wheel and a drum brake (inverted rear wheel with a cut axle from MT and pneumatic shock absorbers) from Vladislav.
Before (the tank, mirrors and half of the tidy have already been replaced, the stroller is invisible):
I drove this unit for 2 months and at a rally celebrating the 8th anniversary of our city club Night Riders (hi Sasha!) I stuck the valve on the left cylinder.
As a result, I decided to carry out a complete overhaul, which took 2 years.
The next day after the rally, the engine and everything else was disassembled down to transportable parts and manually transferred to Vlad (from his yard to his house, I drove on the right).
The next year could please me with its pedestrian condition, however, on a tip from guess who, the same Dnepr MT was purchased (which is still running) and mobility was not affected.
Thus, I remained mobile and was able to move from dreams to planned implementation of actions for the transition from carburetor to electronic injection.
3) a kit with a remote oil filter and crankshaft was purchased at moto.kiev.ua
6) After all the steps, the connecting rods/pistons were adjusted to +/- 0.01 grams and fully assembled.
The initial version of the firmware was voluntarily borrowed from Pavel Khripchenko.
In the following story there will be a story about calibration and the current version of the firmware with fuel maps.
You can download the version from Pavel Khripchenko, it works somehow, but requires adjustment at the link https://yadi.sk/d/BSkUX2XNwjPq4
| Bus [347] |
| Aerial platform [7] |
| Motorhome (Camper) [10] |
| Ladder [7] |
| Tank truck [171] |
| Aerodrome equipment [67] |
| Snowmobile [18] |
| Concrete mixer [16] |
| Car [558] |
| Bulldozer [30] |
| All-terrain vehicle [53] |
| SUV [242] |
| Truck [442] |
| Rink [22] |
| Carriage [16] |
| Harvester [25] |
| Crossover [21] |
| Passenger car [1283] |
| Minibus [48] |
| Minivan [12] |
| Moped [16] |
| Motorcycle [120] |
| Pickup [94] |
| Loader [49] |
| Crane [48] |
| Fire truck [151] |
| Trailer [211] |
| Dump truck [94] |
| Sports car [524] |
| Sports prototype [24] |
| Tractor [106] |
| Trolleybus [70] |
| Tractor [255] |
| Van [198] |
| Tow truck [13] |
| Excavator [57] |
| Electric bus [12] |
| Miscellaneous [71] |
How to treat the surface → Room decoration → How to choose the right paint → Surface treatment technologies → Leveling and finishing the walls → Selecting and applying a primer → Removal from the surface → Stretch ceilings and technologies → Reviews and testimonials
| Bus [347] |
| Aerial platform [7] |
| Motorhome (Camper) [10] |
| Ladder [7] |
| Tank truck [171] |
| Aerodrome equipment [67] |
| Snowmobile [18] |
| Concrete mixer [16] |
| Car [558] |
| Bulldozer [30] |
| All-terrain vehicle [53] |
| SUV [242] |
| Truck [442] |
| Rink [22] |
| Carriage [16] |
| Harvester [25] |
| Crossover [21] |
| Passenger car [1283] |
| Minibus [48] |
| Minivan [12] |
| Moped [16] |
| Motorcycle [120] |
| Pickup [94] |
| Loader [49] |
| Crane [48] |
| Fire truck [151] |
| Trailer [211] |
| Dump truck [94] |
| Sports car [524] |
| Sports prototype [24] |
| Tractor [106] |
| Trolleybus [70] |
| Tractor [255] |
| Van [198] |
| Tow truck [13] |
| Excavator [57] |
| Electric bus [12] |
| Miscellaneous [71] |
Homemade motorcycle: tips for making. How to make a motorcycle with your own hands?
Since a vehicle equipped with an engine moves faster than a regular bicycle (this is why the modification is intended), for safety reasons it is necessary to install lighting devices on it. Personal protective equipment – helmet, knee pads and special shoes.
Expert opinion
Strebizh Viktor Fedorovich, leading construction foreman
If only one brake, say the front one, is sufficient for a bicycle, then it is better to play it safe and install them on both wheels. If you want to clarify something, please contact me!
conclusions
- Before choosing, purchasing and directly working with the material from which you will cut models, panels, construction kits and structures, familiarize yourself with its types and classification according to construction documents (GOST).
- For sawing, purchase high-quality tools, equipment and accessories for it.
- Take a responsible approach to choosing high-quality plywood. Do not limit yourself to a visual inspection, tap it for internal voids and delaminations due to poor gluing of the veneer layers.
- Before working with a jigsaw, optimally equip your workplace. Pay special attention to good lighting so that the cut and markings are clearly visible and your eyes don’t get tired. It’s not a bad idea to use a strobe light to illuminate the area where you’re working with a jigsaw. Convenient and comfortable sawing!
DOMOSTROYPlumbing and construction
- Thursday, December 12, 2022 1:08
- Author: Sereg985
- Comment
- Category: Construction
- Link to post
- https://firmmy.ru/
Try cutting a motorcycle like this. The craft is not complicated. To cut this craft you will need:
3 mm plywood, preferably without defects, a wooden ruler (in measurements it is more accurate), a copy, hard pencils, thin files for a hand jigsaw, sandpaper, needle files, a wrench for a jigsaw, an awl or a hand drill with a No. 3 drill. Cutting out a craft is not difficult, which means it will take little time to make it. When cutting, do not forget about the position of the jigsaw in your hand. Watch your posture. If you want the craft to look beautiful, take your time. After cutting, clean each part first with “Medium” sandpaper and then with “Fine” sandpaper; some parts should be cleaned with needle files. Assemble the craft according to the rule: part number 1 must be attached to another part number 1, part number 2 to 2 parts, and so on. First, assemble the craft, then if all the parts fit well into the required parts, glue them together. You need to glue it using PVA glue. To make the craft beautiful, you can coat it with spray paint of any color you want or coat it with Wood Varnish.
I somehow came across a similar rocking chair on the Internet. I started searching for drawings for templates and choosing materials. I settled on 20mm plywood (absolutely everything is made from it, except for the feathers and footrests, they are made from 40mm cuttings).
Cage size 25*25mm (1*1 inch). The finished rocking chair obtained from a template of this size is perfect for a 1.5-2 year old child. I transferred the drawing and cut out the templates. In the end, it turned out that the traverses for the feathers needed to be made larger, and the seat could be made a little wider.
I attached the templates to plywood and outlined them in several copies where required. Cut it out with a jigsaw with a small allowance.
I assembled paired parts using self-tapping screws or double-sided tape and used a belt sander to achieve the required dimensions and identical radii. In hard-to-reach places, use a file and sandpaper. The wheels were held on a milling table.
All visible and palpable edges were processed with an edge moulder. Holes in the “discs” with a forstner drill. Assembled with screws and glue. I filled the cracks and screws with putty.
Again I sanded everything, sealed various parts, and painted it. Wheels - black spray paint, fenders, tank and decorative - water-based stain in rosewood color, frame and base - antiseptic in pine color.
I glued all the parts, assembled the fork, sanded it somewhere, tinted it somewhere. And coated it with semi-matte yacht varnish.
Homemade products from a washing machine engine:
1. How to connect a motor from an old washing machine through a capacitor or without it 2. Homemade emery from a washing machine engine 3. Homemade generator from a washing machine engine 4. Connecting and adjusting the speed of a commutator motor from an automatic washing machine 5. Potter's wheel from a washing machine machines 6. Lathe from an automatic washing machine 7. Wood splitter with an engine from a washing machine 8. Homemade concrete mixer
A rocking motorcycle made of plywood for my son (templates, drawings, assembly diagram)
Templates and drawings of rocking chair elements and parts. Sketch and assembly diagram.
Some step-by-step photos of the assembly process.
See also:
EuroSamodelki.ru is a huge number of homemade products, which are accompanied by detailed illustrated instructions for self-production. There are already more than 3,500 homemade products in our catalog. Join us, join our social group on VKontakte. We are waiting for you! Do something useful for yourself, for your home, for your loved ones.
How to make an all-terrain vehicle from a motorcycle?
Recently, all-terrain vehicle designs that are made from ordinary motorcycles have become widely popular. In addition to the entertainment functions that such a device carries, it is also a very reliable means of transportation.
Thus, motorcycles can be divided into several categories, the main of which are, naturally, ATVs. These transport models amazingly combine the mobility of a motorcycle and the stability inherent in cars. Due to the fact that each of the ATV wheels has its own suspension, the device is able to overcome almost any, even the steepest, road irregularities.
The third type of all-terrain vehicle from a motorcycle is a vehicle equipped with tracks, with which you can easily move through swampy areas.
However, we should not forget that any motorcycle, even a homemade one, is a vehicle characterized by increased cross-country ability. Therefore, in order to achieve the maximum value of this parameter, it will be enough to simply increase the cross-country ability of a standard vehicle, and the need for global modernization will disappear by itself.
Another useful homemade product for children has been added to our collection - a wooden motorcycle, which every child, and perhaps some adults will be happy with:) Last summer was not productive for making it for a number of family reasons (disassembling and assembling furniture, etc.) and not It was worth committing to . However, by the time my grandson arrived at the dacha for the first time, he had managed to assemble an entire small toy from what he found. The wheels spin, the steering wheel turns, the ignition key (from the one with the bit cut off) is there, and both my grandson and I can talk tr-r-ttr. Photo-view straight.
The design is clear and visible from the presented photo. Almost everything is made from dry pine boards 130 x 40 mm. Imitation of motor cooling fins from 20 x 10 mm strips. The exhaust pipe is made of polypropylene pipe and the steering wheel is made of the same. TUT segments (heat-shrinkable tubes) were installed on the pipe and steering wheel and heated with an industrial fan. Wheels from the same board - photo 3.
Wheel diameter 280 mm. To imitate tires and for a soft ride - rubber from the tube on glue and brackets. Wheel axles are 150 mm nails, cut to length. They are not secured and can be pulled out freely, and then he takes a hammer and, under my guidance, tries to hammer it into place. Headlight cover from Nescafe. The steering wheel rotates on the axis by approximately 30 degrees. on both sides. The seat is soft and upholstered. The motorcycle, of course, is a bit heavy, however, my grandson can handle it (he is 3 years and 6 months old). At the bottom of the frame there is a folding, fixed footrest. The photo is a game moment and on the right is the leg of a father who wanted to help his son, who dealt with the “accident” himself.
In the modern world there are a considerable number of creative people who are able to turn even the oldest things into something original and interesting. Many people who are not indifferent to motorcycles do not have the opportunity to buy a motorcycle for some reason. There is a way out for them - to assemble the bike with their own hands.
Not every person can assemble a motorcycle on their own. This requires a lot of time and patience. You need to use all your love for bikes as inspiration. Thanks to this, it will be possible to assemble a very good vehicle at home, which in any case will be unique.
You need to be prepared that when creating a motorcycle with your own hands, a large number of difficulties may arise. It’s not uncommon for designers to make non-standard decisions. For beginners building their own motorcycles, it is best to start by assembling the simplest models.
All homemade motorcycles are unique. Not many bike lovers know how to make a motorcycle with their own hands. This requires a lot of effort. It is impossible to do without knowledge of the design of each model of motorcycle equipment and without the necessary materials.
In any case, when creating homemade motorcycles, the ideas of craftsmen who have long developed original models of motorcycles for various manufacturers are taken as a basis.
Homemade motorcycles are designs that, in all their functional qualities, do not differ from the motorcycles offered by manufacturers. For them, amateur designers use spare parts and components from various types of motorcycle equipment. Each creator of a homemade motorcycle has the opportunity to develop for himself a bike that will meet all his requirements.
Homemade motorcycles may have different technical characteristics. They can be whatever is necessary for any motorcyclist. In most cases, amateur designers create sports motorcycles and dirt bikes. Moreover, the latter can be equipped with elements of sport bikes.
Templates for cutting out figures for the garden to bookmarks 113
Templates for cutting plywood figures for the garden, continuing the theme “Decorating the garden with homemade figures”
Picture templates are suitable not only for cutting, they can be used as regular stencils.
Crafts made from plywood can perfectly decorate a country house interior. They can be made either multi-layered or flat, which can be nailed to a fence or the facade of a country house.
Moisture-resistant plywood, the price of which is not much different from the usual one, is better suited.
Some pictures can be used as a template, you just need to enlarge them and print them first.
So much for your small business!
It takes a long time to “saw” with a simple jigsaw, you need skill or a man’s hands. And where can I get them? Not everyone has golden hands. And everything is so interesting, I even have my own ideas...
A cat with sausage, and summer residents in their usual pose - GREAT.
Elena, I also liked these ones the most. Very funny)))
I sincerely think this is an overspend in the garden. Maybe to kindergartens.
lyazzatr, in many summer cottages children relax all summer, so such crafts are not superfluous there)))
Thanks a lot for the ideas. These funny little animals are suitable for various types of needlework, but in the garden... Let the berries and flowers grow. ))) I am horrified when I see works made from tires, plastic bottles and waste material in summer cottages. I remember - Buy a sculpture to decorate the plaster... The philistinism lived, is alive and WILL LIVE! Alas... But... thank you very much for the ideas! They will come in handy.
nafany240755, from Alexander Kruglov we read: “Aristocracy despises philistinism, just as a higher rank can despise a lower one - but the ranks are of the same hierarchy. … This is elitist philistinism.” – Very well and precisely said. Today there are much more middle-class people among the “prosperous” (against the background of impoverished people!) than there are aristocrats. They are eager to go on TV, where they enthusiastically tell how much their vacation abroad cost (in a room with a gold toilet, apparently, their “golden” butts will not accept anything else; with antique furniture, etc.). In this regard, I will quote another author: “Everyone cannot fall into the swamp of philistinism. Many do not have enough money for this” (Vladimir Goloborodko). So don’t be alarmed, I look through a lot of art sites, and the other day I saw EMBROIDERY! on the mesh netting! - also in the garden... This is creativity, what an artist! These people do not create out of greed, but out of spiritual impulse beyond what is necessary. What kind of philistinism is there in this?
The most valuable thing in the topic is the reminder that you can make crafts from plywood. You can easily download sample pictures from the Internet.
It’s so good that this topic has continued! She charmed me, I kept wondering where I could find drawings of these funny figures, thank you! I would like to add more!
Children's sports bikes
Sports motorcycles designed for young audiences are equipped with wide wheels that provide better stability. The design has a wide frame and a modern control system. Some models have the same power-to-weight ratio as professional sportbikes. To operate such motorcycles, you must have certain driving skills, as well as be able to fully concentrate on the road.
Such motorcycles have enough power to accelerate to a speed of 24 km/h. Therefore, when wondering how much a children’s gasoline motorcycle costs, you need to consider the cost of a protective suit and helmet, which will help avoid serious injuries. You should not save on your child's health.
Paper origami machines (diagrams)
Origami racing car
Such cars were popular in the USSR. We also post a video:
Origami tank
Origami machine
Creative machines - paper crafts (full instructions)
We accumulate quite a lot of tubes after using toilet paper. And if we used to throw them away, now we decided to make crafts out of them. The results were such wonderful machines. Do you want the same? Let's get started!
We will need:
- Scissors or knife
- Glue
- Brush
- Toilet paper tubes
- Acrylic paints
- Cardboard
- White and colored paper (for decoration)
- Small nails or buttons
- Pencil
How to make paper cars (instructions)
1) We prepare as many straws as we want to make machines
2) Paint the tubes with acrylic paints. While waiting for them to dry, you can move on to the next step.
3) Draw circles with a simple pencil (attach any round object and trace it) - these will be our wheels. For one car you need 4 large circles and 1 small one (for the steering wheel)
4) Paint the circles with black paint, the middle with white paint
5) Cut a hole in the middle of the tube - this will be our seat. Glue the steering wheel and attach the wheels using nails or buttons
6) And lastly, and also the most exciting thing, we cut out various decorations from paper and glue them onto our supercars :)
That's all! We hope you found the model you like!
Yuri Khvtisishvili created an exact wooden copy of the legendary Soviet motorcycle IZH-49
Yuri Khvtisishvili is a carpenter from Russia. He created an amazingly accurate wooden copy of the legendary Soviet motorcycle IZH-49. The life-size model is so realistic that when you look at it, it seems that Yuri is about to get behind the wheel and speed away.
The idea for the project came to Yuri at the beginning of 2014, when there was very little work in the carpentry workshop. He decided to do something new and interesting. It was then that he remembered that he had seen on the Internet the work of craftsmen who made full-scale models of motorcycles from wood.
The idea inspired him, and he decided to make a wooden copy of his favorite motorcycle IZH-49. Yuri started working on the project on January 18th. It was a great idea to pass the time during the long winter evenings.
The work took Yuri exactly 4 months and was completed on May 18. It's amazing how Yuri managed to figure everything out and carve parts into the wood - the bicycle saddle, tank, headlight, and especially the tires are strikingly similar to the real thing, even though they are made entirely of wood.
In his work, the master used two types of wood - beech and pine. He chose them because they complement each other perfectly.
In the evenings and nights, the 30-year-old cabinetmaker patiently sawed, planed and sanded every screw. I was inspired by the desire to do no worse than in foreign pictures on the Internet.
In the process of making a wooden motorcycle, Yuri Khvtisishvili did not use computer machines, and did not use a single metal part during assembly.
Wooden motorcycle IZH-49 by Yuri Khvtisishvili
Wooden motorcycle IZH-49 by Yuri Khvtisishvili
Wooden motorcycle IZH-49 by Yuri Khvtisishvili
At the same time, the motorized transport is on the move. Everything that needs to move moves, from the lever to the wheels.
Wooden motorcycle IZH-49 by Yuri Khvtisishvili
Wooden motorcycle IZH-49 by Yuri Khvtisishvili
Wooden motorcycle IZH-49 by Yuri Khvtisishvili
Wooden motorcycle IZH-49 by Yuri Khvtisishvili
Yuri posted photos of the completed project of the wooden motorcycle IZH-49 on social networks. With amazing speed they scattered all over the Internet. The wooden IZH-49 received a large number of positive reviews, expressing admiration for the truly excellent work of Yuri Khvtisishvili.
For now, the wooden motorcycle is stored in the workshop. But respectable buyers are already eyeing it. The starting price is about a million rubles. Yuri admitted that he would be happy to fulfill a museum order. With the condition that his work will be exhibited in Russia.
There is no doubt that Yuri truly has “golden hands”!
Did you like Yuri Khvtisishvili’s wooden motorcycle? Like it, add the publication to your Favorites, and share your impressions in the comments.
***