Furniture
0
13 676
Share
Despite the fact that furniture plywood is an environmentally friendly and wear-resistant material, it is quite difficult to find a finished kitchen made from it. But what prevents you from assembling the headset yourself? We prepare a kitchen project, make drawings of plywood furniture, pick up the tools and start manufacturing. Such an environment will be pleasant at the price and will last a long time - about 20 years. And you don’t have to adjust your headset to the standard sizes of manufacturers. A kitchen made of plywood with your own hands is not made quickly, but every centimeter of it turns out to be as functional as possible.
You can make furniture from plywood sheets yourself
- Which plywood to choose for the kitchen
- Kitchen measurements and design project
- Preparation of materials and accessories: plywood sheets and more
- Tool preparation
- Preparing parts
- Making a headset: assembling the frame and beyond
- DIY tabletop
- Making a dining table
- Summing up
Which plywood to choose for the kitchen
Plywood is glued together sheets of veneer, of which there is always an odd number. Wear resistance and strength are achieved by placing the fibers of each sheet in different directions relative to each other. Usually birch or coniferous wood is used, while the inner part can be coniferous (GOST 3916.2-96), and the top made of birch veneer. Hardwood plywood (GOST 3916.1-96) is considered to be of higher quality and costs more.
Material classification
There are several parameters by which the material is classified:
- Brand - determines moisture resistance and scope of application. Main types of FC, FSF, FKM, FOF, FBA
- Grade - determined by the appearance of each surface. The letter E denotes the highest quality, then there is a decrease from grade I to grade IV. The grade is determined separately for the face and the back - 1/1, 2/2, ¼ and other combinations
- Surface treatment - unsanded plywood is marked with the letters NSH. If there is one sanded side - Ш1, if both sides have a polished surface - Ш2
- Formaldehyde content - the letter E with an index in the range 1-3 indicates the environmental friendliness of the material
Plywood for the kitchen must be free of formaldehyde.
To make a kitchen set from plywood with your own hands, choose sheets with average moisture resistance and no formaldehyde.
More about brands and sizes
Let us give a brief description of the main brands of plywood so that you can immediately see which of them is suitable for making furniture and which is not:
- FC - adhesive composition based on urea resins, average moisture resistance, used for interior work or furniture making
- FSF - usually used for outdoor work, moisture resistance is high. Formaldehyde resins are used as glue, so furniture is not made from FSF plywood
- FKM - synthesis of FK and FSF, veneer sheets are glued with melamine resins, suitable for any work, characterized by high moisture resistance and strength
- FBA - albumin casein glue is used to join sheets; the material is highly environmentally friendly, but has low moisture resistance
- FOF - laminated plywood. The material is covered with a film of various colors, is used in construction and furniture production, and is more expensive than other materials
It turns out that plywood for furniture is selected from materials marked FK, FKM, FOF. Standard sizes of sheets are given in table No. 1.
Table No. 1
| Brand | Width, mm | Length, mm | Thickness, mm |
| FC | 1525 | 1525 | 3 4-10 (in 2 mm increments) 9-30 (in 3 mm increments) |
| 1500 | 1500 | ||
| FKM | 1220 | 2440 | |
| 1250 | 2500 | ||
| 1525 | 3050 | ||
| FOF | 1220 | 2440 | 4, 6 9-30 (in 3 mm increments) |
| 1250 | 2500 | ||
| 1500 | 3000 |
What to make kitchen furniture from
When choosing plywood for furniture, attention is paid to the following indicators:
- Quality of gluing, wood
- General view of the sheet
- Wood species - deciduous is more resistant to temperature changes and high humidity
- Country of origin - preference is given to Russia, since Chinese materials do not have the necessary environmental friendliness, and Finnish plywood is too expensive
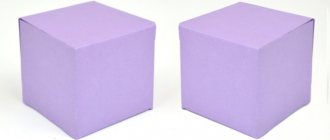
Taking into account the standard size of a plywood sheet, the properties of the material, quality, grade and price, the FC brand becomes the optimal choice. The selected grade is ½, sheet size 1525×1525 with a thickness of 6, 12 and 18 mm. You can make plywood products with your own hands from laminated sheets, but the cost of the material differs significantly from the FC brand.
Laminated plywood will help you build a beautiful kitchen
Types of plywood
The choice of plywood intended for the manufacture of kitchen furniture should be approached responsibly. When purchasing a material, it is necessary to take into account its brand, type of processing, grade, purpose and type of wood used in its manufacture.
Based on the raw materials from which it is made, plywood is divided into:
- hardwood material: birch, beech, mahogany;
- material from coniferous species (pine).
Plywood made from softwood is less durable, but cheaper.
There is a moisture-resistant brand of plywood - FC, intended for interior finishing work. It is this plywood that is recommended to be used for assembling the headset.
Advice! You can purchase plywood from both Russian and foreign manufacturers, for example, Finland. You should refrain from buying Chinese material due to its low quality.
Before purchasing, each plywood sheet should be carefully inspected for the presence or absence of defects or defects: paint runs, swelling, cracks, scratches, chips.
Kitchen measurements and design project
Accurate measurements plus a verified sketch of the headset will allow it to be manufactured with high quality and reliability. The main advantage of such furniture is the individuality of execution.
When making a kitchen set yourself, you should take into account ergonomic standards, the height of the housewife, the geometry of the kitchen, and the wishes of family members
Stage No. 1 - kitchen measurements
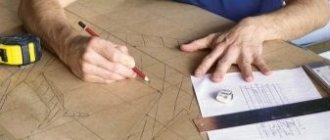
The dimensions of the room are measured taking into account protrusions, niches, and passing communications. The parameters are transferred to a sheet of graph paper in accordance with the scale. Instead of drawing by hand, using computer programs to create 3D sketches is suitable.
Stage No. 2 - sketch development
An initial version of what a plywood kitchen looks like, taking into account the arrangement of household appliances, is being worked out. Then the specific dimensions of the furniture sections - cabinets, shelves, drawers - are thought out. Taking into account the individual characteristics of the project, adhere to the developed ergonomic standards for kitchen furniture (Table No. 2). Dimensions are given in centimeters.
Table No. 2
| Floor cabinets | Wall cabinets | ||
| Height | 85 (including countertop) | Height | 70 |
| Width | 60-80 | Width | matches floor |
| Depth | 45-50 | Depth | 30 |
Additional sizes:
- For drawers, a width of 30-40 cm is suitable
- Plywood shelves are placed at a distance of 30 cm from each other
- Shelf width = cabinet width - 36 mm (frame is made of 18 mm sheet)
- The distance between the upper and lower tiers is 45-65 cm
Please remember that these are approximate dimensions and may be adjusted depending on specific circumstances.
Stage No. 3 - drawing up a design project
The sketch is complemented by the verified dimensions of cabinets, cabinets, drawers, and shelves. Additionally, the dimensions of the facades are calculated taking into account technological gaps. An individual calculation is carried out for each furniture unit. The drawing of the modules is made in two projections, indicating the dimensions, dimensions of technological holes and grooves. This will help you choose the dimensions of the plywood sheet to minimize the cost of purchasing materials.
Kitchen design made of plywood can be the most fantastic, it all depends on your imagination
Design and manufacture of kitchen units
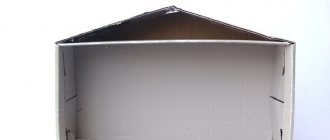
Kitchen made of plywood without finishing surfaces
Design, kitchen dimensions
Before assembling the kitchen furniture, you must first take measurements of the installation location of the kitchen furniture and a drawing, a design of its design (sketch). This can be done manually or using a computer using 3D modeling software (SketchUp, PRO100, Astra Furniture Designer, Basis Designer Furniture Maker, bCad- Furniture Maker and others).
Based on measurements of the place where the furniture structure will be installed, we plan the dimensions of the kitchen furniture.
Adhering to accepted standards, we determine the dimensions of the floor cabinets:
- height – 85 cm (taking into account the thickness of the tabletop);
- depth – 45 (50) cm;
- width – 60 (80) cm with hinged doors (including a sink cabinet), or 30 (40) cm with sliding drawers.
Wall cabinets:
- height - about 70 cm (a little more, depending on the height of the ceiling of the kitchen room);
- depth – 30 cm;
- width – adjust to the selected width of the floor cabinets.
When choosing the distance between wall and floor cabinets, we stick to the size of 45 – 65 (cm).
These dimensions are guidelines only. But, of course, everything depends on the growth and desire of the housewife, the features and geometry of the kitchen space.
We enter all selected dimensions into the sketch. We calculate the entire length of the kitchen furniture, taking into account the built-in appliances. We decide on the number and types of drawers and doors in the set. Hollow doors are made of thin plywood, with stiffening ribs inside (they can be replaced with glass, mirror, plastic)
Important! We calculate the standard sizes of each drawer, door and their components separately. In the drawing, each cabinet is divided into drawers and doors, which must also have specified dimensions.
Sketch of a headset is one example
The length of the shelves in cabinets, the frame of which is made of 18 mm thick FK plywood, is calculated as the difference between the width of the cabinet and the two thicknesses of the frame walls (36 mm).
Materials, accessories and tools
- Having all the dimensions of the cabinet and its components, you need to choose the type of connection of the plywood frame (tongue-and-groove, tongue-and-groove).
- Decide on fasteners (adhesives, nails, screws, confirmats, minifixes).
- Select fittings (handles, hinges, door closers) that will be used during assembly.
Now we have all the dimensions for cutting plywood sheets to make an estimate of the necessary materials.
Advice! The optimal solution would be to entrust the process of cutting large-sized plywood sheets and milling holes for door hinges according to sketches to specialists who have computer-controlled machines. Check finished kitchen components for defects on sawn and milled surfaces. They can also help with marking the selected parts on plywood blanks.
Do-it-yourself cutting of material with a plunge-cut saw
But, if you have the appropriate skills and a good plunge-cut saw, such as Festool or its analogues (with a special guide for cutting sheet materials), you can, for the sake of economy, cut everything yourself and make markings on the back and front sides of plywood blanks.
A set of tools for assembling a kitchen set from plywood
- Marking and measuring tools - tape measure P - 3, folding meter, ruler, square, compass, surface planer.
- Saws – plunge-cut saw with guide, cross-cut saw, jigsaw.
- Tool for drilling – electric drill, a set of regular and special drills (for furniture screed) and countersinks.
- Tools for chiselling and planing - chisels, chisels, planes, mallet.
- Auxiliary tools – hammer, pliers, screwdrivers (cordless screwdriver), files, needle files, knives.
It is clear that if you have ready-made plywood blanks (walls, doors, tabletops), some tools will not be needed (for example, a plunge-cut saw). A hacksaw will also be used minimally, for example, for sawing wooden blocks for stiffeners, if our choice is hollow plywood doors.
Assembly and processing of plywood kitchen units
Instructions and work procedures for assembling and fastening finished plywood blanks are not difficult.
We will fasten the floor and wall cabinets:
- “Euroscrews” (confirmations) in the invisible part of the connections between plywood blanks and cabinets with each other (although they can also be used on the front side of the plywood, covered afterwards with decorative or self-adhesive overlays).
Confirmat – single-element screed for plywood blanks
For a reliable and strong connection of plywood sheets using confirmat (7 mm in diameter), we drill two holes (for its threaded and non-threaded part) with different diameters (5 mm and 8 mm). We countersink the drilled hole on the front side of the plywood frame blank for the confirmation head.
Advice! It is better to do all the drilling and countersinking operations at one time using a special step drill.
Step drill for making holes and countersinking in plywood pieces
When joining frame plywood blanks with confirmat, for the stability of the plywood blanks, you can additionally use dowels (wooden or plastic). In the corners, to improve the rigidity of the plywood frame, you can use corners with a footer.
Joining horizontal and vertical plywood blanks
- Using “eccentrics” (minifixes) we tighten those joints of sheets of blanks that are visually visible.
Eccentric three-element tie for kitchen plywood blanks
Where fasteners should not be visible on the front of the plywood kitchen, we use an eccentric tie (minifix).
Advantages of screeding kitchen plywood blanks with minifix:
- Reliable fasteners - fittings - will allow you to repeatedly assemble and disassemble the kitchen, without losing the quality of the connection.
- Minifixes will not be visible from the front side of the kitchen; there is no need for decorative plugs.
- Installed eccentrics do not require special keys, tools or a flat screwdriver to assemble the kitchen.
If, when cutting plywood, you did not order marking, drilling and milling holes for the elements of the eccentric coupler (metal eccentric, plastic coupling and rod), then they can be easily made with your own hands.
To do this you will need:
- Milling cutter (diameter 15-16 mm).
- Drills (diameter 7 and 10 mm).
Scheme of plywood screed with eccentric fasteners
Eccentric installation procedure:
- We make markings on the surface of the plywood where there will be holes for the eccentrics. We punch the markings for the minifix coupling.
- In the plane of the plywood blank, we drill a blind hole (with a 10 mm drill) for a plastic coupling.
- We install it (you can use PVA glue, B3 for strength).
- We screw the minifix rod into the coupling.
- We drill a blind hole (14 mm deep) for a metal eccentric in the mating plywood piece.
- At the end of the workpiece we drill a hole for the minifix rod. We drill it so that the rod fits into the eccentric hole.
The video will help you install the eccentric coupler in more detail.
Thus, the kitchen frame is assembled from plywood blanks, all that remains is to mount the shelves and hang the doors.
Plywood shelves and kitchen doors
Hollow plywood swing doors are hung using overhead hinges
Doors can be hung using BLUM hinges with built-in closers. In some places, shelves can also be replaced with built-in drawers with self-finishing.
The treatment of plywood kitchen facades can be done by using decorative stain of any color (for example, from the Sayerlack product line) and covering it with oil - Borma wax or its analogues. The ends of 18 mm plywood must be treated especially carefully, in several layers.
Advice! Remember that if you coat the surface of a plywood kitchen with varnish, if it is damaged, it is much more difficult and more expensive to correct the defect than with oil-wax coating.
Oils and waxes for treating plywood facades
It is advisable to protect the plywood tabletop with an acrylic coating or marbled material. You can make the tabletop yourself, for example, using mixtures for self-leveling floors with the addition of marble chips (metal strips - overlays, here they will play the role of formwork).
Preparation of materials and accessories: plywood sheets and more
Let's consider which plywood, fasteners, and accessories to choose.
The sizes of plywood sheets that need to be purchased depend on the elements being manufactured:
- Thickness 18 mm - used to assemble the frame; for cabinets, shelves are cut from plywood of the same thickness.
- Thickness 12 mm - selected for the manufacture of facades of floor cabinets.
- Plywood thickness 6 mm - suitable for wall cabinet doors that are reinforced with stiffeners.
Fasteners
The next step is to decide how the parts will be attached to each other. As experience shows, when making furniture from plywood with your own hands, it is enough to use only screws. Plywood sheets do not delaminate, do not crumble, and hardware does not come loose in the holes. Using furniture minifixes to fasten elements at home is more than problematic, since the highest precision in cutting holes in three planes is required. Having an accurate drawing, you can contact specialized workshops to make holes.
Be sure to make a drawing and then you will understand how much material and what shapes you need
So, to connect the parts you will need:
- Screws, minifixes or confirmats - European screws with a countersunk head
- Glue, silicone sealant
Fittings and finishing
This includes handles, hinges, closers, decorative plugs, if minifixes are not used. It should be remembered that kitchen furniture made of plywood is not overloaded with fancy fittings.
For painting you will need putty and paint, for pasting with film you will need putty and self-adhesive. Furniture can be covered with stain and varnish.
Advantages of plywood
Plywood is a building material consisting of several layers of rotary-cut veneer glued together. The advantages of plywood include:
- High strength, hardness and wear resistance. Plywood is not afraid of various mechanical damage: impacts, scratches.
- High level of moisture resistance. Furniture made from high-quality plywood, even if not treated with special impregnation, will not become moldy, swell or deform during use in the kitchen.
- Easy to assemble and operate. Furniture parts made of plywood are easy to assemble, fasten and disassemble. Furniture made from headlights does not require special operating conditions.
- Beautiful surface texture.
- Environmentally friendly.
- Price. Plywood is much more profitable in both quality and cost than MDF and chipboard.
Tool preparation
The kit depends on how you plan to cut plywood. It is recommended to do this in a furniture workshop, since the process requires high precision and the presence of a plunge-cut saw with an attachment for cutting sheet materials. To assemble the furniture you will need:
- Cordless screwdriver or screwdrivers, drill, drill set
- Hammer, chisels, files, chisel, plane, hammer, mallet
- Plunge saw, jigsaw, hacksaw
- Tape measure, ruler, square
A standard set of tools should be in every home
Selection of materials and tools
After you have finally decided on the appearance of your kitchen set and determined all the sizes of individual elements, you need to think about the type of fastenings for cabinets and shelves. For furniture with a plywood frame, a tongue-and-groove joint is usually used. The second type is more reliable, and connecting such parts is easier and faster. But to make a tongue and groove, special tools (milling machine) are required. You can get by with a hand cutter, but such work requires a certain skill.
Dimensions diagram for assembling and installing kitchen units.
A way out of the situation may be to order all the furniture parts for the kitchen to be cut to your measurements in a specialized metalworking workshop. They can also produce tongue and groove connection parts. But then the final cost of your headset can increase significantly.
In addition to the type of fastening, it is necessary to select additional fastening elements. Typically the following materials are used:
- nails;
- screws (self-tapping screws);
- confirmations (Euroscrews or Eurobolts);
- minifixes;
- wood glue.
To make furniture for the kitchen with your own hands, you usually choose fastening with screws with additional reinforcement of the fastening units using glue. This method is the most accessible and cheapest.
When assembling a kitchen set yourself, you will definitely need the following tools:
- a plunge-cut saw with a guide, a hacksaw for wood, a jigsaw with a set of saws for working with plywood;
- electric drill and drills intended for forming nests for furniture screeds, countersink;
- a set of carpentry tools (chisel, chisels, plane);
- auxiliary equipment (hammers, mallets, pliers, screwdrivers).
Profile diagram for mounting wall cabinets.
Don't forget to prepare your measuring tools. You will need a construction tape measure (it is better to choose one with millimeter divisions), squares and a construction level.
If you order the production of furniture parts in a workshop, you can get by with a minimal set of tools. And don't forget about the necessary accessories. You should not put off purchasing it until later, because without the dimensions of the holes that will be needed, for example, for installing handles, it will not be possible to accurately make blanks for assembling furniture.
Making a headset: assembling the frame and beyond
To make furniture from plywood, you will need to assemble a frame, hang doors, install shelves and drawers.
Plywood has sufficient strength, so timber is not used to assemble the frame. The parts are marked for screws or confirmations. Using a special stepped drill, holes are made with threaded and non-threaded parts, and a recess for the Euroscrew head. For a regular screw, countersinking is carried out with a drill of a larger diameter. Fastening from the front side is carried out using minifixes, then there is no need to install decorative plugs, but euroscrews are also suitable.
Before tightening the parts, the ends are coated with silicone sealant.
Headset assembly
The kitchen set made of plywood will be finally ready when the doors are hung on the frame, shelves and drawers are installed. The holes for the fittings are marked and drilled in advance, and the guides for the drawers are installed before the frame is assembled.
Assembling the headset requires care and painstaking approach
The doors are made of 6 mm thick sheets, and stiffening ribs give them stability. To cut out plywood shelves with your own hands, take material 18 mm thick. The front edges are chamfered, the sections are puttied or sanded for painting or covering with film. When processing with varnish, sanding is sufficient.
When covering your headset with self-adhesive film, give preference to expensive and high-quality material - Chinese film does not stick well and looks bad
Furniture made of laminated plywood has an ideal look - a variety of shades allows you to choose a material that suits a specific design.
Assembly and finishing of a plywood kitchen
With a well-designed project and carefully prepared parts, assembling the kitchen will not be particularly difficult. Plywood is a lightweight and durable material that holds any type of fastener well. The main thing is to carefully check the design and do not miss the connections.
After assembly, all that remains is to decorate the new kitchen, varnish or paint it. However, processing plywood is a separate topic.
Advice! Particular attention should be paid to the future tabletop; this is the most used surface. The tabletop should be covered with several layers of varnish and covered with a protective film.
DIY tabletop
A work surface made of laminate looks great. It’s easy to implement an economical option yourself by choosing a coating to match the headset or playing with contrast. The joints of the panels must be coated with sealant to avoid the harmful effects of moisture on the laminate. The front edge is closed with a decorative metal corner.
The high moisture resistance and dimensions of laminated plywood also allow it to be used as a tabletop. The film reliably protects the material from the penetration of liquids, and the edges are impregnated with a moisture-repellent composition.
Step-by-step instructions for making a cabinet from plywood
We will make a simple cabinet with only shelves; drawers are difficult for beginners to make, but it’s not worth the risk yet. A cabinet with two hinged doors, the back wall is also made of plywood to increase durability. The thickness of the material is 18 mm, one surface is polished and does not require finishing. If desired, the cabinet surfaces can be coated with clear varnish. The assembly is done with confirmations, the shelves are inserted into the grooves. Before starting work, you need to take measurements of the furniture, draw a sketch, and buy all the necessary materials.
Work begins with drawing up a drawing and preparing materials
Step 1. Start making the side walls of the cabinet. Place a large sheet of plywood on the sawhorses and think about the cutting pattern.
The plywood sheet is laid horizontally
Professional furniture makers strongly recommend, if the overall dimensions of the sheet allow, not to cut the doors one at a time, but one large piece for two. Why?
- You can make all the technical cuts on two doors at once under one ruler and after one measurement. Due to this technology, even the theoretical possibility of asymmetry of the cabinet sides is eliminated. If you make a mistake with the location of the shelves by a few centimeters, the slots will be the same in the sides, the cabinet will be assembled, no problems will arise.
- Work is almost doubled. Each installation of a cutter or hand saw or ruler is done once, not twice. Only the length of the cut increases, and this parameter has almost no effect on the speed of cabinet assembly. Only one copy is made with small dimensions, the length of the cuts is insignificant.
- Improved build quality. The more accurate the parts, the better they fit into their seats, the easier it is to fix them, the more reliable the design.
For convenience and time saving, identical blanks are cut simultaneously using a large sheet of plywood
Step 2. Place a cutter with a diameter of 18 mm on the hand router; if your plywood thickness is different, then adjust the tool to suit it. The cutting depth should not exceed 0.5 sheet thickness. If you fulfill all the conditions correctly, the sawn sides of the cabinet will withstand the same loads as whole slabs. The shelves should have slight tension and take on some of the effort.
The cutter is set to the size of the sheet thickness
Step 3. Mark the locations of the grooves for installing shelves. Set the stop ruler taking into account the distance between the edge of the cutter and the edge of the body. The sawing depth can be measured using sections or using a special device for adjusting the tool. Clamp the ruler with clamps and saw through the landing sockets one by one.
Cutting grooves for the shelves of the future cabinet
Step 4. Make quarter bevels along the edges of the walls to secure the back wall. We have already mentioned that it is made from the same plywood as the entire cabinet. Due to this, the stability and reliability of the furniture increases.
Chamfers are made along the edges of the workpieces
Step 5. Cut the slab into two equal halves, so the sides are completely identical and ready for further use.
Cut the slab into two parts
Step 6. Use a compass to adjust the remaining scraps to fit the dimensions of the shelves. There won't be enough of them, we need to make more. To do this, cut a piece of the required width and length from a large sheet and proceed to preparing the remaining parts. You can work with a hand-held circular saw using a stop ruler.
Blanks for shelves are cut from the remaining plywood.
Almost advice. You should not saw off important furniture parts without a ruler; do not rely on the steadiness of your hand and the accuracy of your eye. It is possible to insert such shelves after correcting the errors, but the strength of the structure will no longer be the same. The parts will not accept the forces for which they are designed. Experienced furniture makers, after working with a hand saw, always pass them on a compass machine; this is the only way to guarantee the ideal quality of the elements.
Use the same technology to prepare all the shelves, bottom and top. Don't forget that you also need to select a quarter in them. The front edges along the perimeter of the cabinet frame can be rounded with a milling cutter, this will improve the appearance and eliminate the possibility of injury while using the furniture.
Milling of front edges
Step 7. Place one side panel on the goats and insert all the shelves into the grooves one by one. They should fit tightly without gaps. Place the second side panel on their ends and connect the elements. To hammer, use a wooden mallet, do not rush. If the parts do not fit into place, then you need to find and eliminate the reason, and not hit with a hammer with redoubled force.
Assemble the side walls with shelves
Step 8. Screw the roof and bottom to the sides. Call an assistant and remove the frame from the trestles, place it on a flat surface with the back wall facing up.
It is necessary to lift the structure with an assistant
Practical advice. In this state, the frame does not have sufficient strength and may crumble when moved. For insurance, tighten it with temporary jumpers in several places; later, as the stability of the structure increases, they are removed.
Step 9: Cut the back wall to size and screw it to the cabinet frame. You can use nails or small screws, there is no big difference in reliability.
Stuff the back wall
Now we need to make the doors, these operations are a little more complicated, we should talk about them in detail.
Making doors
First you need to prepare two templates. One is made from an ordinary lath, with marks for the location of the loops on it. The second template is used to drill holes for the hinges. Ours is made of organic glass and a stop made of a piece of chipboard. Three holes are drilled in the glass: two for self-tapping screws and one for drilling a seat for a hinge.
Template for marking holes for hinges
Step 1. Place the door blank on the trestles, and press the wooden strip on one side with clamps. Mark the location of the loops. Then the same rail must be used during the manufacture of the second door. If you need to make multiple cabinets, these tools will be of great help.
The location of the door hinges is marked on the blanks
Important. Make sure that the hinges do not fall on the shelves; choose a free place to fix them.
Step 2. To guarantee, draw a line at a right angle and mark the loops. To make drilling easier, it is advisable to make small indentations with an awl.
Mark the drilling locations
Step 3. Drill holes for the hinge, secure it with self-tapping screws in the selected location.
Insert and screw the loop
Step 4. Place the door on a lining approximately 0.5 cm thick; it will provide the necessary gap for opening/closing. Attach a rail with marks for the location of the hinges to one side panel, transfer the dimensions and drill the mounting holes.
On the cabinet wall, markings are also made according to the template.
Step 5. Using the same algorithm, install all the hinges and hang the cabinet doors.
Hang both doors
All you have to do is screw on the handles and the cabinet is ready. If you wish, you can perform a special finishing of furniture surfaces. If you don’t want to, let the cabinet have a natural look, if plywood can be called a natural material.
Video - Plywood cabinet
The plywood cabinet you made is installed in the bedroom. This room requires a special approach when decorating the interior; it should not only relax as much as possible before bed, but also provide the opportunity for proper rest. What's a holiday without TV today? No. So, make a TV stand out of plywood and install it in the bedroom. There is an excellent article on this topic on our website.
Making a dining table
To give your kitchen a finished look, try making your own rectangular shaped plywood dining table with two wide legs.
A plywood table can be made of absolutely any shape
To do this you will need the following supplies:
- Plywood for the tabletop - sheet 80×120 cm, thickness at least 18 mm - 1 pc.
- Horizontal strapping - plywood strip 15×110 cm - 1 pc.
- Tabletop and leg supports - timber with a section of 7.5×20 cm and a length of 68.7 cm - 2 pcs.
- Table leg - timber with a cross section of 7.5×20 cm, length 60.0 cm - 2 pcs.
You will need to work on every detail to make a plywood table.
Supports for table top and legs
The beam is sawn lengthwise, resulting in 4 pieces measuring 7.5x10x68.7 cm. The elements that are adjacent to the floor are shaped into legs. Marks are placed at a distance of 20 cm on each side, between which an arched line is drawn with a maximum height of 5 cm. The outer part of the support for the legs is rounded or left rectangular.
In each tabletop support, a part of a rectangular block is cut out in the center to a depth of 40 mm - the table leg should fit into the recess. The outer edges are rounded.
Table legs, horizontal strapping and table assembly
The legs are left rectangular or given a curly shape. A horizontal strap holds them together, and the part is chamfered.
After sanding the workpieces and treating them with an antiseptic solution, a plywood table is assembled:
- Connect table legs to tabletop supports and floor elements
- Tighten the structure with a horizontal strap, installing it between the legs
- Place the tabletop, tighten it with screws from below through the supports - you will need at least 4 screws on each side
All parts are fastened together with euroscrews, the caps of which are closed with plugs. The table is coated with varnish that dries for 36 hours.
WATCH THE VIDEO
Project development
In order to make a kitchen set with your own hands, it is not at all necessary to have professional training. To do this, you just need the skills to use basic construction tools.
The first stage of creating a kitchen set with your own hands is design. To begin with, measurements are taken in the kitchen of places to install furniture. A drawing of the project can be made on paper or using a special program on a personal computer. When developing a project, you need to consider the following points:
- Number of cabinets.
- Dimensions of wall-mounted and floor-mounted modules. Average dimensions for wall cabinets: width - 60 cm, depth - 30 cm, height - 70 cm. Average dimensions for floor cabinets - 60x45x85 (WxDxH). The height is taken taking into account the thickness of the table top. The distance between wall-mounted and floor-mounted modules is approximately 50-60 cm.
- Door opening method: horizontal or vertical, hinged or compartment type.
- The number and location of household appliances, especially built-in ones.
- Types and number of boxes.
- Architectural features of the room: niches, protruding corners, as well as uneven floors and walls. All this must be taken into account when developing the project. However, in practice, you usually have to adjust all the parts on site.
- Ways to cover communications: various pipes, ventilation systems. They can be hidden with sheets of plywood so that they form a single surface with the kitchen cabinets. At the same time, it should be possible to remove this plywood or open it like a cabinet in order to gain access to the pipes in case of emergency or planned repairs.
Advice! You can make hanging boxes more spacious by increasing their height almost to the ceiling. The disadvantage of this idea is that it will be difficult for short people to reach the contents of the upper shelves.
To make cabinet doors, thin plywood, glass, mirror or plastic are used.
Summing up
Preparing materials, furniture diagrams and drawings, and directly assembling a kitchen from plywood is a painstaking but interesting task. The headsets are durable and beautiful, the release of harmful substances is minimized. Self-manufacturing of the design allows you to take into account the nuances of a particular room and the individual characteristics of family members. If the set is a complex structure, then the table can be assembled in 1 day. Try to start with this to understand how plywood behaves and what skills will be required to make more complex structures.
Assembly nuances
Before you start assembling the set, prepare all the parts and blanks. Be sure to sand the cuts and edges. A specialized drill attachment and coarse sandpaper (for small parts and assemblies) are suitable for this.
Places of chips that could occur when cutting workpieces need to be puttied. In this case, it is wiser to use acrylic mixtures. They are the most convenient when working with veneered surfaces. Be sure to let the putty dry, because it may shrink, and then the treatment will have to be repeated.
At the final stage of preparatory work, all workpieces must be coated with antiseptic impregnation or ordinary drying oil. Moreover, the coating is applied at least 2 times, allowing each layer to dry completely. This measure is necessary, since the kitchen is a place with high humidity. Accordingly, your furniture must be protected as much as possible from negative external influences.
Assembling a plywood kitchen needs to start with the frame of the drawers. It is worth considering that if the walls are made of a sufficiently thick sheet (10-15 mm), then you will not need additional stiffeners. The walls themselves will take on their role. If you are not sure about the stability of the cabinets, you can make internal corner ribs from timber. But this can create cracks that must be sealed.
Connecting parts
Sufficiently thick elements of kitchen blanks made of plywood, located at right angles to each other, do not require the use of additional fixing units. To connect them you need to do the following:
Assembly diagram of a kitchen table-cabinet.
- Mark the position of the fastening unit and the parts to be joined relative to each other.
- Drill out the sockets for the fasteners. First, use a thin drill to mark a hole on the side parts, and then countersink them.
- Do the same with the end elements. Do not be afraid that the plywood will not withstand the stress and will burst. As a rule, high-quality veneer does not delaminate. In this case, additional precautions can be taken. Before drilling the sockets, tighten the parts to be joined with clamps. Make sure that the hole in the end piece is no smaller than the length of the screw blade.
- Apply a silicone-based sealant to the end and secure the parts to be joined with screws. Be sure to thoroughly wipe off any remaining sealant. Otherwise, dried marks can ruin the appearance of your kitchen furniture.
In the same way, assemble the frames of all the drawers of the plywood kitchen. In this case, you will not have the need to additionally glue the parts. The sealant will also serve as a fastening element. The bolt heads can later be puttied or closed with special plastic plugs.