- Materials for felt flowers
- Felt flower patterns
- Felt rose
- Felt violet
- Felt chrysanthemum
- Felt peony
- Felt hydrangea
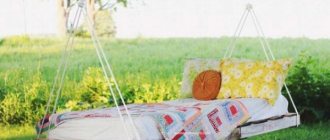
- Pillow with felt flowers
An original decorative decoration in Handmade style – felt flowers. It’s easy and fairly quick to do, but it turns out very unusual and beautiful.
Felt, it should be noted, is the favorite material of handicraft masters. How many possibilities it opens up for creating a designer item. Judge for yourself how original a flower brooch on a black dress will look. And in general, on a dress of any solid color. After all, sometimes a small accessory is enough to make the same outfit look fresh and new. You can also use felt decorations to complement the appearance of the box, decorate a postcard or photo album. Felt flowers look original on handbags, hairpins, as decoration for hairbands, as well as in the design of any gift souvenirs.
A few words about what felt is and the reasons for its popularity. Felt is nothing more than felt made from rabbit or goat hair. Felt, in turn, is a non-woven textile. Wool or synthetic fibers can be used as a base. The choice of wool is determined by the peculiarity of its structure. The fact is that the edges of its fibers have so-called “notches”. This ensures good adhesion of the fibers to each other.
Making felt flowers with your own hands is a fun and not difficult activity. And all this thanks to the pliability of the material. It differs in its density and thickness. Felt can be bought at almost any craft store or ordered online. More often on sale there are felt sheets with a thickness of 2-2.5 mm and a size of 30*40 cm, as well as a thickness of 4 mm and a size of 20*30 cm.
At the stage of choosing shades, you can show all the richness of your own imagination. The creative process fully corresponds to the author's concept and imagination, and therefore products can be created in any color scheme. Fortunately, the modern market for handicrafts makes it easy to realize even the most daring ideas. Some people use ready-made felt sheets with floral prints. Others prefer to combine the original contrasting colors. The boundaries of this process are determined solely by the taste of the master.
Felt flower patterns
Felt flowers, patterns of which can be found in large quantities in catalogs of online magazines, are usually very simply designed. A regular chamomile template can be used as a base. But the work, made in several layers of contrasting or monochrome colors, takes on a completely different concept. Cut out paper petals. This will be the template. Here are some ready-made patterns for felt flowers:
Let's look at the assembly process using the example of a flower made using this pattern:
First you need to recreate the pattern design directly on the fabric.
Next, cut out the felt blanks. The petals turned out to be of different sizes in accordance with the level of location.
Then the edge of each petal is trimmed with a skillful seam using floss or not processed at all.
We place the petals on top of each other from largest to smallest (or vice versa) and sew them in the center to form a recess for the future flower (you need to sew it tightly). And let's move on to creating the core. Place a circle cut out of felt on glue and place it in the middle of the flower.
Sequins, pre-prepared beads, beautiful beads will add originality to the resulting work of art.
Depending on the intended purpose of the product, we attach a pin or sew an elastic band to its reverse side.
We are posting a few more photos of flowers that inspire new creations. Each of these flowers uses French knots as an additional decoration:
The felt flowers presented below are master classes from handicraft masters. These works will help beginners master the simple creativity of creating decorative floral elements.
cherry leaves
Let's start the master class with the simplest standard-shaped leaves. Let's take oval cherry leaves with sharp edges as an example. The veins are parallel, identical on both sides. Contours are drawn on felt with chalk and cut out according to the template using scissors. You can make these felt leaves into two layers. Then the work will look more voluminous, and the threads from the embroidery of the veins will not be visible on the back side. Their contours are applied with a thin simple pencil.
If you have a machine, you can make veins on it. But if not, then don’t worry, the product will look great even with hand embroidery. When both sides are made, the felt leaves can be glued together. Felt is an easy material to work with, as it cuts, glues, and sews well. When a lot of multi-colored leaves have been made, you can string them on a fishing line and hang the garland on the window.
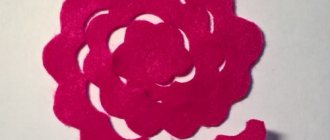
Felt rose (master class)
This amazing accessory is ready to “settle” on the evening dress or coat of its resourceful owner.
Let's start from the base of the flower. To do this, we will prepare a circle whose diameter will be 10 cm. We cut out semicircular petals along the edges of the circle, gradually moving from the outer edge inward.
The central part is rolled up, thereby forming the core of the future rose.
It needs to be secured with a pin and filled with a layer of glue. After the glue has dried, you need to wrap the rest of the felt around the resulting bud and close the cut from the bottom side.
This is such a wonderful rose that you will end up with!
If you make several roses, glue them to a piece of fabric and sew on a metal clasp, you will get a wonderful brooch!
For clarity, a few more roses made according to a similar principle:
Tsvoric shows how to decorate a hairband with felt roses (music by Key.peter):
Double layer crafts
You can make original maple leaves from felt. This option has two layers. The bottom one is solid and simply represents the contour of a maple leaf outlined according to a template. The top carved layer is made of a different color. In our case, the bottom sheet is red, and the top sheet is beige and smaller in size. The bottom sheet should be visible along the edges. The main work will be on the veins. First you need to draw them with a pencil.
Then we bend the material in half and make cuts with sharp scissors. The fabric is cut into thin strips according to the drawing. When all the lines are cut, the light sheet is glued onto the large red one. The bottom layer peeks through the slits, and the veins turn out to be red. It’s easy to make such beautiful felt leaves with your own hands, and they look original.
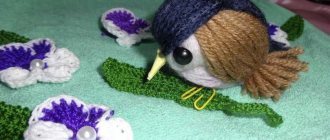
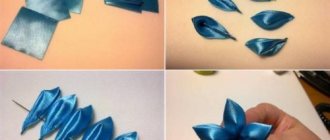
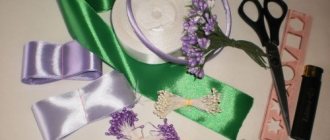
Felt violet (master class)
Materials for work:
- felt (sheets of two different colors: lilac - for petals, green - for leaves)
- scissors
- threads, the color of which should match the color of the violet
- needle
Let's prepare 5 templates for future petals (diameter - 4 cm):
We take one of the petals in our hands and fold it in half twice. We get a petal in the form of a corner:
Using a couple of stitches we attach the corner to one of the blanks:
We repeat the steps for the remaining petal corners. To achieve the desired neat effect, carefully monitor the direction of the petals (they should be directed in one direction):
At the end of the work, the flower should be thoroughly straightened:
Let's move on to cutting out the leaves:
Sew them together:
Lifting the petal, we fasten the leaves to the base:
We enjoy the result!
For example, you can decorate a headband with such flowers:
DIY felt leaf garland - step by step tutorial with photo
A simple green garland that can brighten up any interior. To make it, you need to stock up on green felt (any shade).
Initially, make a leaf template on paper, then transfer it to felt. Carefully cut out the workpiece. When a sufficient number of leaves are ready, you can proceed to fastening them. You can fix them either to a thread or thin rope, grosgrain ribbon, or to each other. To fasten the leaves, use silicone hot melt adhesive. This garland will look beautiful in any corner of both home and office interiors.
Felt chrysanthemum (master class)
The felt strip must be folded in half (widthwise). For reliability, fasten with sewing pins.
On the side where the fold was made, we form identical cuts.
Using matching threads, we sew the strip with large stitches and roll it into a roll, forming petals. We secure it by sewing the layers together in several places.
All that remains is to straighten the felt and form a beautiful flower!
From two parts
As mentioned above, this is the simplest pattern, but this will not make the product itself look the worst.
You need to cut out a circle from fabric with a circumference 10-15 centimeters larger than the diameter of your head, this will be the first detail of our future beret.
And the second element is a strip of fabric, approximately 7-8 centimeters wide, the length should correspond to the diameter of the circumference of your head. Now we place the cut of the circle on a strip, and that’s it.
You can increase the volume of this beret by simply making the circle larger. You should end up with the same beret as in the photo below.
Now let us present to your attention the pattern of a classic beret; it is made of three parts.
Three parts
Our future pattern will consist of such details as: the bottom, sides (otherwise called crowns) and a cache-pin (rings).
Construction of the pattern:
- First you need to measure your head circumference. Place the measuring tape in the middle of the forehead, wrap it around the head, passing behind the occipital protuberance. It is better to ask someone to help you, in this case the measurements will be more accurate.
- Now, on tracing paper, draw an even circle (it’s better to use a compass), according to the measurements that you made before.
- Next, stepping back from the circle you just drew, draw another circle parallel to this one. The height of the sides will depend on how much you retreat. Their height can be different, most often they are made from 6 to 12 centimeters, you proceed from your desires. But it is worth considering that it is better to make the side of light fabric lower, and if you are sewing a beret from thick fabric, it should be higher. When making a fabric pattern, cut a circle along the larger border, then a circle along the measuring strip.
- Now we draw a strip of fabric for the band, the length of the strip depends on the diameter of your head, and make it about 6-7 centimeters wide.
Below is a visual diagram of this pattern, taking into account that the head circumference is 56 centimeters and the height of the sides is 12 centimeters.
Read this: DIY car organizer: trying to sew at home
Takes from wedges
This pattern is the most complex, but the headdress ends up being very unusual. The pattern contains a lot of elements and requires careful and careful work.
Here is a diagram of this pattern to give you an approximate idea of what it looks like.
Construction of the pattern:
- The first step is, naturally, taking measurements.
- Now we need to calculate the radius of this circle, we do this using the following formula: R = P/2, P is the circumference of the head.
- Now we take A3 graph paper and draw a top and side view on it. We draw the axis of symmetry, in this case we need to step back from the edge a little more than the radius and draw a vertical line. Next, draw a horizontal line - this will be the base of our product, and it should be equal to the circumference of the head. Using a compass, we draw a semicircle of radius from the point where the horizontal and vertical intersect - we have a vertical projection. Increase the radius, taking into account the thickness of the material, hem and seam. Draw a silhouette line on the vertical projection. Below are diagrams of this stage of work.
- Now we make a broken line from a smooth one. Take an ordinary ruler and apply it to the silhouette line, draw small segments along it that run along the entire length of this silhouette. Don't forget to number these segments to make it easier to work in the future. It is worth considering that the more bends on the silhouette line, the more segments you will get.
- Now, from the points that we have numbered, we draw straight lines to the vertical axis. These lines will create circles on the horizontal projection. You can draw only part of the circles; their size will depend on the number of wedges you have planned.
- Next, use a ruler to measure the distance from the circle to the axis; the resulting number is its radius. Now, using the formula R=P/2, we will find the length of each of the circles, it will be needed to cut out the wedges: the length of the circles must be divided by the desired number of wedges. It is worth considering that the more wedges, the smoother the surface is, the more unusual the look, but when there are a lot of wedges, this is also bad, you get an abundance of seams, as a rule, you sew from 8 wedges.
- Let's start cutting out the wedge itself. We draw a vertical axis and mark distances on it with dashes that are equal to the segments marked on the broken line. Now we mark the width of the wedge at the level of these lines. We determine this width in the top view.
- Now we draw the outline of the wedge through the resulting points, do not forget to check the angle at the top. If you want the top of the beret to be flat, then in the top view the angle should be the same. In order to connect the wedges, do not forget to leave seam allowances.
As mentioned above, the number of wedges is chosen based on the desired shape; as a rule, an even number of wedges is made. But the beret, which consists of five wedges, looks very original, angular, but, so to speak, is not for everyone.
You can decorate berets with visors, bows, flowers, embroidery, in general, with anything.
Video on the topic of the article
- You can watch more detailed lessons on patterning a fabric beret in the videos below.
Source: https://knittochka.ru/shityo/vykrojka-bereta-iz-tkani.html
Felt peony
This flower will consist of a large number of petals.
Having cut out rectangles from felt, make a fringe on one edge and round the other. There should be about 20 petals. They should all be different sizes.
We pinch the edge that was rounded and fix the petal with glue.
Forming a flower:
Cut out a yellow strip. We cut it on one side. Then we roll it up and fix it with glue. We get the finished core.
To use a flower as a brooch, you need to attach a small piece of felt to the base from the wrong side, and then pin it all together with a pin or metal clasp.
Felt garland without sewing - how to make it yourself
A bright and simple garland that is easy to make. Two colors of felt strips are usually used for it. White stripes with red and pink will look very bright, but other options can be used.
Two strips of the same length need to be folded and secured together. Next, make cuts on the strips at equal distances. All that remains is to stretch the ends of the strips into the slots using the technology indicated in the master class. The finished product has a spiral appearance.
Felt hydrangea (master class)
Materials for the flower:
- felt
- scissors
- glue gun
It is necessary to cut out 13 felt circles of the following sizes: 1 piece - with a diameter of 3 cm, 12 pieces - with a diameter of 2 cm.
We apply hot glue to the center of each circle and thus form future petals.
We take a large circle and, using a glue gun, distribute 4 prepared petals along its perimeter.
Between these petals we glue the next four. Repeat until the circle is filled.
Beautiful patterns of women's fabric berets
For several centuries now, berets have not lost their popularity. They can be combined with dresses, coats or overalls. These hats are worn by everyone from children to men. This article talks about how to make a fabric beret with your own hands and what materials are needed for this.
What are berets good for?
Hats can be worn in any season; they perfectly emphasize the shape of the face. Quite easy to sew and decorate, it will become an indispensable part of your wardrobe. They can be worn with coats, jackets or suits. A hand-made knitted beret will highlight the individuality of your look.
Beret, fabric pattern
For example, in France, women have hats for different occasions. Both for holidays and for everyday outings. They can complement business suits or evening dresses. And children generally cannot do without this clothing. It perfectly protects from the sun or light rain, and does not allow drafts to pass through.
Choosing fabric
The products are made from rigid fabrics that hold their shape well and are easy to care for. A fabric beret pattern can be found on the Internet or in tailoring magazines.
Such products can be sewn for dolls so that girls can play fashionistas. It is advisable to take high-quality fabric, so it will have a high price.
Cheap materials can quickly deteriorate, crumble, or form a lot of pellets.
Models and styles of fur berets
Fur hats and berets are similar, but have significant differences. This headdress is a soft cap without a visor and side parts, usually widened at the top and narrowed at the bottom. It can cover the ears or be only on the head. Functionality depends on the style and material. Examples are shown in the photo.
Fashionable styles
When choosing a factory product, you need not only to follow fashion, but also to know which variety suits a certain type of face. Any round hat visually lengthens the look. Therefore, it is not recommended to be worn by girls with an oval face type.
Fur beret
With visor
Despite the fact that the visor characterizes a cap or cap, it can also be present on berets. The barely noticeable length adorns the face and does not cover it at the same time.
Beret hat with visor
The most common model that can be found in stores. It is easy to sew, which is why it is so popular among other products. Women's berets made of mink, arctic fox, and sable look ideal with leather outerwear, down jackets and winter jackets. With a mink coat, it must be selected carefully. It should be a tone darker or lighter than the outerwear.
Mink fur beret
Volume
Women's fur berets themselves provide additional volume to the head due to the pile. The longer it is, the more impressive the headdress looks. When purchasing such an accessory, you do not need to decorate it with various decorations. They will only spoil the image and impression of the sophistication of the texture of the material.
Volume beret
With elastic band
This type of model fits perfectly on the head and does not fall off when wind or movement occurs. Typically, a wide elastic band is used along the edge of the factory product.
With decor
Various decorations are added to the look if the headdress has thin and not long pile. Various brooches, flowers, pendants are placed on the side.
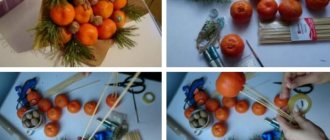
Bouquet tree
An autumn bouquet of nature's gifts, which are abundant in the garden, is a worthy decoration for any room, including a group in a kindergarten. To the bright autumn fresh flowers, it is enough to add sunflower inflorescences, reeds, red and yellow leaves, and rowan berries. The unusual tree bouquet looks exclusive. To make it you need the following:
- Cloth tape (orange, brown, black or green).
- Tight tourniquet.
- Elements for decoration: fern, reeds, coffee beans, physalis, rowan inflorescences, acorn caps may be suitable.
- Long tree sticks.
- Leaves with twigs or cuttings.
- Any autumn flowers.
- Wire of medium thickness.
Rowan branches are secured together with tree sticks using wire. Gradually add fresh flowers, securing them into the composition also with wire. At the end, it is harmoniously decorated with additional materials. The entire trunk of wire, sticks and stems is wrapped with adhesive tape and a tourniquet to the bottom.
[custom_ads_shortcode3]