| Iris folding or rainbow folding technique |
I would like to dedicate this master class to the irisfolding technique, which translated from English means folding the iris, iris folding.
Indeed, the design is formed as a result of gluing paper at a certain angle in the form of a twisting spiral. We, in a way, replace paints with colored paper.
This technique is simple, but at the same time it requires attention, accuracy and perseverance (when it comes to teaching children). Drawings in iris folding are made using iris templates.
In iris folding, you can use special paper for this technique, regular colored paper, velvet paper, gift wrapping paper, colored foil, in general, whoever has enough imagination...
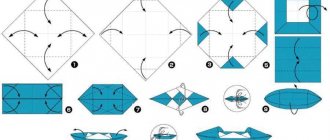
1.
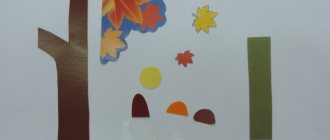
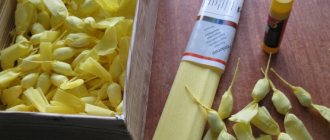
We will need colored paper (in our case, the background is velvet paper, the drawing itself is foil), an iris template, a pencil, a ruler, a stationery knife, scissors, copy paper, pencil glue or PVA glue (in general, preference is given to adhesive tape, because glue you can stain the front side of the picture), it is easier for children to work with glue.
- 2.
- We take background paper (usually thick paper) and, using carbon paper and a pencil, trace the outline of the design onto the wrong side of the paper.
- 3.
- Using a utility knife or scissors, cut out the outlined shape on the background.
- 4.
- Using adhesive strips, glue the iris template to the front side of the background.
- 5.
We get a picture with a template for paper layout. The template has numbers and lines. The lines indicate the border for laying out the paper, and the numbers indicate the sequence of pasting it. A list of numbers with an indication of color is printed on the templates, for example: color A and a list of numbers, color B, etc. etc., the color is chosen according to your desire.
6.
Having decided on the colors, we begin to cut the paper into strips 2 cm wide and 20 cm long (the width and length of the stripes depend on the size of the template; it is also necessary to take into account the supply of paper, since the stripes will overlap each other). We bend the cut strips lengthwise by 1/3 or in half.
7.
Let's start our rainbow layout.
We apply the strip (fold line to the center) to the number 1 (the layout always starts with one and continues in ascending numbers), leave an allowance on the sides, cut it off and apply glue on both sides of the strip (the glue is applied carefully, because
may protrude onto the front side and spoil the desired result), glue it, and so continue until the middle, not forgetting to change the colors of the paper. The middle of IRIS can be covered with any bright paper, or matched by color.
8. Wrong side, i.e. Where the layout was made, we cover it with a sheet of paper of the same format as the background (we hide our pasted stripes).
Origami
Designer Jen Stark, an American, makes very interesting works from paper. Some will say that you can surprise anyone with works made from paper; everyone can do it. Well, first let someone do at least something remotely similar to what the designer does, and then speak.
After all, paper is not a very easy material to use when creating artwork. It is very fragile, it tears, it stains, if it is wrinkled in some place - consider that the sheet can be thrown away - it will no longer be suitable for this kind of work.
Of course, her sculptures are mostly abstract.
There are a lot of different flowers, there are stars, but most of them are just shapeless figures. Some are symmetrical, some are not. But they are all bright, colorful, reminiscent only of good, positive things.
It’s not for nothing that she uses multi-colored paper! If her works were, say, in black and white, they would evoke completely different emotions in us. No, the work wouldn’t get any better or worse, it would just be that our reaction would change somewhat.
This fascinating technique - creating three-dimensional figures from triangular origami modules - was invented in China. The whole figure is assembled from many identical parts (modules).
Each module is folded according to the rules of classic origami from one sheet of paper, and then the modules are connected by inserting them into each other. The friction force that appears in this case prevents the structure from falling apart.
Therefore, you can assemble such a swan without glue (if you are not going to use it as a toy).
To assemble a swan you will need quite a few modules. Therefore, it is easier to make it in a large group. Also, this type of creativity is great for group work at school. You can experiment with different types of paper.
Suitable office paper of different colors, coated colored paper. Sometimes such figures are made from magazine clippings and candy wrappers. School colored paper is not suitable because it is too thin, friable, breaks and tears at the folds.
Swan execution order
- From multi-colored paper rectangles measuring approximately 40x60 mm, create the following set of triangular origami modules:
If you want to make a snow-white swan with a red beak, then take 458 white rectangles and 1 red one.
- Take three pink modules and arrange them this way.
- Insert the corners of the first two modules into the two pockets of the third module.
- Take two more modules and attach them to the first group in the same way. This is how the first ring is completed. It consists of two rows: an inner row, the modules of which are on the short side, and an outer row, the modules of which are on the long side.
- Each row consists of 30 modules. Assemble the ring along the chain, holding it with your hands. Use the last module to close the ends of the chain.
- Take 30 orange modules and complete the third row. Please note that the modules are put on in a checkerboard pattern.
- Complete the fourth and fifth rows in the same way, also consisting of thirty orange modules.
- Now, holding the edges of the workpiece with your fingers, perform a movement as if you want to turn the entire ring inside out. It should look like this. From above it resembles a stadium.
- From the reverse side, the “stadium” will look like this:
- Complete the sixth row, consisting of 30 yellow modules. Now you need to put them on from above. Check that the arrangement of the modules is the same as in the previous rows.
- From the seventh row, start making wings. Choose the side where the swan's head will be. Choose one pair of corners (from two adjacent modules). This will be the attachment point for the neck. To the left and right of this pair, make a row of 12 yellow modules. Those. the seventh row will be 24 modules and has two spaces.
- Continue making wings, decreasing each next row by one module. 8 row: 22 green modules (two times 11), 9 row: 20 green modules, 10 row: 18 green modules.
- 11th row: 16 blue modules, 12th row: 14 blue modules.
- 13 row: 12 blue modules, 14 row: 10 blue modules, 15 row: 8 blue modules.
- 16th row: 6 purple modules, 17th row: 4 purple modules, 18th row: 2 purple modules. The wings are ready. Shape them so that they are convex at the bottom and slightly curved at the top.
- Make a ponytail consisting of five rows. In the same way, reduce the modules by one in each row. It will take 12 green and 3 blue modules.
- To make a neck, the pieces need to be connected in a different way. Insert two corners of one module into two pockets of another.
- Connect 7 purple ones to the red module. Try to immediately give your neck the desired bend. If you don’t want the swan’s beak to be forked, it’s better to glue the corners of the red module in advance.
- Next, connect 6 blue, 6 light blue, 6 green and 6 yellow modules. Give your neck the desired shape.
- Strengthen the neck on two corners between the wings.
- If desired, add details - eyes, bow.
- Make a stand in the form of two rings, consisting of 36 and 40 modules. Connect the modules in the same way as for the neck.
- If desired, the rings can be glued together and the swan can be glued to the stand.
The name of this technique, iris folding, can be translated as “rainbow folding.” The design is filled with thin paper strips, which, overlapping each other at a certain angle, create an interesting twisting spiral effect.
Source: https://infourok.ru/masterklass-po-tehnike-ayris-foldinga-3172108.html
Iris Folding: what is it?
The Iris Folding technique is a special method of folding colored paper. Translated into Russian, the name translates as “rainbow folding”. To begin with, blanks are made from colored paper, and then they are folded in a special way in a spiral. As a result, interesting three-dimensional paintings appear.
You can “draw” anything using this technique. The result of folding depends on the desire and imagination of the author of the work. You can make a star or a huge painting of a modern city. It all depends on the availability of time and desire.
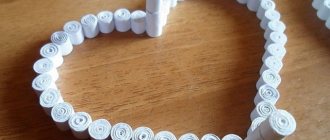
Iris folding
| Iris folding from autumn leaves Tatyana Prosnyakova Master class 1370 124 | Christmas tree using iris folding technique Tatyana Prosnyakova Master class, Postcard 1171 61 | Building a template for the iris technique... Tatyana Prosnyakova Master class 991 26 | Cheerful snail sonce Master class, Craft, product 227 44 |
| valentines gatase_14 Postcard 126 96 | My New Year's marathon IraGrin Postcard 104 102 | Men! + diagram cirova Postcard 95 16 | Loving hearts ! + diagram cirova Postcard 94 12 |
| My New Year cards Svetik2008 Postcard 89 14 | Easter-2 (closed) + ATS review ShMyGa ATS card 78 82 | Mastering IRIS FOLDING EVP Master class 69 8 | Sunny summer again, again... Masterishka Pedagogical experience, Photo report 53 39 |
| Works for the exhibition Vitulichka Crafts, product 52 36 | Happy Easter! Mashusya Master class, Postcard 47 4 | Easter motives 2 cirova Postcard 46 62 | Bullfinch + diagram GALANAHODKA Painting, panel, drawing 46 10 |
| Happy New Year!) Nuha Postcard 46 13 | Postcard-frame for photographs Borovikova Oksana Postcard 46 6 | April 4 is International Bird Day. Giraffe Extracurricular activities 45 18 | Spring horse. knyagna TANIYA Painting, panel, drawing, Master class 42 36 |
| Maple leaves Anjuta Postcard 41 14 | Burenka Giraffe Craft, product 41 12 | Iris folding Irishka-67 Craft, product 41 13 | I'm getting ready for my son's wedding. (1) Natalya Suponnikova Decor of objects 38 27 |
- 1
- 2
- 3
- 4
- 5
- 6
- 7
- 8
- 9
- …
- 29
- →
Source: https://stranamasterov.ru/content/popular/inf/776
History of technology and modern times
Rainbow folding appeared in Holland in the middle of the last century. Since cameras with apertures were used at that time, the Dutch felt that their work resembled it. They were also associated with the iris of the eye. This is where this unusual name came from.
Although more than seventy years have passed, the technology has not lost its relevance. It is widely used in the modern world, it is becoming one of the fashionable areas of decorative and applied art.
If previously only colored paper and cardboard were used to make products, now the range of materials has become much wider. Now scrap and origami paper are used, and various fabrics are used.
Why is rainbow folding so popular?
It’s easy to find lessons and master classes on Iris Folding on the Internet. The technique is popular because it’s easy to master and accessible even to older preschoolers. In addition, the materials for making products are inexpensive, and the result of the work can please both children and adults.
Young mothers and teachers enjoy working with Iris Folding. The technique is used not only for making cards and paintings, but is also used as a decorative element. It is used for scrapbooking when making diaries, it is easy to mix with other techniques,
History of origin
The homeland of the iris folding technique is the Netherlands - Dutch craftsmen made large three-dimensional paintings with spiral prints from cardboard and multi-colored paper. The resulting masterpieces were somewhat reminiscent of the apertures of cameras popular at that time, and were also visually similar to the iris of the eyes.
The technique quickly gained popularity among Dutch masters, and soon came to other countries of the Old World. The secret to the success of iris folding is explained by the ease of learning the principles of the technique, the availability and low cost of consumables, as well as the ability to independently create stencils and diagrams.
Crafts in the direction of iris folding attract with their appearance and literally motivate creativity. The simplest options are available for use by preschool children; they become familiar with more complex models as adults.
This technique is very popular with young mothers and becomes a permanent hobby for girls and women whose area of interest is related to the development of children. In addition, she is a source of inspiration for craftswomen who are in search of unconventional techniques and developing methods of combining those already studied.
What tools are needed?
Everyone has the tools necessary for making paintings in their home. If not, then buy:
- ruler;
- simple pencil;
- scissors;
- stationery knife.
Cover the table at which you will work with a thick base to protect it from cuts while working. After that, get down to business: select a template or make it yourself.
Making templates (stencils)
To create a template you need a sheet of checkered paper, a ruler, a pencil, and an eraser. Select a shape that matches the design. To determine the size of the stencil, place the sheet on the drawing and mark its approximate dimensions with dots.
These points determine what size to make the stencil. Simple geometric patterns in the form of a square, rectangle, triangle and circle can be made by beginners on their own.
Rules and techniques
If you are a beginner, then it is better for you to start with standard patterns: triangle, square, circle. On their basis, a wide variety of paintings are created by folding. To do this, a thematic design is applied to the cardboard, and then folded paper parts are applied and glued onto it.
The main elements used in the technique are triangles and rectangles. To create a three-dimensional drawing, prepare (fold) the required number of parts, which are then adjusted to the template.
Toys
Any kid will gladly agree to make his favorite toy out of paper: a car, a doll, a teddy bear, and hang such a picture on the wall of his room.
To do this you need to prepare materials:
- drawing of your favorite toy;
- a template that matches the contour of the image;
- paper, the same color as the toy;
- decorative stickers to decorate the picture;
- frame.
Preparation method:
- Take colored cardboard or cover it with beautiful paper.
- Draw an outline and cut it out.
- Cut colored strips from paper that, when folded, correspond to the width of the template step.
- Attach the template to the cardboard and begin gluing the strips.
- After gluing the colored paper, remove the template and decorate the front side of the picture with decorative elements.
- Insert the picture into the frame.
Template creation schemes
Creating simple templates is possible even for children starting to work in Iris Folding. On a notebook sheet in a box, using a ruler, draw a square with a side of 140 mm. After this, place points at a distance of 15 mm from each corner. Connect them. You will get a square within a square.
Then repeat the steps, also measuring the same distance from each corner of the inner square. And so on up to eight to ten times, until a small square is formed in the very middle.
If the template is simple, start posting the picture right away. When you have a complex template in front of you, number the sequence of sticking on the parts. If it is very difficult, also mark out the color scheme.
How to draw a diagram?
It is better for beginning craftsmen to use drawings for iris folding, which are offered in various master classes, but there is nothing difficult in creating a diagram yourself. All you need: a couple of sheets of paper of the desired size, a ruler, a simple pencil and an eraser, just in case.
- Select a template for the future drawing, draw or print it on 2 sheets of paper: you will need the first one as the basis for the diagram. From the second, the picture will need to be cut along the contour to cover the iris folding. In this master class, the drawing of a bunny from the cartoon “Smeshariki” is taken as a basis.
- Draw the ears and paws with identical parallel lines in an order convenient for you - since these parts of the picture are very small in size, you simply won’t be able to lay out a spiral in them.
- Frame the body with an equilateral figure, for example, a square, as in the figure.
- On each side of the square from the left edge, put pieces of the same length - they are called a step. As a rule, 1 step is approximately 1-1.5 centimeters, but you can change the size at your discretion.
- Connect the points of the segments with straight lines - you should get another square inscribed into the first one at an angle. Immediately number the resulting figures in the direction of “twisting” the future spiral - this will simplify the work.
- Repeat the previous 2 steps until you have a diagram with a sufficient number of figures to fill.
You can choose any desired shape instead of a square: triangle, rhombus, polygons - they do not have to be equilateral. Over time, you will get the hang of quickly drawing beautiful, intricate iris folding patterns before making a card.
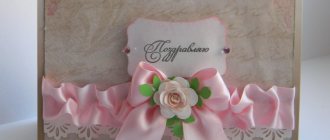
Making paintings using the Iris Folding technique: master class
To get a beautiful postcard or picture that will work for you and your friends, you need to carefully glue strips of paper onto the stencil. For the simplest products, three colors are enough; for more complex products, the color scheme should be more varied. Remember that the paper is cut along the long edge, having first drawn a cutting line. The width of the part should be two and a half times the mark on the template. Allow two centimeters on each side. During operation, the strips fold and overlap each other. This is the secret of a three-dimensional image. Now let's look at the technique step by step.
The main stage of work
Iris folding technology is based on carefully gluing multi-colored stripes in accordance with a stencil. Consider the sequence of actions when making a postcard:
Mark the parameters of the strip on decorative paper. For simple ornaments, three colors are usually selected. The cutting line should go along the long edge of the paper. The width of the strip is made 2.5 times larger than the pitch on the template. The length depends on the pattern, take care of an allowance of 2 cm on each side.
Cut it out.
Fold the strips in half, that is, make them narrow and long.
Prepare the base. Bend the cardboard into a card shape. Apply a design (Christmas tree, balloon, cake) to the front side. Cut using a utility knife or thin scissors.
Prepare a template of the required form.
Secure with staples to the front of the card.
Lay out strips, alternating colors. The first strip of one color, then the first strip of a different shade, then a third. The second strip of the first color, etc.
The first strips are fixed with glue or tape on the base itself. The rest are glued both to the base and to the adjacent element.
Important! Do not apply glue to the entire surface of the decorative piece; lubricate only the places where the strips touch.