DIY postcard making techniques
There are many techniques for making cards and souvenirs from paper yourself:
- Scrapbooking or decorating photo albums, frames or cards with paper, beads, buttons and other suitable materials. Using scrapbooking, they create unusual themed souvenirs.
- iris folding method was invented in the Netherlands and involves folding a picture from strips of colored paper in such a way that the figure takes the form of a spiral. The postcards turn out colorful and unusual.
- Kanzashi is a Japanese type of needlework based on making flowers from ribbons folded in a certain way. The technique requires perseverance and takes quite a lot of time.
- isothread technique is embroidery on cardboard or thick paper, performed using strict geometric lines.
- Quilling is a simple and accessible technique for decorating cards using strips of paper twisted into a spiral.
- Another type of Japanese art, origami , is the ability to fold various figures of animals or plants from paper.
- Decorating products using decoupage was invented in China. Craftsmen used pictures cut out of paper to decorate furniture, and for durability and longevity they were coated with varnish. Since then, the technology has not changed at all. Napkins are considered an ideal material for decoupage, due to their thin and delicate texture.
Postcard on the theme “Autumn has come” made of paper and cardboard with templates
In order to make a postcard with an autumn theme, it is not at all necessary to take natural materials. You can limit yourself to plain paper. See for yourself.
Materials we will need:
- Scissors;
- Colored paper and cardboard;
- Gouache and brush;
- Glue;
- Stationery knife;
- Markers.
This is the kind of postcard we should get:
Subsequence:
We make a base out of thick cardboard. We cut out a rectangular hole in the left side, leaving a margin of 3 cm wide. On the right inner part we glue the background - a blue rectangle 10x15 cm.
We cut out birch tree trunks from white paper and draw bark on them with a black felt-tip pen.
We prepare all the other details of the composition: here these are mushrooms, grass, the trunk and crown of a large tree. You may have other elements.
Glue the sun (a circle of yellow paper) and birch tree trunks onto the blue background.
Then weed.
We complete the composition with mushrooms.
On the front side of the work we glue the tree and the inscription. There is no need to completely coat the tree trunk with glue, otherwise it will stick to the inside of the postcard. Lubricate only the necessary parts.
Use felt-tip pens or gouache to complete the details: birch branches and leaves on them. Ready!
Here are a couple more ideas for autumn cards and appliques.
And of course, I can’t help but give examples of products using my favorite technique – quilling. Look how wonderful it is!
New Year card with buttons using scrapbooking technique
A do-it-yourself postcard from paper and buttons can be easily made using the scrapbooking technique. Postcards with Christmas trees made of buttons look very original.
In order to make such a gift, you will need the following materials:
- thick paper or cardboard for the base of the card;
- decorative paper of several colors;
- buttons of different sizes, flat with two or four holes;
- ready-made stamps for scrapbooking, consisting of ready-made inscriptions or individual letters and numbers;
- double-sided tape or silicone glue gun.
Curly scissors, colored threads, felt-tip pens, rhinestones or ribbons are also useful for decoration.
First you need to plan what kind of Christmas tree to make, where to place it and how to decorate the future card.
It's better to sketch a plan and then get to work:
- Mark the middle of the sheet of cardboard for folding and draw along the line with scissors, pressing lightly. Then decorate the cardboard. To do this, paper of a suitable color is sewn or glued on top of the cardboard or a frame is made.
- If you plan to decorate the back of the card, you need to do this in advance.
- The next step is to form a Christmas tree of buttons on the front page of the card. The Christmas tree can be the traditional green color or decorated with multi-colored “balls” made from smaller buttons or rhinestones. Buttons are easy to attach using double-sided tape, hot glue, or sew on.
- The inscription from scrapbooking templates is carefully glued to the selected place: “Happy New Year!”, “Congratulations!”, “Best wishes for the new year!”
- An additional decoration for the product will be bows or beads glued near the Christmas tree.
Why should you give preference to voluminous postcards?
There is no need to think that such an offering is not entirely respectable. In fact, such a gift will look more than original. You can include your best wishes in a card, as well as things that are difficult to convey in words. In such a frame, poems, especially those written for the addressee personally, a declaration of love, will look great.
It is also important that everything necessary for needlework is always at hand, because you can make a 3D postcard from paper, cardboard, fabric, etc. The simplest things that can always be found in household items are also used as decorations. We're talking about:
- ribbons;
- braid;
- buttons;
- beads;
- beads;
- shells
A voluminous postcard will become an original gift
Even children will work with all this with enthusiasm, the main thing is to give them an entertaining idea. So what can be made from such simple materials?
Postcard with a Christmas wreath using scrapbooking technique
An excellent option for decorating a New Year's card using the scrapbooking technique would be a beautiful Christmas wreath made of ribbons or paper. To decorate the product, you can use the recommendations for decorating a card with a Christmas tree or get creative and decorate the front side with lace or beads around the perimeter or along the edges of the two sides that form the corner of the card.
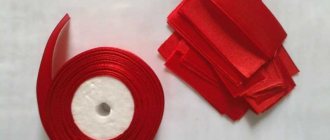
To make a wreath you will need narrow satin ribbons . One ribbon should be green, and the second should be light green, red, gold or silver. The edges of the ribbons should be singed to prevent them from fraying and the wreath should be woven in any known way.
A Christmas decoration can be made from paper ribbons or small snowflakes, making a fluffy wreath from them, which is glued to a pre-prepared card base.
Original card with flowers embroidered with cord
A DIY birthday card for mom will look original if you embroider flowers on it with a cord.
To complete the work you will need:
- silver-tone and colored lace (thickness 1 mm, can be purchased at a specialty store);
- dark cardboard;
- 2 needles – with a large eye and a small one;
- ordinary white threads;
- simple pencil, colored markers;
- scissors;
- copy paper.
First, you need to bend the cardboard in half with the colored side facing out. The outline of an elegant flower or a beautiful bouquet is drawn on an ordinary white sheet. The drawing should not be complicated, since the trick is not in its sophistication, but in the resulting volume. The finished outline is transferred onto the colored base of the postcard using carbon paper.
The surface is prepared for embroidery with a silver cord, which is threaded through a needle with a large eye (gypsy needle). A white thread is threaded into an ordinary needle, designed to secure the lace in certain positions and places. The flower head can be embroidered with a cord of a different color. You need to pierce the cardboard very carefully so as not to dent it.
It is not recommended to tighten the lace too much; the outline should look voluminous.
The words of congratulations can be written with a marker or printed on a printer and pasted on the gift in a convenient place.
Card with a heart using quilling technique for Mother's Day
Everyone can make a beautiful card with a heart from bright paper for Mother’s Day with their own hands using the quilling technique.
This requires a little time, patience and some materials and tools:
- thick colored paper of red, pink or cherry color (it is convenient to purchase a special set of paper for quilling);
- a quilling holder, with which you twist the paper into a spiral (instead of a holder, you can use a toothpick with the end split in two);
- PVA glue;
- rulers, pencil, scissors.
To create an original heart, it is enough to master 3 types of twists:
- A basic tight roll is made using a holder. Having caught the edge of a strip of paper, twist it counterclockwise, holding it with your finger to form a tight roll. The free tip is glued to the roll and then the finished roll is removed from the holder.
- A loose roll is prepared by wrapping a strip of paper around a pencil. Remove the roll from the pencil and place it in a pattern of a suitable size, where it should unravel slightly. Only then fix the outer end of the roll with glue. If the end is left free, you will get a curl, which can also be used to decorate the heart.
- A teardrop-shaped roll is made from a base or free one, squeezing it after removing it from one side so that the figure takes the shape of a drop.
The youngest crafters can assemble a heart for mom from pre-prepared rolls. To do this, on the front page of the postcard you need to lightly mark the outline of a heart with a simple pencil, and then the child will paste rolls into this outline.
For older craftsmen, a greeting card with a heart can be made like this:
- The outline of a heart is formed from two strips of paper, gluing the strips edgewise to the front side of the card.
- Rolls and curls are placed inside the resulting heart, resulting in beautiful floral patterns.
- The finished look of the product will be given by several beads or rhinestones glued inside the rolls.
DIY postcard “Happy Preschool Worker’s Day”
Content
The all-Russian holiday dedicated to preschool education workers is celebrated annually on September 27.
On this day, congratulations are accepted by kindergarten teachers, nannies and all employees of preschool institutions who work with children.
Each parent will decide for themselves which gift to choose for a preschool worker However, a postcard is the detail that usually no gift can do without, especially to officials.
The postcard can be bought in any book department, or at the post office, or in a specialty store. However, there are a lot of greeting cards for Teacher’s Day, but cards for Teacher’s Day are rare. You can make such a greeting card with your own hands, and it will fully correspond to the theme of the holiday.
Of course, ideally it is meant that the child will make most of the greeting card himself - such touching children's crafts will leave few people indifferent. Well, children who will soon leave kindergarten, having graduated from the senior group, will be able to do such creativity. But you can limit yourself to the fact that the child simply signs a postcard for the teacher, which will be made by an adult.
How to make a greeting card for a teacher with your own hands - a master class for a child and an adult
What you need for work
- Watercolor paper, watercolor paints, brushes
- Glue stick or glue Moment “Crystal”
- Cardboard, scissors, ruler, pencil
- Happy Teacher's Day Pictures
- Template of maple or other patterned leaf of two or three types and sizes
- A few pencil stubs, preferably colored ones
- Ribbon
The working process. First stage. Moisten a sheet of watercolor paper with water using a brush. Wait a few minutes, then apply multi-colored stains with watercolor paints. Use colors that are characteristic of autumn leaves. A child can handle this task with pleasure. After the entire sheet is covered with paints, send it to dry.
Second phase. Fold a sheet of cardboard in half. To make the fold neat and without creases, you can use a pen that has run out of paste. Draw a line along the ruler with such a pen, pressing a depression on the cardboard. In the language of scrapbookers, this is called “creasing” . Place the future card horizontally, that is, with the long side parallel to the edge of the table and yourself.
Third stage. Choose a suitable picture and carefully cut it out. Place in the center of the working plane and glue. Sharpen the pencils, glue them together, and tie them with ribbon. Glue them in the bottom corner of the picture.
Fourth stage. Trace the leaf templates on the back of the watercolor-painted sheet and cut them out. Decorate the outer part of the card with several leaves and glue them.
Fifth stage. You need to make a step piece from cardboard for the inside of the postcard. To do this, you first need to mark a rectangle, 10 cm long and 5 cm wide. Place the rectangle horizontally and make marks along the width at a distance of 1, 2.5, 4 cm from the top edge. The marks should be on both sides of the rectangle. They need to be punched and folded along the folds. You will get a step, the edges of which are attached to the postcard. The step is glued to the open card, to the top and bottom.
Sixth stage. Place the remaining autumn leaves on the step and glue them. Thus, when the postcard is opened, the step with leaves will “grow” out of the plane. The greeting card is ready, all that remains is to sign it, adding words of gratitude and good wishes!
DIY postcard for Teacher's Day
To work you will need
- Paper for scrapbooking autumn and school themes
- Figured hole puncher with maple leaves
- Glue stick
- Watercolor paper
- Coffee colored ink pad, school themed stamps
- Chipboard “Happy Holidays” or printed inscription “Happy Teacher’s Day” or “Happy Preschool Worker’s Day”
First stage. Cut a rectangle 21 by 15 cm from watercolor paper or card paper. Fold it in half along the long side. Cut a 10 by 14 cm rectangle from scrapbooking paper, round the corners, and tint the edges. Glue to the front of the card. Cut out an 8 by 12 rectangle from another paper, also round the corners and tint the edges. Glue on top of the first layer .
Second phase. Place the chipboard or printout in the center of the top layer. Using a hole punch, make many leaves from construction paper of the appropriate color. Densely frame the central element with leaves and glue it. If desired, instead of an inscription or chipboard, you can use a thematic picture or even a photo of the teacher surrounded by children.
Third stage. Place a stamp on the inside of the product in the lower right corner - backpack, textbooks, etc. The work is ready!
myhobby.guru
Christmas angel using isothread technique
Before you start making a card with a picture of a Christmas angel using the isothread technique, you must draw a picture on cardboard or use a ready-made template. On the layout, you should immediately mark an even number of points at the same distance from each other and pierce them with a needle or awl.
Each element of the angel is embroidered separately and care is taken to ensure that the thread is sufficiently tensioned and does not sag or bend the cardboard.
To embroider an angel using the isothread technique, you will need floss threads: pink for the face and nose, white for the dress, yellow for the hair and halo, red for the mouth, black for the eyes.
The face, hair and halo are embroidered using the “Circle” technique:
- Each stitch should go through 8 holes: after passing the thread through the first hole, you need to complete the stitch on the 7th hole clockwise.
- On the wrong side, a new stitch begins in the next hole counterclockwise.
- It is more convenient to embroider hair designed in the form of arcs of circles, passing the thread through every 7 holes.
The torso begins to be sewn from the uppermost middle point connecting the torso and head, the first stitch ends at the point dividing the bottom of the dress in half. Next, perform the work as described above. Finally, you need to glue the embroidery onto the title page of the postcard. To decorate the craft, cardboard is processed around the perimeter with curly scissors or a frame is made.
Manufacturing stages
You should start making a postcard by choosing an occasion and thinking about the plot. The ideal option to start creativity is to draw a sketch of the future postcard.
It is important to take into account the specifics of the holiday, the age and favorite colors of the recipient, the possibility of delivering it in person or sending it by mail, the need for an inscription, and internal contents.
Thinking through and developing a sketch is a responsible matter; it is better to do it in advance, giving yourself a day or two, or better yet, a week.
The next stage is a practical approach to the matter. You need to choose what exactly will be used in production, what will be needed - glue, colored paper, stapler, tape, additional materials. Preparing everything you need can take from half an hour to a whole day.
Then the creativity itself begins. It requires a workplace free from other things, as well as a sufficient amount of time. To make a postcard neat and similar to a sketch, you need to put in a lot of work, diligence and patience.
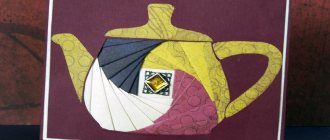
Bouquet of flowers using iris folding technique for birthday
To make an original card with a bouquet of flowers, you first need to work out the layout. For flowers, a square or pentagonal layout is suitable, which is more convenient to do on a sheet of paper folded several times into a checkered pattern. First, draw the outline of the first square; from each of its corners, from left to right, mark the sides of the square with dots in increments of 10 mm.
If you connect all the dots, you will again get a smaller square in the first square. By continuing to build new squares in each previous one, a ready-made iris template is obtained. It needs to be covered with colored strips of paper, folded in half, following the markings. The strips are glued directly on top of each other, and the excess paper is cut off at the end. The result will be a picture resembling a spiral.
By making several pictures of different colors, you can create a whole bouquet.
Next, you need to draw and cut out flower patterns that will fit in the first square. These templates are placed on the front page of the postcard, outlined and cut out along the contour. At the back, under each cut out shape, ready-made pictures from strips of paper are glued. The stems and leaves of the flowers can be completed with a marker or cut out of colored paper.
The inscription "Happy Birthday!" placed under or above the bouquet. The back side of the front page of the card is carefully covered with paper, and on the second page they write wishes to the birthday person.
Quilling
Quilling involves forming curls of various shapes and sizes from strips of paper, from which various compositions are created.
This technique requires a person to concentrate and be careful. The manufacturing process involves folding paper strips and shaping them using finger pressure.
To work, use both colored and plain paper, as well as a toothpick and glue. The toothpick acts as an axis around which the paper strip is wound.
The finished spiral must be removed from the base, and the free end glued, after which the workpiece is given the required shape with your fingers.
The quilling technique is easy to learn and therefore children are delighted with it and do it with great pleasure. Moreover, all this does not require large financial expenditures; it is enough to purchase everything you need.
Dinosaur using iris folding technique for children
To create fairy-tale characters, for example, a dinosaur using the Iris folding technique, you can use ready-made layouts. Each detail of the layout is numbered with a number indicating color.
To ensure the job is done accurately, you need to do the following:
- On a sheet of cardboard, draw and cut out a dinosaur, the same shape as the iris template.
- Connect the layout and cardboard with paper clips so that the outlines of the dinosaur on the cardboard match the outlines on the template.
- Cut multi-colored paper into strips measuring 7x10 cm, fold them in half lengthwise. Colors must be selected in accordance with those suggested on the template.
- Glue the strips onto the cardboard, following the markings of the iris template. At the end, the template itself must be removed and the excess ends of the paper trimmed. The edges of the cardboard can be trimmed with curly scrapbooking scissors.
- Prepare a new sheet of cardboard of a different color and larger size than the first.
- Paste a picture of the finished dinosaur onto it. Decorate the background with an applique or inscription.
Materials for creating a postcard
To bring a flight of fancy to life and make a truly original postcard, you will need a standard set of tools:
- scissors, including curly ones;
- stationery glue or glue stick;
- double-sided and simple narrow adhesive tape;
- ruler, including curly ruler, compass;
- markers, felt-tip pens, pencils.
As well as a variety of materials:
- sheets of thin cardboard or thick colored paper;
- multi-colored paper, suitable for gift wrapping;
- various ribbons, scraps of material, laces;
- rhinestones, beads, beads, buttons.
Volumetric card with a heart in a spiral
A postcard with a heart, made using the Iris folding technique with your own hands from colored paper, will be an excellent gift for any occasion.
Making a gift consists of the following steps:
- Find, print and cut out a ready-made heart design. The numbers printed on the layout will tell you how to correctly arrange paper strips of different colors.
- Attach a mock-up of the heart to a sheet of cardboard, trace it with a pencil and cut out the shape along the contour. Place the layout under the cut out part of the cardboard, and glue its corners with tape to the table to secure the future postcard.
- Prepare strips of paper in 3 different colors, such as pink, burgundy and purple. Glue the strips onto the cardboard using glue or tape, following the layout markings.
- Cover the middle of the heart with cardboard or leave it open. Cover the wrong side of the work with paper. The front side of the card can be decorated with an inscription or ribbon.
Postcards with volume effect
Volumetric postcards are considered one of the most original souvenirs. All the splendor of this composition is revealed to the eye only after the postcard is opened.
This postcard is made as follows. The title side is decorated in any form, and the inner side is assembled from pre-prepared elements glued together in a special sequence.
For work you will need: a ruler, glue, pencil, knife and cardboard.
From 2 sheets of cardboard folded in half, a so-called base is made by gluing one sheet into the other, and cuts of varying depths are made on the inner sheet.
The resulting strips must be bent inward and these same strips will serve as a platform for securing the insert with decor. The front side is decorated in absolutely any way and technique you like.
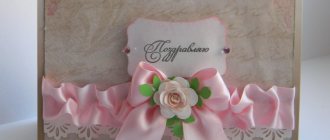
Postcard decorated with a flower using the kanzashi technique
To create an original greeting card with a flower using the kanzashi technique, you will need satin ribbons of 2 colors and different widths, tweezers, thread and needle, scissors, a lighter, beads or rhinestones for decorating the card, a silicone glue gun, cardboard for the card.
Making petals:
- The ribbons are cut into squares and folded diagonally. The resulting triangle is folded twice in the middle, using tweezers for convenience.
- The ends are sewn together, and the right angle is cut parallel to the fold line of the petal. The edges are scorched with a lighter to prevent the tape from scattering.
- Make 9 petals from a wide ribbon and 8 from a narrow one.
From the prepared petals, 2 flowers of a smaller and larger diameter are collected and sewn together. A bead or rhinestone is glued into the center of the flower. The flower in the lower left corner is attached to the prepared cardboard base of the postcard using silicone hot glue, and the remaining space is decorated with rhinestones and ribbons.
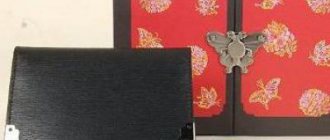
Postcards for Teacher's Day | Country of Masters
Hello! The holidays have begun... I whipped up some cards for Teacher's Day. I made them from pieces of paper left over from previous projects. I came up with the composition for one postcard, and made others in its likeness - it was much faster this way.
This is for our teachers.
It’s hard to see in the photo, but it’s brown paper with “diamond” embossed on it. I cut out the curl myself. I also drew the inscription myself in Corel. I used falling leaves as one of the attributes of September - this is a condition of the task.
In this card, the curl was made using a new edge punch. Autumn inspiration was falling leaves, and the choice of gray-green colors is not accidental - it’s dank gray rainy weather outside our window :)
And this card is for the teacher's assistant. I also drew the inscription myself.
Once again all together. I took the photo at night, so the embossing is not visible :(
This is how I designed the back of the card
With a brown postcard (photo No. 3) I want to take part in the task “It’s September” on the blog “Treasury of Ideas” https://sokrovishnica.blogspot.com/2013/08/17.html
And with a green postcard (photo No. 4) I will take part in the task - “What is autumn?” on the blog |I Love Scrap
https://blog-ilovescrap.blogspot.ru/2013/09/blog-post_4.html
stranamasterov.ru
Original postcard using decoupage technique
One of the easiest ways to make cards with your own hands is to decorate the product with paper napkins using the decoupage technique. To create an original gift you will need cardboard, a beautiful paper napkin with a themed pattern, scissors, cling film and an iron.
When everything is ready, you can start working:
- Remove a thin layer with the image from a multi-layer napkin.
- Select the required size cardboard and place it on a flat surface.
- First put the film on the cardboard and smooth it out; put the removed layer of the napkin with the image on the film.
- Cover the workpiece with a sheet of white paper and iron it with an iron preheated to moderate temperature.
- Trim off any excess along the contour of the cardboard sheet.
The finished card can be decorated with ribbon, rhinestones or a frame.
Volumetric card for Valentine's Day
You will need: white and red cardboard, scissors, double-sided tape, curly scissors, artificial flowers or other decorative elements.
Master Class
- Print the template onto white cardstock or redraw it.
- Cut out each piece.
- Attach the white cardstock to the red one.
- Attach the flowers with double-sided tape and decorate to your liking.
A voluminous postcard for Valentine's Day is ready! I recommend watching the video master class!
DIY 3D Card Heart from 1 sheet of paper
Children's Christmas card: fingerprint tree
All you need to create a cute card is cardboard, a ruler, markers and paints.
How to make a Christmas tree from fingerprints:
- The cardboard for the postcard is folded in half.
- On the front page in the middle, using a ruler and felt-tip pens, draw a layout of the Christmas tree: a vertical trunk and 4 perpendicular branch lines, decreasing towards the top. There should be a distance between the branches that will comfortably accommodate the fingerprint of the most adult needleworker.
- They choose paints, dip their fingers in them and put fingerprints over the drawn branches, symbolizing toys. At the very top they must place an imprint that will resemble a star.
- Congratulatory inscription "Happy New Year!" placed at the top or bottom of the page, and wishes are left inside the card.
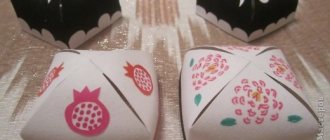
Christmas tree made of corrugated paper
Another simple version of a greeting card can be made with children from corrugated paper:
- On the cardboard base of the postcard, markings of the future Christmas tree are applied with a pencil: double-sided tape is glued to the horizontal lines, and the tiers of the New Year's tree will be attached here.
- Strips 4 cm wide and 6, 8, 10 and 12 cm long are cut out of green corrugated paper.
- The longest strip is gathered along one long side and secured to the bottom strip of tape. The result was the bottom tier of the Christmas tree. Repeat the action with the remaining strips, attaching them one above the other. The topmost tier is assembled into a thin top, which is decorated with a star.
- The tiers of the Christmas tree can be decorated with beads or rhinestones, and a beautiful inscription can be made at the top or bottom of the title page of the card.
Origami Christmas tree
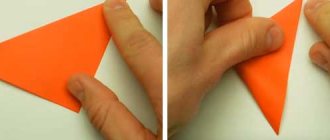
To make a Christmas tree using the origami technique, you only need 1 sheet of green paper and scissors.
A volumetric craft is made as follows:
- Fold the sheet diagonally, cut off the excess part.
- The resulting square is folded in all directions, obtaining clear fold lines along the diagonals, horizontal and vertical.
- Using the resulting fold lines, fold the square into a triangle, hiding the sides inward (if you look at the figure from above, you get 4 identical right-angled triangles touching the vertical legs).
- The resulting triangle is placed base down, a midline is drawn from the top to the base, and the right and left sides of the triangle are folded, connecting their corners in the middle.
- Repeat the procedure, turning the figure over to the other side.
- Then they carefully unfold the bent parts and bend them again into a shape resembling a rhombus.
- This is done on each side of the figure.
- Corners extending beyond the lower level of the Christmas tree are cut off or turned inward.
- You should end up with 8 edges that need to be cut parallel to the base in 3 places.
- The strip of each cut is folded from top to bottom, and at the end the edges are separated to obtain a fluffy Christmas tree.
Postcard with voluminous snowflakes
You can make original, voluminous postcards from paper with your own hands. To create a beautiful snowflake that will appear when you open a gift, you will need a stencil that you can draw and print from the Internet, colored cardboard and scissors.
Performance:
- Fold the sheet in half and cut out the snowflake according to the stencil, but not completely. If the snowflake is octagonal, 6 of its ends should be left attached to the paper, and only 2 middle ends should be completely cut out.
- Glue the sheet with the cut out stencil onto the cardboard, leaving the snowflake free.
- Close the card by pressing the snowflake in the direction opposite to the fold line.
- Decorate the title page of the product with ribbons, rhinestones, beads or lace.
master class, interesting ideas and recommendations
Greeting cards glued and drawn with your own hands are valued much higher than store-bought options. You not only create unique things, but also put your soul into your work. We invite you to learn how to make a greeting card with your own hands on various themes.
Card for teacher
The “Happy Teacher’s Day” greeting card, created with your own hands in the craft style, will be quite interesting. It involves the use of several separate pictures, letters and decorative elements that are assembled into one. You will need A4 cardstock for the base of the card, an A5 picture for the background and a few pictures of school related items. For example, these could be letters of the alphabet, a backpack, a note sheet, a ruler, a compass, and so on.
First, make the base, that is, simply bend A4 cardboard in half. Paint it if necessary. Then stick the picture with the background on the front side. It will be nice if its format is a little smaller (A5). Then cut out the prepared images of school items along the contour. You can also print out a small rectangle with the words “Congratulations” or “Happy Holidays.” Place the pictures on the background as they should look in the final version. Glue them. You can also decorate the card with ribbons or various decorative elements. DIY greeting card “Happy Teacher's Day”. All that remains is to sign it.
A preschool teacher will be very pleased to receive a congratulatory card made by his students. You can borrow the idea of finger painting as a basis. First prepare the base of the card. To do this, take cardboard or craft paper and fold it in half. Then thin the paint and apply it to your lips. Make several shades - this will make the picture brighter.
Now have each child dip their finger into the sponge and put a fingerprint on the front of the card. You can combine them by drawing wavy lines below that extend from the lower points. This way you will get a bunch of balls. On the plastic side you can write “Congratulations!” Thus, the greeting card for Teacher’s Day, created with your own hands, is ready!
Another cute baby card
A personal greeting card presented to the teacher will bring a lot of positive emotions. You can make it with your own hands from the most ordinary colored paper. Moreover, the only additional things you will need are scissors and a pen. Fold the paper in half and place your child's hand on it so that his thumb and forefinger touch the fold line. Trace it along the outline and carefully cut out the card. As a result, you will get a cute card that is shaped like a baby’s hand. When opened, there are already two of them. All that remains is to fill out the card and present it to the teacher.
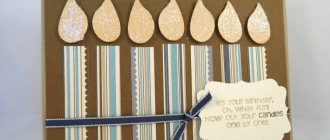
Simple postcard
To get such a card, you need to take cardboard for paper, thin double-sided tape, several types of kraft paper or regular colored pictures with designs, as well as yellow sheets. First prepare the base of the greeting card by folding the sheet in half. Then cut several strips of different papers. Try to make them the same in width, but different in length. Now cut out shapes resembling drops from yellow sheets. There should be as many of them as there are stripes.
When all the details are ready, you can start decorating the front side. To do this, lay out the strips on the card. It will turn out more beautiful if they are not parallel. Lay them out slightly at an angle. Then take one strip and glue a piece of double-sided tape to the back of it. Place the rectangle in place. Glue all the strips onto tape in the same way. Finally, attach the drops over the paper candles.
This DIY school greeting card is made very quickly. Therefore, it is ideal for a lesson or class topic. As a result, each student will have their own greeting card, which they can then give to someone on their birthday.
Paper greetings for the New Year
Making DIY greeting cards for the New Year is even easier. For example, to create such a card, you will need red cardstock or craft paper of the same color. Also take a narrow and wide ribbon in a beige or gold shade, the same tone as a drop-bead or rhinestone.
Fold the paper in half. Take a special gun or Moment glue and attach a small piece of narrow ribbon on top. It should be in the center. Draw a circle under it with a light pencil movement. Place bead drops inside it so that most of the space is filled. Then glue all the elements. It is most convenient to use tweezers. All that remains is to make a bow from a wide ribbon and glue it over the ball. Sign the card.
Volumetric card with balls
You can make very beautiful greeting cards with your own hands using thick double-sided tape. Also, for example, to create a card with balloons you will need several types of craft paper or cardboard with designs, a small piece of thin ribbon and beautiful threads (floss, wool, decorative twine, and so on).
First, make a blank for the card by folding the cardboard in half. Then take decorative paper and draw circles, hearts or ovals on the back side. These are the shapes of our future balloons. Then take scissors and carefully cut out the shapes along the outline. Now cut the threads. You need the same quantity as the number of balls you got. Connect the thread to the cardboard figure using double-sided tape. Place the balloons on the front of the card and then glue them on.
Tie all the ends into one bundle using a thin ribbon. Glue the back of it to the card. Align the ends of the threads. The three-dimensional postcard is ready! Using this principle, you can make many different greeting cards. Just prepare the elements and stick them on thick double-sided tape.
Preparing a postcard in scrapbooking style
You can make original greeting cards from paper with your own hands in scrapbooking style. To do this, you will need to take several types of beautiful cardboard, a thin ribbon and PVA glue. First, prepare the base. It can be cardboard folded in half, or just a square or rectangular piece of paper. Then take red paper and cut out exactly the same shape as the card itself, only a centimeter smaller on each side. Cut out another exactly the same piece, only white or beige. In addition, it should be several millimeters smaller than the previous one. Glue the red sheet on the front side of the card first, and then the light one.
New Year's card decor
Now cut out three rectangles from different papers. They should differ in length by 1 centimeter. Glue a medium-sized rectangle horizontally in the middle. Cut a piece of tape and glue one end to the back of the long rectangle. Place the shape under the center piece and glue it in place as well. Lift the tape up. Glue the last rectangle on top, having previously wrapped the second piece of ribbon under it. Make a bow from the leftover ribbon and stick it on the top of our gifts.
Under the picture, write “Happy New Year!”, “Happy Holidays!” or “Congratulations!” It is noteworthy that depending on what color of paper you use, the content of the postcard changes. If you take cardboard in neutral shades with a pattern of hearts or circles, then the card can be presented for a birthday.
Greeting card in minimalist style
For such a card you will need a plain, beautiful, dark-colored cardboard. As well as white thick paper and several types of colored tape. Make the base of a greeting card from dark cardboard. Cut a few strips of decorative tape and simply apply it to the front of the card. The stripes should go horizontally, maybe a little diagonally.
Take white cardboard and use a pencil to beautifully and carefully write “Happy Birthday!” in two lines. or one “Congratulations!” Letters must be bold. Circle the inscription in a frame, and let it connect with the words in some places. Now take a sharp utility knife and cut everything along the contour. Using PVA glue, stick our blank onto tape. All. A greeting card in a minimalist style is ready. Despite its simplicity, it turns out bright and stylish.
More design options for minimalist cards
Handmade greeting cards: “Happy Birthday” or “Happy New Year” turn out beautiful. Especially if you use colored tape in the process. There is no need to use any other materials or tools. Simply apply the tape to the front of the card in different orders or make different shapes out of it. It could be candles, a gift, a cake, and so on. To finish the card, you simply paste a greeting message cut out of white cardstock over the tape. This way, you will have several options for simple, but creative and stylish greeting cards.
fb.ru
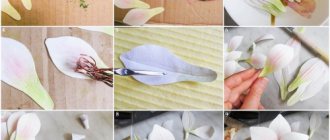
Postcard with a voluminous bouquet of paper flowers
A voluminous bouquet for a postcard, made from paper with your own hands, will become an original gift and will bring joy to the recipient. To do this, you will need colored double-sided paper, flower templates of different sizes, a cardboard base for the card, scissors and glue.
The technique for performing the work is as follows:
- Draw or print flower patterns on colored paper, then cut them out.
- Each petal needs to be bent along the middle towards the inside of the flower.
- Place flowers of different sizes together, gluing them in the middle so that the largest flower is on the bottom and the smallest on top.
- Decorate the middle with a bead, colored paper or ribbon.
The base for the card is decorated or colored cardboard is used for the base. Congratulations should be written in advance, because it is inconvenient to do this at the end of the work. Flowers are glued onto the finished base and leaves cut from paper are added.
How to make a three-dimensional postcard. Volcano of hearts.
This card consists of two halves that are glued together.
You will need:
- colored paper
- thick paper
- scissors
- glue
*You can try to draw hearts yourself, but you need to know certain rules - they are listed below.
1.
Remove the large heart from the middle (it's right on the fold).
2.
Cut out the hearts, leaving only their folds intact (see picture).
3.
Make cuts on the hearts shown in the picture (gray lines on opposite hearts), this way you can fasten them.
* The card will close better if you cut the paper at the center fold and glue them separately to the base (the base is thick red paper that serves as the background for the card).
4.
Glue the halves to the base and connect the hearts in which you made the cuts.
Rules
*The sizes of the hearts on both sides are the same.
*The blue line in the diagram shows that the distance from the fold in the middle to the cut is the same, and the red lines indicate the same distance between the hearts close to the middle of the card.
Craft postcard with small decorative buttons
Using craft paper to design postcards is a fashionable trend for eco-style lovers. If such products are succinctly decorated with buttons, they will become the most unusual gift.
Making a surprise is very simple:
- Fold kraft cardboard in half.
- Paste buttons on the title page, having previously come up with a plot. For example, buttons can represent balloons, Christmas tree decorations or flowers.
- Use a helium pen or markers to complete the picture. For originality, you can use threads or ribbons.
Original ideas for making birthday cards for mom from her daughter
How many pleasant memories will flood over a mother’s mind after many years when she comes across a postcard that her daughter once made. Particularly touching are crafts where the main detail is children’s hands outlined on paper with a pencil.
To implement one of these ideas, you need to trace your hand on cream-colored paper with a pencil, cut out the outline and stick it on a postcard base prepared at your discretion so that your fingers remain free. Next, using the quilling technique, make 3-5 flower heads and cut out stems and leaves from green paper.
The flower arrangement is attached with glue so as to create the impression of a hand holding flowers. A couple of good wishes will complete the card. Another idea for a card will require a photograph of the birthday girl (preferably together with the recipient of the gift), which is pasted onto the prepared base of the craft. The photo can be taken in a lace frame.
The second step is cutting out the outline of the right and left hands with the continuation of the wrist. The blanks are glued in such a way that it appears that the children’s hands are crisscrossing or holding the photograph.
You don’t have to waste time making your own cards for your mom for her birthday; you can choose something suitable in ready-made printed abundance. But will a purchased postcard absorb the warmth of loving hands, will the template of congratulatory words reflect the whole gamut of a daughter’s feelings for her mother?
Heart shaped card with decorative decorations
DIY postcards made from paper can be complemented with various decorative elements.
A handmade heart card is an eloquent gift that expresses the warmest feelings for the recipient. From red, pink or white cardboard, folded in half, cut out a heart so that it meets at the fold. An inscription is made on the inside, and the front side is decorated with suitable decorative details.
Depending on the chosen style, you can use the following types of jewelry:
- lace and ribbons;
- rhinestones, beads or beads;
- decorative buttons;
- flowers and butterflies.
Decorations are placed around the perimeter of the card, or they fill the heart.
Postcard-topiary
With your own hands, you can actually make not just a three-dimensional card with flowers or a real panel, but also a topiary card. This “flower on a leg” is perfect for congratulating you on March 8 or the New Year (in the form of a Christmas tree).
If you make the topiary large enough, you can write congratulations and wishes on paper “petals” or on a flowerpot stand.
Made from paper, the topiary will resemble an independent craft. Whereas the author will know that his creation is nothing more than a greeting card for a birthday or other holiday.
DIY beaded card
A picture of beads for decorating a postcard can be made in two ways: stringing beads on threads to form a pattern, or gluing beads of a suitable color onto a ready-made template.
To make a Christmas tree for the New Year, you first need to draw a triangular outline on cardboard.
Then fasten the thread in the lower right corner of the outline, string the required amount of beads of a matching color onto the thread and fasten the thread at the top of the triangle.
Return the thread from the lower left corner and repeat the process, ending with securing the thread with the beads at the top.
Continue filling the triangle with bead strands. At the end of the work, decorate the top of the Christmas tree with a star and sign the card.
To make a picture from beads, it is preferable to use a ready-made model. It needs to be printed on such a scale that each cell of the layout corresponds to the size of the beads.
A small area of the model is smeared with PVA glue and the beads are carefully glued with a pin with the hole facing up. When the entire layout is completed, you can varnish it and treat the edges with suitable acrylic paint.
Before gluing the picture to the card base, you need to let it dry. Colored cardboard is used as a base. If desired, you can decorate it and then glue a finished beaded picture onto it. Handmade beaded cards on thick paper or cardboard are quite heavy, so you can make a special stand for them.
Using different techniques for making paper crafts, you can create real creative masterpieces. Unique handmade cards, made with love, will delight loved ones and will remain in the memory for a long time.
Autumn card made from natural material
The golden age is wonderful because the material for creativity can be found literally under your feet. In the next MK we will look at how to make a postcard from:
- Plasticine;
- Pumpkin seeds;
- "Helicopters";
- Colored cardboard.
Subsequence:
We make flowers from painted pumpkin seeds. We stick it into the plasticine base. It turns out the core and leaves.
Popular articles Congratulations on the May holidays
We make stems for our flowers from flagella of green plasticine. And we make a vase.
The vase can be decorated with helicopters. It will turn out very unusual.
You can use these same helicopters to make grass if you don’t want to plant flowers in a vase.
Postcards made using natural materials always turn out very delicate and beautiful. Look at what lovely compositions you can make from dry leaves and flowers.
The edges of the work can be decorated with lace, braid or ribbons.
Look how great it turns out!
You can simply collect as many materials as possible for the children and invite them to create the composition themselves. This is a great way to develop your imagination!