Master class “Spikelet”
Olga Konovalova
Master class “Spikelet” I would like to present to your attention my work on making
spikelets for matinees and evening entertainment. We used them at the autumn matinee “Bread Land”, dance with ears of corn . To make one spikelet you will need : a shelf for balloons, yellow corrugated paper, santipon, pencil glue (13 grains: 1 for the top and three for each row; there should be 4 rows)
.
cut a thin strip of corrugated paper, coat it with glue and wrap it diagonally around the stick. Prepare the “grains” for the spikelet . Cut into rectangles (6x12, roll into balls from santipon and wrap like candy. Twist one side - this will serve as a spine.
You can collect the spikelet . We screw one “grain” onto the very top, having previously smeared the lower part with glue.
Then we glue 3 “grains” in each row.
The side of the “grain” that is closer to the stick is also glued with glue and pressed. This is so that the “grain” does not stick out to the sides later (it doesn’t look nice)
.
For the long ears we used cut chacon branches. Try it too. Good luck.
DIY foam masks Good evening. Dear colleagues! I want to share with you my new hobby. One day I came across an interesting book “Making.” Heart for Valentine's Day. You will need: - corrugated paper (green and yellow); - corrugated cardboard; - velvet paper; - glue; - pencil; - ruler;.
Source
Wreaths made from natural materials and flowers
We continue to make wreaths from natural materials, using various plants harvested from the summer for the creative process. Elegant and fragrant wreaths made of natural flowers, which have been dried and properly prepared, improve the atmosphere in the apartment and free the air from unpleasant odors.
Materials:
- dried buttercup flowers;
- willow twigs;
- fishing line;
- glue gun;
- green tape;
- yellow lace trim.
Progress
- Make a ring from willow branches and wrap it with fishing line for strength. Leave to dry for 2-3 days. Once dry, the branches will retain their ring shape.
- Before starting work, you need to prepare the flowers. To do this, they need to be trimmed and divided into small bunches.
- Using floral tape, wrap each bunch. The tape will securely fix the flowers.
- Start gluing the bunches of buttercups prepared as described above using a heated glue gun. Moving in a circle, gradually fill the entire space of the base. Apply the bundles in layers, and the next bundle should only slightly cover the bundle lying below, masking the places where the flowers are glued to the base.
- Choose a beautiful lace braid to hang the wreath on the wall.
Adviсe:
- The flowers do not need to be glued; you can use thin wire and attach each bunch of wire to the base.
- The wreath can not only be hung on the wall or door, you can simply place it on a shelf, leaning it against a support.
- Dried ranunculus flowers are completely harmless, but you can replace them with other flowers. Try drying and then making a wreath from small inflorescences of bird cherry, apple tree, lilac, daisies, etc. The wreath will turn out not only beautiful, natural, but also very fragrant.
- Similar wreaths of dried flowers will fit perfectly into country-style interiors. Country style is a rustic style, which is distinguished by simplicity, naturalness and natural materials.
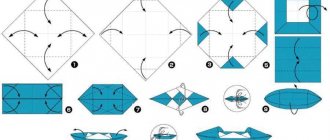
Master class “Spikelet” (origami)
Larisa Mikhailova
Master class “Spikelet” (origami)
Autumn has come again. Brought trouble to harvest.
I bring to your attention a master class on making “ Spikelet ” ( origami )
.
For work we will need: yellow colored paper; yellow double-sided cardboard; pencil; ruler; scissors; glue.
We mark a sheet of yellow paper into squares, I took squares measuring 6x6 cm. Choose the dimensions depending on the size of the finished product (the larger the square, the larger the size of the finished spikelet ).
Cut into squares.
Let's start folding the spikelet :
1. From a square, make a basic triangle
.
2. Fold it in half.
4. Bend the sides towards the resulting midline.
5. Turn the workpiece over.
6. Bend the upper sharp corners towards you, forming two right angles at the top.
Wreath “Herbs of Provence”
Materials:
- wreath made of vines;
- 3 artificial lavender sprigs;
- fishing line;
- glue gun;
- ribbon.
Progress
- Disassemble the branches into small inflorescences; if necessary, use wire cutters to cut through the wire.
- Using a heated glue gun, glue the branches to the base, moving in a circle. Do not apply too much glue to the branches, otherwise the work will look sloppy.
- Tie a matching ribbon to the wreath.
Adviсe:
- If you want to get a thicker and more magnificent wreath, use 5-6 artificial branches.
- The branches can be attached using thin colored bead wire. It comes in different colors, so it won’t be difficult to choose the right color.
- A wreath can be made using natural lavender sprigs. You can weave a wreath using live twigs and dry the lavender in the wreath, or you can make a wreath from already dried lavender flowers.
- By applying a drop of lavender essential oil to artificial sprigs, you will also be infused with the subtle aroma of blooming lavender.
- Such a wreath can be made for an interior in the Provence style, which is associated with the bright summer sun, the sea and huge fields of blooming lavender. Provence is a southern region of France. The word “Provence” itself translates as “province,” and interiors created in this style correspond to the style of provincial houses in the south of France.
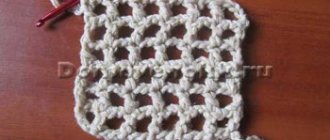
Corrugated paper spikelet
Hello everybody! Today I come to you with a new idea))) I looked in our Country for how to make spikelets and couldn’t find anything similar to mine. Maybe you will like my master class and try to do the same with me.
You can get any color of the spikelet, depending on the color of your corrugated paper. Can be yellow or gold. Or you can make a green spikelet that is not yet ripe.
I used a spikelet to decorate a postcard with bears in a haystack) you can make a lot of spikelets and add them to a bouquet of flowers.
We will need: glue, scissors, pearl barley, corrugated paper.
Cut a strip of paper. Draw a leaf about 2 by 7 cm and cut it out.
Now we wrap the grain in paper.
We do it carefully and not hastily.
They twisted the grain. Then we twist the ends.
The thinner tip will be a tendril; it can be twisted a little and made wavy. The thicker tip will be the stem.
We do the next one in exactly the same way.
Let's start gluing. We take three grains and connect them with a drop of glue. We wait a bit until it dries.
Just below we glue four grains. Be very careful not to damage the paper. It quickly gets wet from the glue.
We make another row of four grains. Next we will thin the leg.
We move the last glued grains-tips apart, cut off the previous ones.
Ask questions if it is not clear.
I made the last row from five grains. I smeared the leg with glue, twisted it and dried it. You can make more rows and the spikelet will be longer. It took me about 20 minutes to do everything.
We straighten the tendrils of the spikelet and admire the result)))
And this is a new version of the spikelet, a pigtail. Thanks for the idea GrekaRek! My work with new spikelets https://stranamasterov.ru/node/789944 can be viewed here.
Well, you have learned how to make spikelets with your own hands. Try, create, create! You will definitely succeed)))
Thank you for your attention!
Regards, Anna.
Did you like the article? Subscribe to the channel to stay up to date with the most interesting materials
Source
How to make a wreath from natural materials and meadow herbs
Before making a wreath from natural material and meadow grasses, you need to prepare all the tools and materials:
- cardboard base made of corrugated cardboard;
- various dried meadow herbs;
- sisal;
- plaid material;
- tape;
- glue gun
Progress
- Cut out 2 circles from cardboard and glue them together. Cut a strip of fabric and wrap it around the base, securing the tip of the fabric with glue.
- Trim the herbs, leaving the stem length approximately 1-2 cm. Form small bunches, secure each bunch with tape.
- Heat up the glue gun and start gluing the bunches in a circle in this order: first glue the longest ones, then the shorter ones and the shortest ones. Each subsequent bunch should slightly cover the previous one. In this way, you can disguise the places where the grass sticks to the base.
- Use green sisal fiber to decorate the base. Sisal is also glued with hot glue.
- Tear off a few fibers of sisal and twist them to form a rope. The rope should be quite strong, as it will be used as a hanger for the wreath.
- Attach the pendant to the wreath.
DIY “Wreath made from natural material” craft
The craft “Wreath made of natural material” can be made with your own hands together with children of different ages. The creative process develops thinking and fine motor skills. We recommend choosing crafts such as a wreath made from natural materials for creativity with children and interior decoration. Below are some ideas.
Material:
- willow twigs.
- mimosa sprigs;
- yellow and blue feathers;
- decorative small blue eggs;
- thin wire;
- yellow checkered ribbon;
- glue gun
Progress
- Tie the willow branches into a ring, tie the ring with wire.
- Glue the mimosa branches to the willow base. Place mimosas at an equal distance from each other.
- Glue the feathers first yellow, then blue.
- Make several bows from checkered braid and glue them to the testicles.
- Glue the eggs to the wreath, placing them between the feathers.
- Make a wreath hanger from the same ribbon you used to make the bows.