History of origami
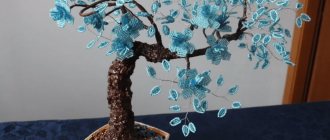
Nowadays, origami captivates mainly children. However, this was not always the case. Most animal figurines were created as iconic figures in Chinese and Japanese mythology. Photos of origami toys are still motivating to create something new.
Ship
To fold this simple three-dimensional figure, we only need a sheet of A4 paper.
First, fold the sheet in half, connecting the short sides. Then cut in half again, again along the short sides.
Folding the boat
Unfold, leaving the short sides underneath. And we attract the upper corners to the resulting middle line. We get a large angle. We turn the free sides from below upward from different sides. We take the middle line from both sides and unfold it so that it turns out to be a square. We lift the free corners of the square up from different sides, pull and unfold the boat.
This little magic, created in a few minutes, will keep your child busy for a long time.
Christmas tree decorations made of paper: 6 master classes
Photo: liagriffith.com
Making Christmas tree decorations with your own hands is not only an opportunity to make your tree unique and different from all others, but also a great pastime that helps create a New Year's mood. The easiest way to make Christmas tree decorations is from paper - see for yourself by trying to create toys using these step-by-step instructions!
Photo: liagriffith.com
Any handicraft will bring you more pleasure if you do it in convenient, comfortable and beautiful clothes. Pay attention to the patterns of home dresses, home trousers and home tops in our electronic catalog.
DIY paper Christmas decor: 13 ideas with instructions
How to make a Christmas tree toy out of paper: spinning top toy
You will need:
- paper of two colors;
- paper scissors;
- thread or fishing line;
- needle for hand sewing;
- 2 beads.
Step 1
Cut out 9 strips of paper of each color, each measuring 1.5 x 9 cm. Also cut out 2 circles with a diameter of 2 cm each.
Step 2
Cut a piece of thread. String one bead onto it. Then fold the thread in half and thread the ends through the needle.
Step 3
Fold all the strips in half, without pressing the folds too much.
Pass the needle through the center of one of the paper circles, leaving the bead at the bottom.
Then thread all the strips, inserting the needle from one edge and alternating the strips by color.
Step 4
Then you need to string the second ends of the strips. Start with the strip that you strung first, that is, the one that is closest to the bottom circle, and then string them in order.
Step 5
Add a second circle on top.
Then add a second bead, cut the thread and tie a knot to make a loop. Ready.
Photo and source: howaboutorange.blogspot.com
Snowflakes for cutting: 40 best stencils and templates
Christmas decorations made of colored paper: paper balls
You will need:
- double-sided colored paper (paper can be of different colors on different sides or the same color);
- something round as a template;
- pencil;
- paper scissors;
- glue;
- thin flexible wire.
Step 1
Cut out 12 identical circles from paper. You can use different colored paper like in the picture above.
Step 2
Fold all the circles in half and place one inside the other.
Wrap the wire around the stack of circles so that it runs along the fold.
Step 3
Place a dot of glue on the top circle as shown in the photo (the tip of the pencil points to the glue). You can also use small pieces of double-sided tape.
Bend over half of the top circle, press it, gluing it to the left half, and place a dot, as shown in the photo above. Continue, alternating points below and above.
You will get such a toy. All that remains is to glue a loop of thread and ribbon to it and hang it on the tree.
Photo and source: homemade-gifts-made-easy.com
How to make a New Year's star wreath from scraps: master class
DIY paper Christmas decorations: balls made from paper strips
You will need:
- double-sided colored paper;
- paper scissors;
- hot glue gun;
- if you want to add leaves, you will also need green paper.
Step 1
Cut the paper into strips measuring 3x30 cm for large balls and 3x22 cm for smaller balls. For one ball you need 4-8 strips.
Step 2
Bend the strip into a ring and secure the ends with hot glue.
Step 2
Add strips by gluing the ends together and gluing them together at the bottom until you have a ball.
Step 3
If you want to add leaves, cut them out of green paper.
The leaf can be put on one of the strips by making a cut, or simply glued, hiding the place where the strips are attached. Add a loop on top and you're done.
Photo and source: thehousethatlarsbuilt.com
DIY tiger for the New Year: 3 master classes
Christmas decorations made of colored paper: shaped balls
You will need:
- double-sided colored paper;
- pencil;
- paper scissors;
- something round as a template;
- glue or double-sided tape;
- thread and needle for hand sewing.
Step 1
Cut out 8 circles of the same diameter.
Also cut out 2 small circles.
Step 2
Fold each of the 8 large circles in half and then in quarters.
Step 3
Coat one small circle with glue or stick double-sided tape on it. Glue large circles folded in four onto the circle, as shown in the photo.
Glue the other 4 large circles onto the second circle in the same way.
Step 4
Glue the two halves of the ball together.
Step 5
Add a loop using a needle and thread.
Step 6
Spread the circles into a ball shape. Ready.
Photo and source: homemade-gifts-made-easy.com
New Year's decor from snowflakes: 8 ideas that will enchant you
DIY paper Christmas decorations: accordion balls
You will need:
- thick colored paper or thin cardboard;
- ruler, pencil and paper scissors;
- hot glue gun;
- ribbon for loop.
Step 1
Cut strips according to the dimensions shown in the photo above. If the length of a sheet of paper is not enough, glue strips of shorter ones.
Step 2
Fold all the strips into an accordion shape.
Step 3
Close each strip into a circle and hot glue the ends together.
Then assemble the strip as shown in the photo above and secure it in the center with hot glue.
Step 4
Assemble the ball using hot glue to secure the tiers together.
Add a loop.
You can add a ribbon bow. Ready.
Photo and source: diyinspired.com
New Year's mood: how to dry oranges for decoration
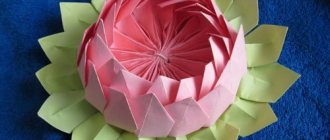
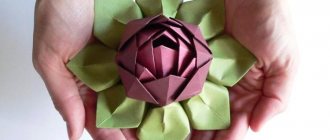
Christmas decorations made of paper: flowers
You will need:
- colored paper or thin cardboard;
- paper scissors, pencil and ruler;
- large stapler;
- double sided tape;
- ribbon for loop.
Step 1
Cut 10 strips of paper of two colors, each 2x21 cm.
Fold the strips, alternating colors, into a stack and staple in the center.
Step 2
Start folding the halves of the strips as shown in the photo and gluing the ends with double-sided tape.
Glue all the strips like this and you will get a flower. Add a loop and you're done.
Photo and source: thelinkssite.com
How to make a three-dimensional snowflake: 3 simple step-by-step master classes
Folding the modules
A standard A4 sheet of paper is suitable for the module. We divide it into 4, 8 or 16 equal parts, depending on the size of the figurine that we plan to assemble.
Fold the resulting rectangle in half, pulling the long sides towards each other. We determine the middle along the fold line and turn the corner, like an airplane.
We turn the workpiece over and at the ends of the “airplane” we bend the outer corners up. We wrap the lower free ends up and fold everything inward along the middle line. You should get a triangle with two caps inside.
Volumetric paper toys
To develop creative abilities in children, it is worth making voluminous paper toys together.
Cat Matroskin
To make Matroskin the cat out of paper, you should transfer the proposed template to a landscape sheet, print it, then paint the picture with the desired colors, and then cut it out along the contour lines.
Print and cut out the toy from paper, glue it and get a sailor cat
In places where the dotted line is laid, it is necessary to bend parts of the product inward and form the figure of an animal. The folds on which the pink dots stand should be glued together.
Dog
To design the product, you should print out the given pattern and color the figure at your own discretion. Then, along the dotted lines, you need to bend the parts of the template and glue them in those places where the unpainted parts of the layout are located. After the paper craft is ready, glue the tail to the back.
Butterfly
When creating three-dimensional multilayer butterflies, several pieces of the same configuration are cut out of paper material (the size and color scheme may be different). After this, the parts need to be stacked on top of each other and connected with glue, and the wings be bent at different angles.
A beautiful effect can be obtained if you make moths of the same shape, but from paper of contrasting colors or different shades . Make some of the blanks openwork, and the rest simple. Then they need to be combined by placing the link without a pattern down.
Dymkovo toy
To make a Dymkovo toy, you can use templates in the form of a laying hen, lamb, horse and cockerel. The fragments should be printed, colored to your liking and cut out along the contours.
To add brightness, it is better to choose a color scheme in which blue, scarlet, green and yellow shades predominate. The parts that need to be glued together are indicated by arrows.
Cardboard house
The house can be built from cardboard.
Step-by-step design:
- First you will need to print or draw a pattern and cut out cardboard elements according to its outlines.
- Then the blanks should be traced on the fabric, leaving an allowance of 1.5 cm. In the cut out fabric fragments, you need to cut the corners.
- In the window area, the material should be cut in the shape of the letter X on the fabric, then fold the resulting shreds inside and glue them.
- When all the parts of the cardboard house are ready, they are glued together.
Airplane
To create an aircraft, the following steps are provided:
- Fold a rectangular sheet of any shade in half lengthwise, then open it and fold 2 corners inward, aligning it along the central bend.
- In the new rectangle that is formed, the corners should be tucked inward again, leaving a small triangle visible at the bottom. Bend the peeking corner up, fixing the future wings with it.
- Bend the product along the middle line so that the ends of the triangles are at the bottom.
- Fold in the wings, aligning the line with the base.
- Finally, spread the wings.
Ship
Step-by-step process for making the simplest paper boat:
- Fold a rectangular piece of paper in half.
- Bend the upper corners towards the center at a right angle.
- Bring the corners of the base of the figure together to form a square.
- Fold the bottom corner points on both sides upward, a triangle should emerge.
- Connect the corners of the resulting figure together to form a square. You need to hold it by the upper corners and spread them to the sides until a boat is formed.
- Align the figure so that it becomes stable.
Volumetric toy made of colored paper
Step-by-step production of a lion cub:
- Cut out a beard, muzzle and ears from white paper, a mane and a tail tassel from orange paper, and make all other blanks from yellow raw materials.
- Attach the beard to the body of the animal using glue, then roll it into a cone.
- You need to glue the muzzle to the bottom of the head, and glue slightly smaller white fragments onto the yellow parts of the ears, and then glue them to the head.
- On the face you should draw a mouth, eyes and nose with your hands.
- Attach a mane in the form of sun rays to another head blank with glue, then fold the orange stripes in half and glue the painted blank onto the resulting part.
- Connect the head to the body with glue.
- For the paws, roll the prepared elements into a tube, fix them with PVA and attach them to the lion cub’s body. Draw claws on them or simply cut them into fingers.
- Glue the parts of the tail together, attach a tassel to it and fasten it with the lion's body.
Types of balls
Kusudama balls have a variety of shapes: these are classic balls, diamonds, stars and even flower balls. Let's consider collecting the simplest of them.
Folding the modules
To fold the modules we need a square sheet.
Fold the sheet in half to determine the middle. We open and pull the sides towards the midline. Let's unfold it again. It turns out that the sheet is divided into four parts.
We bend the lower corner of the first quarter and the upper corner of the last. Fold the sides towards the center.
We turn the corners of the workpiece so that we get a rhombus of two triangles. We tuck the corners of the triangles inside the pockets. We bend the workpiece along the resulting lines so that the corners are at the same level. Unfold and bend the corners outward. Collecting the ball
To assemble the ball you will need 29 such fragments.
Assemble the ball moving from right to left, inserting five modules in a row. The final row will have four modules. The modules are inserted into each other with corners. The modules must be inserted tightly, otherwise the ball will crumble.
Christmas tree toys made of paper
Christmas tree decorations are made from paper with your own hands. Such crafts are inexpensive, but look original and elegant.
New Year's ball
Method of making a New Year's paper ball:
- Paper sheets for notes are suitable for crafts. You will need 3 shades - for each of them 4 leaves.
- Place the bottom of the glass against one sheet and trace its outline.
- Using the template, cut out circles from the rest of the prepared paper.
- Fold the resulting circles in half separately and fold them together. It is better to combine colors symmetrically.
- Fasten the round fragments along the fold line with thread or a stapler.
- On a landscape sheet, draw another template, which will be required in order to fix the circles in a certain place. Apply markings, dividing the semicircle into 3 equal parts, then mark 1/3 from the bottom and top and draw lines, aligning the ruler with the middle of the circle and the drawn marks.
- After this, apply a ruler and align it with the line until you coat only the required area with glue, and cover the upper segment limited by the strip with adhesive.
- Turn the page of the round brochure over, gluing it, then move the ruler to the bottom and repeat the manipulation again.
- In this way, connecting alternately the leaves from below and from above, there comes a time when only two fragments of the book remain to be glued together before unfolding the craft into a festive ball.
- At the last stage, you should glue a bright thread on which the ball will hang on the Christmas tree.
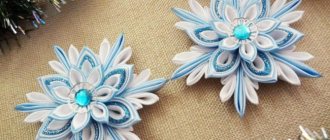
Volumetric snowflake
Step-by-step production of paper snowflakes:
- On a white sheet of paper, mark 6 squares with sides of 9.5 cm and cut them out.
- Fold the figure diagonally, on one side at a distance of 1.5 cm. Make 6 cuts, not reaching the fold line. Then unfold the part.
- Now take the 2 bottom strips in one blank and connect them together with glue.
- Turn the product over and glue the following sections together. In a similar way, combine all the strips of the fragment.
- Repeat similar actions on the remaining squares. You should get 6 blanks.
- To connect them together, you need to drop glue into the base of the part and connect it to the other part.
- In the same way, fasten the remaining 3 fragments.
- Glue the resulting 2 parts together.
Kusudama toys
The kusudama ball is an interesting toy in itself. However, here you can also get creative and make, for example, a fish. To do this, cut out eyes, tail and fins from colored paper. Glue them to the ball and the magic fish is ready.
Origami is always a lot of interesting ideas for play and creativity. It keeps kids busy and is a fun hobby for adults.
Paper wall decorations
You will need: 10 paper or plastic plates, 20 green sheets of paper, stapler, double-sided tape, scissors, glue, white braid or ribbon, decorative elements.
Master Class
- Cut out 2 squares of green paper.
- Fold them like an accordion, then in half.
- Secure the ends of the folded accordion with tape and make a semicircle.
- Connect 2 semicircles together to form a circle.
- Repeat these steps with other paper.
- Attach the circles to the plates.
- Attach double-sided tape to the back of the plates.
- Attach the plates to the wall, laying out the Christmas tree in this way: the bottom row is 4 plates, then 3, then 2 and 1 plate as the top.
- Decorate the Christmas tree to your taste by attaching ribbon and decorating it with toys.
New Year's paper wall decoration is ready!