Raincoat pattern
In order to get started, you need to prepare the necessary materials: a piece of special fabric, chalk or soap, a measuring tape, a large ruler, scissors, a needle and thread and other accessories. First you need to draw a pattern. Even a person far from design can draw it.
Raincoat without pattern
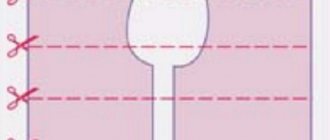
A rectangle 180 cm long and 150 cm wide can be drawn directly on the fabric. It needs to be cut out, folded in four layers and the required shape drawn by eye. Then, connecting two points along a rounded line, cut out a hole for the neck and sleeve. The shelf is cut in half.
Raincoat pattern 2
Raincoat pattern 3
You can make a raincoat like a cape. The fabric is folded diagonally and a semicircle is built on it. Its radius should be equal to the length of the arm. Then the neckline is cut out and a cut is made in the front.
Raincoat pattern 4 Raincoat pattern 4
Hood pattern
The hood is cut out on a separate piece from the remaining material. The advantage of a raincoat in the form of a stole is obvious. This option is suitable for those who do not have a sewing machine. This product is made without seams, and the craftsman does not have to worry about connecting them.
If you want to create something unusual or designer, then it is always better to use ready-made patterns. It's also quite easy to trace around an existing rain cover and make a new one the same.
There is a way to make a raincoat strictly according to your figure. To do this, take your favorite long-sleeved sweater. Next, place it on a sheet of paper folded in half and outline the edges in the shape of a semicircle with a margin. From the resulting edge to the end of the sleeve there should be approximately 10 cm on each side. From the bottom of the sweater to the edge of the paper, the required margin should be at least 20 cm, depending on the desired length of the product.
In the part where there was a neckline on the blouse, we draw a notch for the neck. We measure the recesses for the arms strictly along the sleeve. We place it on the edge of the paper and, at the location of the shoulder, begin to cut off a round hole slightly larger than the neck. Then we cut the paper from the neck to the base on one side only. Cut out one sleeve from the rectangle. The hood can also be outlined according to an existing item.
Stages of work
The sewing process proceeds in the following sequence:
- Connecting the side seams of the resulting parts using a sewing machine or manually. Before stitching, the parts can be pinned together. For greater strength, they are reinforced with bias tape.
- Sewing on the hood. To do this, you need to attach it to the neck. The length of the neckline should match the length of the bottom edge of the hood. It is recommended to immediately hem the front edge of the hood by folding the fabric inside out twice.
- Bias trim on sleeves, hem, edges and hood. This is done both for beauty and to give strength to the product. You can simply fold the edge and sew it on a machine. In quick-fix products, processing may not be carried out at all.
- The choice of material and manufacturing technology for fasteners, if any. These can be ties, buttons, Velcro or snaps. It all depends on the personal preferences of the master. To ensure that the fastener stays on the polyethylene, it is recommended to place a transparent button under it.
- Decoration of the product. The raincoat can be decorated with rhinestones, appliqué, or interesting designs can be painted with indelible paint.
What to consider when sewing a raincoat from bags
- Draw pattern lines along the fabric texture (stripes). This technique will make the product less brittle.
- Try to form fragments of the product in such a way that the inside and outside textures match. Sometimes it's hard to tell which side of the bag is which, so pay attention to the texture and color.
- Make sure all seams are on the inside of the jacket.
- Cut out identical pieces by folding the material either in half or just together. This will save a lot of time.
- When ripping bags, use scissors or a utility knife. Do not cut them into pieces, otherwise the fabric will begin to fray and additional time and money will be required for processing.
Progress
- Print or draw a pattern.
- This pattern is suitable for creating a medium sized women's raincoat.
- Cut out all the pieces.
- Cut out four pieces for the sleeves. Separate the two bags. Do not touch the hem (the part where the handles are inserted). One bag should be enough for two sleeves.
- Divide the other bag without folding. It will be used for two pieces of the back.
- In the next bag you open, do not touch the hem either. This will save you from having to finish the bottom edge later. If the handles are in the way, carefully tear them out and stitch the torn areas. From the resulting piece, cut out two front pieces.
- Cut two pieces for the hood using leftover pieces or a new bag.
- Connect the sleeves.
- Take two sleeve pieces and sew along the longer edge. Repeat this for the other sleeve. When unfolded, there should be two pieces that match Figure A.
- Then sew along the other edge as in picture B.
- Sew the back.
- Connect the two pieces and stitch along the long edge.
- Connect the back to the front parts.
- Sew the shorter vertical edge of the front to the edge of the back, right first. Repeat this step with the other front piece on the left.
- Sew on the sleeves.
- Secure the inverted sleeves with needles on the wrong side of the product, and then stitch. Do not sew the shoulder edges all the way. Later they will be sewn to the hood.
- Form a hood and sew to the base of the product.
- Then use a hem stitch along the edge of the hole.
- Sew the hood to the base.
- Finish all exposed edges of the piece.
- Cut two pieces from the handles of the bag (10 cm each) and sew them into the seams on the sides, thereby forming loops for the belt.
- To make the belt, sew two handles of the bag. Light with fire or stitch the ends so that they do not fray.
- Form two more long strips of handles and sew them along the bottom edge of the raincoat to protect that edge from quickly fraying.
- The raincoat is ready.
02instructables.com
instructables.com
instructables.com
Raincoat without pattern: for men, women, children
This wardrobe item can be made in a few hours. The main thing is to calculate the fabric consumption and buy it in the store. An impregnated raincoat is best suited for these purposes; it definitely won’t get wet and will reliably protect you from gusts of wind.
A simple cutting is done like this:
- Fold the fabric in half.
- Place the length of the product down towards the edge.
- Measure the circumference of the hips, divide the value in half, add 8-10 cm for a loose fit, mark the size on the fabric, so you get a rectangle - this is the back of the raincoat.
- Now you need to draw the sleeves. We set the length away from the back, taking into account the increase for the hem.
- Cut out the neck.
- Construct a hood pattern in the form of a rectangle, then round the top corner.
If you are not sure, then it is better to draw the constructions on paper or oilcloth, try them on, and then transfer them to fabric. Stitch the seams, process them, hem them. It remains to determine what to make the fasteners from. These can be ties, buttons, Velcro, buttons, a choice for every taste. A man's raincoat can be left without any additions; a children's raincoat can be decorated with a pattern of rhinestones or ready-made embroidered appliqués; a woman's raincoat can be embroidered with beads or other decorative elements.
LiveInternetLiveInternet
So, nothing could be easier than making your own rain gauge. We take an ordinary plastic bottle of the correct cylindrical shape and cut off its top, stepping back a little from the place where the narrowing towards the neck begins. As a result, we have a lower part - a cylinder and an upper part - a funnel. We make a couple of small cuts on the funnel (otherwise it won’t fit), turn it over and insert it into the cylinder. The device is ready. Rain will fall on the funnel and flow into the device - into the cylinder. A funnel is needed to prevent water from evaporating between observation periods. As you know, the amount of precipitation is measured in millimeters of the height of the layer of water that would form on the surface if the water did not flow anywhere and did not evaporate. According to the mathematical formula h = V / S, where h is the height, V is the volume of water, S is the cross-sectional area of the precipitation gauge. We find the cross-sectional area using the formula S = pi*R^2, where R is the radius (elementarily measured with a ruler, not to be confused with the diameter). The larger the radius of the bottle, the more accurate the measurements will be. To measure, you will need a beaker, which you can also make yourself, but it is better to buy it - it will be more accurate. Let the diameter of the bottle be 10 cm, then the radius is 5 cm. The cross-sectional area is 78.5 square meters. cm or 0.00785 sq. m. Then, to get the amount of precipitation in mm, you just need to divide the measured volume of water in liters by this number. Let's say after the rain we measured 40 ml. water. Then the precipitation was h = 0.040 / 0.00785 = 5.1 mm. That's it, all that remains is to install the precipitation gauge in an open place. In principle, it can be placed on the ground, fixed in place with improvised objects (stones, bricks, etc.), but it is better to build a stand for it on a pole, if conditions permit, of course. And don’t forget that the precipitation gauge must be placed at a sufficient distance from tall objects (houses, trees, etc.) so that, on the one hand, they do not obscure the device from precipitation in strong winds, and on the other hand, so that nothing superfluous comes from them didn't fall there.
We find the cross-sectional area using the formula S = pi*R^2, where R is the radius (elementarily measured with a ruler, not to be confused with the diameter). The larger the radius of the bottle, the more accurate the measurements will be. To measure, you will need a beaker, which you can also make yourself, but it is better to buy it - it will be more accurate. Let the diameter of the bottle be 10 cm, then the radius is 5 cm. The cross-sectional area is 78.5 square meters. cm or 0.00785 sq. m. Then, to get the amount of precipitation in mm, you just need to divide the measured volume of water in liters by this number. Let's say after the rain we measured 40 ml. water. Then the precipitation was h = 0.040 / 0.00785 = 5.1 mm.
I suggest immediately looking for the size of the division (1 mm of precipitation) on the beaker, if it is not calibrated, based on the areas of the precipitation gauge and the beaker. It would be desirable for a beaker to have a flat bottom. H=S1/S2 - where H is the size of the division (1 mm of precipitation) on the beaker in millimeters; S1—precipitation gauge area; S2 is the cross-sectional area of the beaker. If we write in terms of diameters, we find that the ratio of the square of the diameter of the precipitation gauge to the square of the diameter of the beaker will be equal to the size of one division on the beaker in millimeters, which will correspond to one millimeter of precipitation. Next, divide this division on the mezurka into tenths. The scale can be printed on paper in stripes and glued with wider tape. The kit is ready. After calibration there is no need to divide anything. Pour it carefully and it's done.
Hello everyone! I also made myself a precipitation gauge around 2000. For this, I found a metal jar from the Italian canned vegetable salad “Mine Strone” with a diameter of 15 cm and a height of also 15 cm. I did not make a funnel, since I did not find suitable raw materials. but I tried to make a precipitation glass. To calibrate it, I proceeded as follows: I calculated the mass of water that would form a uniform layer of 1 mm in the precipitation gauge. then I took the required amount of water with a 20 cc syringe (I needed 17.7 g, which corresponds to 17.7 ml) and poured this water into a plastic transparent cup. So I put the first and subsequent divisions on the glass. The maximum I got in a glass was 4 mm of precipitation. Next, I calculated the correction for wetting. I again filled the syringe with 17.7 ml of water and poured it not into the glass, but into the precipitation gauge. Then I poured this water from the precipitation gauge into a glass and it turned out that there was only 0.9 mm of precipitation. Accordingly, the correction for rain turned out to be +0.1 mm. You can see my precipitation gauge on my website https://www.meteo.na.by.
I also started thinking about measuring precipitation (I don’t conduct regular observations until I decided to measure precipitation just for fun, during downpours or heavy rains). From the available containers, I decided to use a regular half-liter glass jar (standard, with an outer neck diameter of 82 mm). The internal diameter of the neck of such cans ranges from 72.2 to 74.1 mm, with an average of 73.15 mm being the average and taken into account. The cross-sectional area of the neck is 42 square meters. cm (or 0.0042 sq. m). 1 ml of water in the rain gauge corresponds to approximately 0.24 mm of precipitation. Like any “homemade” product, it has its drawbacks, let’s start with them - a small precipitation collection area (only 42 sq. cm); — there is no funnel, so in summer evaporation is rapid and it is advisable to take measurements immediately after the end of precipitation. But there are many more advantages: - accessibility and replaceability (such dishes can be found in almost any home); - does not rust or warp (like metal or plastic), at the same time it is quite heavy and stable (no need to carefully fasten it), and when installed directly on the soil surface, the jar was not fixed with anything at all. - and most importantly: a good cross-sectional area of the neck (at which 1 ml = 0.23809523809 mm. That is, it (the area) is such that you can not use any tables, but use the rough formula 1 ml = 0.25 mm (or 1 mm = 4 ml) Even in this case the error (compared to using the more accurate but cumbersome number 0.23809523809) will be only +5 mm/100 mm or +0.5 mm with 10 mm of rainfall. On the other hand, this error (+5%) is also a kind of plus, it can be used instead of correction for wetting and evaporation. I have already used the “precipitation gauge” in action and compared it with neighboring stations (28806 Buguruslan, 28805 Kinel-Cherkassy) - in general, despite the small area of precipitation collection, the results were good I have not yet noticed any particular errors or incorrect measurements with my “precipitation gauge” (at least in the warm season).
I would still recommend using a plastic bottle with a large cross-section, say a 2.5-liter beer bottle: it is also accessible and easily replaceable, in addition, the funnel prevents the evaporation of water. I agree here, the cross-sectional area of a glass jar is small, but it is produced according to the standard ( in any case, under a regular nylon or can lid, i.e. not screw ones). And with plastic beer bottles, unfortunately, this is now non-standard %/. There are many things (both carved and thin and thick) and it is not known what their cross-sectional area is. As for the jar, I can’t imagine how you will measure snow in winter with it: even a tall bottle can be filled to the top during heavy snowfalls, and even more so I don’t even know, I just haven’t planned it yet. For now, I’ll assume that you can use a three-liter bottle for this purpose (same neck), on a stand. But at the same time, I thought about it now and realized that it’s not clear how you’ll have to use glass containers in cold weather; they can freeze so much that tearing them off without compromising its integrity will be problematic. We still need to think about it (about winter)
Please tell me what cross section this bottle has and how many ml of water corresponds to 1 mm of precipitation? The calculation is the same as in your first message in this topic: Let us measure 40 ml after the rain. water. Then the precipitation was h = 0.040 / 0.00785 = 5.1 mm.? Are there any other ways to keep moisture in the precipitation gauge from rapid evaporation when using glass containers?
Please tell me what cross section this bottle has. This one is 88 sq.cm. Accordingly, 1 mm is approximately 9 ml. Elementary mathematics.
Description
Sizes: 98,104,110,116,122, 128, 134, 140, 146, 152, 158, 164
Back length
Line A, with stitched cuff – 36, 37.5, 39.5, 41, 43, 44.5, 46.5, 48.5, 50.5, 52.5, 55, 57
Line B, hem – 40, 41.5, 43.5, 45, 47, 48.5, 50.5, 52.5, 54.5, 56.5, 59, 61
Sleeve length, from the neckline – 41, 44, 47, 50, 53, 56, 59, 62, 64, 66.5, 69, 71.5
Before choosing the size of the pattern, determine the required size as accurately as possible using the size chart. First of all, the size is determined by the child’s height; if necessary, the pattern can be adjusted by a few centimeters.
If you are in doubt about the size, you can take a pattern one size larger, baste the product before sewing and try it on. After trying on, adjust the pattern if necessary.
How to sew a raincoat from polyethylene with your own hands
A raincoat is an indispensable item in changeable weather. Its value lies in its compactness and reliability. While precipitation is only expected in the weather forecast, the raincoat will be in your bag or backpack without taking up much space.
However, at the first drops the cloak can be taken out. It will keep your clothes dry and protect not only from moisture, but also from wind. In this case, such a thing is even more reliable than an umbrella, which is not easy to hold in your hands in gusts of wind.
It's good when each family member has their own capes. You don’t have to buy them, because you can make such a raincoat yourself. We will tell you how to sew a raincoat with your own hands.
Do-it-yourself raincoat for a dog - necessary materials, patterns, step-by-step instructions
Clothes for pets have long turned from exotic to necessity.
Warm coats, overalls, caps and boots are liked not only by the owners, but also by the animals themselves, protecting them from bad weather, dirt and dust. For walks in the rain, you also need a special outfit.
Even an owner who is not very skillful with a needle can sew a raincoat for a dog with his own hands. The pattern is simple, the whole process will take no more than half an hour.
Necessary materials
If you can’t sew a raincoat yourself, you can always buy one at a pet store
The basic requirements for dog raincoats are simple. They should be:
- waterproof;
- lungs;
- comfortable to put on and wear;
- durable;
- attractive in appearance.
The cape should not tangle, slip, or irritate the dog with loud rustling noises. If your pet doesn’t like the new clothes, he may refuse to wear them, so you need to approach the issue of material responsibly. To work you will need:
- light fabric with water-repellent impregnation (an old windbreaker or raincoat will do);
- scissors;
- needle and strong synthetic threads;
- pattern paper;
- marker;
- Velcro tape for fastening.
Choose fabric that is not too cheap. Despite the fact that the raincoat is intended only to protect from moisture, it should not cause the pet to overheat.
Pattern and measurements of the dog
Fitting is a mandatory stage in making a raincoat
The style of the raincoat is simple: it is a kind of cape, complemented by a hood and firmly fixed to the body. The dog's paws and muzzle remain open.
For many dogs, a raincoat is essential. But if your pet is large and has short hair, then you should only wear a cape when walking in very cold and rainy weather. If you do this constantly, you can disrupt the animal's thermoregulation.
Before you start sewing, you need to measure:
- neck circumference at the widest part;
- length along the withers from the neck to the base of the tail;
- sternum girth;
- circumference of the lower body near the hind legs.
The simplest pattern is a rectangle with a length equal to the size of the body and a width corresponding to the girth of the body. In order for the raincoat to sit freely and not restrict movement, an allowance of 6–7 cm is required. The hood can be removable or one-piece. The first option is more practical; the part will be attached to the raincoat using a special tape.
The hood pattern is made on a separate sheet of paper. The shape of the workpiece is a semicircle, the length of the base is equal to the circumference of the pet’s neck. The length of the hood corresponds to the distance from the base of the neck to the dog’s eyebrows.
After drawing up the pattern, the details are cut out and transferred to the fabric. For seams, an allowance of 2–3 cm is required. At the bottom and at the base of the neck, the allowance is 4 cm - a fastening tape will be sewn there.
If you want to make a raincoat that is more comfortable and attractive in appearance, you can use a more complex pattern
How to sew a raincoat with your own hands: step-by-step instructions
You can use snap buttons as fasteners
The details are cut out with tailor's scissors and basted by hand. The product must be tried on the dog - it must move freely. At the end part, the workpiece is hemmed by machine or by hand. For fastening, a Velcro tape is cut (the length corresponds to the dimensions of the lower part of the raincoat). It is sewn on by machine - the part must be held as securely as possible.
The raincoat should not fit tightly around the dog's body. She should be comfortable in her clothes.
The outer part of the hood is hemmed, and Velcro tape is sewn to the base. If desired, the hemmed part can be made wider and a cord can be inserted into it to adjust the width of the hood. This style is ideal for dogs with long ears - spaniels, setters, beagles, bassets.
Video: Raincoat for dogs
Having mastered sewing the simplest raincoat, you can try more complex styles, complement your clothes with suitable shoes and other accessories. However, many pets prefer primitive outfits. The main thing is the ability to quickly put on and take off the cape without irritating the dog or spoiling its mood from the walk.
Subscribe to our channel in Yandex.Zen
- tisson
Source: https://pernatiki.com/sobaki/dozhdevik-dlya-sobaki-svoimi-rukami.html
Patterns and instructions for sewing raincoats
In the autumn, a raincoat will come in handy. It is convenient to store and carry in a bag - it does not take up much space, but will be indispensable in very heavy rainfall. But stores mostly sell expensive or low-quality options, so the best solution would be to sew a raincoat with your own hands. Even a novice needlewoman can handle this.
All you need to do is find instructions and tips on how to sew a raincoat, and you can get to work.
Requirements for raincoats
This type of clothing is necessary to protect a person from the rain. Therefore, the following requirements are imposed on it:
- It should sit comfortably and not restrict movement.
- When choosing fabric, you should give preference to materials that are not very rigid and dense. This will allow you to easily fold the raincoat without fear of kinks and kinks.
- Of course, you need to choose a completely waterproof fabric.
- In polyethylene models, the seams must be soldered, and in membrane versions, taped. It is not allowed to sew seams.
- Rivets should be preferred as water can penetrate through the button holes.
- The hood should have elastic bands or ties. This will keep it on your head during strong winds.
Raincoat
Additional Information. It is recommended to provide holes under the arms. They will ensure air circulation and eliminate the “greenhouse” effect.
Choice of style and fabric
In order to sew a reliable and high-quality raincoat, you need to choose waterproof and water-repellent fabric. This material is easy to find in construction or sewing stores. In this case, it is best to check with the seller whether the chosen option is suitable for sewing a raincoat, and what characteristics it has.
You may be interested in Choosing sewing threads for a sewing machine: prices
As a rule, a raincoat is used irregularly, so there is no point in choosing very expensive fabric - even lavsan or polyethylene will do. On average, standard size clothing will require about 3 square meters of material.
Polyethylene
Important! Raincoats can be of two styles - made of two pieces or a semicircular raincoat. The length and width can be different, their choice depends only on personal preferences.
How to sew a Little Red Riding Hood carnival cloak for a girl?
Little Red Riding Hood in the English version is not a Riding Hood at all, but a Little Red Riding Hood. Therefore, if your daughter has to play the role of this fairy tale heroine at a matinee, Christmas tree, or theatrical performance, as an alternative to a red satin cap, you can sew her a cape with a hood.
Little Red Riding Hood's cloak pattern.
Take:
- red satin or crepe satin
- red silk ribbon
- red braid
- elastic band
- Velcro
- chalk
- scissors
- threads
- igloo
- tailor's pins
Cape for Little Red Riding Hood's cloak.
Hood for Little Red Riding Hood's cloak. This is what Little Red Riding Hood's cloak will look like.
- Fold a piece of red fabric in half. Use the pattern for a round cloak. If you don't have one, choose a round object that is close in diameter to the circumference of the girl's neck.
- To draw a large circle, measure the distance from the small circle to the edge of the fabric.
- Leave the same distance on both sides along the fold of the fabric. Don't forget to leave seam allowances.
- Sew the hem of the raincoat with a decorative seam or trim it with braid.
- Make a double hood. Cut 4 identical pieces for the hood from red fabric.
- First assemble the hood parts and process the cut. Then sew the hood into the neck of the cloak.
- Use red tape and Velcro to make a cape fastener and sew it on.
DIY Little Red Riding Hood's cloak: step 1.
DIY Little Red Riding Hood's cloak: step 2.
DIY Little Red Riding Hood's cloak: step 3.
DIY Little Red Riding Hood's cloak: step 4.
DIY Red Riding Hood's cloak: step 5. DIY Red Riding Hood's cloak: step 6.
DIY Red Riding Hood's cloak: step 7. DIY Red Riding Hood's cloak: step 8. DIY Red Riding Hood's cloak: step 9.
DIY Little Red Riding Hood's cloak: step 10.
DIY Little Red Riding Hood's cloak.
DIY Tutorial Ideas!
DIY Tutorial Ideas Step-by-Step
We sew a beautiful raincoat quickly and easily. Master class
Spring always brings joy with rainy days, with pleasant fresh aromas and large puddles that you want to run through. Naturally, you want to run through puddles so that you remain dry, so rubber boots and oilcloth raincoats were invented for such an activity. It is the raincoat that I want to invite you to sew yourself today.
How to sew a poncho yourself from oilcloth
10 cm on each side. There should be about 20 cm or more left from the bottom of the jacket to the edge of the oilcloth, depending on how long you want the raincoat to be.
Now we make a hole at the neck of the jacket. We measure the holes for the arms exactly along the sleeve. We apply it to the edge of the oilcloth and in the place where the shoulder is, we begin to cut off a round hole slightly larger than the neck.
We cut the oilcloth from the neck to the bottom on one side.
We make a sleeve from a rectangular piece of oilcloth.
We sew its inner sides.
We pin the hole and sleeve together and sew them together.
In the same way, we sew the upper part of the raincoat from a more elegant oilcloth.
We measure the hood according to the body shirt. We cut blanks from oilcloth into
15 cm above the hood and
10 cm wider. We sew the two parts together along the back edge. Sew it to the neck of the outer part of the raincoat.
We also sew a hood for the inside of the raincoat and sew it to the neck.
We insert two parts of the raincoat one into the other. Sew along the bottom edge, the edges of the sleeves and along the edge of the wrap and hood.
We make a loop in the upper part and sew on a large beautiful button.
That's all, our raincoat is ready, you can go for a walk in the rain.
We sew clothes for dogs ourselves
Every owner wants his pet to stand out from others, look good and be healthy. In winter, warm clothes will help make your dog smart and at the same time protect him from wind and dampness. But you don't have to scour your local stores to find the size, style, or color you like. You can do everything your pet needs on your own. The most basic and simple clothing option is a triangular bandana around the neck. This is where we will begin our series of master classes.
Materials and tools you need to have on hand to make something like this:
- Thick flannelette fabric
- Velcro fastener
- White pompom
- White faux fur patch
- Scissors, thread, needle, sewing pins, sewing machine
The procedure will be as follows:
- To cut out a rectangular piece of fabric of the desired size, measure the circumference of your dog's neck and add 5 cm. The resulting value will be the length of the rectangle. Its width should be half as long.
- Fold the flap in half lengthwise so that the opposite sides match. Mark the center of the rectangle on its bottom side. Then draw two lines from this point to the top corners and you will have an isosceles triangle to cut out.
External module
Do you know where meteorological temperature and humidity sensors are located? They use special ventilated housings similar to plungers. White. So I wanted to do everything beautifully. On thingiverse I found an interesting project “DHT22 TEMPERATURE HUMIDITY SHELTER” from the author of NEO BUILDER.
As you can see from the render, this is the same meteorological plunger. The project was developed specifically for the DHT22 sensor. So this turned out to be what I needed. I was pleased that in addition to the STL files, the archive with the project included detailed instructions for assembling this case. As a result, it was this project that I decided to implement, so to speak, in plastic. PETG plastic from the ABSmaker company was used for printing; if you are interested, here is an article about it “PETG plastic from the ABSMaker company. Brief review and review." Naturally, the model was printed from white plastic.
And this is what I got:
The body is printed from a large number of elements and then assembled onto 3 M4 studs. For assembly, I specially purchased a stainless steel stud and nuts also made of stainless steel. I did this so that rust spots would not appear on the body in the future.
However, another problem arose here. How to securely secure the sensor so that the wires do not come off. And everything held up well. As a result, we had to make a special socket to which the sensor and the wire from it were soldered.
As a result, the sensor was glued and soldered to the socket. A wire was soldered to the socket. Then a layer of protective waterproofing compound was applied to the soldering areas. Like this:
Well, after that, with the help of a small self-tapping screw and electrical tape, the sensor was secured inside the housing.
DIY raincoat: pattern, tips and tricks
Before starting work, you should prepare the necessary tools. A piece of fabric, a piece of chalk, a measuring tape, scissors, a needle, an awl and thread will be needed to sew a raincoat. When everything is ready, you can start cutting. Drawing its diagram is quite simple - even a beginner can do it.
The simplest option
The easiest way to do this is without a pattern. For it you will need to take a piece of material measuring 180 × 150 cm, fold it in four layers and estimate the desired shape of the raincoat by eye. Then you should cut out holes for the head and arms, and cut the shelf in half.
You may be interested in: Making your own wedding veil for the bride
Additional Information. Polyethylene is a fairly cheap material, so you can make fittings and check whether they fit or not. Once the size has been determined, you can begin sewing the final version of the raincoat.
Raincoat pattern
You can also sew a raincoat like a cape. The material needs to be sewn diagonally and made into a semicircle. The radius of the workpiece is assumed to be equal to the length of the arms. After this, you can start cutting out the neckline and making a cut on the front of the raincoat.
Ready-made raincoat-cape
Hood pattern
When patterning a raincoat, a poncho with a hood is made in the same way, and the hood is made from the remaining piece of material. Another option is to make a cape in the form of a stole - it is suitable for those who do not have a sewing machine. If you have an old raincoat, you can make a pattern by simply tracing its outline.
Cloak with hood
Tailored raincoat
To make rain protection that will fit your body exactly, you need to take a sweater of a suitable size and draw a pattern using it, with extra seams. The lower part should be made longer. Holes for the neck and sleeves are cut out according to the pattern, and the hood can also be made according to an existing version.
DIY weather vane
Make and place a weather vane on a high pole and teach the children how to determine the direction of the wind. Take a smooth stick and drive a long nail into one of its ends. Cut out a flag from thick cardboard and laminate it so that it does not get wet when it rains.
Wrap the edge of the flag around the nail so that it can rotate freely when the wind blows. Make arrows from thin wires pointing south, north, west and east and attach them to a stick. The weather vane is ready. Install it on your weather site, orienting the arrows to the cardinal points.
With older children (6–9 years old), making weathervanes fits perfectly into geography lessons, when you talk about how winds are formed, how the first navigators used knowledge about them, what the winds at “horse latitudes” mean, what trade winds are.
Sailors, knowing about the trade winds - steady winds blowing in tropical zones - called them "trade winds" because with their help merchant sailing ships (engines had not yet been invented) crossed the Atlantic Ocean. Sailboats carried goods from Europe to America.
Subtropical winds between 30 and 38 parallels of southern and northern latitudes were so light that sailing ships became calm. We had to wait for months for the right wind. Often the wait lasted for 3–5 months. The sailors were running out of fresh water and food and had to subsist on horses, which were transported in large numbers from Europe. Therefore, these latitudes were nicknamed “horse latitudes”.
Using a weather vane, children mark the direction, strength and change of wind in their weather observation calendars. In this way, we not only introduce them to the basic meteorological instruments, but also to the methods and techniques of observation and processing of results.
How to sew a windbreaker for a dog (instructions with pattern)
To do this you will need the following materials:
- Warm fabric
- Elastic band (“elastic band”)
- Elastic cord, two tips and a clamp for it
First, we take measurements and make paper patterns, only then we move on to sewing.
How to take measurements
- The volume of the neck is measured at its base, at the widest part. Always add about 2 cm to this figure so that the dog can breathe freely.
- The length of the neck is the distance from its base (the widest part) to the top of the head.
- Chest girth is measured at the widest part of the chest, just behind the front legs. You also need to add about 2 cm to this indicator (for very fluffy dogs - 3 cm) so that the animal does not feel tight in clothes.
- The length of the sternum begins at the shoulder blades and ends behind the rib cage, where the dog's torso begins to taper.
- Waist circumference is measured at the narrowest part of the torso, between the chest and hips.
- Back length is the distance from the base of the neck between the shoulder blades to the base of the tail.
- The length of the leg is equal to the distance from the lower edge of the shoulder blade (where the leg meets the torso) to the floor.
- The girth of the leg is measured at its base (the place where the leg meets the torso).
Body pattern:
1. Draw a rectangle that is the length of your dog’s back and the width of ½ the circumference of his chest.
2. Mark the length of the sternum (A) on the rectangle
3. Mark the center of the rectangle in height (B)
4. Draw a smooth curve from A to B. In the figure, the curve that is more suitable for female dogs is marked in pink. The curve more suitable for the male sex is marked in blue.
5. Mark ½ of the circumference of the neck (C) and a point about 1 cm (a little more or a little less, depending on the size of the dog) from the edge of its long side (D). Connect both points with a smooth line.
6. The opening for the sleeve should be slightly narrower than the circumference of the neck, but at the same time be free enough for the dog to move around without interference.
Sleeve pattern:
in the top picture on the left
1. Measure your dog's feet
2. Draw a rectangle whose length is equal to the length of the leg and the width is half of it.
3. Draw a smooth curve at the top of the rectangle according to your leg circumference
4. Leave a small seam allowance on the right side and along the top edge of the pattern (the left and bottom will not be needed)
Hood pattern (in the picture on the right):
in the top picture on the right
1. Measure your pet's neck circumference
2. Draw a rectangle using the length of the neck and ½ its circumference for the length and width of the piece, respectively.
3. Slightly round the top right corner of the rectangle
4. Leave a small seam allowance along the bottom, left and right sides of the piece. Don't add anything at the top.
5. Mark the places where the hole for the lace will be
6. Fold the piece of fabric in half, wrong side out. Attach paper patterns to it, as shown in the photo, secure with sewing pins and cut out all the parts of the future windbreaker. Finish the edges of the fabric with an overlock or zigzag stitch.
Having completed the described manipulations, you can proceed directly to sewing the windbreaker. It consists of three stages:
Sleeve stitching
1. Wrap the rubber band around your leg, directly at the paw, to measure the girth of the cuff. Allow a small allowance as the tape will shrink a little when stitched to the fabric. Cut the resulting piece, and then another one of the same length.
2. Lay out the sleeve pattern on a flat surface, wrong side up. Stretch the elastic so that it matches the width of the fabric on the side where the cuff will be. Pin it to the pattern, about 1 cm from the edge, and stitch it in a stretched state with a zigzag so that it remains elastic. When you release the elastic, the fabric will bunch up. Do the same with the second sleeve.
3. Fold the bottom edge of the sleeve so that the elastic remains inside, stretch the pattern again and sew only the fabric. You should have a simple cuff.
4. Fold the sleeve in half lengthwise and stitch the edges.
Sewing the hood and body
5. Hem the fabric on the flat (not rounded) side of the pattern by 2 cm. You will thread the lace into this cuff.
6. Fold the rectangle in half and stitch the edge opposite the drawstring cuff.
7. Turn the hood inside out and thread the drawstring through the cuff. Place the clamp and lugs on it.
Sewing the sleeves and hood to the body
8. Fold the rectangular body pattern in half, wrong side out, and stitch the edges between the sleeve holes. Sew the sleeves and hood to the corresponding holes and turn the windbreaker right side out. And now your jacket is ready!
Cloak-cape with a hood: pattern for beginners in needlework
Currently, capes with a hood and ponchos with sleeves are extremely popular. This becomes mainly visible in winter and autumn, when the temperature outside drops and it becomes cold.
In such weather, a warm cloak with a hood can save you, the pattern of which is very simple, so even a novice needlewoman can create it for herself.
And most importantly, such a thing will look great on any woman, regardless of age and body type.
Let's start simple
To create a cape with a hood with your own hands you will need:
- Centimeter tape for taking measurements;
- Pen for notes;
- A pattern of the selected product with a photograph of the item that will turn out;
- Special paper for the pattern and tracing paper for transferring the pattern according to the required dimensions;
- Chalk for transferring the pattern onto the fabric;
- Textile;
- Needle and thread for preliminary basting;
- Sewing machine.
When everything you need is at hand, you can begin work, which consists of several phases:
- Taking measurements;
- Transferring the pattern onto paper and then onto fabric;
- Creation of individual parts;
- The last and most difficult phase is connecting all the parts into a whole product.
It’s easy to sew a cape yourself; to do this you need to be patient and be as careful as possible. And the end result will be an extraordinary, unique and fashionable wardrobe item.
Poncho with sleeves
The poncho consists of several parts, the main part consists of the front, back and neck. Both sleeves are sewn into this part. The details of the product should be sewn together as carefully and concentratedly as possible, checking the sample. And the last thing is decorating the resulting product with various elements, for example, tassels, pom-poms or fringe.
Read this: Machine embroidery with patterns: preparing a gift for loved ones
You need to start making a poncho from the main part, namely the front and back. Then the sleeves are created and the neckline is processed. And only after this the sleeves are sewn on. For a summer model, you can make the product sleeveless.
For the cold season, thicker and waterproof fabrics should be used. You can treat the selected material with a special water-repellent impregnation. And for the warm season, the fabric should be light. We choose the length to taste, taking as a rule that the longer the product, the warmer it is. The presence and shape of the hood also depends only on desire.
On a note! If you want, you can make a detachable hood with a zipper.
Features and Tips
To make a cape with a hood look as beautiful as in the picture, you need to consider the following tips:
- One of the most important stages is cutting the fabric. You need to be very careful on it, clearly and accurately observe all dimensions. Because if you make a mistake, difficulties will arise when sewing all the parts together. Don't forget to indent a few centimeters for seam allowances.
- It is necessary to purchase material “with a reserve” so as not to end up in a situation where there will not be enough fabric during cutting.
- To be comfortable, you need to make the hood loose. It will be most convenient if you make it adjustable. To do this, it is necessary to equip the hood with a drawstring and thread the cord.
- You can take fabric of any color, plain or printed. For a light option, a fabric with a pattern is better, and for a warm model, a plain fabric in dark colors is better. If there is a hood, then it can be decorated with fur.
Read this: Chiffon dress in several options
The popularity of this item is explained by the fact that it provides excellent protection in windy and cold weather. And also because walking in a poncho raincoat is very comfortable, it suits a girl with any body type.
Another way to sew
Let's look at another way to sew a stylish new thing:
- We take the fabric, draw a circle on it with a radius that will be equal to the length of the future product. And the diameter of the second circle is drawn from the same point as the first, but with the addition of 5 cm for the neck. Cut out and cut the front side in half. To create a hood, cut out 2 squares with sides equal to 40 cm, and round 2 corners on them.
- Now we can assemble the cape. The hood can be created in 2 ways.
The first method: fold the two parts with the front sides inward, stitch and finish with bias tape. Second method: fold the back sides inward, stitch along the front side, turn it inside out and sew a little wider to hide the previous seam and prevent threads from spilling out.
- Sew on the hood and attach it to the cape so that the length of the bottom is equal to the neck. Sew it on with bias tape, or in the same sequence as you assembled the hood. Now we process the edges with bias tape, or fold them twice and stitch them.
- We sew a fastener to the edges of the neck so that it fits tightly on the shoulders, for example, laces, a button or a button.
- If in the end you want to get a cape with sleeves, then we do it a little differently. We fold the fabric 4 times, draw half of the kimono on it, cut out the corner (future neck), cut it out and cut the shelf in half. In this case, we process the sides in the same way as the hood.
- To make the cape more attractive, we decorate it. For example, you can round the bottom of the cape and sew lace around the edge. And along the edge of the hood you can add pearls, beads, rhinestones. If the cape is for cold weather, you can use fur.
New Year's version
If the New Year is coming, it’s time for Christmas trees and costume parties, then you can sew a raincoat with a hood. This New Year's costume will look very unusual, but it is very easy to make. Below are some ideas for such images:
Video on the topic of the article
- Even a beginner can easily handle creating a cape using a ready-made pattern, and to make sure everything works out, watch several video tutorials.
Source: https://knittochka.ru/shityo/plashh-nakidka-s-kapyushonom-vykrojka.html
How to sew a raincoat cape with a hood with your own hands?
Home » Other »
Loading…
Best answers
You can make your own cape literally in one evening, all you need is a piece of fabric and sewing supplies. Having decided on the length of the cape that you will sew, you will also find out the fabric consumption - it is equal to two lengths of the product, plus seam allowances.
The photo shows the dimensions for a long cape. For a short cape, the fabric consumption will be less.
The pattern is very simple, so it is not necessary to draw it on paper first; you can mark it with chalk directly on the fabric; by the way, it is more convenient to fold it in half and fasten it with pins.
For the throat, cut out a semicircle with a diameter of 15 centimeters; if you make it smaller, strictly according to the girth of the neck, then the cloak will lie unattractively on your shoulders - it will pull and hunch over.
Cut out the piece with sharp scissors. Fold all the edges of the raincoat under and stitch them. It is convenient to process the edges of the product with bias tape along the entire perimeter of the cuts, without tearing them off.
Good luck!
Materials and tools for work
Since we will be making a functional and practical item, it is important to use a material that does not allow water to pass through. The easiest way to do the work is from polyethylene.
Let's prepare the following for work.
- Polyethylene – 2 m.
- Bias binding for processing.
- Reversible plastic clasps and clear buttons.
- Measuring tape, ruler.
- Felt pen or ballpoint (gel) pen.
- Scissors.
- Sewing machine.
Raincoat pattern
In order to get started, you need to prepare the necessary materials: a piece of special fabric, chalk or soap, a measuring tape, a large ruler, scissors, a needle and thread and other accessories. First you need to draw a pattern. Even a person who is far from design can draw it.
Raincoat without pattern
A rectangle 180 cm long and 150 cm wide can be drawn directly on the fabric. It needs to be cut out, folded in four layers and the required shape drawn by eye. Then, connecting two points along a rounded line, cut out a hole for the neck and sleeve. The shelf is cut in half.
Raincoat pattern 2
Raincoat pattern 3
You can make a raincoat like a cape. The fabric is folded diagonally and a semicircle is built on it. Its radius should be equal to the length of the arm. Then the neckline is cut out and a cut is made in the front.
Raincoat pattern 4
Raincoat pattern 4
Hood pattern
The hood is cut out on a separate piece from the remaining material. The advantage of a raincoat in the form of a stole is obvious. This option is suitable for those who do not have a sewing machine. This product is made without seams, and the craftsman does not have to worry about connecting them.
If you want to create something unusual or designer, then it is always better to use ready-made patterns. It's also quite easy to trace around an existing rain cover and make a new one the same.
There is a way to make a raincoat strictly according to your figure. To do this, take your favorite long-sleeved sweater. Next, place it on a sheet of paper folded in half and outline the edges in the shape of a semicircle with a margin. From the resulting edge to the end of the sleeve there should be approximately 10 cm on each side. From the bottom of the sweater to the edge of the paper, the required margin should be at least 20 cm, depending on the desired length of the product.
In the part where there was a neckline on the blouse, we draw a notch for the neck. We measure the recesses for the arms strictly along the sleeve. We place it on the edge of the paper and, at the location of the shoulder, begin to cut off a round hole slightly larger than the neck. Then we cut the paper from the neck to the base on one side only. Cut out one sleeve from the rectangle. The hood can also be outlined according to an existing item.
Stages of work
The sewing process proceeds in the following sequence:
- Connecting the side seams of the resulting parts using a sewing machine or manually. Before stitching, the parts can be pinned together. For greater strength, they are reinforced with bias tape.
- Sewing on the hood. To do this, you need to attach it to the neck. The length of the neckline should match the length of the bottom edge of the hood. It is recommended to immediately hem the front edge of the hood by folding the fabric inside out twice.
- Processing with bias tape on sleeves, hem, edges and hood. This is done both for beauty and to give strength to the product. You can simply fold the edge and sew it on a machine. In quick-fix products, processing may not be carried out at all.
- The choice of material and manufacturing technology for fasteners, if any. These can be ties, buttons, Velcro or snaps. It all depends on the personal preferences of the master. To ensure that the fastener stays on the polyethylene, it is recommended to place a transparent button under it.
- Decoration of the product. The raincoat can be decorated with rhinestones, appliqué, or interesting designs can be painted with indelible paint.
You can sew a raincoat yourself very quickly. The main thing is to choose a good waterproof fabric and choose the right length of the product. With a little imagination, a raincoat can become not only useful, but also an elegant wardrobe item.
How to wash a men's suit
What to wear with a women's trouser suit
Did you like it?
Taking measurements
You can sew a waterproof raincoat yourself, following the tips and recommendations of experienced craftsmen. An important measure is the length of the product, which is chosen depending on height and personal preferences. You can take a measuring tape and use it to measure the length of other types of outerwear and choose the best one. Usually they prefer to make long raincoats in order to protect the body as much as possible from moisture.
For example, a semicircular raincoat will require 2 lengths. You need to add about 20 cm to the recess for the neck and processing the bottom of the product. Also, if necessary, you need to measure arm length and neck circumference . More complex models may also require hip and chest measurements. Here we look at the simplest, quick options. Loose raincoats without patterns can be sewn for the whole family.
It's easy to sew a raincoat
A product that does not require a pattern can be made by a person without special knowledge and skills. It is a little more difficult to sew a trench coat, even if there are patterns. They can be bought or downloaded on the Internet on websites that teach sewing. A craftswoman without experience should not take on the job if the raincoat is supposed to have a lining. This can be done beautifully and efficiently by professional seamstresses. You can contact the atelier, where they will cut and sew a raincoat of the desired style according to your figure.
If you know how to use ready-made patterns or have ever done this type of needlework, then the work will be easy to complete. You can design a raincoat based on patterns for a dress, you just need to increase the increments and expand the product downwards.
Main details:
- back;
- shelf;
- selection;
- sleeve;
- collar.
They will need to be laid out on fabric folded in half in the direction of the grain, outlined and cut. There will be 2 copies of all parts, and one copy of the back, since the pattern is laid on the fold of the fabric. Now all that remains is to baste, try on and sew the product.
This is interesting: Pattern for a women's raincoat with a warm lining (36-44 euros)
Raincoat pattern
In order to get started, you need to prepare the necessary materials: a piece of special fabric, chalk or soap, a measuring tape, a large ruler, scissors, a needle and thread and other accessories. First you need to draw a pattern. Even a person who is far from design can draw it.
Raincoat without pattern
A rectangle 180 cm long and 150 cm wide can be drawn directly on the fabric. It needs to be cut out, folded in four layers and the required shape drawn by eye. Then, connecting two points along a rounded line, cut out a hole for the neck and sleeve. The shelf is cut in half.
Raincoat pattern 2
Raincoat pattern 3
You can make a raincoat like a cape. The fabric is folded diagonally and a semicircle is built on it. Its radius should be equal to the length of the arm. Then the neckline is cut out and a cut is made in the front.
Raincoat pattern 4
Raincoat pattern 4
Hood pattern
The hood is cut out on a separate piece from the remaining material. The advantage of a raincoat in the form of a stole is obvious. This option is suitable for those who do not have a sewing machine. This product is made without seams, and the craftsman does not have to worry about connecting them.
If you want to create something unusual or designer, then it is always better to use ready-made patterns. It's also quite easy to trace around an existing rain cover and make a new one the same.
There is a way to make a raincoat strictly according to your figure. To do this, take your favorite long-sleeved sweater. Next, place it on a sheet of paper folded in half and outline the edges in the shape of a semicircle with a margin. From the resulting edge to the end of the sleeve there should be approximately 10 cm on each side. From the bottom of the sweater to the edge of the paper, the required margin should be at least 20 cm, depending on the desired length of the product.
In the part where there was a neckline on the blouse, we draw a notch for the neck. We measure the recesses for the arms strictly along the sleeve. We place it on the edge of the paper and, at the location of the shoulder, begin to cut off a round hole slightly larger than the neck. Then we cut the paper from the neck to the base on one side only. Cut out one sleeve from the rectangle. The hood can also be outlined according to an existing item.
Stages of work
The sewing process proceeds in the following sequence:
- Connecting the side seams of the resulting parts using a sewing machine or manually. Before stitching, the parts can be pinned together. For greater strength, they are reinforced with bias tape.
- Sewing on the hood. To do this, you need to attach it to the neck. The length of the neckline should match the length of the bottom edge of the hood. It is recommended to immediately hem the front edge of the hood by folding the fabric inside out twice.
- Processing with bias tape on sleeves, hem, edges and hood. This is done both for beauty and to give strength to the product. You can simply fold the edge and sew it on a machine. In quick-fix products, processing may not be carried out at all.
- The choice of material and manufacturing technology for fasteners, if any. These can be ties, buttons, Velcro or snaps. It all depends on the personal preferences of the master. To ensure that the fastener stays on the polyethylene, it is recommended to place a transparent button under it.
- Decoration of the product. The raincoat can be decorated with rhinestones, appliqué, or interesting designs can be painted with indelible paint.
You can sew a raincoat yourself very quickly. The main thing is to choose a good waterproof fabric and choose the right length of the product. With a little imagination, a raincoat can become not only useful, but also an elegant wardrobe item.
How to wash a men's suit
What to wear with a women's trouser suit
Did you like it?
Cape-cloak for mother and daughter
Modern family images are full of photos where adults and children are wearing the same clothes. If you also want such a set, then the easiest way is to sew a cape in the form of a cape.
Using the material folded diagonally, you need to build a semicircle, the diameter of which is equal to the length of your arms, measured from one wrist to the other. The neckline is cut out, a cut is made in the front, and if necessary, a hood is drawn on the remaining flap. Further steps are to sew the headband, sew it in, process the cuts, and perform hems. The girl will be delighted if her mother chooses the fabric to her taste. Whether she likes floral motifs or would like to see cartoon characters, listen to the child’s wishes.
A raincoat is a stylish and fashionable item; it is necessary in any person’s wardrobe. It does not lose its relevance in the off-season, when the jacket is not a suitable option; it can also be worn in the summer in rainy weather when the temperature drops. A child over two years of age must have a raincoat and rubber boots in their clothing set. Then the baby will not be afraid of rain and wind.
This is interesting: Pattern for women's raincoat (size 36-44 euro)
How to sew a children's raincoat: the basics of cutting and sewing tricks:
“There is no bad weather” - each of us has heard this phrase. And even a rainy day cannot become an obstacle to walking with your child if, in addition to rubber boots, your child’s wardrobe includes a children’s raincoat.
No, we are not talking about this polyethylene miracle of production, which is more reminiscent of a uniform in the exclusion zone. Such a thing is repellent not only in appearance, but also in practice it turns out to be not very convenient.
But if you sew a children's raincoat from raincoat fabric with a beautiful print that the child can choose, then, of course, the child will wear such a thing with pleasure. A thoughtful cut and fasteners will make the item comfortable.
Selection of materials
To sew a high-quality children's raincoat that will really protect from rain, you should take water-repellent raincoat fabric with a polymer coating on the reverse side of the fabric. You can also take raincoat material with a varnish coating.
In the first case, the item will be very thin, and it can be worn directly over a winter jacket. It can be easily folded into a little bag and will not take up much space in your purse.
Also, the work will require buttons and decorative buttons if you are planning a model with a clasp. A cord in the hood with tips and fasteners would be a good idea. Naturally, the product should be sewn on a sewing machine, and all cuts should be processed either with satin bias tape or with an overlocker.
Cut options
A children's raincoat can be cut in two ways. This can be simply a circle of fabric with a diameter equal to the measurement from wrist to wrist across the baby's neck. A neck is cut out in the center and a cut is made from the center to the outer border of the circle. This creates a one-piece back and two shelves. All that remains is to make the hood.
Its pattern is made on the basis of two squares with a rounded corner at the back of the head and a rear middle seam slightly shifted towards making the piece smaller. The length of the bottom of the hood should be equal to the length of the neckline. Here you should slightly raise the edge of the part at the back of the head, by about 2 cm.
If the raincoat is without a fastener, the front flap is not cut, and the neck is cut out to a size slightly larger than the circumference of the head.
The pattern of a children's raincoat can also be made on the basis of a square, in which the side seams appear, turning into the sleeves. Here, too, a neckline is cut out in the middle, and the front shelf is divided in half. With this cut, there will be no seams on the shoulders either, but this option must have a fastener.
To beautifully design the cuffs, the fabric is either folded and adjusted, putting additional length into the part when cutting, or a strip of fabric folded in half is sewn on.
Tricks of tailoring
There are no special tricks in how to sew a children's raincoat, but here you should know how to design the bottom of the product, how to close the sections of the shelves and the hood.
One of the simplest options for processing the hem of a round raincoat is to process it with bias tape, which can be cut from the same raincoat fabric.
In the case of front shelves and hoods, it is better to use a strip of fabric folded in half and sew it around the entire perimeter. In this case, the bottom of the product should simply be tucked and stitched.
It is very difficult to punch through loops on such fabric, and therefore the best fastening option would be sew-on buttons and decorative buttons on the front side.
Decorative elements
To make the product original, you can use various decorative elements, from thermal transfer stickers to contrasting combinations of raincoat fabric. Here the boundaries of creativity are set only by imagination.
Raincoat cut options
Today, raincoats of various colors, textures and models are in fashion. A raincoat, poncho, cape, trench coat, mac are options that can be taken as a basis. Decorate it with some decorative elements and your individual item will be the envy of everyone.
The simplest cut option is a poncho raincoat, which can be cut in two ways.
- A circle of fabric with a diameter equal to the measurement from wrist to wrist across the neck of a child or adult.
- Based on a square in which the side seams are drawn into the sleeves.
The poncho can be fastened with a zipper, buttons, or a belt. Or it can simply be put on over the head. The length may also vary.