A craft for dad on February 23 or for his birthday requires a responsible approach. This could be an inexpensive gift for dad. After all, the main thing is attention. But what gift should I give my dad? There are many different options. We suggest making an original craft - a shoe made of paper. This is a pretty simple DIY gift, instructions included. All you need for the job is a printed color template, scissors and a piece of lace. Instead of a color template, you can use black and white and multi-colored markers with which you will need to print it.
We prepare the materials necessary for the craft. Print the selected template. You can download it at the end of the article.
Cut out the template.
Don't forget to cut out the lanyard holders. To do this, you can use a hole punch.
We bend the template.
It also needs to be folded along the italic lines.
Now let's assemble our craft. We fasten the necessary parts with glue.
Insert the lace.
All that remains is to tie the lace. And the craft is ready.
By the way, you can make a cute pencil holder from this craft. To do this, the work process needs to be slightly changed. First of all, we need to strengthen the nose of our boot. We decided to do this with an eraser.
Then we put a toilet paper roll.
And repeat the procedure with the lace.
This is the craft we made. All that remains is to fill it with pencils, pens or markers.
To make the craft look more presentable, the toilet paper roll needs to be painted or decorated with beautiful paper. And now a nice DIY gift is ready.
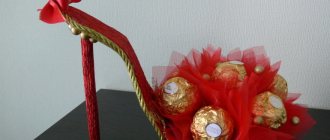
A high-heeled shoe is a favorite ladies' accessory, which is the personification of femininity, beauty and attracting the attention of the opposite sex. A real woman never remains indifferent when looking at a graceful, elegantly shaped stiletto heel. Many ladies enjoy collecting shoes and have them for every outfit, for every event and event.
But that's not what we're talking about now. On March 8th, the holiday of all women, and therefore the holiday of beautiful shoes. The shoe can be given as a gift, not just a simple one, but an almost magical one. This is exactly what a voluminous shoe will look like - a postcard that you can make with your own hands, which will fit absolutely everyone and will suit any outfit on International Women’s Day, and not only. In addition, such a shoe can serve as a container for another gift: chocolate, a perfume or cosmetic set, jewelry or a bouquet of flowers.
In order to make a voluminous paper shoe, we will prepare the following materials: thick colored paper or paper with a pattern (for example, thin colored cardboard, scrapbooking paper, leftovers from bright wallpaper), glue, pattern paper, decorative elements (buttons, bows, beads, paper or fabric flowers, etc.).
Take a paper shoe pattern, use one of the templates, or create a template according to your sketches. It is convenient to make the pattern on tracing paper or a white sheet of paper.
Transfer the pattern onto colored paper. Carefully cut out and glue along the folds intended for this. Use a glue stick or PVA glue to avoid warping the paper with excess moisture, which is present in regular stationery glue. You should get a three-dimensional display of the desired ladies' item of clothing - a high-heeled shoe.
Now comes the fun part: decorating the shoe with accessories. See if you have any nice buttons, rhinestones or beads. The shoe can be complemented with a silk bow, a flower made of fabric or paper, a fragment of a chain and some other elegant things.
The shoe can be an independent object that can be filled with gift filling if the surprise is small. If the gift is larger than a shoe, then it is easy to attach it to the top of the packaging box and insert a note or a small card with wishes into it.
This paper shoe also holds a small bouquet of violets, lilies of the valley or mimosa, which will look super original.
A very successful gift for March 8th, it will surprise and delight the recipient of the magic shoe. However, not only International Women's Day can serve as an occasion for such a gift.
The source of some photos is the website “Fair of Masters”, where you can also see other options for making pretty paper shoes.
We hear the word handmade more and more often in everyday life. But it’s true that something made with your own hands brings more joy and warmth. Heeled shoes inspire femininity, beauty and attract the attention of men. Any woman does not remain indifferent when she sees beautiful stilettos. You can give a shoe, and not an ordinary one, but an almost magical one. A handmade paper shoe can be used for a beautiful and unusual gift, for example, ordinary sweets, perfume or money, which will make the gift original and will definitely not go unnoticed. Depending on the decor, such a masterpiece can be presented for any celebration, be it a wedding, birthday, New Year or March 8th. Below is an example of how to do this and what materials you will need.
DIY shoes
DIY paper shoes can be used:
- as decor to decorate a gift;
- as packaging;
- just as an item for decorating a room.
Necessary materials:
- Thick colored paper and cardboard.
- Sample.
- A simple pencil.
- Scissors.
- Knitting needle or wooden stick.
- Paper glue.
- Decor for decoration.
Step-by-step execution of actions:
- Download the template online and enlarge it to the size you need.
- Attach the template to colored paper and trace using a simple pencil - this will be the inside.
- Trace the outer part on cardboard.
- Cut out all the elements of the future product.
- On the cardboard at the folds, make dotted lines according to the template.
- Draw a sharp wooden stick or knitting needle along the dotted lines, bend the parts along them so that the diagram folds neatly.
- Apply glue along all the necessary lines and glue.
Important! It is best to glue starting from the back of the heel.
- Let the product dry thoroughly.
- We repeat the same procedure with the inner part - we use a sharp object along the folds.
- Apply glue to the inside and carefully glue it to the outside, starting from the toe.
- Fold the shoe so the inside looks neat.
All that remains is to decorate your product. To do this, you can use any decorative items, for example, beads, sequins, small flowers, lace, ribbons at your discretion.
LiveInternetLiveInternet
A detailed master class from Alexandra Tiunova on creating a wonderful basket in the form of an old shoe from newspaper tubes with a wicker bottom.
Required materials and tools:
• Newspaper tubes • Water-based wood stain “Oak”, “Mocha” • PVA glue • Moment Crystal glue • Water-based acrylic varnish • Scissors • Steel knitting needle • Clothespins • Brush • Cord • Paper clips • Lighter • Ribbon flowers To weave this shoe, I used tubes twisted from strips of newspaper measuring 11 x 28 cm and painted with Oak stain. In total, 400 tubes were used. I moistened the tubes before weaving.
1. Weaving the bottom
To begin with, I made 6 long tubes, connecting two tubes together. I glued 7 single short tubes perpendicular to the long tubes. The distance between single tubes is 3 cm.
I turned it over and glued 6 more tubes in between. The cross is ready. I began to braid the cross with a “rope in two tubes” weave. When weaving the first row, single tubes were braided one at a time, and the neighboring six - all at once. Starting from the second row, six adjacent tubes were divided into three pairs. She braided each pair separately, evenly distributing them in an imaginary semicircle.
Starting from the fifth row, I braided the tubes one at a time.
When weaving the seventh row, I added additional tubes. She did the same on the other side.
When weaving the ninth row, I began to braid the added tubes separately. When weaving the ninth row, the sole began to form a curly shape. To do this, before reaching the central pillar, I made a U-turn. How to make a turn is shown in the photo:
Then I made two more turns (see photo). And I moved on to shaping the shape of the right side of the sole.
Then, she braided the entire sole with one row of tubes. The bottom is woven. To give the bottom a curved shape, I coated it with water-based acrylic varnish. At the same time, I did not cover the two outer rows with varnish (because in the future I planned to tint these tubes with a dark stain).
When the varnish had dried a little and the tubes were not very sticky on the outside, but were still damp on the inside, I folded the edges up. At the same time, the future toe of the shoe was bent more than the heel.
Dried the bottom completely.
2. Weaving the upper part of the shoe
Distribution scheme in parts: I wetted the racks with water from a spray bottle. Bent the racks up. To form the hole at the toe of the shoe, I placed clothespins on the posts.
I started weaving the first row of walls over the clothespins.
I wove four rows of walls. At the same time, the heel part of the shoe was slightly narrowed inward, and the toe part was strongly narrowed inward. To separate the nose section from the side sections, additional posts were added to the front of the shoe (on both sides). See the part distribution diagram for the exact location of adding racks.
Continued weaving. When I reached the additional counter, I made a U-turn.
When I reached the second additional stand, I also made a U-turn. I continued weaving the nose part, gradually narrowing the distance between the posts (narrowing the shape of the toe). I wove 14 rows in this way (if you count from the moment the bow is separated with the help of additional racks). After that, I continued weaving the bow part, gradually increasing the distance between the posts (expanding the bow part). I wove 10 rows in this way.
I removed the working tubes (you can see how I remove the tubes below, in the weaving of the side parts). I made a bend “through one post before the next.”
After this, she began to separate the side part, braiding five racks back and forth.
I wove 9 rows. On the opposite side of the shoe I put on a loop of two connected tubes and weaved them through the second side part. I removed the working tubes on the side parts. How I did this is shown in the photo:
To weave the back part, I inserted additional posts. I put on a loop of two working tubes and started weaving the back part. When weaving one row, the back part was narrowed inward. Next, I began to expand the back outward, increasing the distance between the posts while weaving. I wove 10 rows. I removed the working tubes. I made a bend “through one rack before the next one.
The back is ready. Next, I started forming loops on the side parts. They are needed to thread the lace. First, I cut off three central pillars, leaving 2-3 cm at the ends. I applied Moment Crystal glue to them. She folded it inward and secured it with paper clips.
I tucked the side posts into the center, forming loops.
She took out the clothespins. The weaving of the shoe is finished.
3. Tinting and varnishing
To tint the shoe I used Mocha water-based stain, water, napkins and a brush.
First, I painted two rows completely with stain. Then, with light movements, I tinted a few more rows. After that, I blotted the brush with a napkin, removing excess stain from it and applied water to the lightly tinted rows. Water is needed so that the stain strips “spread” and evenly color the lightly tinted rows.
If it seemed to me that not enough stain had been applied to the lightly tinted rows, I would dip the brush into the stain, blot the excess with a napkin and tint the rows moistened with water a little.
Then, dried it. If the color saturation did not suit me, I repeated the operation again.
I tinted in small areas, because... otherwise the stain would have time to dry and a smooth transition would not be possible. This way I tinted the bottom, upper parts of the toe, sides and heel. And also, the upper part of the hole in the bow.
I covered the shoe with water-based acrylic varnish. I applied two coats of varnish in total. While painting with varnish and drying, I gave the shoe the desired shape.
4. Decoration
I made the lace from synthetic household cord. I painted the cord with Mocha stain.
I inserted it into the loops and tied knots at the ends. I melted the ends with a lighter. I decorated the shoe with flowers made from ribbons. I tinted the lace and flowers a little with gold paint.
Source: https://artstudio.club/bashmak
Shoe with candy
Let's consider another very interesting type of gift, which will be the size of a size 36 shoe. You will need:
- Shoes size 36 (or size of your choice).
- Corrugated cardboard.
- Glue gun.
- Double sided tape.
- Wire.
- Penoplex.
- Pencil.
- Scissors and stationery knife.
- Sandpaper.
- Thin cardboard and corrugated colored paper.
- Decor.
- Candies.
How I make shoes for dolls))) MK from Yulia Simbirtseva.
Greetings to all needlewomen and lovers of the doll world. For questions and requests, I decided to make a master class on shoes for our favorites))) First, I’ll say. I have read many tutorials on shoes/slippers/slippers, they are all very similar, but at the same time, each master does it in his own way! Therefore, in this MK I will show my version
I found the pattern by accident on the Internet. In general, I saved a lot of patterns, but I saw this one and really wanted to get to work right away. It turned out to be not in vain! The pattern is very successful! So.
We will need: Foamiran of any color from which you will make shoes. Foamiran for the sole, preferably black, brown, or whatever you like. Superglue Velcro for clothes (small piece) Scissors Needle for drawing a pattern Pattern
Oh, by the way. about the pattern! How did I get the size? I saved the picture to my phone. I turned the brightness to maximum, attached the doll's foot and enlarged the photo to the desired size. Place a sheet of paper on top of the screen and draw the contours of the pattern.
The only moment. insole pattern. I narrowed it down a little! Just a little! by 1-1.5 mm.
Let's get started. One more moment! I did not redraw the squares.
The main color I chose was light green with polka dots. The sole will be made of dark green fom. the insole can be made in any color.
I made some leftover peach fudge. Be sure to make marks on the heel and toe.
Next, apply the pattern so that there is an allowance of 5-7 mm along the semicircular side. And we trace the pattern with a needle.
- Share
Cut out, not forgetting the allowances. Then we cut out the cloves using these allowances. We should get blanks like this. By the way, on the pattern we have points marked (the middle of the toe and the middle of the heel), these points must be transferred to the foamiran.
Now we take one insole and one shoe base. Lubricate the tooth opposite the toe mark with glue.
connect with the mark on the insole. Like this
- Share
Similarly, glue the marked tooth on the heel, aligning the base mark with the insole mark.
How to make Huggy Waggy with your own hands from scrap materials
Amateur craftsmen on the Internet come up with different methods to create a blue monster. The author of Medialeaks analyzed the three most original and budget methods.
Magnit clamps come to the rescue
Rubber clips from the Magnit chain of stores, which Medialeaks talked about, became a good basis for creating a mini-version of Huggy Waggy. They can be received as a gift with a large purchase or purchased for 49 rubles. To make a monster, you need to choose a staple of a suitable shape - with a triangular head, as shown by TikTok user @nochevkini.
The first step is to erase the existing drawing. Now you need to paint the figure blue and wait until it dries. Then, using a thin brush, paint on Huggy Wagga's famous face with big eyes and a red, toothy mouth.
Stages of creating Huggy Wagga from scrap paper
It is best to choose durable acrylic paint. If you don’t have one at home, then you should take regular gouache and then coat the dried product with varnish.
Congratulations, little Huggy Waggy is ready.