When we change the oil in a car, we always change the oil filter, but in order to unscrew it, you need to make a simple key with your own hands that would easily unscrew it. You can, of course, not bother, but just go to the store and buy, but this is not our direction, we will of course do it ourselves.
So let's look at three ways to make this key.
Method 1: We make a VAZ 2106 internal combustion engine chain
There is nothing special to describe here, I think that is already clear from the photographs. We cut off a piece of chain slightly larger than the filter and weld it to a round or other blank. I welded it to the round one, then welded another nut to screw in the lever. And just in case, I sharpened the edge at the end, making it turnkey. That is, now you can unscrew it in two ways, whichever is more convenient. And twist it too.
2 way;
We weld a nut with a bolt through and through and a handle to the ring. We put the ring on the filter, tighten the bolt and calmly unscrew the oil filter. Simple and convenient.
3 way; Well, the last one, a little labor-intensive compared to the above methods, but maybe someone will consider this method the best for themselves. So;
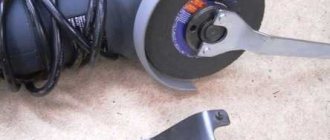
We find a blank or hexagon, it just fits the 17 or 19 key. Cut off 15 centimeters, then make a slot in the middle with a grinder (5-6 centimeters)
We drill two or three holes, diameter 5.5 centimeters, so that we can then cut M6 threads into them
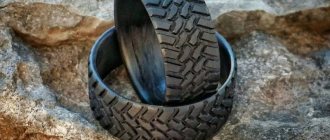
Then we take some kind of belt, in my case I took it from a seat belt, cut off a piece 50-55 centimeters long. We fold it into twos and insert it into the slot of the workpiece.
Read also: Expert advice on choosing a washing machine
Then we heat a nail or an awl and burn holes in the belt aligned with the holes in the workpiece. Then we take a hammer and flatten the workpiece a little, thereby clamping the belt. We screw in three bolts and the key is ready.
We put the belt over the oil filter and wrap the belt around the hexagon, then take the wrench and tighten it with the wrench until the filter comes off.
We do the same when tightening the filter, but you need to wind the belt in the other direction.
DIY oil filter pullers.
Production of oil filter pullers from used auto parts.
Hi all! Today I want to talk about oil filter pullers
that I made for myself from used auto parts.
In addition to the standard set of tools, it is desirable to have electric welding. Surely your neighbor in the garage will have it.
To make pullers, I used a timing belt and chains.
As well as a broken cheap ratchet and a tubular candle holder.
BEHIND THE STEEL
It turns out that there is a rather big problem when the filter actually sticks to the engine block (or it was tightened too much at the service station).
Of course, to remove it, you can buy a special key (it is inexpensive). However, it is not always possible to find it (and ordering online means a long wait). Today, I will tell you how to make it yourself, how and which one to choose in the store. There will be a video version... The oil filter is not so easy to remove, even if it is screwed on by hand. It has a rubber gasket that presses tightly against the engine block and, like a suction cup, pulls the housing very strongly.
Cyclone oil separators (oil separators)
To get rid of the shortcomings of synthetic fiber filter fabric, cyclonic oil separators .
Rice. Operating principle of the engine crankcase ventilation system with a cyclone oil separator: 1 – cyclone oil separator; 2 – pressure regulation valve; 3 – charge air cooler; 4 – turbocharger; 5 – gases breaking through the piston rings
Crankcase gases are supplied through a channel inside the engine into a cyclone oil separator. The cyclone oil separator causes the air to rotate. Due to the resulting centrifugal force, the oil mist hits the wall of the oil separator. Drops of oil form there, which flow through a channel in the crankcase into the oil pan. The air, cleared of oil mist, is supplied to the air intake duct through the pressure control valve.
The cyclone oil separator is equipped with a special valve that limits the vacuum in the engine crankcase, since a strong vacuum can damage the engine oil seals and other rubber seals.
Rice. Diagram of operation of the cyclone oil separator pressure control valve: 1 – crankcase gas supply pipeline; 2 – air intake pipeline; 3 – membrane; 4 – compression spring; a – open position of the valve; b – valve closed position
The pressure control valve is located in the cover of the cyclone oil separator. It consists of a diaphragm and a compression spring and regulates the pressure when air is removed from the crankcase. The pressure control valve closes when there is a strong vacuum in the intake channel. When there is a slight vacuum in the intake channel, it opens by the force of a compression spring.
We recommend: Do-it-yourself anti-rain for your car
Types of keys
First, let's talk about special keys with which you can unscrew the filter. The principle is simple - you need to put it on the filter and unscrew it:
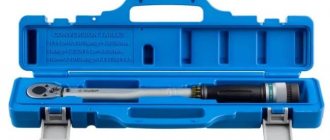
- Socket wrench . It is a movable oval “half-bracket” with teeth on one side. And a short protrusion that is combined with the handle on the other.
As you understand, the moving part is removed and placed on the filter housing. And with a small protrusion you seem to press down on the other side, thereby ensuring a very strong fastening.
Next, simply unscrew the handle, a very simple and effective design. A big plus is that the price is not high, about 150 rubles, it is also easy to throw on, there is no round loop that needs to be tightened
- Size key . This type is oriented specifically to a specific oil filter, is placed on top and unscrewed. After all, the body is often made either with jagged edges or resembles a nut. By the way, it is recommended to use such options for plastic cases. The downside is that it is not universal.
- Key head . It resembles the second type, only it is made in the form of a “head” that is thrown on top. The disadvantages are that it is not always convenient (because there may be no space near the filter), and again, only for one size, that is, it is not universal
- Crab key . This is a universal type, on top there is a platform for the head or a knob, there are three legs that clamp the oil filter, and there are also three nuts (or gears) with which you can adjust these legs. The plus is that the design is universal, the minuses are expensive (from 500 - 600 rubles), and again it’s not always convenient for them to crawl up
It is worth noting that there are also special pullers; it’s hard to call them keys!
How to use a universal wrench and what it can do
The size of the grip of a homemade key can be selected by placing on the tail of the screw the chain link that provides the required size of the grip loop.
This is how the loop turned out to be quite large.
If you hook another link onto the tail of the screw, the loop can be smaller.
As for the possibilities, for our instrument they are almost limitless. For example, they can easily open a stubborn cap on a plastic bottle.
With our wrench you can completely easily rip off a completely round old nozzle that has rusted to the country faucet.
A universal wrench made in this way will allow you to unscrew a rusted bolt of any size.
Our tool is capable of unscrewing the seemingly tightly stuck head of an old faucet.
So, we see that a simply made universal wrench is almost omnipotent. Do you like this thing? Do you want to praise us for reminding you of the existence of a homemade product that has been known for a long time, or does this tool seem unnecessary to you and you want to scold us? Feel free to click here, write about your impressions, and your opinion will be immortalized on the Internet.
Dear visitors of the site “ Samade Friend ”, from the material presented you will learn how to make a universal key yourself from a bicycle chain, a bolt and three nuts with your own hands. Step-by-step photos of assembling the wrench are presented and so off we go... Many of you have probably encountered such a problem... when the edges on a nut or bolt being turned off are a little knocked off and a regular wrench simply turns without performing its function. This can be solved with the help of a homemade chain wrench that works in compression, that is, the stronger the handle of the key, the stronger the chain will be clamped and thereby unscrew even the most eaten nut or bolt.
Read also: Saw calm does not gain momentum
To make a universal key you will need a piece of a bicycle chain, two nuts and a bolt. We screw the nuts onto the bolt and weld a piece of chain to them so that we get a grip and weld it to the other side of the nuts. Next, we put the chain on the nut or bolt that needs to be unscrewed and tighten the bolt, thereby tensioning the chain, everything can be unscrewed)
Materials
Tools
Step-by-step instructions for assembling a universal key with your own hands.
And so, the necessary parts to assemble the key. Two nuts are screwed onto the bolt. We measure the chain, namely how much is needed from nut to nut. We make a mark in the place where the chain should be riveted. We clamp the chain in a vice and cut off the rivets using a grinder. We knock out the rivets. Next, the chain is welded first to one nut. Then it is tensioned and welded on the other side of the nut.
Types of pullers
Essentially there are only two types and they work the same:
- Ribbon loop . It’s just a handle in which a slot is made and a loop is inserted there; it can be made of a soft material (such as rubber), or it can be made of a hard one, but it must bend (for example, a thin sheet of metal). Place it on top and tighten it with a handle, then simply unscrew the oil filter element
- Loop from a chain . Everything is the same, only the loop is made from a chain, many write that this option is much stronger, because the first type (rubber or thin metal) can simply break
Some craftsmen say that pullers are the best option - but what is it really like?
Cyclonic oil separators
Operating principle. When entering the oil separator, refrigerant vapors with oil droplets enter the spiral part of the device. The flow moves in a spiral and, due to centrifugal force, oil droplets are deposited on the inner surface of the walls of the oil separator. The oil flows down the walls into the lower part of the apparatus, separated from the main part by a special oil separator, which prevents re-absorption of oil. At the bottom of the oil separator is a float mechanism with a needle valve that returns oil back to the compressor.
Read also: How to autostart a generator during a power outage
The oil separator and sump design prevents oil from escaping when the refrigeration compressor starts.
To separate oil from refrigerant, various types of oil separators , the efficiency of which depends on the conditions of their use. For example, the degree of oil separation in devices increases with decreasing temperature of the steam entering the oil separator. Oil separators with a filter attachment provide a greater degree of separation with a smaller proportion of oil in the refrigerant vapor entering the device. Bubble oil separators operate with a nominal separation degree if the height of the bubble layer in the apparatus is at least 0.12 m, and the separated oil is continuously removed from the apparatus.
Painting work in a garage or outdoors is simplified if you use a spray gun powered by a compressor. The method has one significant drawback: the air pumped by the compressor has quite high humidity, which will negatively affect the quality of painting. A special moisture separator for the compressor is responsible for removing moisture from the air flow. Is it worth buying it or can you make it yourself? Let's figure it out!
Which is better, a key or a puller?
I am expressing my experience. Personally, I always use the simplest key, item one on our list. Why? YES, simply because (as I already wrote) it’s cheap, and it’s easy to fit on almost any engine.
For example, other options, where they are put on top, may not be convenient only because there may not be room, and it’s trivial that you won’t put this head (or “cape”) on, and if you do put it on, it will be inconvenient (or practically impossible) to turn.
The situation is the same with the oil filter pullers - you can easily put them on. BUT again, there may not always be room to delay!
Why can't I keep the old filter?
A very common question - all because when the engine is running, chips form (banal wear), the oil also burns, becomes dirty, and dust can get inside. All this “stuff” settles on the filter (on its cleaning paper surface). If you want, the filter is the “liver of the motor”. If it were not there, the engine would wear out much faster (scientists calculated up to 5 times).
Over a service life of 10 - 15,000 km, it becomes almost completely clogged, and leaving it to work with new oil is IMPOSSIBLE! It is MANDATORY to install a new filter element. There will simply not be enough oil pressure, and the engine will suffer from oil starvation .
So the air filters are not so critical (although I think they also need to be changed), and they are very easy to unscrew. But it is MANDATORY to change the oil oil.
How to make it yourself
Oil filter wrench - you probably won't! But the puller can be made easily and quickly.
Basically, all you need to have is a broken or old timing belt or a piece of bicycle chain.
Next, you need to insert the belt (or chain) into the spanner wrench (suitable for 17 - 19). Throw the resulting loop onto the oil filter and twist it on the other side. After the loop has tightened, you can try to unscrew it.
However, you can also make a special puller, such as in this video, watch.
Did you like the article? Subscribe to the channel to stay up to date with the most interesting materials
Making drying oil from sunflower oil at home
Few people know that drying oil can be prepared with your own hands, and in the manufacturing process you do not need to resort to complex technologies. In order to make drying oil from oil at home, you will need to do the following series of sequential actions:
- You will first need to prepare all the ingredients for manufacturing, as well as an auxiliary tool.
- Next, you have to choose the appropriate option for preparing this substance for wood processing.
- The next step is mixing the components and subsequent cooking of the substance under appropriate conditions for a specific time.
- At the end, you just have to cool this composition, then mix it thoroughly and use it for application to the surface.
In itself, the process of boiling old drying oil or a fresh composition from the appropriate components is not particularly difficult; the main thing here is to follow the technology, and in addition, adhere to a specific recipe for implementation.
Important. The cooking procedure for this substance involves the release of a strong and unpleasant odor, which will require you to open a window if the process takes place indoors, otherwise you may get poisoned.
How to unscrew the oil filter without a key
Having decided to change the oil in their car themselves, many car owners are faced with an unexpected obstacle - the oil filter does not want to be unscrewed by hand.
Everything is complicated by the round shape of the filter element housing, which is impossible to grasp properly. It’s good if there is a car store nearby that sells special pullers of different types (they are chain, screw, end, belt, etc.), but what if there is no way to purchase a key, but you desperately need to remove the filter?
In fact, everything is much simpler than it might seem at first glance: there are several simple ways to remove the oil filter without a key . We will talk about them in detail in this article.
What methods are used to extract oil from vegetable raw materials?
Vegetable oils, depending on the extraction method, are divided into two main types, each of which involves the use of a specific technology and appropriate equipment. These types, in particular, are:
- oils obtained by hot pressing;
- cold pressed oils.
Oil extraction area using double hot pressing
If the oil is produced using hot-pressing technology, then the pulp obtained after rolling is placed in special fryers, where it is heated to a temperature of 110° and at the same time moistened. At the same time, the mass is constantly stirred. After such preparation, the raw materials are placed in a screw device, where pressing is performed, as a result of which the oil is released. Vegetable oil obtained using hot-pressing technology is distinguished not only by its beautiful dark golden color, but also by a very bright aroma, as well as the taste of fried seeds.
Meanwhile, cold-pressed vegetable oil is considered more useful, since the raw materials for its production are not subjected to thermal effects, and accordingly, the product retains all its beneficial properties. For cold pressing of oil, a technology similar to that described above is used, only it does not include the stage of heating the pulpy mass that has passed through the rollers. Vegetable oil obtained using cold-pressing technology, although it has more beneficial qualities, has a shorter shelf life, and over time acquires a darker color and a bitter taste.
Method 1: Using a strong, sharp screwdriver and hammer
This is the simplest of all possible options.
The principle is as follows:
- Take a large flat screwdriver and use it to punch a through hole in the filter housing (the metal is thin, so this can be done with almost one blow).
- Next, you need to grab the handle of the screwdriver and apply force in a counterclockwise direction. Due to the increase in the force arm, the filter breaks off quite easily, after which it can be unscrewed by hand.
Relevance
Why do you need to install such a clever device? Due to high crankshaft speeds, oil flies through the crankcase ventilation breather and can end up on the carburetor assembly, and in the case of injection engines, on the throttle unit. And to prevent this from happening, just such a device is installed. Moreover, it is advisable to install it not only for those drivers who do not mind pressing the accelerator pedal to the floor. Those owners who have been using their car for quite a long time should also think about it. After all, during this period, the rings have most likely already worn out and do not provide proper sealing of the combustion chamber.
Method 3: Using a leather trouser belt
If you don't have an old timing belt at hand, a regular leather belt will do just fine.
- The principle is as follows: the belt is put on in a loop and tightened with force. In this case, the long end of the belt serves as a lever.
Do not forget that the oil filter is unscrewed counterclockwise.
The most important thing is that the filter housing is clean, otherwise the belt will slip. For better contact, the surface of the filter can be slightly sanded.
Method 4: Hammer + chisel.
- Everything is very simple here: a deep notch is made on the filter body on the thread side, then a chisel is inserted into it and the filter is torn off the thread with tangential hammer blows.
- Next, the filter element is unscrewed by hand. This method is rarely used, since the free space around the filter is limited and there is practically no room for such maneuvers.
VIDEO INSTRUCTIONS » alt=»»>
Making drying oil from sunflower oil at home
Few people know that drying oil can be prepared with your own hands, and in the manufacturing process you do not need to resort to complex technologies. In order to make drying oil from oil at home, you will need to do the following series of sequential actions:
- You will first need to prepare all the ingredients for manufacturing, as well as an auxiliary tool.
- Next, you have to choose the appropriate option for preparing this substance for wood processing.
- The next step is mixing the components and subsequent cooking of the substance under appropriate conditions for a specific time.
- At the end, you just have to cool this composition, then mix it thoroughly and use it for application to the surface.
In itself, the process of boiling old drying oil or a fresh composition from the appropriate components is not particularly difficult; the main thing here is to follow the technology, and in addition, adhere to a specific recipe for implementation.
Important. The cooking procedure for this substance involves the release of a strong and unpleasant odor, which will require you to open a window if the process takes place indoors, otherwise you may get poisoned.
How to make a chain wrench for an oil filter with your own hands
The devices listed above are not applicable to all car brands. For example, on the Suzuki Grand Vitara the oil filter is located in a hard-to-reach place and getting to it with a belt and a screwdriver is very problematic.
In this case, a more ergonomic and efficient chain wrench is needed. You can always buy it at the car market for 200-300 rubles or make it yourself.
to make a universal chain wrench for removing an oil filter , but many of them involve the use of a welding machine, which not every garage has.
However, you can make a practical puller without welding.
All you need for this is:
- a piece of an old bicycle chain;
- a small piece of metal pipe 10-15 centimeters;
- a large nail (100-120 mm) or a piece of thick wire;
- drill with a metal drill with a diameter of 5-7 mm.
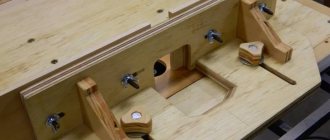
The oil filter puller key itself is very simple to do:
- A hole is drilled in the pipe at a distance of 2-3 centimeters from the edge so that a nail passes through it.
- The bicycle chain is folded in half and inserted into the tube so that the resulting loop approximately corresponds to the diameter of the filter (it should fit over it).
- Using a nail, the chain is fixed in the pipe to the required length. The key is ready!
VIDEO INSTRUCTIONS » alt=»»>
It is enough to throw it over the filter and press the pipe like a lever (in a counterclockwise direction) to easily unscrew any oil filter.
This filter is universal and suitable for all types of oil filters, since the length of the loop is adjustable.
Advantages and importance of using the device
Using a moisture separator when painting a car with a compressor unit significantly increases the service life of the coating and protects the body from corrosion. The air must be dry - this is achieved through the use of refrigeration equipment, centrifugal force or silica gel. You can assemble a homemade device from an old cylinder, fire extinguisher, oil or water filter.
Some compressor units supply high pressure air and require factory filters and dehumidifiers. Before connecting the dehumidifier, carefully read the manufacturer's instructions and make sure that all requirements for the air mixture will be met.
In order for the compressor unit to apply a layer of paint more efficiently, experts recommend supplying dry air into it. You can remove excess moisture using homemade moisture separators. They will cost less than factory ones and, if manufactured well, will work reliably and efficiently for a long time.
Reasons why the oil filter is not dismantled
To unscrew the old filter, you need to place the car on a pit or lift the car using a lifting device. Then you need to unscrew the old filter, but difficulties may arise here. If it does not come off, this may be due to its sticking. The motor becomes very hot during operation. Because of this, parts that are not very heat-resistant melt. Such components include a rubber gasket, which is included in the design of the oil filter. It can melt and stick to the engine, especially if oil gets on the gasket.
Problems arise when the filter is twisted too tightly. When changing the filter element, you need to tighten it well so that the rubber band is pressed tightly against the motor. In this case, the oil filter is often screwed on too tightly, especially when using a wrench. If you take into account the melting of the gasket, it becomes clear that unscrewing the filter will be enough.
It is important that the oil filter is not located in the most convenient place, therefore, it becomes impossible to exert maximum effort to unscrew it. In addition, when unscrewing, your hands get dirty with oil and slip.
Why can't I keep the old filter?
The oil in a car engine is changed every 10-15 thousand kilometers or once a year. When using a vehicle in difficult conditions, the replacement interval for consumables will be shorter. Oil service life depends on the specific brand of fluid and the vehicle. It is necessary to change the oil filter when changing consumables.
The motor is the main unit of the machine, which is subject to rapid wear during operation because it operates under high loads. Over time, foreign substances begin to appear in the lubricant, which negatively affect the functionality of the internal combustion engine. To prevent their impact on the power unit, an oil filter is used. The higher the wear of the device, the lower the quality of the oil, and this will sooner or later affect the operation of the internal combustion engine.
Moreover, it will not be possible to determine the suitability of the filter element visually, nor will it be possible to draw conclusions about the need for replacement based on mileage alone. The lubricant cleaning device always works, including when the engine is idling. Its wear is determined not by the mileage of the car, but by the number of engine hours worked. And it doesn’t matter whether it’s a VAZ 2109, 2110 or a foreign car.
Which way to unscrew the oil filter?
When difficulties arise with unscrewing the filter element, the motorist may begin to be tormented by doubts regarding which direction the device should be unscrewed. Remember that the oil filter must be unscrewed counterclockwise (to the left). In the same way, a regular nut or bolt is unscrewed (if you do not take into account fasteners with reverse threads).
If you cannot unscrew the oil filter on your own, ask a stronger person for help. In fifty percent of cases this method works. The main thing is to achieve a breakdown from the starting point. This is easier to do with a warm engine. When the engine cools down, it becomes difficult to unscrew the filter.
For dismantling, you can use one of the following methods:
One of the factory oil filter wrenches
1. Special key. In stores selling car accessories, you can find a wrench that is designed to unscrew the oil filter. It can be one of three types:
Such a tool needs to be hooked onto the filter. After that, start rotating it.
You will also be interested in:
Main characteristics
| Make: BMW | Gearbox: automatic / manual |
| Model: X1 | Body: sedan, coupe, station wagon |
| Year of issue: 2009 | Power: petrol/diesel |
| Engine capacity: 1985 cm³ | Drive: rear |
–> Good afternoon, Friends!
I would like to share with you my experience in making an oil trap and crankcase gas filter with my own hands, using the example of a VAZ 21102 produced in 2000.
First, a small digression, for those who do not know why this modification is needed.
Many car owners, both domestic and foreign cars with high mileage, have more than once paid attention to oil deposits in the form of a plasticine-sticky mass (which appears when crankcase gases with droplets of oil escape, due to wear of the oil scraper rings, from the “breather”) in the intake path, as well as on the throttle valve, intake manifold, idle air valve, oil also flows into the air filter through the mass air flow sensor (MAF), which can lead to failure of the mass air flow sensor (replacement cost is about 2500-3000 rubles) . And so, if you are tired of suffering from idle problems and constantly carrying out preventive work on cleaning the intake manifold, throttle assembly and changing various sensors, which, firstly, not everyone can do due to lack of knowledge, and secondly, it is necessary a lot of time, tools and of course money
In general, to avoid all of the above, you can install a crankcase gas filter or an oil trap, which can also be bought at a tuning store at a fairly decent price, or you can make it yourself. We will dwell on the latter, that is, the manufacture of an oil trap (crankcase gas oil trap), in detail.
So, to make a crankcase gas filter we will need:
– a hose with a diameter approximately similar to the hose of the interior heating system and a length of about 25-30 centimeters;
– fine fuel filter without settling tank for carburetor cars,
– plastic clamp for the filter.
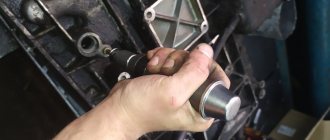
First, we disconnect the hose from the valve cover and from the intake tract, you need to make any plug for the hole remaining in the intake tract (I took a technological plug from the new VUT), then we take a hose of the required length (depending on the location of the filter), I took about 30 centimeters, so that the filter is at the level of the air filter housing, we put it on the valve cover fitting and fix it with a clamp, then from the fine fuel filter housing, you need to take out the filter element and put it on the hose, securing it with a plastic clamp.
Now, when crankcase gases escape, the oil will remain inside the filter.
How to unscrew the oil filter without a key
It is not difficult to unscrew using a special factory key, but not every car owner has this tool. However, it is possible to make a key yourself. For this you will need:
Video: Do-it-yourself oil filter puller (without welding)
- part of an old bicycle chain;
- a small piece of metal pipe (10-15 centimeters long);
- a large nail (100-120 millimeters) or a piece of thick wire;
- electric drill with a metal drill (diameter 5-7 millimeters).
Main characteristics
| Make: BMW | Gearbox: automatic / manual |
| Model: X1 | Body: sedan, coupe, station wagon |
| Year of issue: 2009 | Power: petrol/diesel |
| Engine capacity: 1985 cm³ | Drive: rear |
–> Good afternoon, Friends!
I would like to share with you my experience in making an oil trap and crankcase gas filter with my own hands, using the example of a VAZ 21102 produced in 2000.
First, a small digression, for those who do not know why this modification is needed.
Many car owners, both domestic and foreign cars with high mileage, have more than once paid attention to oil deposits in the form of a plasticine-sticky mass (which appears when crankcase gases with droplets of oil escape, due to wear of the oil scraper rings, from the “breather”) in the intake path, as well as on the throttle valve, intake manifold, idle air valve, oil also flows into the air filter through the mass air flow sensor (MAF), which can lead to failure of the mass air flow sensor (replacement cost is about 2500-3000 rubles) . And so, if you are tired of suffering from idle problems and constantly carrying out preventive work on cleaning the intake manifold, throttle assembly and changing various sensors, which, firstly, not everyone can do due to lack of knowledge, and secondly, it is necessary a lot of time, tools and of course money
In general, to avoid all of the above, you can install a crankcase gas filter or an oil trap, which can also be bought at a tuning store at a fairly decent price, or you can make it yourself. We will dwell on the latter, that is, the manufacture of an oil trap (crankcase gas oil trap), in detail.
So, to make a crankcase gas filter we will need:
– a hose with a diameter approximately similar to the hose of the interior heating system and a length of about 25-30 centimeters;
– fine fuel filter without settling tank for carburetor cars,
– plastic clamp for the filter.
First, we disconnect the hose from the valve cover and from the intake tract, you need to make any plug for the hole remaining in the intake tract (I took a technological plug from the new VUT), then we take a hose of the required length (depending on the location of the filter), I took about 30 centimeters, so that the filter is at the level of the air filter housing, we put it on the valve cover fitting and fix it with a clamp, then from the fine fuel filter housing, you need to take out the filter element and put it on the hose, securing it with a plastic clamp.
Which way should you unscrew?
To dispel doubts, you need to know that the thread of the filter is “correct” - it is screwed clockwise and unscrewed counterclockwise. And the fact that it does not give in means that the force applied is not enough. Either there is not enough strength, or the “lever” is short - the hands are in an awkward position due to the tightness of the engine compartment.
In this case, you need to use a special oil filter wrench. And if the puller is not in the garage, then choose a suitable means at hand that will essentially do the same thing - create a more powerful torque by increasing the length of the lever or the force of impact.
Making vegetable oil at home
A business idea for the production of sunflower oil is based on an oil mill.
From an investment perspective among professionals, the idea has not lost its popularity and is still in demand and profitable. However, for many, the issue of income in this area is quite controversial, which is in vain. Let's take a closer look so as not to rely on the opinions of the majority, but to base our own conclusions on specific numbers and facts.
In this business you won’t be satisfied with just butter. The profit from its sale is hardly enough to reach the cost level. But we must not forget about the additional products obtained from the creamery, which bring a significant net profit.
How to unscrew the oil filter with a special wrench
There are many types of pullers. Here is a description of some of them:
- Tape. Handle with a grip in the form of an open ring made of steel tape. One end is attached through a hinge to the handle itself, the second - through a hinge to the movable rocker arm. When you turn the handle counterclockwise, the rocker starts to move, the ring moves together, decreasing in diameter, the tape wraps around the filter body and sets it in motion.
- Belt. The principle of operation is very similar to belt ones, but only one end of the belt is attached to a hinge to the rocker arm. The second one is free. The free end is wrapped around the body, passed into the rocker arm, and the belt is “pinched” by turning the handle counterclockwise. Continuing the movement of the handle, unscrew the stubborn element.
- Chain. A loop from a chain, similar to that from a timing belt or bicycle, is clamped in a head with a hole for the square of the handle from the set with socket heads. They wrap the filter in a loop, insert a square into the head, and wind the chain around the head until it clamps the housing and turns it.
- Ticks. Keys modeled after pliers. They consist of two handles with semicircular toothed girths on a hinge joint. They work like a locksmith's analogue.
- Crescent-shaped. With one handle, one movable serrated girth and a fixed short serrated end. A simplified version of the previous key.
- End, cup-shaped. Puller heads. For professionals, they are sold in the form of kits for different sizes of oil filters. You can buy only one for a specific car make and type of filter element.
- Crabs. They belong to universal end pullers with three movable self-clamping “legs” at an angle of 120° relative to each other. They are activated, like the cup-shaped ones, by a square inserted into the hole at the end of the key.
How does an oil separator work?
By cleaning the air returned to the intake system, the separator (installed on the crankcase ventilation pipe) reduces the amount of carbon deposits on the throttle body, spark plugs, valves and intake manifold, so the engine maintains optimal efficiency and does not lose power for a long time.
Among the options for separating crankcase gases from oil suspension, there are two most common ones. These can be like regular filter elements that use a fabric or metal filter.
Likewise, cyclone-type oil traps and centrifugal separators
Thanks to the separator, the engine intake system remains clean, which is especially important in cars with high mileage, as well as cars with a turbocharged engine and in power units that have undergone tuning modifications
For example, in the first case, oil is separated from gases due to the resistance of synthetic fabric or thin metal wire (over time, the internal filter element must be replaced or washed), but a centrifugal oil separator separates lubricant from gases in the following way: when passing through the device, gases and an oil suspension in they seem to “unwind”, exposed to centrifugal force; Thanks to this centrifugal force, the oil settles on the walls and flows back into the engine crankcase.
The cyclonic oil separator is equipped with a special valve that limits the vacuum in the engine crankcase, since strong vacuum can damage the engine boots and its rubber seals.
This is how the built-in filters provided by the internal combustion engine design work.
How to unscrew the oil filter without a key
Some of the folk methods for unscrewing a “stuck” oil filter repeat the principle of operation of factory pullers (or rather, vice versa - manufacturers have improved home-made equipment and put it on the conveyor). Some of them refer to extreme methods that lead to partial destruction of the hull.
Attention! Extreme methods require precision. You must be careful not to accidentally damage the car engine or get burned by hot oil that may splash from a damaged filter.
Those who wear work clothes with a belt may believe that they always have the key “at hand” (more precisely, on their belt). This is almost a complete analogue of a belt puller, but without a handle. The classic belt buckle serves as both a rocker arm with a hinge and a clamp.
To remove the filter, make a loop by passing the free end through the strand. Place a loop on the body so that the end of the belt bends counterclockwise at the buckle, and pull it. The loop tightens, the filter moves a little, but this movement is enough to continue further with your hands.
The simplest tools at hand are a hammer and a chisel. They have long been used to move any rusted threaded connection - nuts, bolts.
The chisel is placed against the body closer to the flange and a notch is made (for emphasis). Tilt the chisel slightly to the right relative to the axis of the flange plane and hit it with short, strong blows. Barbaric, but it helps.
Advice! There is no chisel in the tool kit; an impact slotted screwdriver will do (there is such an element on the handle as a metal knob).
This is another option for using a screwdriver and a hammer, but in a different way. Take a long screwdriver, pierce the filter housing with it, use it as a lever, and turn it counterclockwise.
Gas key
The device of a gas wrench is not fundamentally different from a special pincer puller; it works the same. It can be used if the “working range” of changing the jaw grip allows you to clamp the filter housing. The second condition is that the handles must fit in the engine compartment.
Advice! If you can’t clamp the filter from the side, you can try to do it from the end.
other methods
There are other ways to unscrew the filter without a key:
- Rope. They want a loop, pass both ends through it, put it on the filter using the “noose” principle, tighten it, and turn it.
- Rope and two metal rings. A loop is made from a rope. Pass them through the rings so that they can pinch the ends. Place the loop on the filter, tighten it, and pull the ends counterclockwise.
- Old timing belt. Not everyone throws it away after replacing it when it has reached wear and tear. Make a double loop from it, put it on the filter with the “toothed” side, and pull.
Homemade equipment from an old chain (from a timing belt, bicycle), a piece of pipe and a nail. It's not difficult to make it yourself. Find a piece of pipe with a diameter so that the chain folded in half will pass inside. If you take a steel pipe, then it is better to use a thin-walled one rather than a water pipe - it is easier to drill. A duralumin tube from an old folding bed or country folding chair is also suitable. Select a nail to fit into the chain link. A through hole for a nail is drilled in the tube, closer to one of the ends. The chain folded in half is pulled into the pipe with a loop towards the drilled hole - the puller is ready. The loop is put on the filter, tightened as tightly as possible (but so that the holes in the pipe and in the chain link coincide), and blocked with a nail. Using the pipe as a lever, rotate the filter.
Operating procedure
You don't need any special tools for assembly. Everything you need is available in every garage. The work is carried out in the following order:
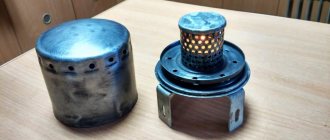
- The tank is disassembled
. Contents are extracted from it. The filter and 2 springs (large and small) can be put aside; they will not be needed; - We insert a tube with a diameter of 14 mm into the body; it should go down to the very bottom. So the gases will pass through the entire jar without exception;
- We take sponges and, after fluffing them, fill the jar with them. After that, we put a washer and a cotter pin, in the end we get this kind of filter;
- We take the mesh that was in the tank and make a hole for the tube. Then we install it in place;
- The next step is optional. You can paint the jar any color (at your discretion). But this will not affect performance;
- While the reservoir is drying out, it makes sense to clean the throttle valve from dirt; for this you can use any available method;
- We install it under the hood. We connect the hose from the breather to the terminal with a long tube, and attach the hose going to the throttle to the main one.
Instructions for creating an oil trap for the Tavria ZAZ 1102 car
First of all, you should prepare the jar. We cut two holes in the lid with a diameter for threaded corner adapters. Then we screw them into the lid so that they stick out outside the jar. Apply sealant or silicone around the adapters to prevent gases from escaping.
After this, take a tube or hose, cut it to the depth of the jar, and make the bottom cut at an angle, then screw it onto one of the adapters under the lid. As you can see in the photo, I first tried to make an energy drink out of a can, but I gave up and took a can of infant formula from the times of the Soviet Union.
After this, we place the cut bottom upside down in the jar, insert the crusher with the hose inside, but at the same time push the metal jaws into it. We are closing this whole thing hermetically. Next, connect the hoses and clamp them with clamps.
In order to prevent your can from rattling under the hood on bumps, I recommend putting a cut-off inner tube on it and wrapping it with tape or something for better fixation (if the inner tube does not fit tightly).
This is probably all that needs to be done to create an oil sump. For convenience, you can turn the nipple of the engine head cover with a knob in any direction. You can see the results of the oil sump by going HERE. The oil washer worked for 4 months, and see the results of its work there.
How did you experience it?
We tested each tool for the maximum torque that it is capable of transmitting to a cylindrical steel blank simulating an oil filter. If it can “grab” a smooth surface, it can easily grab onto a real filter. Only the polyhedral puller escaped these tests, which, even if it wanted to, would not be able to unscrew the cylinder.
We also assessed the mechanical strength of the pullers, manufacturing standards, and ease of use—the final rating was given on a five-point scale.
Of all the tested pullers, we will single out one best representative from different groups.
Bicycle chain parts and necessary tools
Chain wear indicator
: A typical chain wear indicator hooks onto a pin in the chain while the other end is inserted between two pins or rollers. The numbers on the tool will show how worn the chain is and whether it is time to change it.
New chain
: The type of chain depends on the number of speeds of the bicycle. So, for example, if the bike is 9-speed, you need to buy a 9-speed chain. More advanced chains include a special coating that will delay the appearance of rust, or they are already made of stainless steel.
Replacing pins or connecting link
: New chains immediately come with a new pin or special link called a connecting link that connects the 2 ends of the chain together. If you are repairing an existing chain, you will need to buy replacement pins or connecting links separately - they must be compatible with the chain speed and brand.
Squeeze
: If you have a standard link chain, you will need a compatible puller that will allow you to easily remove the old pin and install the new one when disconnecting and joining the chain.
Pliers:
If you have a chain that connects to a connecting link, you will need pliers to make the process of disconnecting and connecting the connecting link easier.
What to look for when purchasing
An adjustable wrench is a universal tool with varying jaw sizes. It has a number of advantages:
- it replaces several models;
- if desired, you will purchase a tool with specially shaped jaws;
- There are models on sale with plastic handles, so they are comfortable to hold while working.
There were some downsides:
- since the head of the adjustable wrenches is quite large, it is difficult to work with the tool in hard-to-reach places;
- the sponge is not fixed securely, and it is not easy to unscrew a tightly tightened nut;
- During the operation of the key, the play increases;
- The position of the sponge needs to be adjusted.
Despite all the disadvantages, the adjustable wrench is easy to use, so hurry to get one.
Is it possible to install an additional oil separating filter?
As you can see, this is a useful thing, especially when there is no time or desire to clean the throttle, change spark plugs and clean the intake manifold. However, not many automakers install such filters on their cars.
photo: www.drive2.ru
If there is no oil trap, you can install it additionally by first purchasing a ready-made one in the store (experienced users claim that they are ineffective) or make it yourself.
For an example of how this can be done, see here:
Video taken from the YouTube channel “Denis MECHANIC”
And more on the topic:
Video taken from the YouTube channel “Yuri K”