The use of gas fuel is ineffective without the use of special burners. Today the market offers a considerable selection of designs, from professional ones that create temperatures of up to 1500 degrees and above, to household devices that are needed for heating and cooking.
Nevertheless, it is common for home craftsmen to make these devices themselves. The reason is simple - a do-it-yourself gas burner, adapted to a specific task and working conditions, is more convenient, even if it costs more than a factory one.
Types and classification
Based on their intended purpose, devices are divided into professional and household.
The first include:
- Burners for work related to metal processing: soldering, forging, welding.
- Devices for general construction, road work, roofing, wood burning, and removal of old paint.
- Technological equipment for various purposes. For example, drying chambers, food industry tools.
For household purposes, this includes a gas stove, nozzles for home stoves, heating boilers, and gas convectors.
Household devices include home workshop devices . This is where you most often find do-it-yourself burners, not only manufactured, but initially designed to perform specific tasks.
They are arranged according to two main schemes:
- injection or injection;
- with complete preliminary mixing of the working mixture, or ejection.
In the first type, air (or oxygen) is captured by the supplied gas stream. In the latter, the gas-air mixture is obtained in a preliminary chamber.
Types of burners
All devices can be classified according to two parameters: operating technology and scope of application.
Based on the principle of operation, the following types of devices can be distinguished:
- diffusion, in which the process of mixing gas and oxygen is carried out during combustion;
- injection, where even before the gas enters the combustion chamber, it is enriched with oxygen;
- atmospheric, which, according to the principle of operation, resemble injection ones, but oxygen is supplied to a lesser extent;
- recuperative, where a special device - a recuperator - heats up the gas before mixing it with air;
- regenerative - similar to recuperative, but heating to the required degree is carried out by another unit - a regenerator, which first heats the gas and oxygen, and only then supplies it to the combustion chamber;
- inflatable, where air is forced into the combustion chamber using a fan;
- with pre-full mixing, where oxygen is added near the outlet;
- with incomplete premixing.
Devices are also classified by purpose:
- Household appliances characterized by low power. Most often we are talking about atmospheric devices, since their operation is associated with the least number of problems.
- Industrial equipment used in boiler rooms, factories and for heating a large number of residential units. The most common are injection, fan and diffuse devices.
What needs to be done?
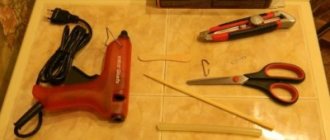
First the tools. Although for the most part the assembly is made from ready-made elements, the following are required:
- Hacksaw for metal.
- Drill with a set of drills.
- Pliers, screwdriver, personal files, velvet or appropriate needle files.
- Set of dies and taps with holders.
- Bench vice.
Basic materials you will need:
- Rubber or silicone hose for connecting the device to a gas cylinder.
- Two gas valves: the main one, which opens the gas supply, and the regulating valve, which serves to change the amount of gas supplied to the combustion zone.
- A tube with a thin hole at the outlet is a jet (nozzle).
Often, a gas nozzle is called a nipple, which is incorrect and contradicts the principle of operation of the device. Nipple - a threaded tube, often with a built-in valve. Used to connect parts. The jet ensures the injection of the required amount of fuel into the mixing chamber (for example, a carburetor jet).
- Tubes for the body of the product, injector chambers with a nozzle.
- Lever.
The exact list will be determined by detailed study of the drawings of a homemade gas burner, based on the blanks available.
How fuel is used:
- propane or propane-butane mixture;
- methane or natural gas;
- acetylene;
- hydrogen.
Each gas has its own characteristics. For household and home-made systems, the most convenient are acetylene, propane, and its mixture with butane.
It is quite difficult to get a hydrogen cylinder; methane has a higher pressure than household gas; it requires a reducer.
Connecting a homemade welding machine
Connection diagram of the inverter to the battery.
The finished welding inverter must be connected to the network or to a battery. Use clamps to connect to the battery. Be sure to observe polarity. The black clip goes to “-“, and the red one goes to “+”. If there is a connection between the battery and the on-board network of the unit, it does not need to be disconnected. When the outputs of the welding inverter are connected to the battery, a spark should appear.
Connect devices to an outlet. The outlet must have a fuse or an automatic shut-off feature. If necessary, an extension cord of up to 50 m can be used.
Turn on the implement button. If everything is normal, the green LED will light up. It will light green until the battery voltage goes beyond acceptable limits.
When connecting and using a homemade inverter, you need to consider one more very important point. If, when operating the welding inverter on a load, the battery voltage drops to 10.5 W and continues to drop for more than 1 minute, the device will automatically turn off. This will prevent the battery from completely discharging and eliminate the need for repairs. Shorter voltage drops will not harm the welding machine, battery, or network.
Work safety
The main traumatic factor when using and setting up a burner is temperature.
Gas, even household gas, is also dangerous, as evidenced by accidents involving explosions or poisoning.
The power of a propane torch depends on the diameter of the injector and nozzle . We must remember: it is not the gas itself that burns, but its mixture with air (oxygen).
The larger the volume that reacts, the stronger the torch. At the same time, the danger of getting a dangerous proportion of propane with air in the injection chamber increases, and as a result, a small explosion - cotton.
Therefore, a homemade burner does not need to be too large. As a rule, the injector diameter does not exceed 3-5 cm, and the nozzle opening is 0.5 mm.
Important! Work in a ventilated area or outdoors. Use gloves to protect your hands.
Application of hydrogen welding
Hydrogen is suitable for welding iron products, but not stainless steels, since it dissolves in molten nickel, nor is such welding suitable for copper, but the hydrogen atmosphere does not allow the surface to oxidize.
The hydrogen welding machine can operate from a regular household electrical outlet; the device operates in automatic and manual mode. A mixture of oxygen and hydrogen is supplied to a standard burner through a hose; the flame temperature is regulated at 600 - 2600 degrees.
These devices are easy to use, they do not require frequent recharging, you can start using them in just a couple of minutes, and the device is very powerful.
This type of welding is very environmentally friendly, which distinguishes it from acetylene welding, which heavily pollutes the environment. The devices are safe to store and operate; however, you should not dispense with protective clothing.
Another important condition before starting work is that you need to choose the right electrodes, all types of welding electrodes are unique, the success of the work will largely depend on their correct choice, when choosing you need to take into account the working material, the required quality of the seam, working conditions and many other parameters.
- Such welding is capable of performing almost any task in the flame processing of a material. These devices are very popular with jewelers, dentists and refrigerator repair specialists.
- Powerful devices allow you to cook material up to 3 mm thick; they are constantly used at stations for repairing various equipment, since oxygen cylinders cannot be used there.
- Hydrogen machines can be used for body work, repairing batteries, blocks and engines. As soon as the maximum possible level of electrolyte pressure is reached, the system itself will give a signal and the device will turn off, which ensures high fire safety.
This technology provides a much cleaner cut compared to propane and acetylene. These devices are used in wells, tunnels and subways, where propane and acetylene are prohibited.
Hydrogen welding is also possible at negative temperatures. Such a device will be very useful at home, but they are quite expensive, there is another option, to assemble the device yourself.
DIY hydrogen welding
The hydrogen mixture can be obtained by electrolysis of an aqueous alkali solution, the current source can be made using a rectifier to charge the battery from the car.
Electrolysis should take place in a vessel; at home, a glass jar with a polyethylene lid will do; its volume can be from half a liter. Make exit points in the cover for the wires and electrode plates, as well as for the gas exhaust tube sleeve.
Next, seal all the terminals and the cover, for this you can use the usual Moment. Fill the jar with electrolyte through the gas outlet fitting; this can be done using a syringe.
The hydrodispenser can be a second vessel; gases are bubbling in it, where they are saturated with vapors of flammable substances. This mixture is sent to a third container with water; it serves as a seal for the release of gases. Gas containing oxygen, hydrogen and flammable substances will come out through the medical needle.
- The flame temperature can reach up to 2500 degrees, but if you change the level of the supplied voltage it can be adjusted.
- The combustion process must be stable; if you change the voltage on the electrodes, the current strength will also change, and it affects the dose of gas evolution.
- During electrolysis, water is consumed, but the amount of alkali does not change; it breaks down into ions, which increases the electrical conductivity of the solution.
The fuel mixture can be refilled with a regular medical syringe with a needle. You need to place cotton swabs inside the syringe tube, at its end and base, this is necessary to prevent the flame from leaking through the tube into the vessel with the alcohol composition.
The rectifier can be assembled by connecting diodes via a half-wave network; a transformer with a power of 180 W or more is suitable for this; a device from an old Soviet TV would be a good option; remove the secondary windings and wind new ones using thick copper wrapped wire.
Make taps to regulate the output voltage that powers the electrolyser. The flame temperature will depend on the composition of the fuel; acetone or ethyl alcohol can be used.
If you choose acetone, do not use sleeves made from gel pen tubes, they will dissolve in it. If oxygen predominates in the mixture, the flame may go out.
If you assemble the device well and it is sealed, it can work for a very long time. If you need to weld large metal elements, then you need to learn how to do resistance welding with your own hands; in principle, this is quite possible.
Hydrogen welding can be very dangerous, as mixtures can explode, oxygen reducers can ignite, and backfires can occur.
Before starting work, you need to clearly study safety precautions, this is the first thing a beginner needs for welding, it is impossible to neglect it. This type of welding should not be carried out near flammable substances.
If welding is carried out indoors, you need to take frequent breaks and go out into the air. In closed and semi-closed spaces, use local suction to remove gases. If welding takes place in a tank, then an observer is required outside.
- Carry out all work only with safety glasses to avoid damaging your eyes. If you use gas cylinders, carry them on a cart or stretcher and use a protective cap.
They should not touch or fall, and there should be no oxygen cylinders in the welding area. Always use gearboxes with proper pressure gauges to avoid explosions.
When welding, the torch flame should be directed away from the power source; if this is not possible, protect the source with an iron shield. Gas-conducting hoses must be located near the welder; during breaks, the burner flame must be extinguished. If you follow these simple rules, hydrogen welding will always be safe.
Which one should I do?
Before we begin manufacturing, we will select the appropriate type of burner from the following list:
- atmospheric injection;
- ejection;
- supercharged.
The second and third types are more difficult to manufacture. And to organize pressurization you will need compressed air or oxygen, which means a compressor or another cylinder.
The easiest way to do it yourself is the first type; it’s the one you should prefer..
The atmospheric burner process is controlled by a control valve. Therefore, the choice of type, as well as the model of the device itself, largely depends on which one turns up.
It must be remembered that the combustion of a particular gas depends on the diameter of the nozzle hole. The hydrogen jet has slightly less of it, the propane jet has more.
Designs, diagrams, drawings, assembly technology
First of all, you will need a drawing of the future device, a sketch or diagram of the burner, with dimensions.
It’s easy to find a ready-made one using the Internet . If you understand the general principles of the device’s operation and know how to calculate it, you can develop the project yourself.
An easy option is to use a valve from a propane or oxygen cylinder, known as model VK-74 (see diagram).
A fitting is machined into the side thread, which will also serve as a handle. You can use a pipe of suitable size. On one side, cut an internal thread, on the other, make a shank for putting on the gas hose.
We screw a plug onto the thread with which it is attached to the cylinder. We drill a hole in its end and cut a thread for the jet. We weld a nozzle to the plug on steel spokes, which will also serve as an injection chamber.
It's even easier if you come across an old acetylene cutter or gas cutter. Essentially, this is a finished burner . It is enough to remove the parts connected with the oxygen supply so that they do not interfere, replace the gas nozzle with a nozzle, and attach the injection chamber-nozzle above it.
Block diagram of the welding machine
For welding work, devices operating on alternating and direct current are used.
The circuit of any device includes a transformer (it is possible to use a transformer from a microwave), a rectifier, a choke, a holder, and an electrode. It is in this sequence that electric current flows through a closed circuit.
The circuit is completed when an electric arc occurs between the electrode and the metal workpieces to be connected.
In order for the quality of the welded joint to be high, it is necessary to ensure stable combustion of this arc.
DC machines are used for welding elements made of thin sheet metal. With this welding method, you can use any electrodes and electrode wire without ceramic coating.
The electrode holder is connected to the rectifier through a choke. This is done in order to smooth out voltage ripples.
The choke is a coil of copper wires that is wound on any core. The rectifier, in turn, is connected to the secondary winding of the transformer.
The transformer is connected to the household electrical network. The connection sequence is simple and clear.
AC voltage conversion is done using a step-down transformer.
According to Ohm's law, the voltage that is induced on the secondary winding of the transformer decreases, and the current increases from 4 amperes to 40 or more.
And use wires to attach the electrode holder to it. But it is impossible to use the holder for practical purposes, since the circuit does not contain other necessary elements.
And most importantly, it does not have a current regulator. As well as a rectifier and other elements.
The transformer is considered the main element of the welding machine. You can buy it or adapt one that is already in use.
Many craftsmen use a transformer from a microwave that has expired. Due to its dimensions and weight, a micropulse element always takes up a lot of space in the structure.
If we consider the welding unit as a whole, we can distinguish three main blocks that it includes:
- power unit;
- rectifier block;
- inverter block.
A homemade inverter device can be configured in such a way that it has minimal dimensions and weight.
Such devices, designed for use in the home, are sold in stores today.
The advantages of an inverter device over traditional units are obvious. First of all, it should be noted that the device is compact, easy to use, and reliable.
The most general calculations confirm that making such a device with your own hands is easier and more profitable.
The main elements can almost always be found among electrical machines and devices that end up in storage rooms. Or in a landfill.
The simplest current regulator can be made from a piece of heating coil, which is used in household electric stoves. The choke is made from a piece of copper wire.
Video:
Radio amateurs have come up with the simplest pulse welding method. It is used to attach wires to a metal board.
No complicated devices - just a choke and a couple of wires. A current regulator is also not needed. Instead, a fuse-link is connected to the circuit.
The second one is a crocodile clip. The plug with wires is plugged into a household outlet.
The clamp with the wire is sharply applied to the board in the place where it needs to be welded. A welding arc occurs and at this moment the fuses located in the electrical panel may blow out.
This does not happen because the fuse link burns out faster. And the wire remains securely welded to the board.
Mini
A very tiny gas burner can be made from a fitting for inflating basketballs, a syringe needle and a couple of droppers , or as they are called medical “systems” for drip administration of drugs. The homemade product can even work from a lighter refill can.
Adjusting roller clamps will act as valves.
True, we will need a forced air supply for this device; the nozzle diameter is too small for injection of atmospheric air. For this purpose, you can use the compressor of an aquarium or an old refrigerator.
Carefully grind off the tip of the syringe needle and fitting. After this, bend the syringe needle slightly and insert it into the side hole of the fitting, so that the end comes out slightly from the cut tip.
We wrap the needle insertion site with copper wire and solder it well with acid.
The burner is ready. All that remains is to connect gas and air to it.
Instructions for use
If you will use a gas burner for roofing work, then you must carry out several steps before doing so. Initially, the base for laying the material is prepared; for this, the surface is cleaned of dust and debris. If there is a need, the concrete screed should be leveled. Next, the surface is treated with a primer. At the next stage, you can begin working with rolled material, which is laid out to ensure overlap. The width of the latter can vary from 8.2 to 9 cm. This installation of waterproofing is only a fitting. During these manipulations, the rolls should be leveled and then rolled back. The material must be fixed at the base of the roof, during which a gas burner is used for roofing work. Now an assistant should be connected to the work. One of the craftsmen uses equipment to heat the surface of the base, as well as the lower surface of the waterproofing. While the second person is engaged in tightly pressing the insulation to the roof surface. In this case, the roll must be rolled out immediately. To prevent the formation of wrinkles and bubbles, the roll should be rolled with a hand roller. If peeling of the seams was detected, then a gas burner for roofing work, the photo of which is presented in the article, will eliminate these errors.
Nozzle and handle - manufacturing options
If you look from the outside, the handle and nozzle are, in fact, the entire unit .
The rest is pipes and valves supplying gas. For the nozzle, you can purchase a brass nozzle from gas appliances. They sell without problems and cost pennies.
If you need a special design, you can proceed as follows.
We clamp a suitable workpiece with a vice.
To avoid crushing the thread when clamping the part in a vice, first use a regular wooden clothespin.
Carefully drill a hole with a drill of a suitable diameter, not reaching the end about a millimeter. We grind down the remaining metal until the point left by the very tip of the drill appears.
After this, using a thin drill or a hardened awl, we punch a hole of the required diameter from the inside.
Any suitable object can be used as a handle. A handle from an old soldering iron, a piece of thick-walled hose, or a drilled piece of wood will do.
To fix parts and hoses, we use clamp clamps and hot glue gun.
The burner flame is adjusted and adjusted in the following ways:
- gas control valve - current;
- moving the nozzle (nozzle) along the axis of the injection chamber, changing its opening.
- changing the size and shape of the supply window through which atmospheric air enters.
The last two methods are used when setting up . They do not need to be changed during operation. However, if you are not sure of the accuracy of the design calculations, you should take care of the possibility of adjusting them.