If you decide to make a water mill yourself, you will need to select materials and a suitable place to install the decorative structure. In addition, in order for a decorative water mill to work, it is necessary to provide artificial circulation of water, that is, install a device that will transmit the flow from the reservoir to the blades, setting them in motion. It is necessary to step by step disassemble all the stages of manufacturing the mill structure from choosing a style, constructing a model and drawing up a diagram to assembling the house and installing the blades.
The principle of operation of the mill is very simple: water can flow onto the blades from above, through a chute, or supplied from below. The general principle is to use the flow of water. A decorative hydromill in an old style will decorate a garden area, and the sound of water being distilled by the blades will relax and soothe.
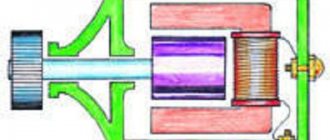
In order for the decorative water mill to be useful after production, and not just decorate the area and relax, you can connect a small generator to it. The generator will only work if there is a stream on the site, the flow of which rotates the mill wheel, and otherwise the generator will be useless. You can place the generator in a decorative wooden house.
Materials and tools
As a material for building a mill with your own hands, you can choose wood, brick, plastic, or a combination of them. The most popular option is to use wooden blocks to construct the frame and sheets of plywood to cover the mill. Additionally, for construction and fastening you will need:
- Self-tapping screws for woodworking for fastening parts;
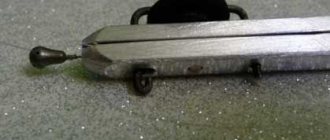
- One large stud, wheel axle;
- Pipe for gutter;
- Impregnation for wood.
The volume of materials required for construction is determined by the size of the structure. To calculate the estimate, it is advisable to make a drawing and reflect in it a diagram of the model of the future mill.
Sometimes bricks are used to build a mill. A mill house made from it will be heavier and more expensive, and in addition, to install a decorative water mill on a summer cottage, you will need a solid base and support.
Water mill design
There are many design styles in the modern world for different buildings, but mills are usually made in 3 targeted solutions - country, Japanese, half-timbered. Each design has its own characteristics and subtleties.
Japanese style
This style is characterized by simplicity, minimalism and naturalness, so it is necessary to lay stones around the mill and decorate the house with bamboo or reeds. Decorative dwarf plants, pebbles, and sand are required. Some designers suggest making a tower-shaped house out of stone for the Japanese style.
Country
This is the most common rustic design. The mill is made exclusively from wood and varnished. For the house you can use branches (unprocessed), logs and the like. Stone elements, nearby wells, aged bridges, carts, flowers, and decorative wooden figures fit perfectly into country.
Half-timbered
This is an unfamiliar, but already popular style, distinguished by its modernity, so it is advisable to use metal tiles for the roof of the house.
The house itself is done in light colors. But the slats with which it is covered may have a brown tint. Ideally, the surface of the building is divided into triangles, rectangles, and squares. A bench and flower bed look beautiful next to the mill.
Creating an Artificial Flow
The main driving force of a water mill is water flow:
- To create a flow, it is necessary to install a pump at the summer cottage, which will drive water through hoses and tubes from the reservoir to the chute of the decorative mill;
- If there is a reservoir with moving water on the site, you should install the mill so that its wheel is immersed in water by 1/3 of its diameter. The water of the reservoir will rotate the wheel in a circle without additional effort.
Another option for a water flow device is to operate the wheel from water pressure from the gutter. The disadvantage of this solution is the impossibility of ensuring continuous operation of the mill, the independent movement of the wheel of which will only occur during rain or melting snow in the garden. In the absence of rain, water for rotation will have to be distilled from the reservoir.
Design selection
In recent years, water mills have been installed as a decorative element, but there are so many design models that it is sometimes difficult to choose just one.
In this case, you need to be guided by the style of landscape design, the topography of the site, material capabilities, the presence or absence of a reservoir, and personal preferences. But there are two important elements in all mills, which are made differently.
Spin wheel
Depending on the above indicators, the wheel is made of the following materials:
Manufacturing stages
The creation of a decorative water mill consists of the phased construction of all its main elements, from assembly and installation to a selected location on the site.
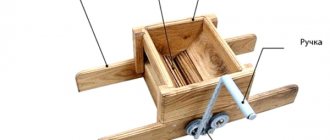
Wheel
The design of the water wheel consists of two parallel rims or round disks made of plywood, between which wide blades made of aluminum profile or plastic are installed. A hole is drilled in the center of the wheel for the mill for a pin, which will become a support and an axis of rotation.
To create a durable connection, you can equip the axle with rolling bearings.
House
The most important thing for design is the construction of the frame of a wooden house. As the base of the hydromill, you can use a concrete foundation, which is poured into a dug trench with wooden formwork. A simpler option is a flat garden area covered with paving slabs next to a pond.
To construct the roof of a building, you can use roofing felt, corrugated sheets or tiles. An excellent option would be to use tiles in the same style as those used in the construction of a country house and other buildings. We fix the tiles securely, and you can decorate the roof with a ridge in the old style.
Impregnation of wooden parts
To preserve the wooden elements, wheels and fastenings of the water mill, they must be covered with several layers of waterproof impregnation or yacht varnish. This procedure should be repeated every 2-3 years . Such impregnation will not only protect the wooden mill house from moisture and fungus, but will also decorate it.
All wooden parts of the building must be varnished before production begins. To ensure that the glossy coating does not lose its decorative properties, the mill parts must dry thoroughly.
To protect metal fasteners and axles from corrosion, use special paints and varnishes.
Installation
After pouring the foundation of the mill, assembling the frame and wheel according to the drawing, establishing the water supply, as well as installing and decorating the gutter for draining it, the main part of the mill - the rotating wheel - is installed.
To attach the wheel to the main structure, you need to drill a hole in the casing into which a pin is inserted, one end resting on a support (preferably with a bearing), and on the other end it is pressed onto the bearing of the impeller. After this, we attach a nut to the free end of the stud and finally fix the wheel on the axle.
The final stage of creating a decorative structure with your own hands will include masking all the unsightly elements of the mill (hoses, tubes, pump) that drive water from the reservoir to the wheel blades. Masking of the pump and hoses is done using living plants, natural stones or other decorative decorations and devices.
When the work is completed, a test run of the mill is carried out to check the operation of the wheel, the absence of water leaks, as well as the stability and reliability of the entire decorative structure.
Making a water wheel frame
We start manufacturing the wheel with a frame, which consists of two rings (rim) and diagonals that fasten the fragments of the ring and give rigidity to the entire structure.
We make the rings from boards 30 x 200 mm. Each ring consists of eight arcs (parts), and for two rings we will need to make sixteen such parts. Here is a drawing of the arc with exact dimensions.
The width of the arc is 134 mm, this size was obtained as a result of minimizing the cost of building materials, a board with a width of 200 mm is popular and you can easily find it in any market or store. You can also use a board of a different thickness, if you don’t have 30 mm, feel free to take 25 mm thick, its strength will be enough and will make the construction easier, I was just playing it safe.
To make arcs, make an exact template from cardboard or tin; it’s easier to measure and draw once on the template, and then transfer it to all the workpieces. Use a jigsaw to cut out the arched sides. The end sides must be smooth for the arches to fit snugly against each other, so cut them with a miter saw or circular saw.
After making the arcs, lay them out on a flat surface, you should get a ring, if the joints do not match well, adjust them a little, but this is not so important, the most important thing is that the ring has the correct round shape, and to check this, wherever you measure the diagonal , the diameter size must be the same.
Fasten them with self-tapping screws as shown in the sketch:
But don’t move the ring, there is no rigidity, you need to make and screw the diagonals, now we’ll start making them. We make diagonals from timber 30 x 70 mm. For two rings we will need 4 long pieces of 2 m each and 8 short pieces of 1 meter each (16 m. in total). We make long ones by sawing them to a size of 2000 mm, and then sawing them in the middle to join each other as in the drawing:
We make short ones according to the drawing, 8 pieces:
We join the long ones and twist them together, but away from the middle, where we will then drill a hole with a diameter of 30 mm.
First, we apply the long diagonals to the ring so that the diagonals overlap the joint of the arcs, and the joint of the arcs is in the middle of the diagonal. Don’t rush to screw it on, double-check that everything is even and symmetrical; the correctness of the design depends on this. Screw the long diagonals to the ring with several self-tapping screws, later we will strengthen them with bolts.
We also attach short diagonals and attach them using self-tapping screws.
Then we make four mounting plates that will strengthen the structure. We use metal of at least 2 mm. We cut it to the required size with a grinder and drill holes for the bolts according to the drawing:
Next you need to screw the plates, but to do this we measure all the diagonals again. We apply the plate, the central hole in the plate should be exactly in the center of the circle, we drill holes in the diagonals through the plate one at a time so as not to disturb the alignment, we apply the plate on the other side and screw it together.
What is needed for construction work?
Making a mill does not prohibit your imagination. Therefore, different materials are used. The mill can be made from stone or broken brick. But for such structures you will need to make a foundation. Many people make a wooden mill with a house. The roof is made of straw or reeds. Such a structure will harmoniously fit into the rustic design.
For construction, you can use boxes, boards, tiles that are no longer needed. It is worth varnishing wooden material so that it lasts for a long time.
The house, which is being built near the mill, has windows and doors. Initially, it is recommended to start constructing the model. To do this, it is worth deciding on the material from which the structure will be constructed. It is also necessary to acquire screws, a hammer, glue and other necessary tools.
Choosing a style
The construction of a water mill as a whole is not a complicated process . With a little imagination, your structure will be original and beautiful. Before starting work, you should think about what style the mill will be in, because it should not spoil the surrounding landscape.
For example, if the site is made in a classic style, then a wooden structure in a country style will be inappropriate. But made of stone with forged elegant elements, it will be a real decoration of the garden.
A water mill will fit very harmoniously into a garden made in Japanese or Chinese style. This is a very popular technique among admirers and lovers of such gardens, since you can sit near such a structure for a long time and enjoy the murmur of water and the measured endless movement of the wheel.
In a Dutch garden, the mill will be the main center of attention, around which the landscape design of the site will be formed.
Plants planted near it will further help emphasize the style of a decorative water mill. Tall grasses and coniferous plants (mountain pine, Canadian spruce, junipers) will add mystery and fabulousness, and columnar or spherical thujas planted in a row will add sophistication.
The rustic style is emphasized by planted daisies, decorative low-growing sunflowers, violets, primroses, a bush of dwarf peonies, etc. It is advisable to use plants with small flowers and leaves.
You can use stones of various sizes and shapes in compositions, and those covered with moss, with cracks and chips will look natural. You can place a miniature bench and other sculpture next to the water mill.
As a result, you will get a smaller copy that will seem real.