People widely use self-contained structures to heat water. Such devices are ideal in conditions where there is no centralized water supply. They allow their owners to use hot water at any time of the day or night and not depend on utilities.
Until now, manufacturers have created many models of electronic boilers. However, not every person can afford to buy a device of this format. These people are advised to think about how to create a gas water heater with their own hands. Such a device can function perfectly on a stove with gaseous fuel. A dacha or private housing construction for temporary residence is an ideal place for the operation of such devices.
Types of water heaters
Popular models of gas water heaters that you can make yourself will help you choose the ideal option for specific purposes. Currently, such structures can be of several types:
The last version of heating devices is the most popular among consumers. It is a boiler powered by a gas stove. Such designs guarantee their owners an uninterrupted supply of water, efficiency and durability of operation.
It’s not difficult to make a good heater from a gas stove with your own hands. Creating it requires a number of useful skills and tools. In addition to such devices, many craftsmen make excellent water heaters from gas cylinders. The design of these models standardly includes a heating element, a regulator, a nut and some additional elements.
A homemade balloon heater in these cases is a stationary container for heating and storing water. The devices operate on electricity. Their only drawback is the limited amount of heated liquid. Therefore, many owners of private housing construction prefer to make a gas water heater with their own hands from a stove.
What materials will be needed to create an electric flow heater?
How to make a instantaneous water heater with your own hands, powered by electricity? The process of assembling a tubular unit powered by a heating element will be described. In this case, a heating element with a thermostat for heating water has a power of 4 to 6 kW.
- a piece of steel pipe into which a heating element will fit with a small margin;
- two half-inch pieces of steel pipe, which have a standard thread on one end;
- pieces of steel in sheets, the thickness of which is 3 mm;
- nut and bolt for grounding;
- anti-corrosion paint.
How to make a design with your own hands
Making a flow-through geyser with your own hands is quite simple. To perform this design you need to have on hand:
- gas stove;
- brass or copper tubes with a diameter of about 10 m;
- a couple of pieces of rubber hoses.
A do-it-yourself gas water heater of this format can be created very quickly. However, when installing devices, one should not forget about safety precautions. Assembly consists of making a spiral from copper and brass tubes. Next, rubber hoses are attached to the ends of this spiral. One end is fixed directly above the sink. Hot water is supplied from it during operation. The other is securely connected to the water tap. It must ensure an uninterrupted supply of water.
The water heating element or spiral is fixed directly above the gas stove. To check the effectiveness of such a device, you should first run cold water through the system. Only after this can the gas be ignited without hindrance.
A do-it-yourself geyser or a gas water heater from a cylinder is an excellent option for appliances for country houses and personal plots. However, they are not recommended for use in apartments, cottages and villas. In such housing constructions, it is better to provide heating and water supply using devices created by reliable manufacturers. Devices for heating water should be selected taking into account installation methods, type of fastenings and connection methods.
What you need to know about security
Do not forget that we are dealing with a source of increased danger - an electric heating device, therefore, when assembling and using it, you must follow some rules:
Be sure to use a separate electrical line to connect the induction boiler, and also equip it with a safety group.
- If water circulates naturally in the boiler, be sure to equip it with a temperature sensor so that if it overheats, the device turns off automatically.
- Do not connect a homemade water heater to an outlet; it is better to draw a separate line for this with a larger cable cross-section.
- All exposed sections of wires must be insulated to protect people from electric shock or burns.
- Never turn on the inductor if the pipe is not filled with water. Otherwise, the pipe will melt and the device will short out or it may even catch fire.
- The device must be mounted at a height of 80 cm from the floor, but so that about 30 cm remains from the ceiling. Also, you should not install it in a residential area, since the electromagnetic field has a bad effect on people’s health.
- Don't forget to ground the inductor.
- Be sure to connect the device through an automatic circuit breaker so that in the event of an accident, the latter will cut off the power from the water heater.
- A safety valve must be installed in the pipeline system, which will automatically reduce the pressure in the system.
Installation methods and types of fastenings
Currently, manufacturers produce two main types of gas boilers: instantaneous and storage. Products from Electrolux and Vector are especially popular among consumers. The device of this line can be located on the floor or on the wall. In the second case, various types of fastenings are used:
- dowels with fixation;
- metal hooks.
These elements are suitable for a reliable base of concrete or stone. For looser and thinner surfaces, other fastenings and installation methods should be used.
For example, on a wall made of plasterboard, it is better to install a reinforced boiler. For these purposes, you can use various materials:
- wood reinforcement;
- metal reinforcement;
- fastening with chemical anchors.
The choice of installation option directly depends on the experience of the technician, available tools and materials, as well as the size of the boiler.
What can be used instead of a rubber hose?
Instead of a rubber hose, a steel tube can be used, the thickness of which is 5-10 mm, or a coil from an old refrigerator. In this case, guides will not be needed, but you will have to bend the pipes in such a way as to achieve a turning radius of at least five diameters.
After the tube has been given the appropriate shape, it is covered with a tin sheet painted black and secured in the device body.
The glass is cut to size and mounted into the unit using slats that are laid on the beam. Water is connected to the water heater.
Main types of breakdowns
Modern manufacturers have learned to create excellent luxury water heating equipment. It uses gas to operate efficiently and rarely fails. However, even the best gas heaters cannot avoid breakdowns. The list of inevitable malfunctions includes:
- water leaks;
- poor heating of the liquid;
- discharge of power elements;
- weak water pressure;
- lack of gas.
Owners of gas boilers can repair some faults themselves. Anyone can change the batteries in the power supply. It is also easy to eliminate weak water pressure - perhaps excess scale has simply formed in the heat exchanger. To remove it, remove the heat exchanger and rinse thoroughly. For these purposes, you can also use special descaling liquids.
Will need
- Before starting work, we need to find and purchase:
- old gas cylinder;
- door hinges and awnings;
- plastic pipe and corrugated elbow;
- copper tubes and elbows;
- hoses, connectors and adapters;
- solder and flux for soldering copper pipes;
- perforated mounting tape;
- screws with washers;
- steel corner.
The tools we will need are: grinder, semi-automatic welding machine, gas torch, drill, hammer, dremel, etc.
Indirect heating boiler design
An indirect heating boiler is a storage tank that is not dependent on energy resources (gas, electricity, etc.). Inside the container, made of stainless steel, there is a heating element 1 in the shape of a spiral.
Cold water enters the tank through an inlet tube located at the bottom of the device. The water in the unit is heated using the moving coolant of the heating system. The hot water outlet pipe is located at the top. To make using the tank convenient, it is equipped with taps with a ball design. The outer part of the device is covered with heat-insulating material.
The water heater diagram is shown below.
The advantages of the unit include:
- possibility of connecting to a central heating system;
- installation near a heating boiler;
- low cash costs when installing the circuit;
- economical use of energy resources;
- water supply at a constant temperature.
Boiler advantages
There are undeniable advantages of a boiler, let’s consider them:
- Temperature sensor that works automatically. In the event of a malfunction, it simply turns off. If we look from the point of view of fire safety, then, of course, the industrial boiler wins, since it is equipped with several types of interlocks. But if we consider the situation with a homemade one, then everything is at your discretion.
- Water flow sensor and pressure sensor. Of course, the boiler neutralizes pressure drops, withstands water hammer, and also easily copes with high water pressure. Saving water with a boiler is only beneficial if it is small in size. For example, a 50-liter boiler consumes a sufficient amount of electricity, so the savings on water are practically unnoticeable. As soon as insufficient pressure appears in the water supply system (less than 0.6 bar), the boiler automatically turns off. As for the instantaneous water heater, even with a minimum water flow, the number of liters of water flowing per minute is about 1.5 liters.
There are instantaneous water heaters on sale that have industrial assembly and a quality guarantee.
They are fixed in place of the tap and have a presentable appearance. For added safety, the chassis must be grounded as the equipment is powered.
More expensive models come with a shower head, which is very convenient for summer residents. But, unfortunately, the price of such a device is very impressive.
If you attach a pan or any large container to a flow-through heater, it will also become storage. To screw in the hoses, use a brass nipple.
Installing a metal articulated crane will greatly simplify the operation of the drive. Without a tap, it will look more like a washbasin, which is very impractical. Pay attention to the tightness of the drive (the lid must be welded with argon welding) and the entire structure as a whole. Insulate the hull and make it safer.
When using a storage flow heater, pay attention to the meter readings: in rural areas the maximum power is about 4 kW.
If an ordinary electric kettle draws 1.5 -2 kW, and a TV draws 1 kW, then you can already calculate which electrical appliances can be turned on at the same time and which cannot. If the meter is automatic, then it will simply blow out the plugs, as fuses will trip, which can be replaced. But if your meter does not have fuses, then turning on the water pump, electric stove and TV at the same time can cause a fire in the wiring.
Making the unit yourself
Since the principle of operation of the device is simple, anyone can build a water heater with their own hands. The whole process is based on the assembly of component parts.
To make a water heater with your own hands, you need to follow these steps:
- prepare a special container;
- make a coil;
- provide thermal insulation;
- assemble your own water heater;
- connect the heating element;
- provide cold water supply;
- build pipe distribution;
- install water intake taps.
Installation of a factory gas water heater
You should not try to make the device yourself, because the device of a gas water heater includes at least three degrees of protection:
Thanks to this, accidents are simply impossible if the equipment is connected correctly. All valves are constructed in such a way that if a break occurs, the circuit is closed. How to make a gas water heater yourself that would meet all the requirements? This can only be done by a master who has the necessary spare parts on hand. We hope that readers have given up the idea of making their own gas water heater. The exception would be families that are really tight on money. Do not forget that hoses should not be afraid of fire!
With that, we say goodbye until next time. Many issues with gas are not so obvious to ordinary people; we will reveal them as far as possible.
Source
Choosing the right container
The storage tank acts as a container. Its volume depends on the needs of users for hot water. The calculation is carried out according to the following principle: 50-70 liters of water per person daily. A 200-liter container is suitable for a family of four.
When choosing a material, you should pay attention to how susceptible it is to corrosion. Typically, aluminum alloy or plastic is used. You can make your own boiler from steel treated with anti-rust agents.
The basis of a storage water heater can be a pipe from a heating main. This will give you a seamless cylinder. But experts advise making a water heater from a material such as stainless steel. The price for it is reasonable. Iron is known to release substances harmful to the body. A stainless steel water heater will be absolutely safe for health.
You should also think about the weight of the pipe. A linear meter of 720X10 weighs approximately 140 kg. The price of one kg is 12 rubles. How much does stainless steel cost? The price of 1 kg of the AISI304 series is 130 rubles. The weight of a sheet measuring 2000x1000x1 is 16 kg.
Making a boiler with your own hands will cost you 2,000 rubles. If the metal is bent along its length, you will get a cylinder, the height of which will be 1 m, and the diameter will be approximately 63 cm. A thicker steel sheet will not work, as it is difficult to work with. The tank volume will be approximately 318 liters.
The result will be an excellent homemade container in which you can install a factory-made heating element for water. Its power should be 6 kW. It can heat 300 liters of water in three hours. If you use a heating element with a power of 2 kW, it will take the whole night.
The tank is supplied with two holes. One is located at the top of the body. It serves to supply hot water. The other one is below. Its function is to supply cold water. Each hole is equipped with ball valves.
An alternative to a tank is a gas cylinder.
How to assemble an induction boiler yourself
The modern market of heating devices offers a large selection of different models of induction heaters for both domestic and industrial use. Despite the fact that today such equipment has not reached the level of widespread use in heating systems, its cost is high. The price for domestic boilers starts from 25,000 rubles, and for industrial boilers - from 100,000 rubles.
To save money, you can make an induction heater yourself. Even a non-specialist can do this kind of work.
Device with welding inverter and plastic pipes
All materials and components used for assembly are available and are often at hand. What is needed for this:
- wire rod or stainless steel wire (diameter up to 0.7 cm);
- copper wire;
- metal grid;
- a fragment of a plastic pipe with thick walls for the heater body (inside diameter 5 cm);
- welding machine;
- adapters for mounting the boiler to the heating system;
- tools;
- pump to ensure water circulation.
Stainless steel wire needs to be cut into pieces 0.5-0.7 cm long. Fill the plastic pipe tightly with them and close it on both sides. There should be no free space in it. A metal mesh is installed at the bottom of the tube, which allows you to keep steel particles inside.
Next, you should make the main heating component - the induction coil. Copper wire is wound onto a plastic pipe. It is necessary to make at least 100 neat turns at the same distance from each other. The induction coil is then connected to the individual heating system. The boiler is installed in any part of the pipeline. To pump water, you need to build in a pump.
The homemade device is connected to the inverter using an external copper winding. Electrical and thermal insulation work must be carried out on the boiler. All open areas are covered with special material. Basalt wool is used for insulation. This is necessary so that the pipe is heated without losing heat energy to the air.
Device with transformer
This option is easier to assemble than the previous one. What you will need to make it yourself:
- three-phase transformer with mounting option;
- welding machine;
- copper winding.
It is necessary to insert the pipes into one another and weld them. The design in cross section should resemble the shape of a donut. It performs two tasks simultaneously - a heating element and a conductor. Then the heater body is wrapped with copper wire and connected to the transformer. To prevent heat loss during operation, a protective casing can be installed on the boiler.
Induction heating is a good alternative to standard heating systems. Its efficiency is about 97% efficiency. Such systems are economical, operate on any liquid, operate silently, and do not emit harmful substances.
If the assembly rules are followed, the boilers are safe to use. They are durable. But if any element becomes unusable, replacing it will not be difficult. All materials are easily replaceable and available.
How to make a coil?
The coil is an important part of the device. It can be based on a metal or metal-plastic pipe with a small diameter. As a rule, copper or brass are used, as they have a high level of heat transfer. The manufacturer can choose the diameter of the coil at his discretion. The main condition is that its contact with water is maximum.
The serpentine tube is wound in a spiral onto a cylinder-shaped mandrel. For this purpose, a log or pipe with a large diameter is used. When winding the coil, it is necessary to monitor the turns. They shouldn't touch each other.
Do not make the winding tight, as it will be very difficult to remove the coil from the mandrel.
The number of turns on the coil is directly dependent on the volume and height of the tank. Typically, for every 10 liters, 1.5 kW of coil heating power is used.
Homemade instantaneous water heater for small household needs
Necessary materials
The source of heating the water will be a gas stove. There are 2 options for how to quickly make an instantaneous water heater, but their operating principle is the same.
In the first case, you will need a copper tube. In the second option - an old car radiator (it is better to give preference to a copper one, whatever is available). You will also need 2 hoses and 2 clamps.
Stages of manufacturing a water heater
If you use a copper tube as a heating element, then initially it will need to be bent in such a way as to form a spiral. You can make the coil neat and even by wrapping the tube several times around another pipe of the required diameter or something similar, as shown in the photo.
(The picture was taken from the network as an example, since my bending process was not filmed due to the fact that I preferred to make a flow-through water heater from a car heater radiator).
The main thing is that one edge of the pipe is free, otherwise it will not be possible to remove the spiral. All further steps for manufacturing an instantaneous water heater for a copper coil and radiator are the same.
You need to take 2 hoses. We connect one of them to a cold water tap, and the other end to the radiator pipe of the stove (or copper tube). The second hose, respectively, to the second pipe. Heated water will flow from it.
Open the cold water tap, light the fire and place the radiator (or coil) on top of the cooking plate grate.
Final result
During all of the above actions, the instantaneous water heater heated the water. Her temperature was between 37-41 degrees. The water pressure was low.
A homemade gas instantaneous water heater works and is well suited for many household needs, but it also has its drawbacks. Due to the fact that the water has time to warm up with little pressure, it will be inconvenient to use a homemade heater for bathing in the shower.
Source
Thermal insulation
To minimize heat loss, the tank should be wrapped in a layer of thermal insulation.
For this purpose, use:
- construction foam;
- isolon;
- polyurethane foam;
- foam;
- mineral wool.
Some craftsmen use a foil-based backing for the laminate. The water heater is wrapped in this case like a thermos. The insulation is attached using wire, glue or strip ties. We recommend insulating the entire building.
The lining will not only ensure long-term preservation of hot water, but will also shorten the duration of heating of the tank, which will reduce coolant consumption. Without well-equipped thermal insulation, the water in the device will quickly cool down.
Often they resort to the construction of a double tank: a small tank is placed inside a large one. The space created between them also performs a heat-insulating function.
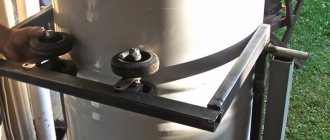
To secure the container, hinges are welded to the top of its body, and a metal corner is installed on the wall to which they are attached.
The law - what the drawbar is, where it is turned... that’s where it came out
The design on YouTube is not illegal, but it is not very convenient. There is even less chance of setting it up correctly for use. Here are a couple of tips to help you do this somehow:
The device itself is a coil, which is connected at one end to a cold riser, and at the other to a shower head or mixer. The flow is regulated by a valve. In this sense, you will have to use an old cast-iron tap at the inlet or a bronze tap at the outlet of the coil. The radiator is placed on the hob grate and heated by one or two burners. It is clear that the hose must be heat-resistant, otherwise various unpleasant consequences are possible.
An adult must supervise the operation of the device and, in case of danger, turn off the supply of blue fuel while someone is washing or doing the dishes. A gas water heater or an electric water heater is much safer from this point of view. I would also like to add that even purchased equipment needs to be configured, which means that the intervention of a qualified technician will be required. Sometimes a set of jets (injectors) needs to be replaced, in other cases a reducer is installed in the gas supply path. In the latter case, the system resembles traditional propane-butane power supply.
Other methods of making a water heater
You can build a water heater powered by the sun. This is a fairly common design, which is distinguished by its efficiency. The device is often found in country houses. Making the device is not particularly difficult, so many can build it with their own hands.
- large capacity tank (100 l or more);
- PVC pipes for filling the container and supplying water to it;
- steel corners measuring 20 mm or square blocks of wood measuring 50 mm for a frame for a container.
It is more advisable to use polyethylene barrels as containers. They are distinguished by their strength. They should be placed in a sunny place where there is no wind. As a rule, the roof of a summer shower is chosen for installation.
In order for the barrel to heat up better, it needs to be painted black. Screens are installed on the leeward side for protection. They are constructed from boards coated with reflective material similar to foil. In this case, the sun's rays are directed towards the tank and increase the temperature of the water. In hot weather, in a container of 200 liters you can get water whose temperature will be 45 ºС.
Natural gas and water heaters
Today the concept of natural gas is very fashionable. What is its fundamental difference, and what did we use before? What are all these pipes for, if in the courtyards of many houses there are storage facilities with the inscription Propane-Butane, fenced with chain-link mesh. We understand that there is gas inside in the liquid phase, the calorific value of which is much higher than natural gas. This is practically the same liquefied cylinder, only in a larger volume. It is supplied to homes through reducers, which bring the pressure to the desired level. So it turns out to be main gas. (See also: How to properly install a gas boiler with your own hands)
Please note that bottled gas has a lower cost in specific terms than residential propane-butane. There are more problems with it: you need to buy cylinders, reducers, hoses, and connect at least two tanks in parallel. The removal of combustion products is a separate topic of conversation. As a result of chemical reactions, not only carbon dioxide and water vapor are produced, but also sulfur oxide. All this combined produces an explosive mixture. That is why it is impossible not only to bring such an army into ventilation, but even to modify special chimneys with anti-corrosion steel or ceramics. It costs money, a lot of it. Attempts to save money will ultimately harm the house, neighbors, and the owners themselves.
A gas or electric water heater is selected based on all of the above considerations. The economic effect of the purchase is assessed. A gas water heater can quickly recoup its own cost if it runs on cylinders or natural gas, and there is a place to supply combustion products. In this case, it is recommended to think about this if the house already has a boiler that operates using blue fuel. Otherwise, installing gas in some village may cost about 70,000 rubles. Calculate how many years this will last to use electricity based on your own needs. Again, a domestic gas water heater must be purchased, nothing else. (See also: How to install a water heater with your own hands)
And here's another thing! Do not forget that the efficiency of electrical appliances reaches 98.5%, while gas appliances often emit combustion products with temperatures of 100 ºС and above. This must be taken into account in the calculations. By all indications, the cheap source of energy presented in the YouTube video may not be so free. It’s another matter if there is no meter in the apartment, and the payment is based on a certain quota. This is the choice of poor families, and the energy will indeed be wasted. In this light, there is some sense in inventing something.
Water heater made from polyethylene bottles
You can make a DIY water heater from ordinary plastic bottles in one day. They form the basis of the storage tank. The number of bottles depends on the desired capacity.
For installation you will need:
- sealant;
- PVC pipes;
- drill;
- two valves or taps with a ball design.
First of all, the bottles are prepared. A hole is drilled in the bottom of each, the diameter of which is equal to the diameter of the neck. The neck of another is inserted into the hole in the bottom of the bottle. This is how they connect. Each battery consists of 10 bottles. The number of batteries is unlimited. All joints are treated with sealant.
The finished modules are located on the south side of the roof on the internal waves of the slate covering. The output of each section is connected to a PVC pipe, which is located perpendicular to them. The cutting of each section is carried out in the same way as connecting bottles into a battery, followed by treating all joints with glue.
Self-production of heaters
Having weighed all the advantages and disadvantages and determined the type of device, begin preparing the materials and the workplace. Most work can be conveniently done in a barn or yard in dry, windless weather. When planning to do welding or soldering, make sure that there are people nearby who will be able to help you in the event of an emergency. Also keep a first aid kit near your work place so that people who come to your aid don’t have to run around the yard and house looking for bandages or other medical supplies. Tools such as a grinder and a gas burner require responsible handling. Neglecting safety measures can end in tragedy.
How to make an electric flow heater
Materials:
- tubular electric heater (TEH) with a power of 4–6 kW;
- a piece of steel pipe into which a heating element is placed with a small margin;
- two pieces of half-inch steel pipe, with standard threads cut on one end;
- several pieces of sheet steel 3 mm thick;
- nut and bolt for grounding;
- anti-corrosion paint.
You will also need tools:
- Bulgarian;
- drill;
- nozzle for removing dirt and rust;
- welding inverter;
- electrodes;
- metal brush;
- roulette;
- hammer;
- sharp core.
The heating element is the basis of an electric flow heater
Step-by-step instruction
- Before starting work, all metal parts must be cleaned of dirt and rust using a special attachment on a drill or grinder.
- Take a piece of metal, the size of which is larger than the diameter of the pipe, and mark holes in the center for installing the heating element. Depending on the heating element model, there can be from 1 to 6.
- Remove the fasteners from the heating element and select a drill 1 mm larger than the electric heater leg. Use this drill to make the necessary holes. Some heating element models are equipped with a threaded or smooth body designed for insertion into some device. In this case, you will have to cut such a hole using a drill or inverter. You can also contact a turner to drill a suitable hole. If necessary, drill a hole for the mounting bolts and tap the threads.
- Attach this piece of metal to the end of the pipe so that the holes are approximately in the middle and use a core to outline the shape of the pipe.
- Using a grinder, cut the metal according to the markings, then make another similar circle, only without holes.
- Insert and secure the heating element into the circle intended for it. Make sure everything is pressed tightly. If something is sticking out somewhere, find and eliminate the cause.
- Remove the heating element and weld the circle to the end of the pipe.
- Cut the pipe so that there is 1–2 cm from the end of the heating element to the second circle.
- Step back 1 cm from each end of the pipe and cut two holes in it on the same line, corresponding to the internal diameter of the threaded sections.
- Weld threaded sections to the holes; you will connect the water to them.
- Weld a circle with holes for the heating element and install the heater, then weld the second circle on the other side.
- In any convenient place, focusing on the subsequent installation of the heater, weld the grounding nut.
- Connect the assembled structure to the water supply and tap to make sure that it passes water well and does not leak anywhere. If you find a leak, weld it.
- Remove the water heater, degrease and paint with anti-corrosion paint. When the paint is dry, you can install and connect it.
Most of these heaters are secured using various gaskets and nuts
Warning: This type of water heater must be grounded. Otherwise, there is a high risk of electric shock. Therefore, before turning on the heater, make sure that it is securely connected to ground.
How to make a flow-through structure powered by a heating system
The operating principle of this device is to heat a heat exchanger (coil) placed in the hot coolant of the heating system, for example, a heat accumulator. However, inserting such a coil into a new heat accumulator will not lead to anything good. This will void your device's warranty and may also damage the insulation, which will dramatically reduce efficiency and increase heating costs. Therefore, it is necessary to independently make a small-sized heat accumulator, embed a heat exchanger into it and insulate the entire structure. You can connect such a water heater to a break in the heating supply pipe and provide yourself with clean hot water. In an uninsulated water heater, some of the heating energy will be wasted, which will increase costs in the winter. If this does not bother you, then you can not insulate the device, this will make it more compact.
This device heats water due to the high temperature of the coolant in the heating system
To work you will need the following tools:
- Bulgarian;
- drill;
- welding inverter;
- cutting torch;
- soldering iron with a power of at least 300 watts;
- roulette;
- compass;
- sharp core;
- metal scissors or pruning shears.
- riveter
This arrangement of instantaneous water heater is well suited for self-production
You will also need the following materials:
- copper tube with a diameter of 4–8 mm;
- sheet copper 2–3 mm thick;
- an iron or wooden round mandrel with a diameter of 10–12 cm (you can use a piece of pipe);
- sheet iron 3–5 mm thick;
- anti-corrosion paint;
- 2 90 degree angles from half-inch pipe;
- 4 pieces of half-inch pipe 10–15 cm long with standard thread;
- 2 brass couplings (half inch) with thread;
- half-inch steel pipe;
- thick-walled steel pipe, the internal diameter of which is more than 20 cm (you can use part of an empty gas cylinder);
- medium-temperature solder for copper and brass, as well as the corresponding flux;
- fluoroplastic sealing material (FUM tape).
To insulate, prepare:
- mineral wool;
- steel corner with shelf size 50 mm;
- sheet iron 0.7–1 mm thick;
- rivets.
Instructions
- Wind the copper tube around the mandrel. If the tube is less than 8 mm in diameter, then two must be wound at the same time. The length of the spiral is 15–20 cm. When winding, slightly pull the tube towards you, this will help avoid its deformation. Do not use a mandrel with a diameter smaller than 5 cm, otherwise the tube will fold or flatten due to too much bending curvature.
- From sheet copper, cut two round plates, the diameter of which is equal to the size of the brass couplings. In the center of the plates, drill holes according to the diameter and number of tubes. Sand both surfaces of the plates and one end of each brass coupling with sandpaper and use a torch, medium-temperature solder and flux to solder the plates to the couplings.
- When the parts have cooled completely, insert tubes into them to a depth of 1 mm and solder using a gas torch and the same solder and flux.
- Connect the coil to the water supply and run water to check for leaks. If they are, then eliminate them.
- Mark two holes in the thick pipe (housing) corresponding to the coil couplings.
- Drill them so that they are 1 mm larger than the diameter of the half-inch threaded pipe sections.
- Clean the pipe inside and out using a drill attachment or grinder.
- Strip the half-inch pipes as well.
- Lower the coil into the thick pipe, insert threaded tubes into the holes and, using FUM tape, screw them into the couplings.
- Using solder, flux and a torch, solder thin pipes to thick pipes. Do not overheat the thin pipe so that the FUM does not melt.
- Drill two holes from the opposite edge of the body and weld two threaded pipes to them. If you have thicker pipes in your heating system, then you need to use threaded pieces of the same diameter and drill a hole for them.
- Cut two circles from sheet steel 3–5 mm thick, the diameter of which is 11 cm larger than the body. If you decide not to insulate the water heater, then the size of the disks should be equal to the diameter of the body.
- Weld these circles to the two ends of the body.
- Connect both heating leads to the water supply to check the resulting unit for leaks. If you find a leak, weld it.
- Coat the unit with anti-corrosion protection.
Correct winding of a copper tube on a mandrel will create a coil - a heat exchanger
If you doubt your abilities and ability to solder, then place a thick pipe so that the thin pipes stick vertically upward. Prop the coil so that it is in the middle of the pipe, fill it with water to the top edge of both couplings and begin soldering. This will protect the coil from overheating.
How to insulate a water heater with your own hands
- Weld 7–10 corners to the surface of the body so that the second shelf is parallel to the surface of the pipe. Weld not with a continuous seam, but with the help of 3-4 tacks 1 cm long. This will reduce heat loss through the corners that come into contact with the outer metal shell.
- Make a strip of thin sheet metal, the width of which is 2 cm greater than the distance between the end circles of the body. The length of the strip should be sufficient to completely wrap the resulting unit.
- Make 1 cm wide edges on both sides of this strip.
- Using pruning shears or metal scissors, give these edges a sawtooth appearance by marking them with a zigzag with a tooth in the shape of an equilateral triangle.
- From the edge of the strip, cut off the teeth opposite the corner.
- Apply the strip to the corner, ensuring the correct orientation of the strip so that you can wrap it around the unit, because after installing the rivets you will not be able to correct anything.
- Drill the strip and corner (5-7 holes) and fasten the parts using a rivet gun.
- Cut a suitable piece of rock wool and insert it between the corner to which the thin metal is attached and the adjacent corner.
- Cover the insulation with metal and secure it with rivets.
- Perform the same operation on the remaining corners.
- Weld the legs from the angle either to one of the round plates, or between the plates if you are installing it horizontally.
Video: how to use a riveter
How to make a solar model
Here is a list of tools you will need for the job:
- drill or screwdriver;
- stapler;
- jigsaw;
- glass cutter;
- pencil;
- roulette.
You will also need the following materials:
- plywood 20 mm thick;
- planed wooden block with a section of 5x5 cm;
- planed board 10 cm wide and 5 cm thick;
- black rubber garden hose;
- foamed foil insulation;
- self-tapping screws of different sizes;
- glass 3–5 mm thick; plywood, the thickness of which is equal to the thickness of glass;
- wooden slats 5 cm wide and 1 cm thick;
- knitting wire.
This water heater is made from a garden hose.
Step by step assembly guide
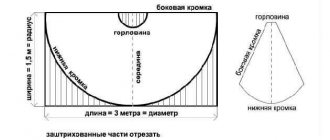
- Determine what size you will make the water heater and where to mount it. It works best on the south side of the roof, in which case it is warmed by the morning, afternoon and evening rays of the sun.
- Cut a rectangular base of suitable size from plywood.
- Screw planed bars to it around the perimeter to make it look like a fire shield.
- Connect the bars to each other, this will increase the rigidity of the structure.
- Line the inside of the resulting box with foam foil insulation using a stapler. Lay the insulation with the foil facing out.
- Cut pieces 15 cm long from the planed board and cut one edge into a semicircle so that the diameter of the circle is equal to the width of the board. These will be the guides for the hose.
- Screw the guides to the plywood from the insulation side so that the hose laid on them forms a snake. At the point where the hose turns, the distance between the turns should not be greater than the diameter of the hose. Using a jigsaw, cut two grooves in the bottom block for the hose inlet and outlet.
- Cut strips 4 cm wide from thin plywood.
- Using a stapler, attach strips of plywood to the face of the blocks so that they form a step that will prevent the glass from moving.
- Lift the water heater onto the roof and attach it to the south side. If possible, install it horizontally, because the smaller the angle relative to the ground, the greater the efficiency.
- Lay the hose along the guides and secure with loops of binding wire. Attach the hinges to the plywood so that they are not higher than the guides, otherwise the glass will burst.
- Instead of a rubber hose, use a 5-10 mm thick copper or steel tube or a coil removed from an old refrigerator. In this case, guides will not be needed, but you will have to bend the pipes so that the turning radius is at least 5 diameters. After giving the tube the required shape, cover it with a sheet of thin tin, painted black, and secure it in the body of the water heater.
- Cut the glass to size, install it on the water heater and secure it using slats, which must be laid exactly on the beam.
- Connect the pipes to the water heater and supply water.
A solar water heater can be made from more than just a hose. An old refrigerator condenser or flat heating radiators are suitable for installation. Detailed instructions can be found here: .
This instantaneous water heater was made from the radiator of an old refrigerator.
Required materials and tools
The storage tank of the device is made of heat-resistant plastic, stainless steel, aluminum or ceramic-coated steel. As blanks for the tank, you can take plastic barrels for food products, aluminum tanks or an unnecessary gas cylinder.
To make a heat exchanger, as mentioned above, it is better to use a round or square copper pipe. When assembling a heat exchanger from square pipes, 90° bends will be required.
As a tool you need to prepare:
- angle grinder;
- electric drill with core drill for metal;
- argon-arc welding machine;
- set of wrenches;
- disc for grinding and polishing metal;
- sandpaper.
To assemble the boiler you will need the ability to work with a welding machine.
Fittings, drain valve and other connecting elements are selected based on the size of the connected pipe. Additionally, FUM tape, a safety valve, a magnesium anode and a nozzle for its installation are purchased.
Device diagram and operating principle
Using a high frequency generator (tens of kHz), alternating current is generated in the induction coil. According to the laws of physics, at this moment a magnetic field with a constantly changing vector appears. Random eddy currents arise in a conductor exposed to a magnetic field. The molecules begin to move chaotically and the material quickly heats up.
With the help of such an inductor you can even heat a metal workpiece red-hot. Since water is flowing through the pipe, there is no excess heating.
The generator can be borrowed from a hob (induction, of course), or you can make it yourself.
Another donation option is an inverter welding machine.
Although, given the simplicity of the electrical circuit, many home craftsmen make similar generators from available radio elements.