A floating cup, or as it is also called, a flying cup, is an incredibly beautiful craft that is liked by many handmade craftsmen and lovers of original decor. As a rule, it consists of two components - a cup and a saucer, fastened together with a strong base. A variety of items can be used to decorate it: piece flowers, whole coffee beans, gold coins, butterflies, birds, etc. Today we invite you to familiarize yourself with a step-by-step master class on how to make a floating cup decorated with flowers using the simplest and most affordable materials.
Floating cup: step-by-step creation
To make this craft you will need the following materials :
- Coffee cup
- flat saucer
- two-core cable, about 18-20 cm long
- glue gun
- scissors
- artificial flowers
Progress:
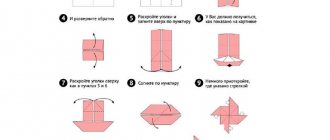
- Cut the wire to the required length. Bend it as shown in the picture.
- Attach the wire to the cup and saucer using a generous amount of glue. Allow to dry thoroughly.
- From individual flowers, first assemble the necessary composition and begin laying it out on a cup and saucer.
- It's better to start at the top and gradually move down. Glue all parts with glue. It is also important not to forget to decorate the back of the craft. After all, the craft should look beautiful from all sides.
Once the glue has dried, the floating cup can be considered ready.
Making a lake out of coffee
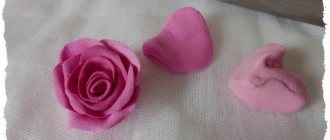
Having secured the overturned cup on the saucer, we begin to make a coffee stream. We take the brown grains and lay them out in rows in the direction from the center of the bottom of the cup to its edges, moving onto the saucer. The grains are placed tightly in several rows on a path pre-smeared with glue. The first layer of grains is glued with the cut down, the next layer with the cut up, while trying to leave as few gaps between the grains as possible.
We depict a puddle of coffee on the saucer (glue it in the same way). Remember that in the place of contact with the saucer (along the rim) the coffee cup should be stained brown. To do this, carefully glue a row of grains onto its edge. And the side of the cup can be decorated with a decorative flower.
To do this, take a piece of twine and lay it in a loop in the shape of petals. Fix the center of the flower with glue and place it on the side of the cup. Fill the center and each of the petals with coffee beans. The saucer can be decorated with a pair of cinnamon sticks tied with twine. Such a wonderful golden cup with the smell of spilled coffee will brighten up your morning awakening, invigorate you and make you smile.
Ideas for creating flying cups
- In addition to flowers, the cup is also decorated with eggs and chickens. Then it will resemble an Easter craft that will decorate any home:
- Also one of the popular options is to decorate such cups with coffee beans. In this form they can be used to decorate a home or even an office:
- In addition to wires, you can use an old plug as a basis for a floating cup. Here's what it looks like in practice:
- Another great souvenir is a floating cup with gold coins. According to some people, it contributes to the enrichment of its owners and is capable of filling the home with well-being:
- A flying cup in the form of a waterfall can also be a good solution. Making it is not so difficult, the main thing is to find a suitable base for creating “water” (this can be a special translucent glue):
- As for those with a sweet tooth, a very good option for them would be a craft in the form of a cup from which coffee is poured directly onto a piece of cake lying on a saucer:
You can create such beautiful and charming crafts with an old set of cups and saucers, glue and a couple of beautiful decorative items on hand.
If you liked at least one of the ideas presented above, be sure to try to repeat it at your leisure. After all, to create flying cups you don’t need to have any professional skills. It’s enough to have a strong desire and find all the necessary materials.
In this master class, the Creative Workshop “Barabashka” invites you to create a decorative composition in an ordinary cup. For her we chose a cozy rustic style. Google tells us that the French word rustique can be translated as “rustic” or “simple.” It is these principles that we will try to embody in our composition.
We will focus on rough natural beauty, for this we choose natural textures: jute, burlap, lace. Simple earthy tones embodied in coffee beans, cinnamon and star anise. Of course, don’t forget about the warm and cozy atmosphere. To get into the right mood, we recommend listening to the wonderful song by the French pop-rock band BB Brunes - I Love you.
Designing our waterfall
Then you should wait for the glue to dry completely and make sure that our cup is securely positioned in the air. Now it's time to mask the wire reinforcement with several layers of paper masking tape. This part should imitate a stream of liquid, and its width varies from the narrowest at the edge of the cup to the widest at the level of the saucer.
After this, paint over the stream with brown acrylic paint using a pre-supplied brush. This is done so that the white tape does not show through between the coffee beans. Masking tape can be replaced with modeling compound, in which case it will be even easier to form an even and smooth stream. Before painting, you should wait for it to dry completely.
After the paint has dried, we begin to decorate our stream with coffee beans. They must be carefully selected and placed tightly next to each other. The work should be done very carefully so that the base does not show through anywhere. Inside the cup you need to depict the coffee mass, for which we glue the beans thickly in several layers. You need to depict a coffee puddle on the saucer. It is laid out in the same way, with the grains tightly adjacent to each other. The surface must be strictly horizontal (so that the grains do not puff up).
To create a coffee composition in glass with your own hands, we will need:
- Mug with saucer
- Coffee beans
- Star anise
- Cinnamon
- Jute twine (2 types)
- Sackcloth
- Thick white thread
- Natural lace (2 types)
- satin tape
- Double wire
- Hot glue gun
- Styrofoam cylinder or cone
- Decorative elements
Decorating the saucer
- Mug with saucer
- Thick jute twine
- Sackcloth
- Hot glue gun
We take an ordinary saucer and very thick jute twine.
Tip: the tighter the twine, the easier it will be for us to wrap the surface of the saucer.
Using a well-heated heat gun, attach the twine from the center of the saucer. We make circular movements, occasionally fixing the thread. The less glue, the more accurate the result will be.
Reaching the edge, carefully move to the back of the saucer.
We glue burlap onto the bottom (the place of the bulge) and wrap the twine to its edges. Fix the edge well with glue.
With coffee beans
Such a bowl will not only please the eye, but also smell pleasant. Preparation method:
- use a cup, saucer and fork to create this bowl;
- Glue an adhesive plaster inside the cup and in the middle, so the glue will stick better;
- attach the fork, first bending it so that it is convenient to place coffee beans on it, as if they were pouring out of a cup into a saucer;
- let the structure dry thoroughly from the glue;
- Now you can start decorating your creation;
- To make the fork look beautiful, wrap it with knitting threads, fixing everything with glue, or you can use transparent tape;
- Glue coffee beans to the fork, the surface of the saucer and the wall of the cup.
Ready! Floating bowl of coffee beans! A cinnamon stick and dried orange slices are perfect for additional decoration.
Materials
1) tea or coffee pair (cup and saucer)
2) glue for connecting the “flowing” structure with the bowl and saucer. It is better to use the universal Moment gel adhesive for ceramics, plastic or glass. An alternative can be any other adhesive designed to work with smooth surfaces. A glue gun is also used, but it is intended mainly for working with rough surfaces. There is a possibility that the cup will come off in the near future after gluing.
3) thick wire or triple wires. You can use other flexible items, such as old aluminum forks or spoons, or a metal hanger.
4) polymorphus ( superplastic ) – self-hardening thermoplastic. When heated, it becomes plastic and convenient for giving it the desired shape. When cooled, it becomes hard, elastic and durable.
5) masking tape - it can replace superplastic
6) modeling mass , can also replace polymorphus. It resembles plasticine, but unlike it, it hardens well in air. Contains natural ingredients (dough made from cereal flour), so it is absolutely safe for children.
7) decoration items : coins, flowers, pine cones, feathers, candies, beads, buttons, ribbons and much, much more.
Making a frame for topiary
For topiary, you need to purchase a white coffee pair, preferably without paintings with flowers and other images. It is better if the cup is light enough, because... if it turns out to be heavy, difficulties will arise with its fixation, and the structure itself will be unstable.
Once a suitable mug has been found, you can begin working with the wire. We take a strong wire and bend it to the shape of the inner surface of the cup.
Now we bend the wire along the remaining length. The wire needs to be bent in the shape of an arc, so our flowing flow will be most natural.
Next we glue the wire: let's start with the mug. To begin with, degrease it with any alcohol-containing liquid and, if necessary, sand the surface to be glued. For gluing it is easier to use hot glue. To do this, I waited until the glue in the gun warmed up well and spread in a puddle, then I poured it all over the place where the wire came into contact with the cup.
We leave the frame for the future topiary to dry and get to work on the cake.
Cup assembly process
The process of creating a floating mug is not at all complicated, but there are several important nuances that need to be taken into account when creating it.
The main secret in creating a flying bowl is to choose the right tea pair. The cup and saucer should not be too heavy. If you take this condition into account, it will be easier to create a flying bowl!
We construct the base of the floating cup; this is the element that connects the saucer to the cup. To do this, take a wire of the required length. It is important to note that the distance between the bowl and saucer should be approximately two cups. With these parameters, the flying cup will look most balanced.
Inside the bowl we form a loop from the wire, the diameter of which should be 2-4 cm. This will help to achieve better fixation of the wire in the cup. We twist the second end of the wire into a flat spiral in two or three turns. This way we will get a kind of stand, which we will fix in the saucer.
The tilt radius of the resulting structure should not exceed 45 degrees, otherwise the structure will be unstable!
Next we work with the resulting wire structure.
Polymorphus is the best material when making a flying cup.
Take a piece of polymorphus and immerse it in hot water for 20 seconds. During this time, the material is converted into soft plastic.
We stick the resulting plastic, like plasticine, around the base, giving it the desired shape. If the plastic hardens before you finish the job, simply dip it back into hot water. The prepared base will completely harden within 15 minutes.
Production and processing of the bottom
In order to determine the diameter of the circle, it is necessary to assemble the resulting wall parts together. For their temporary fixation, it is most convenient to use plastic zip ties.
By tightening the ties, you can determine the diameter of the future bottom. PHOTO: youtube.com
Having outlined the required circle, you need to cut out the future bottom and carefully polish the planes and side edges. This can be done manually, although machines will greatly reduce the time spent on work.
The cutter does an excellent job of processing ends PHOTO: youtube.com
Next, after replacing the cutter, you need to chamfer one of the corners of the bottom. This will allow the wooden wall elements to be placed more tightly onto it. However, for this, the blocks will still have to be slightly modified.
Using a cutter, a chamfer is removed from one side of the bottom. PHOTO: youtube.com
Refinement of elements of the side walls of the mug
Now, having adjusted the overhang of the circular saw blade, you need to make 2 cuts on each of the wall elements so that you can select a groove. This is where the bottom will go during assembly. If you have the necessary tools, this is not difficult to do, although with due diligence and desire, such work can be done with a regular saw and chisel.
When the groove is selected, all the elements are assembled together and temporarily fixed with ties.
You can clearly see how the elements are connected to each other. PHOTO: youtube.com
Flying mug of flowers
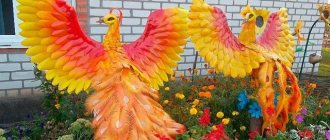
Flowers are the most popular decoration when decorating a floating cup with your own hands!
A cup decorated with paper flowers and monograms will look elegant. Pearls will add additional charm to this composition.
Creamy rose buds and white jasmine will help create such an airy, delicate cup.
Airy chiffon, snow-white lace, satin roses and pearl thread will perfectly decorate such a candle stand.
Using an old watering can and basin, you can create a summer flower bed with sunflowers. Breathe new life into old things!
The sunflower is a bright yellow flower that symbolizes wealth and prosperity. With its help, you can create such a sunny floating cup that attracts wealth into your home!)
Surely many people have a teapot from an old set that sits idle and gathering dust. Create a vintage DIY piece in the form of a floating teapot pouring out a floral drink!
Or a floating jug with flowers:
Daisies made using the kanzashi technique from satin ribbons will become a simple, but no less elegant decoration for a flying cup
Flowers made from polymer clay will also perfectly color a floating cup with a bright floral abundance.
Master - Alena Putyrskaya
A terry flying teapot watering a flowerbed with flowers! When creating it, you can simply knit terry cloth for an old teapot or cover the teapot with pom-poms made of thread.
Nata Liana tells how to make a floating cup “Summer Mood”:
Making a handle from the same solid wood
DIY birdhouse: step-by-step diagrams and drawings for making it yourself. types of birdhouses and materials + design ideas
To make a handle, you will first need to make a pattern out of cardboard, and then cut out a part using it. The handle is processed and fitted into place. If everything is fine, then you can proceed to fixing it on one of the wall elements.
The handle has been tried on, everything fits perfectly PHOTO: youtube.com
Attaching a handle to a wooden mug
2 holes are made in the handle into which dowels are driven with PVA glue. They are used to mark the drilling locations in the sidewall of the mug. You need to drill the sidewall with a limiter that will not allow you to make a through hole.
Holes for dowels are drilled in the sidewall PHOTO: youtube.com
The tongues are lubricated with glue, as is the plane on which they are located, after which the handle is connected to the mug and the parts are tightened with a clamp. You shouldn’t take it off for the next 5-6 hours.
The tongues are coated with glue, after which the handle can be installed in place. PHOTO: youtube.com
Floating cup made of coffee beans
Coffee beans are still one of the most popular materials used in decoration. It’s very easy to create such a floating mug, but there are a few secrets .
1. When creating a flying bowl, it is better to wrap the base with masking tape. Next, the resulting “slide” must be painted in the color of coffee with acrylic paint so that the base does not show through between the grains.
2. Another option is to wrap the base with brown fabric.
After this, you can start gluing the coffee beans. There is also one important nuance here.
If you use hot glue, it is better to apply it to the grains themselves, and not to the base. This way, glue smudges will not be visible.
Coffee beans can be complemented with decorative elements such as cinnamon sticks, dried citrus fruits, and clove flowers.
Satin flowers using the Kanzashi technique will perfectly decorate your steaming coffee cup:
Master - Vera Litvinova
The tea pair can be decorated with simple twine. Twine can be used in either natural color or dyed or bleached.
An appetizing cake will perfectly complement your cup. The cake can be “made” from modeling mass by painting it with acrylic paint and pasting it with coconut shavings. Be careful, there is a high probability of not being distinguishable from the real thing!)
Kanzashi Needlework Video tutorials will clearly show how you can make a floating bowl with coffee decor:
How to make a topiary mug
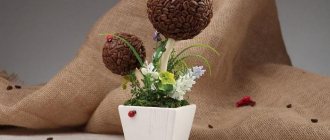
The coffee tree is the most unpretentious plant. You don’t need to water it, take care of it, you just need to love it and occasionally wipe it from dust.
It will never wither, will stand for a very long time and additionally serve as an air flavoring agent, emitting pleasant natural odors into the space around it.
It takes two to four hours to make a classic coffee topiary in a mug.
Materials you will need:
- a foam or plastic ball - for the crown;
- thick wire, stick, tree branch - for the trunk;
- any mug - as a stand for the barrel;
- leg-split;
- hot glue;
- gypsum.
Cover the ball with grains. It is better to do this in two layers so that the base does not show through. The first layer of grains is placed arbitrarily, and the second can be laid out beautifully:
- in a spiral
- different sides of the grains,
- paint some of them with gold or white spray paint and lay out patterns,
- place the grains on edge - the crown of the tree will turn out fluffy.
We insert the barrel into the hole previously made in the ball, secure the topiary in the mug using diluted gypsum powder, and let it dry. The trunk and container can be wrapped with twine if desired.
Flying mug of fruits and berries
With the help of plastic fruits, berries, and mushrooms, you can create such an abundance of fruits and berries pouring out of a cup. Butterflies will perfectly complement your fruit and berry cornucopia.
A floating cup can be decorated with bright gifts of autumn. Dried leaves and flowers can also be used. The mug can be replaced with a wooden barrel made from simple ice cream sticks.
Flowers and fruits are harmoniously combined in a floating stream. Butterflies, dragonflies, and ladybugs will be a wonderful “live” addition.
Subtleties in manufacturing
When you make a cup, saucer and flowers topiary, pay attention to the following:
Firstly, work begins from the depth of the dish.
Secondly, large flowers are glued first, and a composition is built around them.
Thirdly, small roses, berries, and leaves are laid out so that they cover all the gaps and empty spaces.
Fourthly, the flowers are arranged on a slope to create the illusion of flowing down.
Note!
How to properly make a birdhouse with your own hands from scrap materials: we create an original birdhouse according to sketches
How to make candles with your own hands: instructions for making wax, gel, scented, homemade decorative candles with a wick
What you can make from foamiran with your own hands: we create flowers, Christmas tree decorations, snowflakes, three-dimensional paintings (photo + video)
Fifthly, the transition from the waterfall to the saucer is done smoothly so that the topiary floating cup looks as natural as possible.
Floating money mug
A floating mug made of coins and coffee beans looks very stylish. The design technique of using an unfastening zipper will also add originality to your mug. Keys, bells, old small toys - everything can be used as decorative elements for your mug.
With coins you can also use imitation bills in which we pack candies.
The secrets of creating a money mug can be found in the Sveta DIY video tutorial:
The money tap is created using the same principle as the flying mug. Instead of a mug, we use a plastic tap, and a small chest or casket can replace the saucer. Coins will look more impressive if they are coated with gold spray paint or varnish.
Master - Anastasia Spitsyna
Cash flows can be depicted using paper bills.
Master - Oksana Ankudinova
You can see how to create a money tap in the DIY Gifts master class:
Floating Cup of Abundance
A great idea would be to create a floating bowl of abundance. Many people believe that such a symbol attracts good luck and prosperity to the home. For this craft, you need appropriate symbols - coins and bills, and, if desired, gold paint for metal.
The manufacturing process includes the selection of parts, arrangement of coins and bills. Instead of the top, sometimes they take a faucet, and the lower part can be made from a box or chest.Using a spray bottle, apply gold paint to the coins. You can also paint dishes. Having bent the wire, connect it alternately to the top and bottom of the composition. After the glue has completely hardened, check the workpiece for stability.
Place the coins in random order, or one side up. You can put foam around the wire as a base.
Decorate the back wall of the product with coins so that the floating bowl of abundance looks beautiful from different angles.
If desired, place imitation banknotes.
Flying mug with birds
The bird is a symbol of lightness and freedom; it is very often found in interior solutions in various styles and variations. This motif is also reflected in the decoration of the floating mug.
A floating mug can become a wonderful house for a nest of birds. The nest resembles a home and an idyll in it.
A cup with daisies and a bird with a nest looks like a real symbol of family, love and fidelity.
A bird with delicate roses, fluttering butterflies and other decorative elements will help create a summer soaring composition.
Origin of the first wooden mugs
Not a single historian can name the exact date when people began making utensils from wood. At the excavation sites they found utensils made in the 8th century BC. It all started with birch bark, then bowls and brothers appeared. The wood was perfect for making household utensils.
Wooden utensils can be a wonderful decoration in your home.
Note! Previously, food was placed in recesses made in the tabletop. It was inconvenient to eat from the table, individual containers began to appear
The wood was hollowed, cut, and then they began to sharpen. Mugs for mead were made by coopers, assembled like barrels, and tied with iron hoops. Now some craftsmen specialize in such utensils. This is a great gift for lovers of baths and hot saunas. Wooden dishes have long been made by the Scandinavian peoples; all-wood Viking mugs with carved handles and lids in the Middle Ages are considered real works of art.
Any product poured and stored in a wooden container acquires an unforgettable aroma of the forest spirit.
Finnish wooden mugs remain popular; they are purchased by outdoor enthusiasts for hiking, fishing, and hunting. The utensils, made from a single piece of wood, have a convenient loop handle, with which the container can be fastened to a belt or backpack. Kuksa are made by hand without the use of woodworking machines.
Wooden utensils are an original Russian product, used in everyday life as kitchen utensils and design decorative elements.
Important! Finnish children's mug with a capacity of 50–100 ml; in large ones (with a capacity of 500 ml) in ethnic restaurants they serve first and second courses. In the East, in the hot countries of Asia and Africa, drinking containers were made from bamboo, knotty shoots were cut off, dried, and soaked in the resinous sap of living trees.
Modern bamboo dishes amaze with their shapes, versatility, and durability
In the East, in the hot countries of Asia and Africa, drinking containers were made from bamboo, knotty shoots were cut off, dried, and soaked in the resinous sap of living trees. Modern bamboo dishes amaze with their shapes, versatility, and durability.
Not a single kitchen product can boast of complete safety for the human body, except for wooden utensils.
Flying mug made of beads
Pearls are the most noble decorative element that will add festiveness and pomp to any craft! A simple white tea pair can be transformed into such a pearl miracle!
A very delicate floating bowl will be made from soft pink satin flowers and matching pearls. A white dove will perfectly complement the composition).
Beads of different colors will also help create a unique spill cup. Flowers and ribbons of the same shade as the mug will perfectly decorate and complete the image of your cup.
Master - Irina Khokhlova
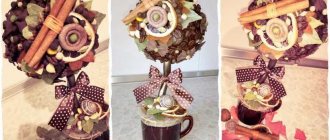
Coffee topiary - tree
A topiary made from coffee can serve as an excellent decoration for your home or office. In addition, due to the increased popularity of this interior solution, topiary can become a gift for various holidays. For example, if you are invited to a wedding, you can create a love tree in the shape of a heart for the newlyweds.
How to make such a craft from coffee beans is a question asked by many. Making a coffee bean tree is quite simple.
To do this you will need the following:
- A foam ball of the required size. When choosing a heart-shaped tree, you can cut a heart out of a ball yourself, or buy a ready-made one.
- The stick can be flat or curved as desired. The second option will look better; the curved trunk is more natural.
- Ribbons, bows, stars and other decorations.
- Flower pot.
- Gypsum solution.
- PVA glue or glue gun.
- Roasted coffee beans. The cheapest varieties are also suitable for this purpose, the main thing is that the grains are even and whole.
In addition to all this, scissors, a pencil, and a stationery knife will come in handy. To begin with, the foam ball must be glued with sewing thread, preferably to match the grain. Next, we wrap the trunk of the future tree with a ribbon of any desired color and glue the ends of the ribbon to the stick.
Using a stationery knife and glue, insert the barrel into the ball and wait until it sticks. Then, one grain at a time, glue the first layer of grains with the even part facing up. After the first layer has dried, it is worth gluing the second one in the same way.
After the ball has dried, you need to decorate the flower pot and fill it with plaster solution. It is better to prepare the solution immediately before pouring. We insert the trunk into the pot and support it with something until the plaster hardens completely.
While the plaster has not yet hardened, you should decorate the top at your discretion. You can put any nuts or coffee beans, as well as any decorations.
New Year's flying cup
A floating cup in New Year's style will become an original decoration of the New Year's interior. Snow made of cotton wool or padding polyester, a Christmas tree made of a pine cone or a cypress branch, a small figurine - what could be easier to create a winter New Year's entourage!
Christmas trees can also be made from New Year's green tinsel. White paint or a simple note corrector can imitate snow on them. You can determine the characters yourself when creating your New Year's story in a floating bowl!
A candle will add warmth and light to your cup
Winter cup with snow sparks
You can create decorative elements for a cup with your own hands from almost nothing; for example, making such small gift boxes will not be difficult. You can leave a note with your wishes in the form of a small envelope.
A flying cup decorated with Christmas-style candles, flowers and New Year's balls will give you a festive Christmas mood.
Reveals the secrets of creating a festive New Year's flying bowl in his master class by Nika Shvetsov:
Form and decor
Do-it-yourself slippers: varieties of models, choice of manufacturing materials, a detailed master class on how to create them yourself with simple diagrams
Modern coasters for cups delight with great variety. In addition to differences in the material of manufacture, bonfires can have different shapes, functionality and designs. Distinctive features of the products:
- Shape - a fire can be round, square, rectangular, multi-faceted. This criterion is not limited to the listed types; the shape of the product remains at the discretion of the manufacturer.
- Design - such a decorative element allows you to realize your wildest fantasies.
- Manufacturing method - in addition to factory products, a handmade mug stand is very popular.
- Size – directly depends on the mug for which the stand is intended. For example, a coaster - a stand for a beer mug, is made of moisture-absorbing material and its size is about 207 mm.
- Type of use – there are reusable and disposable. The former are purchased mainly for personal use, the latter are used in bars and restaurants. Typically, such bonfires have advertisements for the establishment.