An umbrella basket will perfectly complement the interior of the entrance area.
The times when umbrellas were left open in the corridor are long gone. Now the place to store them can be an excellent decorative element, which should be chosen very carefully, taking into account an important point: the basket will help to dry the umbrella properly, which means the accessory will last longer.
An elegant accessory for rescuers from bad weather
Why do you need such an accessory?
A basket or umbrella stand is a place where a folding umbrella and umbrella cane will be placed compactly. And this item will be very useful in the house, and will also complement the overall style of the hallway.
Note! It is not recommended to dry the main accessory for rainy weather in the open, as the fabric on the dome stretches and loses its strength characteristics.
The fun design of the hallway is enhanced by the unusual shape of the umbrella stand.
Since umbrellas are placed in the basket wet, it is important that the bottom is solid or there is a container underneath to collect moisture. In this case, untidy puddles on the floor will be avoided.
We crochet a cover for an umbrella - canes
To work, you will need a hook and yarn for knitting - yarn of any color that matches the color of your umbrella. Any yarn except wool is suitable for knitting an openwork cover. The diagram presented below is designed for a cane umbrella with a length of 52 cm. The volume of the upper part of the cover is 22 cm. You will also need to crochet the strap with double crochets, the length of the strap is 30 cm, the width is 1 cm.
Knitting an openwork cover for an umbrella begins with a chain of 18 chain stitches (the length of the chain should be 5 cm). Next we knit according to the diagrams, the rows and number of loops are indicated below.
Basic design features
The basic design feature of any umbrella can be considered the way it is deployed or opened. Essentially, there are only two possible options:
- Telescopic;
- Cantilevered.
Telescopic garden umbrellas are very common. They are loved for their convenience; opening the design is very simple. Press the shutter with your finger. The knitting needles and fabric rise up towards the latch.
The main disadvantage of this design is that the umbrella can only be opened where there is a lot of free space. By the way, beach umbrellas “work” on the same principle.
However, on the beach there may not be problems with the space where the structure is opened, but in a garden where there are many trees or on an area with a large number of buildings this is not always possible.
The main advantage can be considered the low cost and high mobility of the device. Lightweight beach and garden models can be moved in space as desired, each time located in a new location.
Knitted umbrella cover
I decided to show this simple thing, but I really needed to come up with something to take a non-folding umbrella with a handle on the road and which cannot be packed into a suitcase and checked in as luggage. And how useful was the detachable strap from the handbag, which now lives with the umbrella, and the rest of the skein of yarn, matching the color of my scarf and short coat with a hat. I knitted the cover in single crochets, starting from the bottom. Everything is very simple! If anyone has to travel and needs to transport an umbrella, I think my idea will come in handy.
Join the group and you will be able to view images in full size
But seriously: use it as a handbag. This depends on the size, of course. You can put a wallet, mobile phone, keys and other things. If it looks like a beach, you can take a bottle of water there, for example.
And also, it’s most convenient to put another umbrella there :))
A blog about beauty, health, fashion, cosmetics, perfumes, personal care and other interesting things.
What is the difference between an umbrella and a weather vane, cap, head and chimney?
The chimney, weather vane, cap, umbrella and cap are quite simple and time-tested protective structures for air outlets on the roof. Steel, copper, aluminum, plastic and titanium-zinc additional elements, when properly installed, can be used for ten and sometimes more years, providing comfortable and safe living:
- caps - the general name of elements that prevent precipitation and foreign objects from entering the chimney, as well as carrying a decorative load;
- chimneys - rectangular or square decorative caps designed for arranging chimney and ventilation pipes;
- umbrellas - are represented by caps that are simple in design and designed for round or square pipes;
- deflectors - caps on round pipes, characterized by a rather complex internal design to increase traction.
The category of complex structures also includes weather vanes - rotating caps that direct the escaping smoke exclusively in one direction, depending on the direction of the wind.
NOTE!
Umbrellas are used to equip a round or square head, but modern manufacturers, in addition to functionality, take into account ease of use, including adding a smoke dissipator to the lid.
Where to begin?
When considering a future purchase, potential buyers initially consider the nuances regarding the appearance of the future shelter from the heat of the sun. Garden umbrellas on modern trading floors are presented in a wide range.
Any colors, textures, shapes and sizes are available to capricious buyers. Moreover, many manufacturers are trying to decorate their products so that they look as presentable and unique as possible.
Initially, you should think about what the shape of the future garden umbrella will be:
- Round standard;
- Square;
- Rectangular;
- Polygonal;
- Original shape (non-standard versions on order).
The standard dimensions of garden umbrellas that protect from the sun and rain are 1.5 by 4 meters. However, most buyers prefer not standard models, but folding options or umbrellas that fit into a specific environment.
Types of protection for the chimney and ventilation pipe
The classification of umbrella types is determined by their shape, purpose, and materials used in their manufacture.
Depending on the shape, the most widespread are standard designs that replicate the appearance of a hipped roof, as well as varieties in the form of a mushroom cap.
Varieties can be represented by drips and drains designed to collect and further remove all flowing moisture, as well as prevent it from getting inside.
To make a mushroom or umbrella, various non-ferrous or ferrous metals can be used, but galvanized durable steel is most often used.
Varieties of smoke umbrellas also include deflectors, which act as a very effective spark arrestor.
The appearance of the structure and the materials for the manufacture of the chimney “fungus” do not have a significant impact on the functionality, so when choosing, consumers should focus on finances and personal preferences in decor.
Save the umbrella
How many umbrellas are thrown away after heavy rain due to broken spokes! But some of them are very beautiful, you just feel sorry for them. So I had my favorite umbrella with wedges painted in all the colors of the rainbow. When it couldn’t withstand another gust of wind, at first I also wanted to take it to the trash, but then I decided that the umbrella’s dome had a beautiful coloring, and my backpack, with which I like to walk, needed good protection - a cover. Such an accessory, I decided, would be very compact and light, but at the same time very, very useful. I’ll tell you now how I sewed a backpack cover from the dome of an umbrella.
Plastic and cast iron: an interesting alternative
Plastic is used to reduce the cost of production as much as possible. High-quality raw materials allow you to create relatively durable structures. The plastic stands are pretty light themselves anyway. The best way to make the base heavier is to pour water into special compartments or add sand.
Cast iron bases of round and rectangular shapes are, on the contrary, very heavy. They are able to securely fix the structure. Even strong gusts of wind are not able to move the umbrella from its place. However, moving such devices from place to place will be difficult.
The charm of natural wood
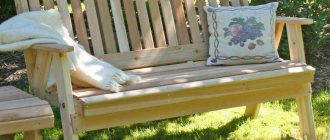
Wooden stands exude a special charm. A beige umbrella with a spectacular wooden base is the most versatile option that will fit into any landscape design.
To create luxurious exclusive designs, expensive elite breeds are selected. Most often these are oak, beech and eucalyptus. For lovers of true exoticism, manufacturers have selected a whole range of “foreign” options: abacha, amaranth, wenge, ipe, iroko, padauk, rosewood, teak, limba.
You can make your own umbrella using your favorite types of wood
When choosing a natural material, you need to remember the importance of careful processing of wooden surfaces. Wood is protected from rot, fungi and other “biological attacks” using special impregnations and finishing varnish.
How to make it yourself?
A metal hood has the following advantages:
- light weight;
- it is possible to install additional options;
- low price;
- simplicity of design;
- ease of installation.
Brickwork has an undeniable advantage: such a structure can stand for a thousand years without visible damage.
After all, it has a detrimental effect on the quality of prepared dishes and the operation of the air duct itself. Traction will sooner or later decrease due to accumulated dirt, so it is best to do preventive cleaning.
It is important to decide at the very beginning which type of exhaust device is preferable. The materials needed to create a metal hood are simple:
The materials needed to create a metal hood are simple:
- iron sheets 1–3 mm;
- corners with a section of 30 x 30 x 30 mm;
- bolts;
- thermal primer.
The height of the umbrella can reach 2 meters, the optimal size of the barbecue is 110 x 65 cm. The umbrella is composed of three units: a base, a dome with internal fastening and a pipe.
It’s not difficult to make a barbecue hood with your own hands. First, markings are made on a sheet of metal with a marker, which corresponds to the previously drawn sketches. Then, using a grinder, the necessary components are cut out, the parts are assembled and the joints are welded.
Brick hood has its own characteristics. It is created from special bricks (fireclay) mixed with clay and sand. The clay must be of a certain grade and soaked in water for 48 hours. In a brick hood, a special frame is made on which the brick is placed. In this case, the material must be treated with special fire-resistant enamel.
This is followed by brick laying. The base, that is, the first rad, is laid with the pushing side of the brick, the shortest. A typical smoke collector consists of 9–11 rows. The masonry is made in such a way that it tapers, that is, the displacement occurs about 16 mm at each level, at the end part 35 mm. Then a square-shaped pipe is laid from brick.
At the top, the pipe has a cross-section of 265–265 mm. This figure was obtained empirically; it is optimal for the operation of the retractor, while the height of the pipe is about 3 meters.
It is important to wait at least 3-4 weeks after finishing the masonry to allow the structure to settle for greater strength. There is no rush to use a “raw” structure
This can lead to deformation and cracking of the material.
The surface is covered with a special primer, which will protect it from exposure to high temperatures. As you can see, technologically there is nothing overly complicated in such work; masonry can be done by a person with minimal construction skills.
When working, be sure to use safety glasses and gloves.
Wednesday, May 22, 2022
How to sew an umbrella cover: master class with photos
We will be making “clothes” for a small automatic or semi-automatic umbrella designed to protect against rainfall. The cover for the beach is sewn exactly according to the same principle. But you will also need to make a strap to wear it on your shoulder. Plus the beach case will be longer and thinner. Accordingly, more material will be used for it.
How is such a thing sewn?
1. At first everything is simple. Cut out a rectangle of suitable size.
2. We stitch it, leaving a cut so that it is convenient to put the “case” on the umbrella.
3. We process the seams if the fabric is loose. Or we leave it unstitched, since the material does not fray.
4. Now we decorate the top so that the cover is voluminous. There is a simple life hack for this. We need to stitch the corners diagonally at the top, stepping back a little from the edges. But the lines should not be in the same plane as the main seams. And in perpendicular.
I will give a clear example in the photo of how to do it right and wrong:
And another photo, how true.
I also made a video showing how such seams should be positioned. (Personally, when I get acquainted with sewing tips, pictures alone are not enough, I look for videos):
If we do everything right, we will end up with a voluminous case. On the front side it looks like this.
5. The rest is very easy. We make a hem at the bottom and stitch it. My customer did not want any strings or fasteners on the case. In his opinion, all this is unnecessary. And I agree with him: when it starts to rain, you need to spend extra seconds to pull out your umbrella. The likelihood of getting wet increases. And so quickly he took out his defense from the rain - and order. But if necessary, you can leave holes at the bottom and insert drawstrings (strings) into them. Or sew on an overlay and put a button. Or make a loop with a button.
This is what happened in the end.
Nearby lies my umbrella with autumn leaves. It almost fits the size of the accessory for which I sewed the “raincoat”, so I used it for fitting.
And a little about choosing fabric for an umbrella cover. The material, of course, can be anything - it’s your creativity. But it’s ideal to take a waterproof one - raincoat fabric, membrane fabric, and so on.
I hope my master class was useful for you.
Do you have your own life hacks for sewing an umbrella cover? Was there a need for such an item? Tell us about it in the comments.
Brick hood
Brick barbecues are becoming increasingly popular.
They have their own merits. This is a monumental, durable structure. With the right structure and the skill of the craftsman, such a barbecue will delight and decorate the area for many years. Advantages of a brick hood:
- Durability;
- Low heating of the brick surface;
- Aesthetically pleasing, with the help of a brick barbecue with a hood you can create a practical architectural miniature on your site;
- Combines the functions of a fryer and a hood.
Making a brick hood
If you wish and have good experience in construction, you can build a grill with a brick hood yourself. For this you will need:
- Brick;
- A mixture for laying bricks, or a solution of clay and sand, in a ratio of 7 parts clay to 3 parts sand;
- Metal corners to simplify installation of the hood;
- Tools for masonry, for cutting and welding metal corners.
Important: to build a hood and barbecue bowl, use only fireproof bricks (fireclay) and mixtures. Otherwise, under the influence of high temperatures, the entire structure will collapse
Instead of a heat-resistant mixture, it is permissible to use a solution of clay and sand.
Installation sequence:
- Mark the position of the hood, not forgetting that it should be larger in size and volume than the grill itself;
- First, the supporting walls are laid out on which the smoke collector will rest. Rear and two side;
- A metal frame made of corners is installed on the brick supports. By analogy with a metal hood, it also has the shape of a truncated pyramid. First of all, the lower part is welded, then the upper narrowed part of the frame, and they are connected by corners, also by welding. For ease of masonry, you can assemble a chimney frame from corners, welding it to the frame of the hood;
- The finished frame is covered with brick. The first row is laid out with bricks perpendicular to the rear supporting wall, the second and subsequent ones - parallel, with an offset of 17 mm, creating the necessary pyramidality;
- The chimney is laid out with or without a frame, subject to a minimum internal diameter of 120 mm;
- Install a plug umbrella that protects from precipitation.
Where to place the umbrella?
You can place your garden umbrella anywhere. If the selection of the location itself, as a rule, does not cause any difficulties, then the preparation of the “foundation” plays an important role. Umbrella floors can be natural:
- Ordinary land;
- An area sprinkled with sand;
- Area covered with expanded clay;
- Regular lawn.
An area of the patio laid with tiles or an asphalt sidewalk is also suitable as a site for installing an umbrella. In many ways, the choice of base depends on the design features of the umbrella itself.
In general, an umbrella for a summer house should be useful, pleasing to the eye and not cause significant trouble during operation. In any store, consultants will be able to provide comprehensive information about the model you like. It will not be superfluous to familiarize yourself with quality certificates and other documentation that should be available.
Original models
Manufacturers offer a wide range of options for lovers of non-standard solutions.
The classic model can be replaced, for example, by a stylish vase:
- colorful Chinese porcelain looks perfect in an oriental interior,
- An antique tin vase will decorate a retro hallway.
A warm touch to nature - these motifs are very popular. You can purchase umbrella holders from:
- wood,
- imitation leather,
- organic resin imitating tree bark.
They are ideal for interiors in styles: Scandinavian, eco, retro.
Designers have come up with many interesting models that imitate, for example, boots or an umbrella. They will bring an extremely stylish accent to the lobby and will successfully serve as a useful, decorative item.
An interesting option is one that imitates a puddle, made of polypropylene, available in various colors. Advantages of the models:
- originality,
- cheapness,
- take up minimal space.
Impressive models of stands are made of glossy plastic, have a triangle shape with rounded corners, and six holes for umbrellas. The design resembles a triangle for playing billiards. Simple design, glossy finish matches the minimalist interior.
Impressive models are made of steel wire coated with a layer of chrome. An attractive design based on chaotic or diagonal lines realizes an extremely dynamic project. The lightweight design has a transparent plastic bottom.
As an umbrella holder, you can use a simple painted bucket or an interestingly designed branchy snag of an old tree.
For modern interiors, furniture manufacturers offer many models of original shapes and different colors, from which you can choose a model that suits any interior.
Removing the defect
Everyone loves an umbrella canopy, which I decided to use as a material for sewing a cover for a backpack. But everything was spoiled by the central hole that remained on the dome. Through this hole the dome was attached to the main part of the umbrella body. It could be covered with a patch, choosing it from a fabric that matches the color. But I decided to turn this defect into a funny decorative element. I gathered the hole with a small stitch, inserted a piece of cord from the wrong side so that a small loop appeared on the front side, and carefully sewed it in, simultaneously tightening and closing the hole.
In addition to its decorative function, this loop also has a practical purpose - it is convenient to hang a cover from it to dry after rain.
Step-by-step production
Drawing of a metal hood
You can make a hood for a barbecue in a gazebo with your own hands. Ability to operate a welding machine is required. The step-by-step instructions are quite simple.
- Develop a drawing.
- Clean the corners from grease and cut to size.
- The lower base is welded from a metal profile and corners - a narrower opening of the dome.
- Assemble the lower part, which is wider. In shape it resembles a frame for a box with a low side.
- Weld the side elements onto the corners of both frames. The result is some semblance of a tetrahedral pyramid with a rectangular base.
- In the same way, the frame for the smoke collector is assembled - parts of the pipe of the required cross-section.
- After the seams have cooled after welding, they are processed with a grinding disc. It is recommended to paint the structure with heat-resistant paint.
- The components of the umbrella and smoke collector are marked on a sheet of steel or profiled sheet and the metal is cut. Bend the edges. The smoke collector is sheathed immediately. The sheets are secured with rivets.
- A metal sheet is installed diagonally into the frame of the hood. This plate improves traction. It is fixed in the lower rectangular part of the umbrella.
- The cut out fragments are sheathed on each side of the hood and secured with rivets.
- The finished product is painted with heat-resistant paint.
What to make from the frame of an old umbrella
Sometimes, on good umbrellas, the fabric wears out, the spokes break, but the trigger remains intact.
In this rare case, I would make a non-killing harpoon:
- We tear off the fabric.
- Using wire cutters, we unwind and bite off the wires and rods from above, and remove the knitting needles.
- Take a piece of rubber or the polymerized residue of silicone sealant (the tube is easiest to cut with a large stationery knife.
- We wrap it tightly with strong nylon thread, coating it with silicone glue. At the very beginning of the winding, we form a cross of 2-3 stitches at the end.
- Continuing to wrap and coat with glue, we insert the end of a culinary thread or a piece of nylon (this will be a safety cable, you will understand later) tied around the elastic band.
- Continuing our actions, we attach the rubber tip to the end of the harpoon.
- We press the button of the former umbrella into the pillow - the harpoon hits quite hard. The trunk is now fully extended. We stretch our safety rope and wrap it to the handle, coat it with silicone glue so that it does not fidget. This cable will prevent the upper part of the harpoon from jumping out of the lower one. There is a very tight spring inside the barrel. Initially, its inertia and strength were extinguished by the dome, but we removed it. If you do not make a safety cable, the spring will knock out the upper end of the barrel, and the harpoon will fall apart in two.
A humane but serious weapon is ready. My godson knocks over rocks with this when he swims in the river or the sea. He is 13, and he is a kind boy, he will not hurt animals.
You can make a real harpoon by simply wrapping a straightened fork, a sharpened pin or other similar tip with electrical tape. But I was afraid that the boys would start playing around and this harpoon would hit a person. The rubber tip is more secure. The blow will be strong, very strong, but still there will be no wounds or fractures.
Crenaline
This is a complex design, I’ll warn you right away, although it sounds simple:
- Take the knitting needles from the umbrella.
- Attach to a hoop or half ring at equal distances. If you take a ring, make sure you can put it over your head or through your pelvis.
- Sew the hoop into an elastic or textile belt.
- Connect the ends of the knitting needles with a second, larger hoop.
- The crinoline is ready. Several layers of skirts are put on top - it turns out lush and chic, only small corners hint that it used to be an umbrella.
By the way, you can cover the knitting needles with a skirt that follows the shape of an umbrella canopy, only with a hole for the body. You will get a carnival costume, as in the photo “Gender Master”:
Master Class
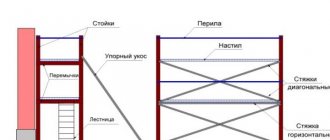
The process of creating a beach umbrella includes the following steps:
- Fastening the knitting needles to wooden ribs. To do this, a hole with a diameter of about 5 mm is drilled in each rail (you need to retreat about 1/3 of the length). A similar hole is made on the knitting needle (near its edge). These parts are connected using metal pins. Similar actions are performed with all the remaining slats - ribs and spokes (usually 8 of them are required).
- Installing the upper bushing and runner on the structure rod using brackets.
- Attaching racks with spokes to the runner. To do this, use steel wire, which is passed through the grooves of the device and holes in the ribs of the structure.
- Making a dome pattern. In total you will need to make 8 fabric parts. The length of each of them is equal to the length of the slats, the width is the distance between the two knitting needles (you need to make an allowance of 2-3 cm).
- Fastening the fabric. Each piece is attached to the slats using a construction stapler.
What to make from an old umbrella without disassembling it
Here is another selection of ideas on where to use an old umbrella:
- throw some soil inside, place it between the stones - we get an original flowerbed;
- glue diode strips inside - an unusual night light;
- hang it from the ceiling with the handle up so that the umbrella covers the light bulb on the wire - a light-diffusing lamp, which is beautiful and gives a lot of light, especially if the inside of the canvas is painted with white acrylic or textile paint (I just put office paper);
- hang it from the ceiling with the handle down, and sew tulle or other fabric to the edge to the floor - the hut or canopy is ready;
- close the cane umbrella, push in some peat or foam sponges, insert the flowers as if in a vase and tie them with a beautiful ribbon - the vase-pot is ready, you can water the flowers so that they stay fresh longer;
- paint it white or replace the colored canopy with white and attach the umbrella to a tripod - a light diffuser is ready for photo shoots and video shooting. Now the face in the frame will look natural, and the teeth and eyes will not glare, as if they were smeared with glitter.
All these are not very complicated crafts from an old umbrella. If you got here, it means you are a persistent person - you will definitely succeed!
Do-it-yourself barbecue hood: drawings, instructions, options
If you have a brick or concrete barbecue at your dacha, you can make it more convenient - remove smoke from it and improve combustion. A DIY barbecue hood is a useful and practical project for every summer house.
If a homemade barbecue without a hood in the open air still creates some pleasant impressions, then a gazebo with a barbecue is simply impossible without a hood. Working on an exhaust hood for a barbecue requires an average level of training and the availability of certain tools, which may be difficult for a beginner.
But at the end of the article you will be able to find both lightweight versions of the same hood and more advanced ones. Let's start with the basic designs and drawings of a barbecue hood.
Hood for barbecue. Tools and materials
- Iron sheet 3 mm.
- Metal corners 20x20x3 mm.
- Rivets, screws, heat-resistant paint.
- Angle grinder (grinder) with discs for cutting metal.
- Welding machine, electrodes, mask.
- Drill with attachments for concrete.
- Riveter.
The umbrella consists of a frame made of metal corners, sheathed with metal. The height of the umbrella is 2 m, it will be installed on a grill measuring 105x60 cm. The umbrella consists of three parts: a base that is attached to the grill; domes with internal bridge to improve traction and pipes.
How to make a barbecue hood with your own hands
Before starting work, measure your grill; if your dimensions differ, then you need to adjust the dimensions of the hood. Before work, new metal corners must be cleaned from factory grease with a clean rag. We use a grinder to cut metal corners (dimensions for each part of the grill are in the drawings below). To avoid metal shavings when cutting metal, be sure to wear safety glasses.
- We weld 2 sides of the hood base from metal corners:
- Then we weld the corners to them for the back surface of the grill base:
- Assembling the lower part of the dome of the exhaust hood for the barbecue:
- We weld the corners of the back of the barbecue dome onto it:
- Assembling the side parts of the barbecue hood dome:
- Assembling the pipe:
- After welding, we process the seams of the hood with a grinding disc. In order to protect the metal, we treat the frame with heat-resistant paint.
- We mark the metal for covering the exhaust hood:
- We bend the edges and fold lines, securing the sheet to the edge of the workbench:
- We cover the base of the hood with metal using rivets and an installation tool (rivet gun):
- Before covering the hood dome, we add a metal plate diagonally inside, which will help improve draft. This plate is a metal sheet measuring 99x34 cm with 2 cm edges on the edges, to which it is attached to the bottom of the dome.
- We mark and cut out the metal for lining the hood dome:
- We cover the pipe of the exhaust hood for the barbecue:
- We paint the grill hood with thermal paint.
- We install the base on the grill, securing it to the brick with self-tapping screws for concrete (brick).
- We install the dome, securing it with rivets to the edge of the base.
- We install the pipe, putting it on the dome, using rivets for fastening.
Barbecue hood: design options
You can modify the basic version of the hood by making other hood options. Often the base is laid out of brick, and then a dome with a pipe is installed on it.
- The pipe can be either finished metal or brick.
- In addition, instead of a U-shaped base, you can make a corner one:
Exhaust hoods made of brick are made according to the same principle - a metal frame is welded, which is lined with refractory bricks. - In addition to brick, the hood is often decorated with wild stone.
- A barbecue hood can also be decorated with wood - a metal exhaust hood is lined with wood using thermal insulating gaskets.
- A DIY barbecue hood will create more comfort for you, eliminating annoying smoke in your eyes when cooking and leaving the aroma of an open fire for ready-made dishes.
If you are just starting to think about how to make a barbecue yourself, you will be interested in our article Do you want to make a barbecue with your own hands: 25 photos and drawings
Measuring the dimensions of the case
In order for the backpack to be reliably protected from getting wet during rain or sleet, the cover must cover it well on all sides. To determine the size, you need to lay out the fabric from the umbrella dome on a flat surface and place the backpack for which you are going to sew a cover strictly in the center. Wrap the umbrella canopy around the backpack, following its straps as a guide. Mark these places on the fabric. Before cutting off the excess, add another 3 centimeters. They are needed to sew a drawstring and insert a cord there that will tighten the cover around the backpack. Trim off excess fabric if the canopy is too large for your backpack.
Specifics
The main aspect that should be taken into account is this: the hood dome is necessarily larger in area than the equipment over which it is located. This way the smoke is collected much more efficiently. The chimney should have a narrowing and bend. This improves the dynamics of exhaust combustion products and prevents reverse draft. The top side of the pipe is usually positioned at least 3 m from the ground. This provides the necessary exhaust conditions. If the cross-section of the chimney is incorrectly calculated, the result is ineffective removal of combustion results.
Every owner is especially proud when through his own efforts he creates both a barbecue and a hood for it
Thanks to additional components, the efficiency of the hood is improved. But this requires additional costs. These components are:
Spark absorber The position is the top of the chimney. This is a tubular metal sieve. Smoke flows easily through it and sparks are extinguished. Grease catcher. This frame has a special cassette inserted (the cassette is replaceable) for capturing fat. When this device becomes dirty, it needs to be rinsed thoroughly or replaced altogether.
It is important here how the model is set up and what filtering agent is used. Fan
It seriously develops traction power. When installing it, it is necessary to make competent calculations regarding the parameters of the required equipment.
Materials for garden umbrellas
Beach or garden umbrellas are made from a variety of materials. In many ways, the choice of main raw materials determines the price of the product. Manufacturers most often give preference to durable materials that withstand moisture, are not afraid of ultraviolet radiation, and are easily cleaned from dust or dirt. However, not only strength characteristics and reliability are important, but also an attractive appearance.
Polyester
Polyester is the most popular material used for the production of country umbrellas. It is often complemented by beach models
The canvas can be either glossy or matte, which is important for creating the perfect design of the model.
Various impurities are added to polyester. They directly determine what the fabric will be like: shiny or matte, smooth or rough, dense or light. In fact, each parameter plays its own important role. For example, it is always better to select hanging models from lightweight materials. A matte fabric is suitable for the beach, and an umbrella made of thick, rough polyester will “take root” at a summer cottage.
Acrylic fabric
Recently, acrylic fabric has gained particular popularity. Acrylic, as a material, has a solid list of advantages. It is easy to care for. Some canvases are even treated with an antibacterial coating, which makes it possible to use umbrellas with acrylic canvases to decorate children's playgrounds in their summer cottages.
Acrylic does not rot or collapse under ultraviolet rays. Expensive elite models are treated with cutting-edge compounds that guarantee high strength and resistance to all kinds of deformation.
Rectangular ducts
Pipes that are made in the form of a rectangular or square section of various cross-sectional areas are called rectangular ducts. They are connected by a flange press fit onto the busbar using a sealed gasket. Along the perimeter of the channel, ridges are made at a distance of 250-350 mm from each other or diagonal bends are made to create rigidity of the air path. Zig is a ring-shaped connecting scar that is made on rolling seam units.
A rectangular air duct made of galvanized steel is mounted using clamps and traverses. Fastening elements are made of striped metal, loaded cross-arms are made of angle iron. With a flange connection, the sides are riveted to avoid long-term subsidence.
Interior decoration
The design of gazebos with barbecues is a matter of taste and capabilities of each owner. There are several recommendations, if followed, your barbecue corner will become a favorite place for the whole family and will decorate the area.
You need to start arranging the design of a gazebo with the idea of the structure itself; it should be harmoniously placed on the site.
The gazebo must be positioned correctly. To do this, choose the most beautiful and quiet corner in the garden, away from prying eyes. This will allow its visitors to relax and unwind. The landscape and the summer kitchen should be combined with each other.
If we talk about the interior, then everything is more complicated here. The space inside should be beautiful, safe and functional at the same time.
When decorating a gazebo, the scope of imagination is unlimited. This is a great way to use up things you may have stashed away in the attic. For example, a horn on the walls or an old samovar can become interesting interior elements. Anything can become a beautiful element: curtains, forks hung on the wall near the barbecue, spatulas and grippers for meat, jars of seasonings, flowers on the table.
An important element of any interior is lighting. The cooking area should be illuminated as brightly as possible, while soft, subdued light is suitable for the relaxation area. It's good if the light level is adjustable.
Design of the food preparation area. The key element of this area is the stove. Depending on the size of the gazebo itself, the content of this zone will be different. For a small gazebo, it is possible to install a small table with a hand washbasin. The countertop material should be easy to clean and durable. It’s convenient if there is a small shelf next to the grill where you can put seasonings and the most necessary utensils.
If space allows, you can make a sun lounger in the gazebo or hang a hammock in a secluded corner. The space next to the gazebo is equipped as much as possible. For example, you can pave the area under an additional canopy in case the planned number of guests increases. You can install a large garden swing with a roof, which will become a favorite place for children and adults. For children, you can also arrange a sandbox or soft area for active games. Here the owner’s imagination can be unlimited.
The material of the gazebo itself can help create comfort. Here the undisputed leader will be the tree. As a complement to it, mats made of straw or other natural materials can be used. In a closed gazebo, you can use any type of textile: large interior chair cushions, soft bedspreads. It should be noted that the comfort of the gazebo is influenced by the size of the gazebo - the smaller it is, the more comfortable a person will be in it, as a rule.
All materials must be suitable for outdoor use or treated as such. They should also all be easy to clean, since staying in the gazebo involves eating.
The most common and pleasing to the eye is the use of natural colors in a natural range. The gazebo should not be conspicuous by its brightness or pretentiousness - this will quickly get boring.
The design style of the gazebo is often chosen based on the preferences of the owners or what is at hand. The Asian style involves complex flattened roofs with several floor levels inside. Country style is well suited for wooden buildings. The English style with forged elements will appeal to lovers of elegance and sophistication.
When deciding on the design idea for the entire gazebo and its interior in particular, one must not forget that this is an auxiliary structure, and the extra costs and difficulties during its construction are not necessary in all cases. And often they can turn out to be unnecessary and superfluous and only complicate the stay inside and the cooking process itself, which is the main one.